Imagine walking into a spacious hall that instantly makes a statement — the secret often lies in the ceiling design! Hall Pop Ceiling ideas have gained immense popularity because they add a touch of elegance, sophistication, and personality to any space. With endless styles, textures, and lighting options, they turn simple ceilings into stunning focal points.
In this article, you’ll explore a diverse range of creative and stylish Hall Pop Ceiling ideas that can transform your home. Whether you prefer minimalist aesthetics, ornate patterns, or modern designs, there’s something here to inspire your next renovation. Get ready to elevate your hall with ideas that combine beauty and functionality seamlessly.
1. Geometric Recessed Ceiling Panels for Modern Elegance
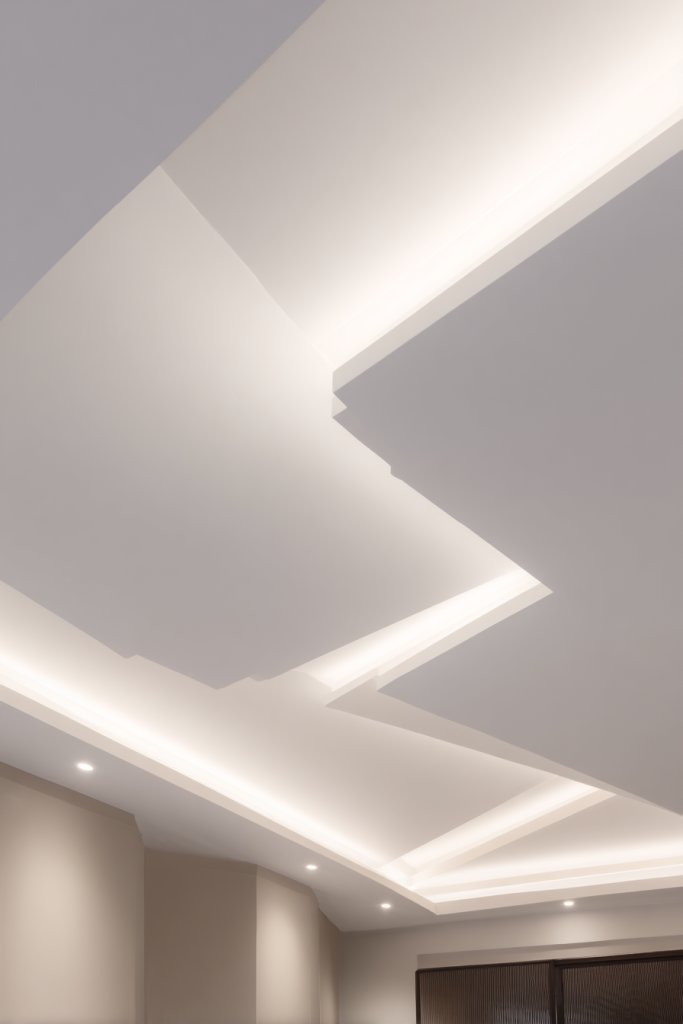
Ever wanted your living space to feel fresh and sophisticated without turning it into a construction site? Geometric recessed ceiling panels offer a sleek way to add modern flair while hiding imperfections. They create visual interest and make your ceilings look intentional, not lazy. If you crave a contemporary vibe that stands out, this idea might just be your new best friend.
Imagine angular panels layered with subtle shadows, giving your ceiling a dynamic 3D effect. The crisp lines reflect light differently, creating depth and movement. Think of a ceiling with bold, contrasting shapes that catch your eye as soon as you walk in. The textured edges add tactile richness, making the space feel more curated and less cookie-cutter.
This design works well in minimalist spaces, industrial lofts, or even eclectic interiors. You can play with monochrome tones for understated elegance or go bold with contrasting colors. For seasonal effects, consider adding metallic or matte finishes to change the mood. Smaller geometric patterns suit low-ceiling rooms, while larger panels elevate spacious areas.
Start by measuring your ceiling and sketching out a pattern that fits your style. Use lightweight, durable materials like MDF or PVC for easy installation. Create templates for each shape and cut them precisely. Affix the panels with strong adhesive or concealed mounting clips to keep the look clean. Finish with matching paint or laminate for a seamless appearance. For a professional finish, hiring a contractor might be worth it.
Add color accents to certain shapes for a pop of personality or stick with neutral tones for subtle sophistication. Incorporate LED strip lighting along the edges to emphasize the geometric design at night. You could also embed small decorative elements within some panels for a unique touch. The key is balancing boldness with clean lines to suit your style.
This approach transforms ordinary ceilings into statement pieces that elevate your entire decor. It’s a smart way to impress guests and boost your space’s modern appeal. Once installed, it’s surprisingly low-maintenance and timeless. Ready to give your ceiling a fresh, architectural upgrade?
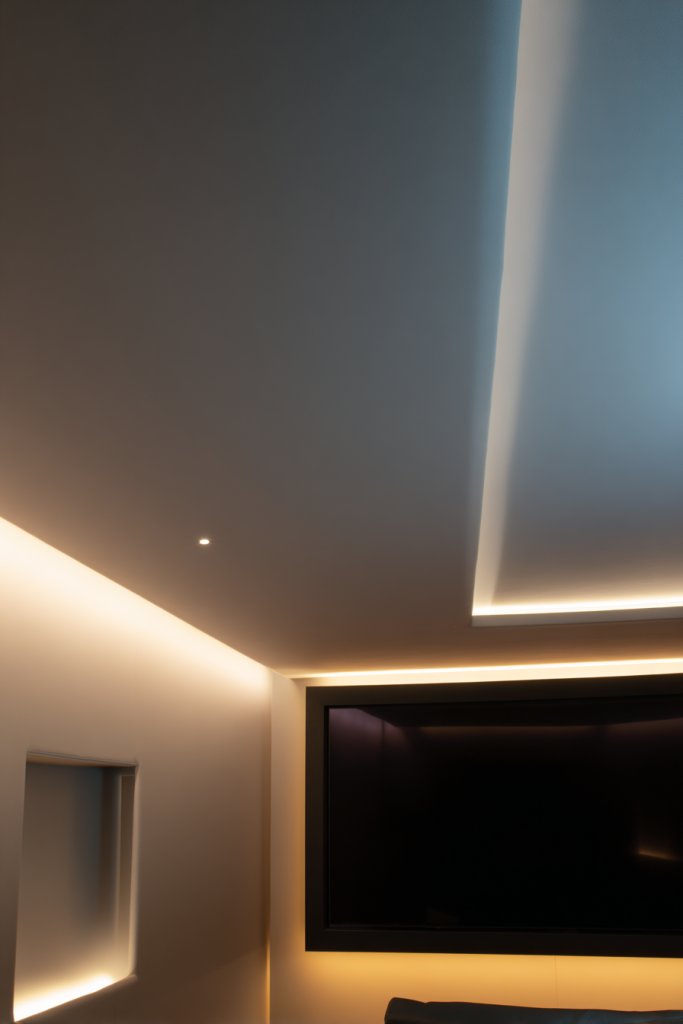
2. Tray Ceiling with LED Cove Lighting
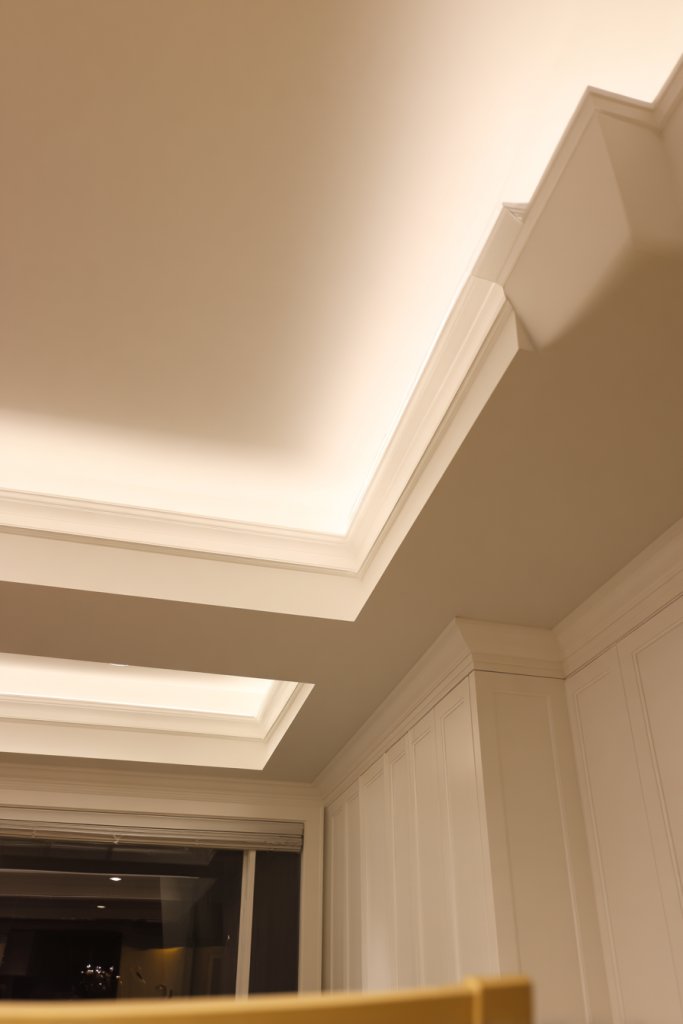
Ever feel like your ceiling needs a little extra oomph to make your room feel special? A tray ceiling with LED cove lighting offers a simple yet impactful upgrade that adds depth and ambiance. It’s perfect for those who want their space to feel cozy and luxurious without a complete overhaul. Plus, it’s an easy way to add a touch of drama.
Picture a ceiling with a stepped, recessed center that creates a layered effect. Soft LED lights hidden in the cove cast a warm glow, bouncing gently off the ceiling and walls. The layered design draws your eye upward, making the room feel taller and more spacious. At night, the subtle illumination enhances the mood, transforming your living area into a relaxing retreat.
You can customize the tray depth, width, and lighting color to match your decor style. For a modern look, go with cool white LEDs and sharp angles. For a cozy vibe, opt for warm tones and rounded edges. This design adapts well in dining rooms, bedrooms, or even home theaters. Seasonal accents like gold or silver trims can add festive flair.
Begin by measuring your ceiling and deciding on the tray dimensions. Construct a frame using lightweight materials like gypsum boards or MDF. Install the frame securely, ensuring it’s level and flush. Hide LED strip lights within the cove, connecting them to a dimmer switch for adjustable brightness. Finish with paint or wallpaper to match your decor. Professional installation ensures a seamless, polished look.
Choose lighting colors that set the mood—warm for cozy evenings, cool for energetic mornings. Incorporate dimmers for adjustable ambiance. Add decorative molding or metallic accents around the tray for extra style points. Consider pairing with smart lighting systems for voice-controlled adjustments. The goal is creating a space that feels both functional and fabulous.
A tray ceiling with cove lighting instantly elevates your room’s style quotient. It’s a subtle upgrade that makes a big impact, perfect for impressing guests or just enjoying your own luxe retreat. With minimal effort, you turn a plain ceiling into a stunning architectural feature. Ready to take your ceilings to the next level?
3. Pearl Finish Pop Ceiling for a Luxurious Shine
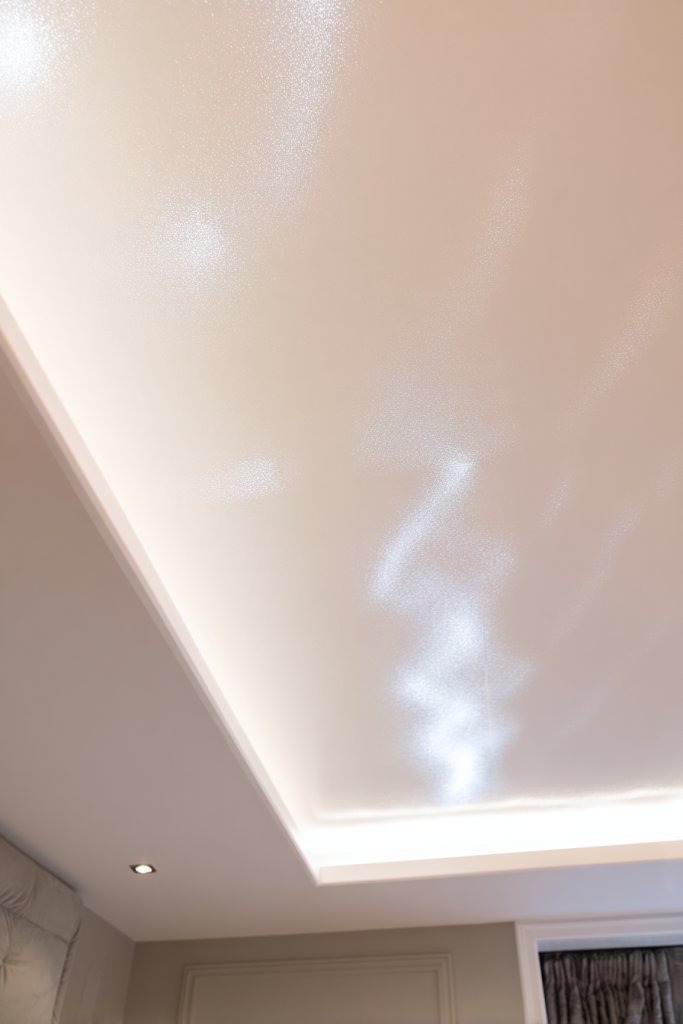
Looking for a ceiling that radiates elegance without complicated decor? A pearl finish on your pop ceiling provides a subtle shimmer that catches light beautifully. It’s perfect for adding a touch of luxury to any room without overwhelming the space. If you love understated glamour, this idea is for you.
Imagine a soft, luminous glow spreading across your ceiling, shimmering like the surface of a calm lake at dawn. The pearlescent paint creates a gentle iridescence that shifts with the light, adding depth and movement. The effect is both calming and opulent, elevating your room’s overall aesthetic. It pairs well with minimalist or classic decor styles.
Choose from various pearl shades—silver, pink, or champagne—to match your mood. This finish works well in bedrooms, living rooms, or even dining areas. For seasonal variation, consider layering with metallic accents or matte textures to balance the shine. It also complements various wall colors, from deep tones to light neutrals.
Start by preparing a smooth, clean surface on your ceiling. Use a high-quality pearl-effect ceiling paint, applying multiple thin coats with a roller or spray for even coverage. Allow each coat to dry thoroughly before applying the next. For a more dramatic effect, you can add a clear gloss topcoat. If unsure, hiring a professional ensures a flawless finish and prevents streaks.
Pair the pearl finish with minimalist lighting fixtures that don’t detract from its shimmer, like concealed LED strips or small spotlights. Incorporate decorative moldings or trim painted in contrasting colors for added sophistication. Textured wallpapers or fabric panels can enhance the tactile richness, making your ceiling a true showstopper.
A pearl finish transforms your ceiling into a centerpiece that exudes class. It’s a low-maintenance, timeless look that works across styles and eras. Once done, you’ll enjoy a subtly glamorous atmosphere that elevates your entire home. Ready to add that luxurious touch?
4. Wooden Textured Pop Ceiling for Warmth and Natural Appeal
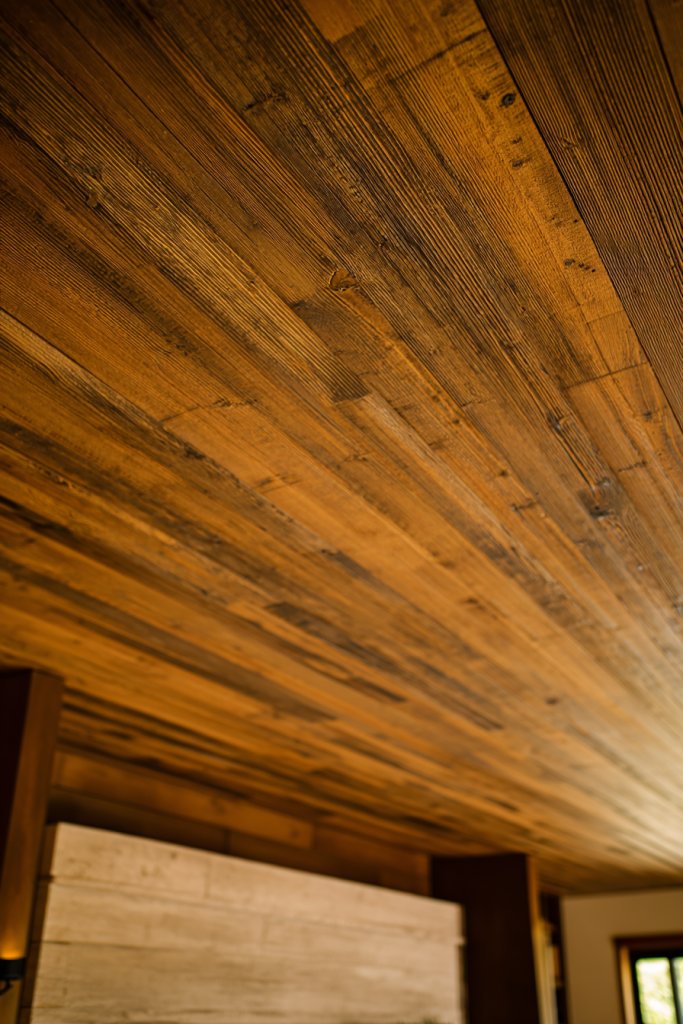
Craving a cozy, earthy vibe that makes your space feel inviting? A wooden textured pop ceiling offers natural warmth while keeping your decor sleek. It’s a great way to bring a bit of nature indoors without sacrificing modern style. If you love rustic charm but want a contemporary twist, this idea might be your perfect match.
Picture a ceiling with faux wood panels or textured plaster mimicking natural grain and knots. The warm tones and tactile surface add depth and comfort, making your room feel like a mountain cabin or a seaside retreat. Light reflects softly off the textured surface, creating a soothing ambiance. Pair it with plush textiles and warm lighting for ultimate coziness.
Choose from various wood finishes—light oak, dark walnut, or weathered gray—to match your decor theme. This design suits bohemian, Scandinavian, or farmhouse styles. Seasonal changes can be made by adding textiles like wool throws or linen drapes that complement the wood tones. It’s adaptable for ceilings of different heights, adding character at any scale.
Begin by prepping your ceiling surface, ensuring it’s smooth and clean. Use textured wallpaper or plaster with woodgrain embossing, applying with a spatula or sprayer. Seal the surface with a matte or satin finish to enhance the texture. For authenticity, opt for high-quality faux wood panels or textured plaster with natural patterns. Proper installation is key to avoiding warping or gaps.
Enhance warmth with soft, warm-colored lighting, and consider adding decorative beams or faux rafters for a rustic look. Incorporate natural elements like stone or brick accents in adjoining walls for a cohesive aesthetic. Personalize further by incorporating carved wood trim or custom patterns that reflect your taste. It’s all about creating a cozy, inviting atmosphere.
A wooden textured ceiling makes your home feel grounded and welcoming. It’s a timeless choice that balances style with comfort. Once installed, it requires minimal upkeep and ages beautifully. Ready to add earthy elegance to your space?
5. Drop Ceiling with Artistic Cut-Out Patterns
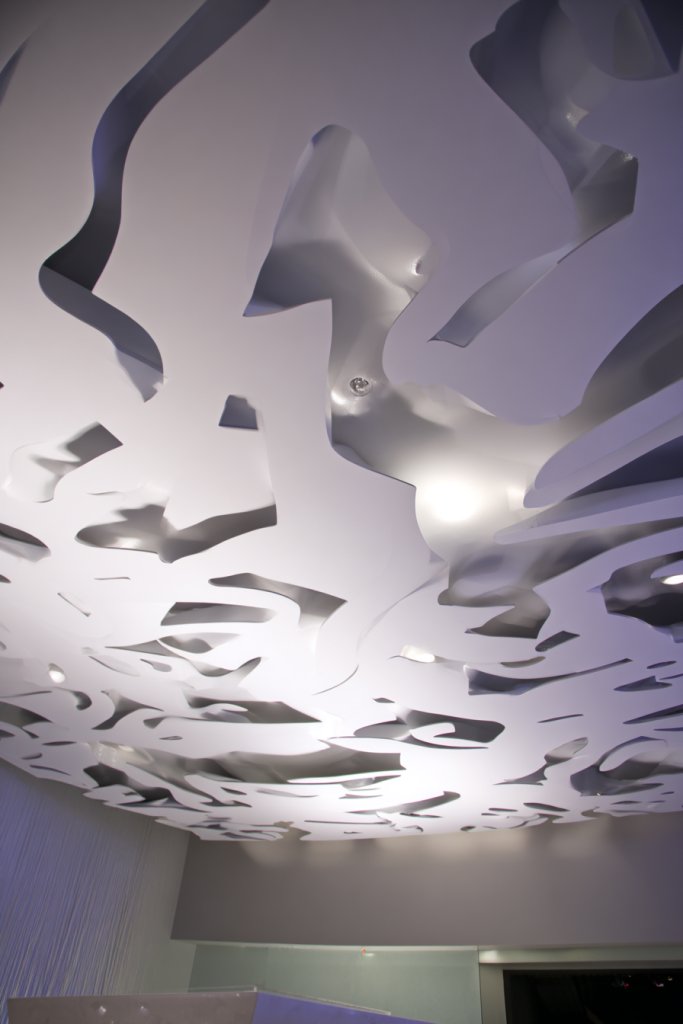
Tired of boring, flat ceilings that do nothing for your decor? An artistic drop ceiling with custom cut-outs injects personality and style into any room. It’s a creative way to break the monotony and showcase your artistic side. If you want your ceiling to be a conversation starter, this idea is worth considering.
Visualize a ceiling with flowing, organic cut-out shapes or geometric patterns that reveal glimpses of the space above. Light filters through these openings, casting interesting shadows and patterns on the walls and floor. The layered look adds depth and dimension, making your room feel more dynamic and alive. It’s like turning your ceiling into a piece of art.
Opt for delicate lace-inspired designs for a romantic vibe or bold geometric shapes for modern appeal. Smaller cut-outs work well in low-ceiling spaces, while larger patterns elevate high ceilings. You can paint the cut-outs in contrasting colors or leave them open for a more airy feel. Seasonal accents can be added by changing the surrounding paint or finishes.
Start by designing your pattern or sourcing pre-cut panels. Use lightweight materials like MDF or acrylic for easy handling. Attach the panels securely to a suspended grid system or directly to the ceiling, depending on your preference. Ensure the cut-outs are smooth and edges are finished for safety and aesthetics. Finish by painting or sealing to match your decor.
Highlight the cut-outs with LED backlighting or colored spotlights to emphasize the design at night. Incorporate metallic or contrasting paint inside the cut-outs for extra pop. You could also add textured finishes around the edges for an artisanal look. Personal touches make this ceiling truly unique.
An artistic cut-out ceiling turns an ordinary room into an extraordinary space full of character. It’s a bold statement that showcases your creativity. Once finished, it’s a durable and eye-catching feature that enhances your overall decor. Ready to craft your own ceiling masterpiece?
6. Multi-Layered Ceiling with Contrasting Colors
Feeling like your ceiling is just floating above your head without purpose? A multi-layered ceiling with contrasting colors adds depth and visual interest, transforming an ordinary space into something extraordinary. It’s perfect for those who want a bold statement without investing in full-scale renovation. Ready to give your ceiling a new dimension?
Picture a ceiling with multiple levels painted in contrasting shades—perhaps a dark border framing a lighter central panel. The layers create a sense of depth, making the ceiling seem lower or higher depending on the colors. Accentuate the contrast with subtle shadow lines or textured finishes for extra richness. It’s like creating an art piece overhead.
Play with color schemes—dark and light, warm and cool—to match your decor style. Use bold hues for a dramatic effect or soft neutrals for understated elegance. This design suits contemporary, eclectic, or even traditional interiors. Seasonal updates can be achieved by swapping out paint or adding decorative trims.
Begin by planning your layers and selecting contrasting paint colors. Use a level and measuring tape to mark out different levels on your ceiling. Apply primer, then paint each layer with the appropriate color, ensuring clean edges. Use painter’s tape for sharp lines and textured roller brushes for added effect. Finish with a clear sealant for durability.
Add indirect lighting along the edges of each layer to enhance the contrast at night. Incorporate decorative molding or trim painted in a coordinating color for a polished look. You can also experiment with different textures, like matte versus gloss, to further emphasize the layers. Personal touches make it uniquely yours.
This layered approach adds sophistication and personality to your space. It’s an affordable way to elevate your decor without major construction. Once completed, it creates a striking focal point that impresses everyone. Ready to make your ceiling the star of the show?
7. Metallic Finish Pop Ceiling for Glamorous Impact
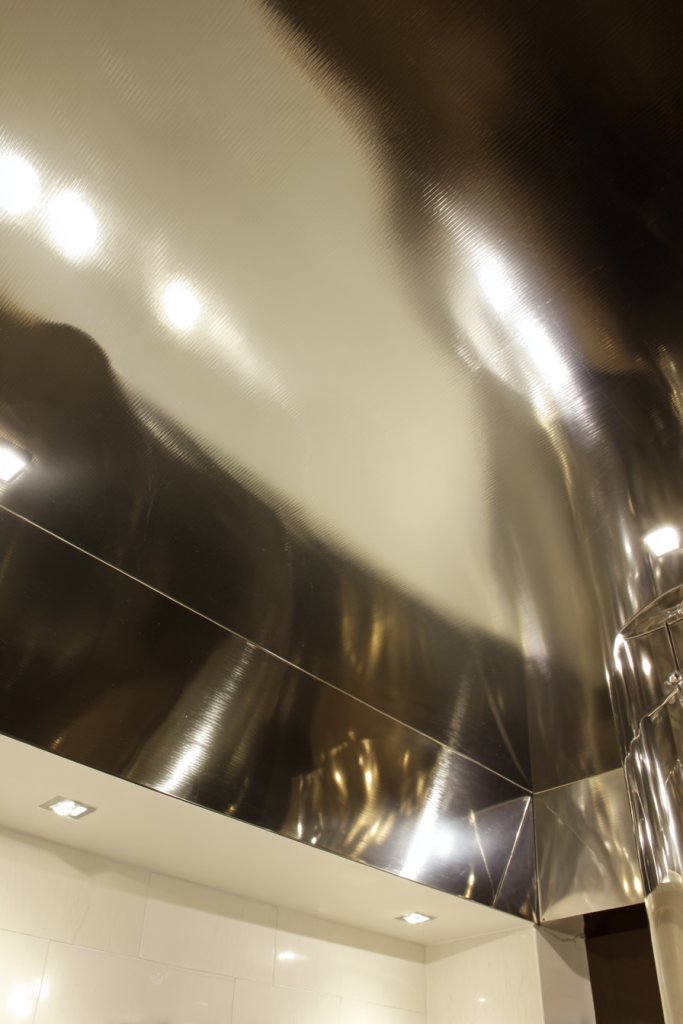
Want your ceiling to dazzle and reflect light like a jewel? A metallic finish on your pop ceiling instantly adds glamour and sophistication. It’s a statement look that complements luxe decor or modern minimalism alike. If you’re craving a space that’s both bold and elegant, this idea might be your new favorite.
Imagine a ceiling coated with shimmering gold, silver, or bronze that catches every bit of light and creates a radiant glow. The reflective surface amplifies ambient lighting and makes the room feel more expansive. The metallic sheen adds texture and depth, giving your ceiling a high-end, showroom vibe. It’s like having a mirror overhead.
Choose a metallic hue that complements your wall color and furniture. Gold pairs well with warm tones and rich textiles, while silver suits cooler palettes and sleek finishes. For a more subtle effect, opt for a matte metallic or brushed finish instead of high gloss. This style works well in living rooms, dining areas, or even bathrooms.
Prepare a smooth, clean ceiling surface before applying metallic paint or foil. Use high-quality metallic paints designed for ceilings, applying multiple thin coats with a roller or spray for even coverage. For foil finishes, carefully lay and adhere sheets with a specialized adhesive. Seal with a clear lacquer to enhance durability and shine. Consider professional help for a flawless finish.
Pair the metallic ceiling with warm lighting—like chandeliers or sconce fixtures—to highlight its reflective qualities. Incorporate decorative moldings or trims in contrasting matte finishes for added richness. You can also add textured wall panels or fabric drapes to complement the luxe aesthetic. The goal is a cohesive, glamorous look.
A metallic finish ceilings instantly elevate your decor, making your space feel upscale and stylish. It’s a timeless choice that never goes out of fashion. Once installed, it’s surprisingly low-maintenance and ages gracefully. Ready to add that wow factor?
8. Twinkling Starry Ceiling with Fiber Optic Lights

Ever wished you could bring the night sky indoors? A starry ceiling with fiber optic lights creates a magical, dreamy atmosphere that transforms any room. It’s perfect for bedrooms, home theaters, or even kids’ playrooms. If you love ambiance and a touch of fantasy, this idea is a star hit.
Visualize tiny points of light scattered across your ceiling like stars, shimmering softly in the dark. Fiber optic cables are woven into the ceiling surface, creating a realistic night sky effect. The gentle glow provides a calming ambiance while adding a wow factor. It’s like lying under a galaxy in your own home.
Choose different colors for the fiber optics—warm whites, cool blues, or multicolored twinkles—to suit your mood. Incorporate small cloud or moon-shaped cut-outs for added charm. This setup can be combined with dark, matte ceilings for a more dramatic effect or with textured finishes for added depth. Seasonal lighting effects can be integrated for special occasions.
Start by creating a dark, smooth ceiling surface. Install fiber optic cables in a pattern that mimics constellations or random stars. Connect the cables to a light source—usually a LED or laser system—and hide the hardware in a concealed compartment. Test the lights before sealing everything in place. Use a dimmer to control brightness and enhance the effect.
Add a small, decorative moon or planet decals for a personalized touch. Incorporate a remote control or app-based system for changing twinkle patterns and colors. Complement with soft, textured fabrics or blackout curtains to heighten the starry experience. The idea is to make the space feel like a personal planetarium.
A starry ceiling creates a mesmerizing environment, perfect for relaxing or sparking imagination. It’s a unique feature that instantly makes your home memorable. Once set up, it’s low-maintenance and endlessly enchanting. Ready to turn your ceiling into a night sky?
9. Minimalist Flat Ceiling with Subtle Textured Finish
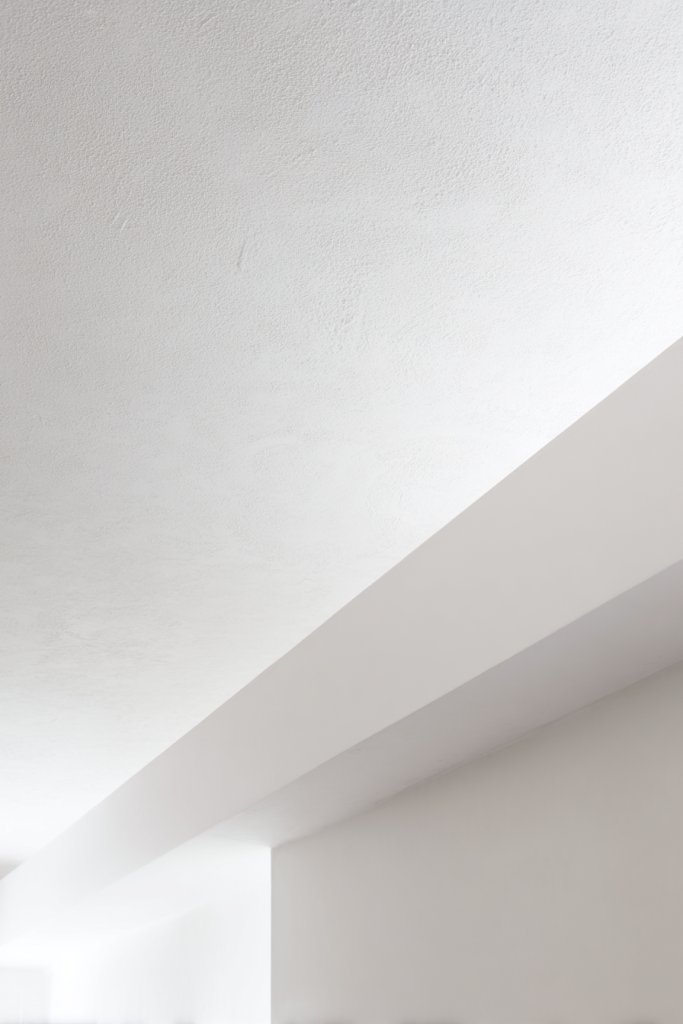
Sometimes, less truly is more—especially when it comes to ceilings. A minimalist flat ceiling with a subtle textured finish offers understated elegance that blends seamlessly with any decor. It’s perfect for creating a calm, clean atmosphere without fuss or distraction. If you prefer simplicity with style, this idea is your friend.
Imagine a smooth, matte surface with barely perceptible textured patterns—perhaps a soft stucco or fine sand finish. The subtle variation adds depth without overwhelming the senses. Light softly grazes the surface, highlighting the delicate textures and creating a serene ambiance. It’s a quiet backdrop that lets your furniture and decor shine.
Choose neutral tones—white, beige, or gray—for maximum versatility. This style pairs well with modern, Scandinavian, or transitional interiors. Seasonal changes can be made by swapping out accent cushions, throws, or wall decor, keeping the ceiling’s simplicity intact. It adapts easily to various ceiling heights and room sizes.
Prepare the ceiling surface by cleaning and smoothing it thoroughly. Use a textured primer or paint with a subtle finish, applying with a roller or spray for uniformity. For added depth, incorporate a light stippling technique or textured roller. Avoid heavy patterns; aim for a delicate, almost invisible texture. Finish with a matte or eggshell sealant to preserve the look.
Complement this ceiling with sleek, modern lighting fixtures—recessed or strip lights—that don’t compete with its understated elegance. Add decorative wall moldings or trim for a touch of refinement if desired. Incorporate textiles like plush rugs or soft curtains to enhance the calming vibe. Personal touches should enhance, not compete.
This approach proves that simplicity can be stunning. It creates a timeless, adaptable backdrop that ages gracefully. Once finished, it requires minimal upkeep and offers a tranquil environment. Ready for a space that whispers sophistication?
10. Circular Ceiling Medallion with Recessed Lighting
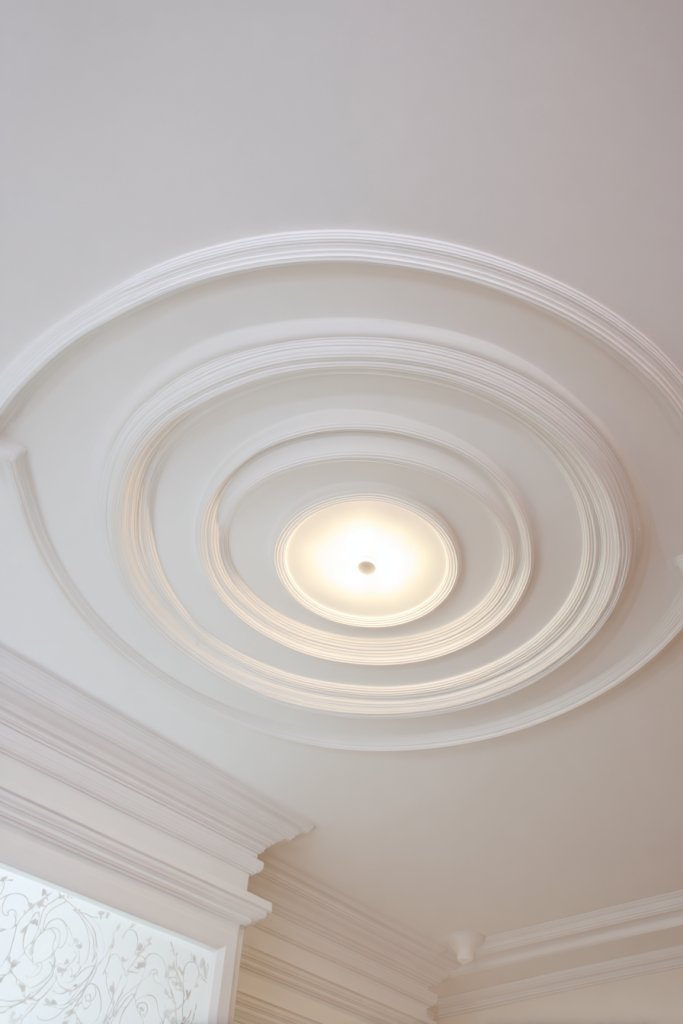
Looking to add a touch of classic elegance with a modern twist? A circular ceiling medallion combined with recessed lighting offers a timeless look that’s also surprisingly versatile. It’s ideal for creating focal points in living rooms, dining areas, or bedrooms. Want to make your ceiling a statement piece? Keep reading.
Picture a large, ornate medallion at the center of your ceiling, with soft, integrated LED or halogen lights radiating outward. The circular design draws your gaze upward and anchors the room’s decor. The contrast between decorative medallion and sleek lighting creates an elegant, balanced effect. It’s like wearing a statement necklace for your ceiling.
Medallions come in various finishes—gold, silver, matte black—or intricate carved designs. They suit traditional, transitional, or even contemporary interiors. You can pair it with a chandelier or keep it minimalist with hidden spotlights. Seasonal accents like ribbons or floral motifs can add a personal touch.
Choose a medallion size appropriate for your room’s dimensions. Install it securely at the center of your ceiling, ensuring it’s perfectly level. Embed recessed lights around or within the medallion, wiring them to dimmers for ambiance control. Finish with matching paint or metallic finishes for a cohesive look. Professional installation guarantees precision.
Add decorative moldings or trim around the medallion for extra flair. Use color contrasts—like a dark ceiling with a gold medallion—to make it pop. Incorporate dimmable lighting for different moods, from romantic to energetic. Personalize with custom carvings or motifs that reflect your style.
A ceiling medallion with recessed lighting elevates your decor instantly, combining tradition with modernity. It’s a refined feature that adds character without overpowering the space. Once installed, it’s low-maintenance and timeless. Ready to give your ceiling a regal upgrade?
11. Beamed Ceiling with Faux Wooden Beams
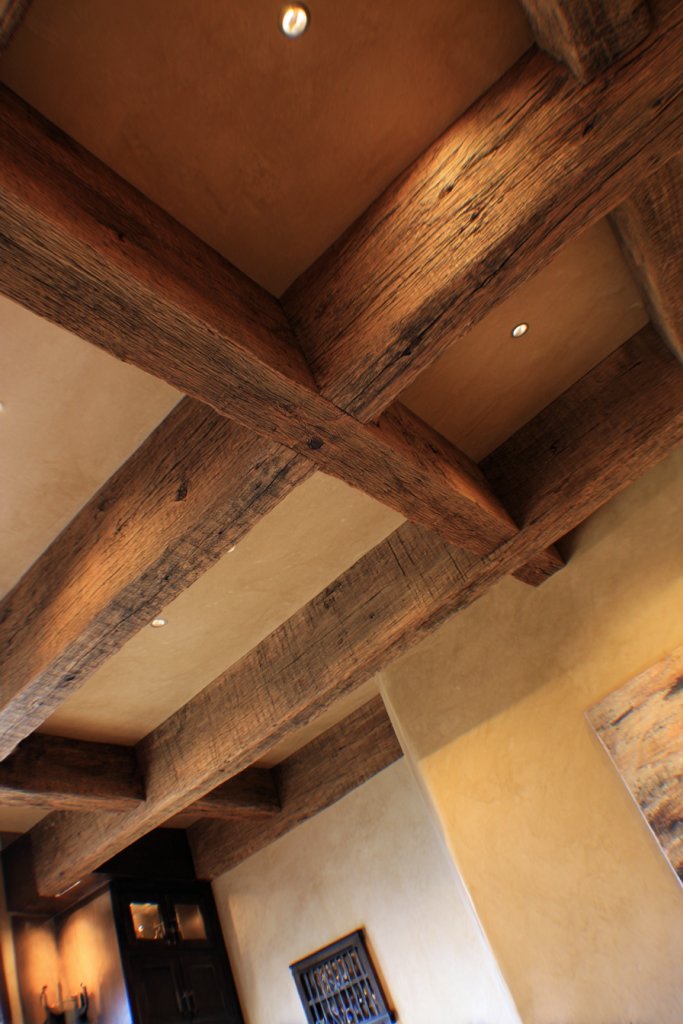
Craving that cozy, rustic charm but don’t want the weight or expense of real wood? Faux wooden beams are the perfect solution to add warmth and character to your ceilings. They give the illusion of exposed beams without the structural hassle. If you love the look of country or farmhouse style, this idea is a game-changer.
Visualize lightweight, textured panels painted or finished to resemble natural wood, arranged in parallel or crossing patterns. The beams create a sense of architectural depth, instantly making a room feel more inviting. The contrast between the beams and the ceiling surface adds visual interest and authenticity.
Choose from various finishes—light, dark, distressed—to match your decor. Beams can be installed in living rooms, dining areas, or even bedrooms. For a modern twist, opt for sleek, minimalistic faux beams with clean lines. Seasonal decor like textiles or accessories can complement the rustic look.
Measure your ceiling and decide on beam placement. Use lightweight materials like polyurethane or fiberboard, cut to desired lengths. Attach the beams securely using brackets or adhesive, ensuring they’re level and evenly spaced. Finish with textured paint or stain for realism. Consider adding LED strip lighting along the beams for a subtle glow.
Personalize with decorative accents like wrought iron brackets or painted details. Use warm, ambient lighting to highlight the beams’ texture. Incorporate textiles such as woven rugs or linen curtains to enhance the rustic vibe. Custom patterns or logos can add a unique, personal touch.
Faux beams give your space a timeless, cozy appeal without the cost or weight of real wood. They’re a quick upgrade that dramatically changes the room’s atmosphere. Once installed, they require very little maintenance. Ready to bring warmth and charm indoors?
12. Patterned Pop Ceiling with 3D Wall Panel Effects
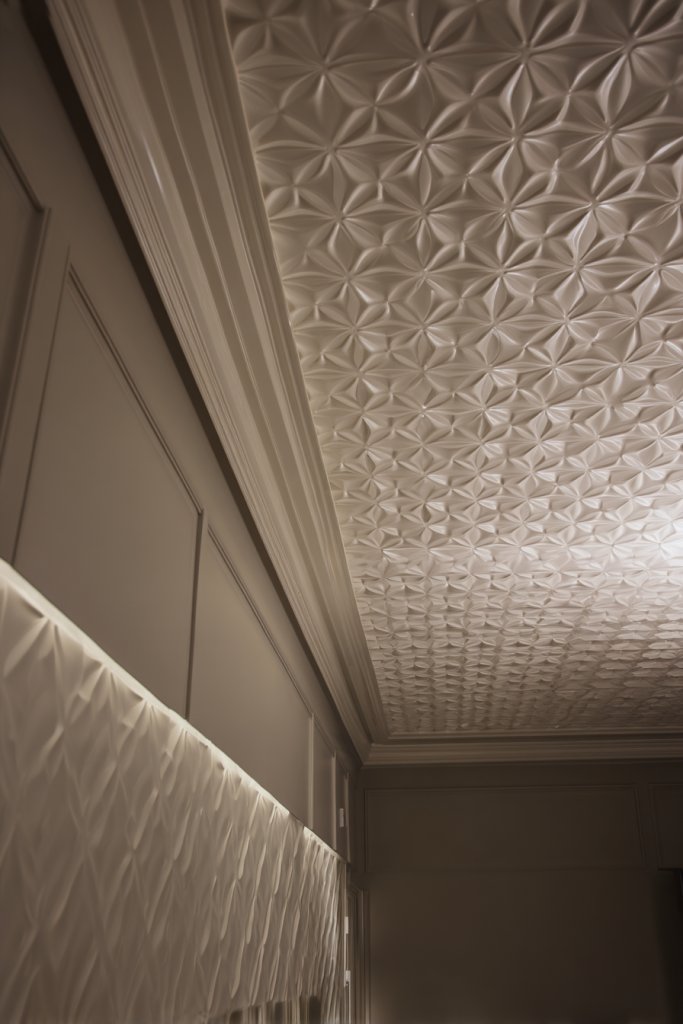
Bored with flat, boring ceilings that lack character? Patterned pop ceilings with 3D wall panel effects add texture and dimension effortlessly. They create a wow factor that elevates your entire decor. If you’re looking for a stylish upgrade that’s also easy to install, this idea hits the mark.
Imagine a ceiling with geometric or organic patterns that rise and fall, creating shadows and highlights as light hits them. The textured panels add tactile interest and depth, making the ceiling feel like a work of art. This effect works especially well in contemporary or eclectic interiors, providing a bold visual anchor.
Choose from a variety of patterns—hexagons, waves, or floral motifs—to match your decor. You can paint the panels in contrasting or tonal colors for added dimension. Smaller patterns suit low ceilings, while larger, bold designs enhance spacious rooms. Mixing textures can create a layered, sophisticated look.
Start by selecting textured or patterned wall panels suitable for ceilings. Attach them securely using adhesive or mounting clips, making sure they’re aligned properly. Finish with paint or varnish to enhance the pattern’s contrast and protect the surface. For a seamless look, paint the entire ceiling in one color or create contrast with different hues.
Highlight the patterns with directional lighting—like recessed or track lights—to emphasize the textures. Incorporate metallic or gloss finishes for extra shine. Personal touches include custom patterns or combining panels with different textures for a bespoke look. It’s all about creating a ceiling that’s uniquely yours.
Patterned 3D ceilings instantly add personality and sophistication to any space. They’re a statement feature that’s both modern and artistic. Once installed, they require minimal upkeep and age beautifully. Ready to make your ceiling a standout feature?
13. Floating Panel Design with Hidden Lighting Edges
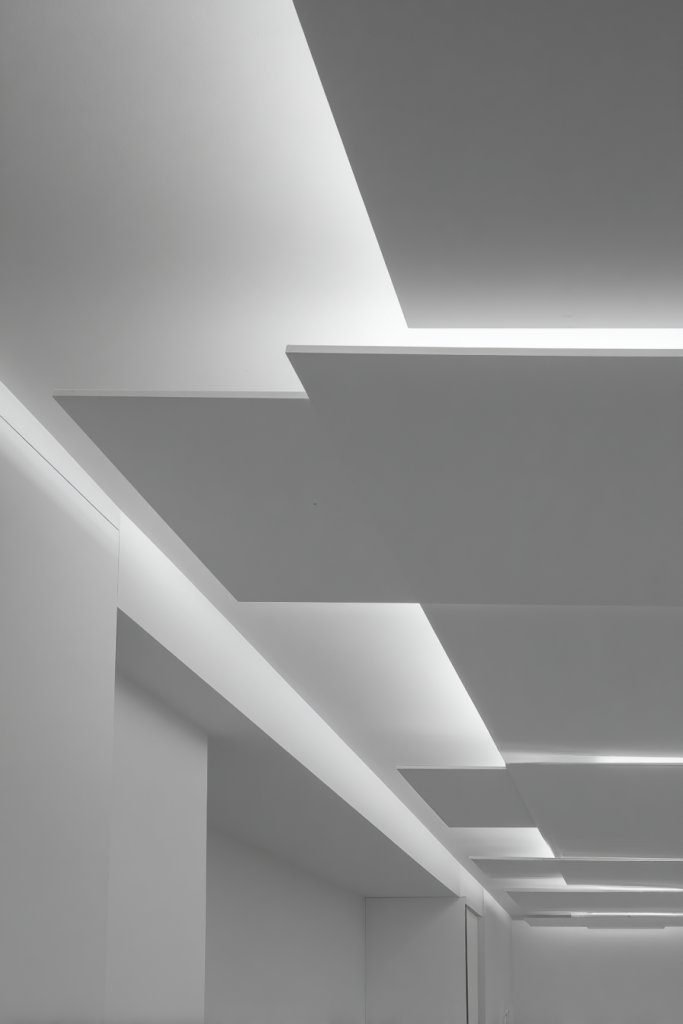
Want a ceiling that looks sleek and futuristic without visible fixtures? Floating panels with hidden lighting edges create a clean, modern aesthetic that’s both functional and stylish. They give the illusion of panels hovering in mid-air, perfect for contemporary spaces. If you love minimalist design, this idea is worth exploring.
Envision panels that appear to float just below the ceiling, with LED strips concealed along their edges. The soft glow outlines each panel, creating a layered, dimensional effect. The subtle lighting emphasizes the floating illusion and adds a sophisticated ambiance. It’s like a high-end art installation above your head.
Choose monochrome panels for a sleek look or mix materials like glass, metal, and wood for texture. The layout can be symmetrical or asymmetrical, depending on your style. Add color-changing LEDs for mood lighting or keep it simple with warm white for a cozy feel.
Start by designing your panel layout and selecting lightweight, durable panels. Mount the panels securely using hidden brackets or rails for a seamless appearance. Conceal LED strips along the edges, connecting them to a controller for dimming and color changes. Ensure all wiring is hidden and accessible for future adjustments. Finish with matching paint or veneer.
Incorporate touch controls or smart systems for easy lighting adjustments. Add textured or patterned panels for visual interest. Personalize with different materials or colors within the same layout to reflect your style. Keep the design minimal but impactful.
Floating panel ceilings offer a sleek, high-tech look that elevates your decor effortlessly. They’re a statement of modern elegance and innovation. Once in place, they’re easy to maintain and adapt over time. Ready to achieve a futuristic ceiling?
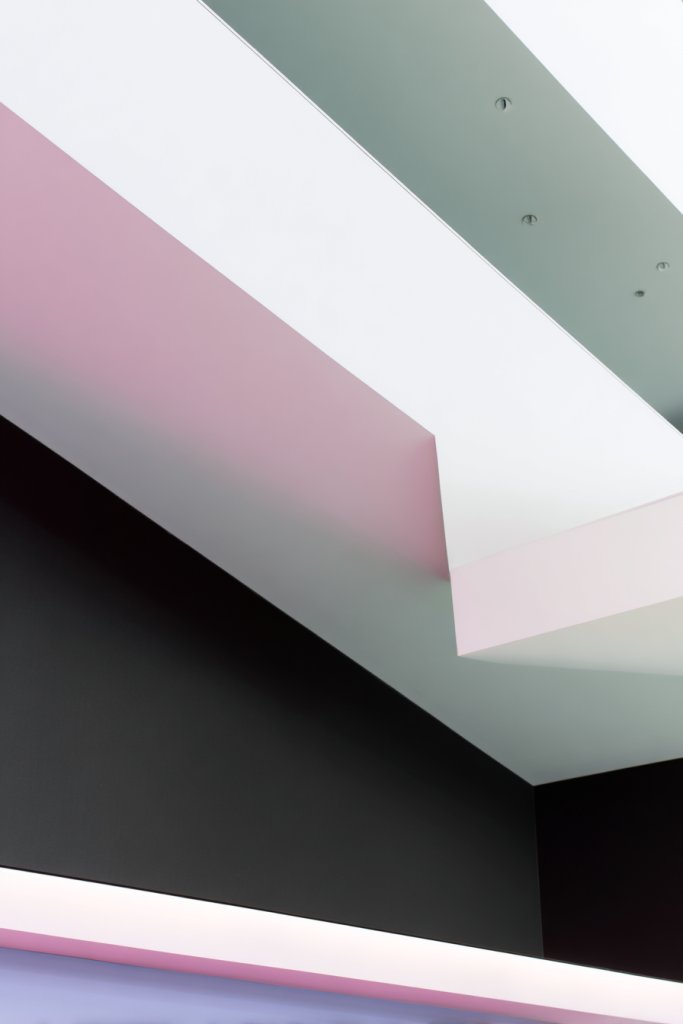
14. Color-Blocked Ceilings for Bold Visual Impact
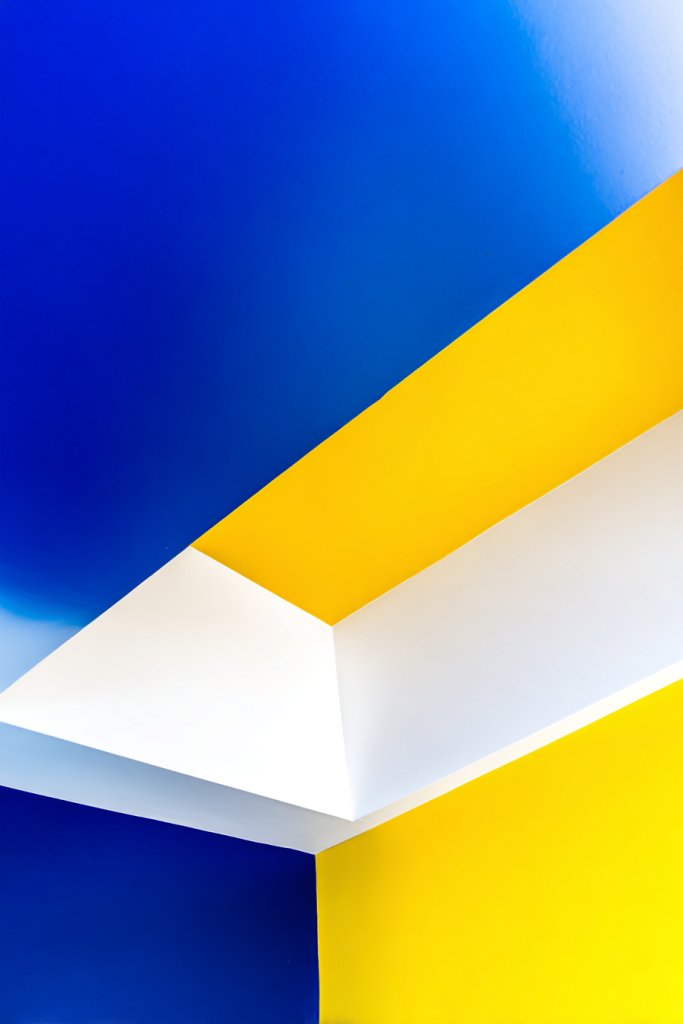
Looking to make a bold statement from above? Color-blocked ceilings introduce striking contrasts and vibrant hues that define your space. They’re perfect for creative souls who want their ceilings to be as expressive as their walls. If you’re tired of white or plain ceilings, this idea will shake things up.
Picture a ceiling divided into sections painted in contrasting colors—perhaps navy and blush or emerald and gold. The clear geometric divisions create a dynamic visual that draws the eye upward. When combined with matching or complementary decor, it forms a cohesive, energetic atmosphere. It’s like wearing a bold accessory on your head.
Use sharp lines for a modern, graphic look or softer, blended transitions for a more artistic approach. Bright colors energize the space, while muted tones create sophistication. This technique works well in open-plan living rooms, creative studios, or kid’s rooms. Seasonal updates are as simple as repainting a section.
Begin by sketching your color divisions and choosing high-quality ceiling paints. Use painter’s tape for crisp edges, and apply multiple thin coats for even coverage. Be mindful of drying times to prevent smudging. For larger areas, consider spray painting for a smooth finish. Protect adjacent walls and fixtures during painting.
Accent the color blocks with LED lighting strips along the edges for a luminous outline. Incorporate metallic or gloss paints for extra shine. Personalize further by adding decorative moldings or patterns within each block. It’s all about creating a vibrant, energetic ceiling that complements your decor.
A color-blocked ceiling turns an ordinary height into an artistic feature. It’s a playful yet refined way to express your style. Once done, it’s low-cost and easy to refresh with new colors. Ready to add a splash of personality?
15. Perforated Ceiling with Ambient Backlighting
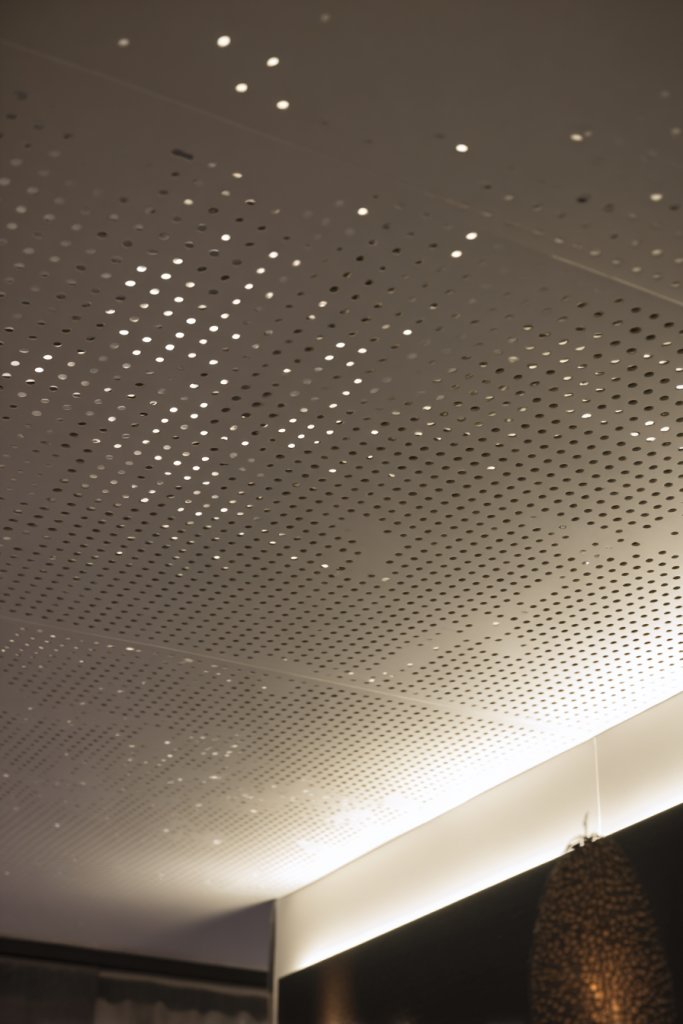
Want a ceiling that feels warm and inviting but still modern? Perforated ceiling panels with ambient backlighting offer a soft, diffused glow that creates a cozy atmosphere. Perfect for lounges, bedrooms, or any space where relaxation is key. If you love subtlety with style, this idea will catch your eye.
Picture panels with tiny holes or intricate cut-outs that let light pass through gently. The backlit LEDs glow softly behind the perforations, casting a warm, inviting light across the room. The pattern adds visual interest and texture without overwhelming the space. It’s like a starry sky or delicate lace overhead.
Choose from geometric, floral, or abstract patterns depending on your decor theme. Bright or warm LED colors can set different moods—cooler tones for energizing, warmer for relaxing. This design suits modern, bohemian, or even industrial interiors. Seasonal lighting effects can customize the ambiance.
Install perforated panels made of lightweight materials like metal, MDF, or acoustic foam. Attach them securely to a suspended grid or directly to the ceiling. Conceal LED strips behind the panels, wiring carefully managed for a clean look. Test the lighting before sealing everything in place. Finish with paint or coating to match your decor.
Add dimmable controls or color-changing LEDs for versatile moods. Incorporate decorative trims or frames to enhance the pattern. Personalize with your favorite patterns or mix perforations with textured surfaces for a layered look. It’s a subtle but impactful upgrade.
Perforated ceilings with backlighting create a welcoming, stylish environment that feels both modern and cozy. They’re versatile and customizable, making your space uniquely yours. Once installed, they require minimal upkeep and age gracefully. Ready to create a dreamy, inviting ceiling?
16. Curved or Wave-Design Ceiling for Dynamic Flow
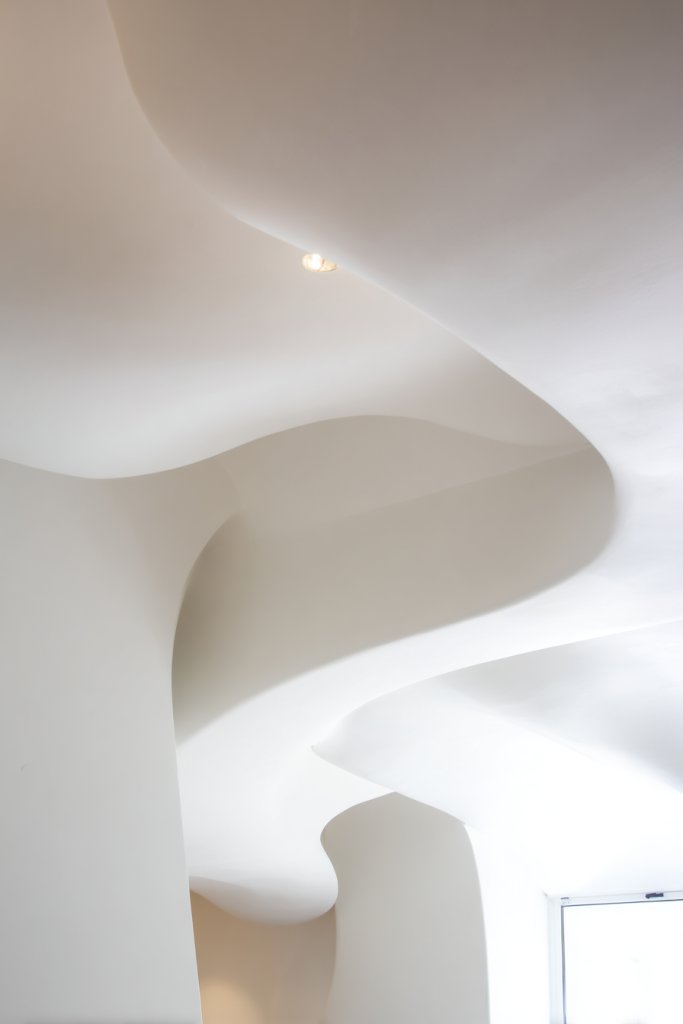
Feeling like your space needs a more organic, flowing vibe? Curved or wave-design ceilings introduce movement and softness to any room. They break away from rigid lines and create a sense of fluidity that’s both calming and captivating. If you crave a more dynamic aesthetic, this idea is a must-try.
Visualize a ceiling with sweeping curves or undulating waves that ripple across the space. The gentle contours catch light differently at various angles, creating shadows and highlights that emphasize movement. The design invites the eye to follow the curves, adding a sense of endless flow and energy. It’s like turning your ceiling into a piece of sculptural art.
Choose smooth, continuous curves for a minimalist look or bold, sweeping waves for maximum impact. Pair with neutral tones to keep it subtle or vibrant colors for a lively atmosphere. This style pairs well with organic, coastal, or contemporary interiors. Seasonal accents like textiles or lighting can enhance the flowing aesthetic.
Use flexible materials like plaster or specialized drywall to craft the curves. Frame the design with metal or wooden supports, ensuring they’re securely anchored. Finish with seamless joint compounds and paint that accentuates the curves’ smoothness. Consider adding hidden LED strip lighting along the edges for a glowing effect. Professional help ensures precision and safety.
Highlight the curves with directional lighting or color gradients to emphasize their shape. Incorporate textured finishes, such as matte or satin, for added depth. Personalize with embedded decorative elements or subtle patterns within the waves. The goal is a harmonious blend of artistry and comfort.
A curved or wave ceiling breathes life into any room, making it feel more organic and inviting. It’s a bold statement that reflects creativity and style. Once completed, it becomes a defining feature that elevates your decor effortlessly. Ready to embrace flowing design?
17. Layered Ceiling with Recessed Spotlights
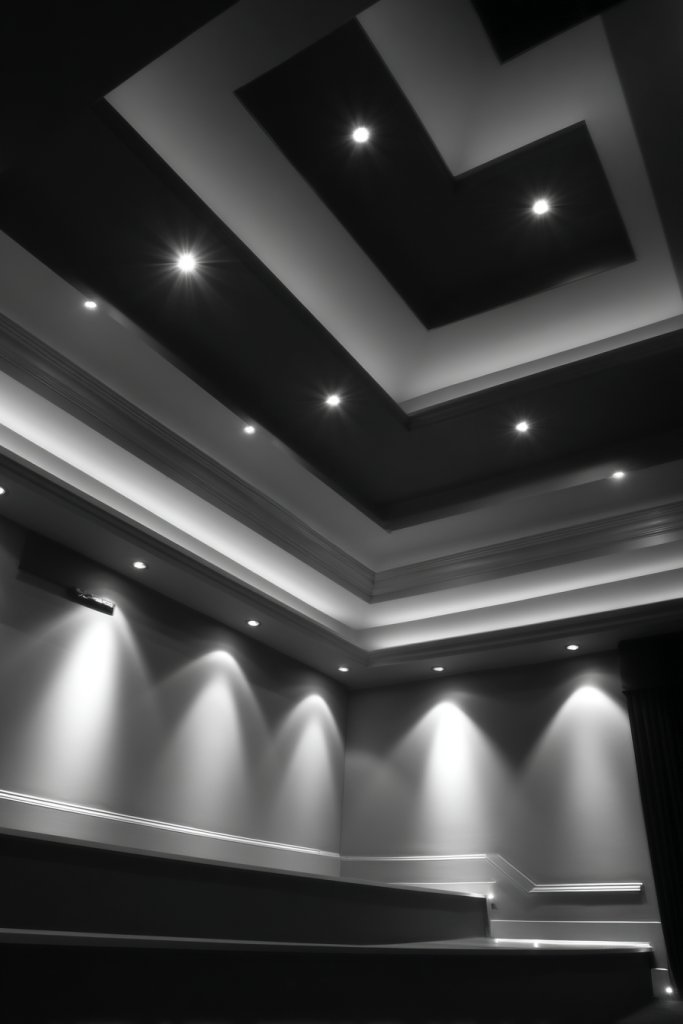
Want to add drama and focus to your ceilings? Layered ceilings with recessed spotlights create zones of light and shadow, adding depth and sophistication. This design is perfect for highlighting specific areas or creating a mood. If you crave a versatile lighting feature, this idea is a winner.
Imagine a ceiling with multiple levels, each with its own lighting zone. Recessed spotlights are embedded into the layers, illuminating artwork, furniture, or architectural details below. The layers cast subtle shadows, giving the room a sense of depth and dimension. The effect is both functional and artistic.
Opt for different layer heights and shapes—square, rectangular, or irregular—to suit your style. Use warm or cool spotlight bulbs depending on your mood. This approach works in living rooms, dining areas, or even home offices. Seasonal lighting can add color or change the intensity for different occasions.
Construct the layers using drywall or plasterboard, ensuring each is securely mounted and level. Install the recessed spotlights into the layers, wiring them for dimming and control. Finish with paint, wallpaper, or textured surfaces for each level to define the zones. Proper planning ensures even lighting distribution and safety.
Adjust spotlight angles to highlight features or create a sense of movement. Incorporate color filters or smart bulbs for mood lighting. Add decorative trims or contrasting colors on the edges of each layer for visual interest. It’s about customizing the lighting zones to fit your lifestyle.
Layered ceilings with spotlights turn your ceiling into a dynamic focal point. They’re both practical and stylish, perfect for modern living. Once installed, they give you full control over ambiance and focus. Ready to create a layered lighting masterpiece?
18. Faux Coffered Ceiling with Decorative Moldings
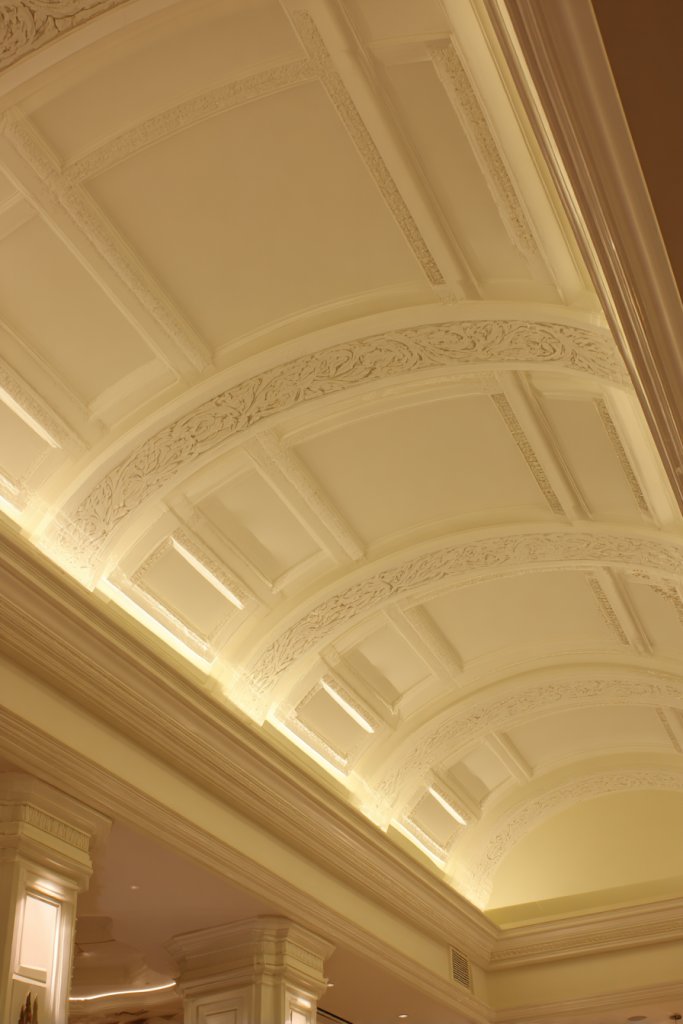
Ever admired the grandeur of coffered ceilings but balked at the cost? Faux coffered ceilings mimic the classic look using lightweight materials and clever paint techniques. They bring a sense of sophistication and architectural interest without breaking the bank. If you want a regal upgrade, this idea is your ticket.
Visualize a ceiling divided into a grid of recessed panels, each framed with decorative moldings. The faux finish adds depth, making the ceiling appear more elaborate than it really is. Light and shadow play across the panels, emphasizing the geometric pattern. It’s like having a custom ceiling in a fraction of the cost.
Choose from traditional, modern, or eclectic molding styles—ornate carvings, simple trims, or minimalist lines. Paint the panels in contrasting tones to highlight the grid or keep it monochrome for subtle elegance. This design works well in formal dining rooms, living areas, or even bedrooms. Seasonal accents can be added with color changes or decorative elements.
Begin by measuring your ceiling and sketching the grid pattern. Install lightweight foam or polyurethane moldings using adhesive and nails. Fill gaps with spackle and sand smoothly. Paint the moldings and panels, accentuating the depth with shading techniques if desired. For an authentic look, use high-quality paints and finish with a clear sealant.
Add LED strip lighting behind the moldings for a soft glow. Incorporate metallic or gloss finishes for a more opulent effect. Personalize with painted motifs or accents within the panels. It’s a flexible design that can be tailored to your decor style.
Faux coffered ceilings elevate your space with elegance and grandeur. They’re a luxurious look that’s surprisingly affordable and adaptable. Once finished, they require minimal upkeep. Ready for a stately upgrade?
19. Textured Plaster Finish with Metallic Accents
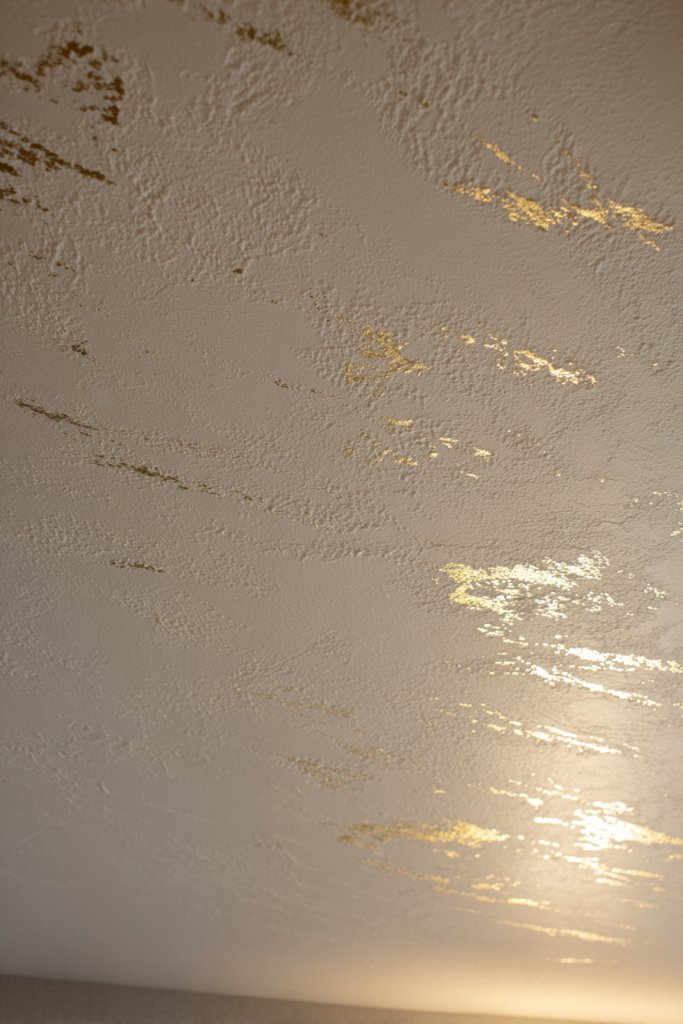
Wish your ceiling had more tactile richness and a touch of shine? A textured plaster finish combined with metallic accents adds sophistication and depth to any room. It’s perfect for those who love a tactile, luxurious environment. If subtle glamour appeals to you, this idea is a must-try.
Imagine a ceiling with a hand-applied plaster texture—perhaps a swirl, stipple, or troweled pattern—that catches light differently throughout the day. Metallic accents, like gold or copper, are brushed or embedded into the surface to add shimmer. The combination creates a rich, layered look that’s both tactile and luminous. It’s like wearing jewelry on your ceiling.
Opt for metallic highlights within textured finishes or create a full metallic plaster look. Pair with neutral wall colors to let the ceiling shine, or match with bold decor for a dramatic effect. This design suits traditional, industrial, or eclectic interiors. Seasonal variations include adding color washes or patinas for aged effects.
Prepare a smooth ceiling surface, repairing cracks or imperfections. Apply textured plaster in your chosen pattern using trowels or spatulas. Before it fully dries, embed metallic leaf or paint metallic accents onto the textured surface. Seal with a protective clear coat to preserve the metallic sheen. Professional application ensures even, durable results.
Highlight textures with directional lighting or small spotlights. Use contrasting metallics or layered finishes for extra depth. Incorporate decorative trims or moldings painted in metallic hues for a cohesive look. Personal touches like custom designs or aged patinas can make your ceiling truly unique.
This textured, metallic ceiling adds a tactile, luminous layer to your decor. It’s a sophisticated upgrade that ages beautifully and ages well. Once done, it’s low-maintenance and endlessly stylish. Ready to add tactile luxury?
20. Contemporary Pop Ceiling with Asymmetrical Layers
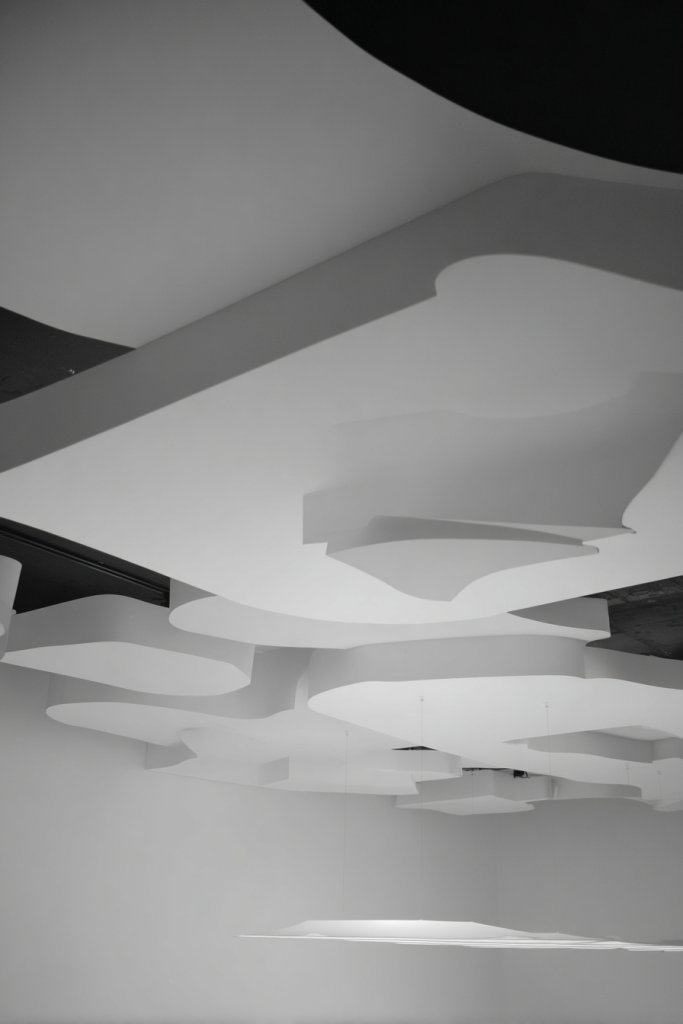
Tired of symmetrical, predictable ceilings? An asymmetrical layered pop ceiling injects a contemporary, artistic flair into your space. It’s perfect for creating visual interest and breaking the monotony. If you love modern, edgy decor, this idea will inspire your next upgrade.
Visualize irregularly shaped layers, each with different heights and angles, stacked in a seemingly random but balanced composition. The layers catch light at different angles, creating shadows and highlights that shift throughout the day. It transforms your ceiling into a sculptural focal point that’s full of movement and energy.
Mix materials like wood, metal, or painted drywall to add texture. Use bold, contrasting colors or keep it monochrome for a sleek look. This style works well in open-plan living spaces or gallery-like interiors. Seasonal accents like lighting or textiles can enhance the effect.
Plan your layout carefully with sketches or digital models. Use lightweight panels or drywall to build the layers, securing them with brackets or adhesive. Vary the heights and angles for visual interest, ensuring structural stability. Finish with paint or textured finishes, emphasizing the asymmetry with lighting. Hiring a professional can help achieve precision.
Use colored or textured surfaces to highlight different layers. Incorporate LED lighting to accentuate the depth and angles. Personalize with embedded motifs or patterns within the layers for a truly unique look. It’s all about creating a dynamic, modern statement.
An asymmetrical layered ceiling pushes the boundaries of traditional design, adding bold personality. It’s a statement of creativity and style that elevates your whole decor. Once complete, it becomes a conversation piece and a source of pride. Ready to challenge the ordinary?
21. Bright White Ceiling with Subtle Shadow Lines
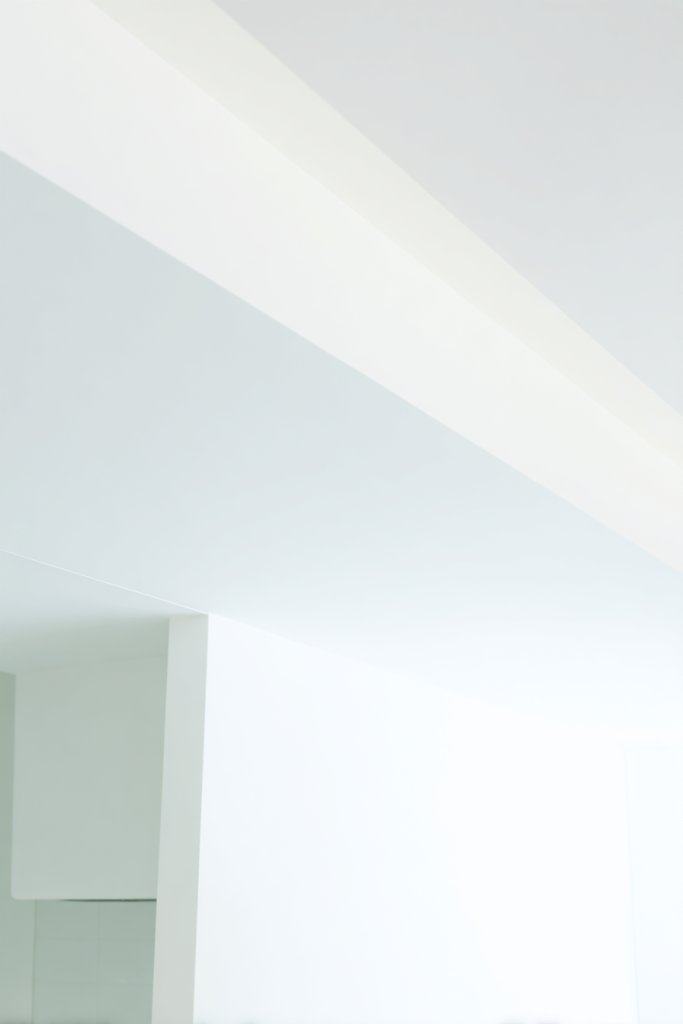
Craving a clean, spacious feel that never goes out of style? A bright white ceiling with subtle shadow lines creates a fresh, airy ambiance. It’s perfect for making small rooms appear larger or establishing a neutral backdrop for colorful decor. If simplicity and brightness are your goals, this idea delivers.
Imagine a pristine white ceiling with delicate, nearly invisible shadow lines running parallel or in geometric patterns. These lines add just enough dimension to prevent flatness, creating a sense of depth. The subtle shadows change with the light, giving the space a gentle rhythm. It’s a calm, elegant canvas for your decor.
Use matte or satin finishes to keep the look soft and non-reflective. This style pairs well with minimalist, Scandinavian, or coastal interiors. Seasonal changes can be achieved with colorful wall art, textiles, or accessories, keeping the ceiling a neutral haven. Low ceilings benefit from this approach, making the space feel taller.
Prepare your ceiling with thorough cleaning and smoothing. Apply a high-quality white paint in multiple thin coats for even coverage. Use painter’s tape and a level to create the subtle shadow line patterns. For added depth, a slightly darker shade of white or gray can be used within the shadow lines. Seal with a matte topcoat for longevity.
Incorporate recessed lighting or hidden LED strips along the shadow lines for nighttime glow. Keep decor simple—think plush textiles and minimal furniture—to let the ceiling’s subtle design shine. You can also experiment with textured wall finishes to add depth without cluttering the ceiling.
A bright white ceiling with shadow lines offers a timeless, versatile foundation for any style. It creates a sense of openness and cleanliness, making your space feel fresh. Once done, it’s easy to maintain and complements any decor updates. Ready to embrace simplicity?
22. Monochrome Ceiling with High-Gloss Finish
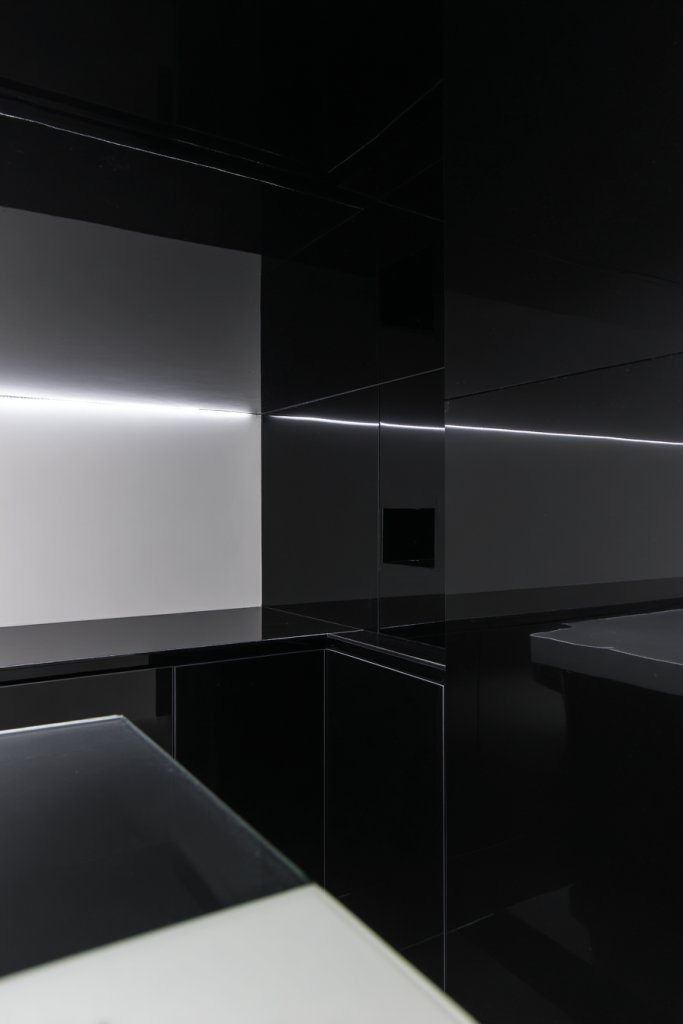
Want a ceiling that amplifies light and makes your space feel bigger? A monochrome high-gloss ceiling reflects light beautifully, adding a sense of depth and sleekness. It’s perfect for modern interiors that love bold statements and clean lines. If you crave a polished, contemporary look, this is your go-to.
Picture a ceiling painted in a single deep hue—black, navy, or charcoal—with a mirror-like gloss finish. Light bounces off the surface, creating a luminous, almost surreal effect. The seamless reflection doubles the visual space and adds a luxurious vibe. It’s like turning your ceiling into a giant reflective surface.
Pair with minimalist decor and sleek furniture for a cohesive look. Use contrasting wall colors or accents to make the ceiling stand out even more. This finish works well in open-plan living rooms, home offices, or art galleries. Seasonal decor can be added with textiles and accessories that complement the monochrome palette.
Ensure the ceiling surface is impeccably smooth before applying the high-gloss paint. Use a spray or roller for even coverage, applying multiple thin coats. Sand lightly between coats for a mirror-like finish. Seal with a clear gloss topcoat for extra durability and shine. Professional application guarantees a flawless result.
Add indirect lighting or wall-mounted fixtures to enhance the reflective effect. Incorporate textured or matte elements on walls to create contrast. Personalize with artwork or decor in matching monochrome shades to complete the look. Keep the space clutter-free to maximize the impact.
A monochrome high-gloss ceiling elevates your decor with a chic, modern edge. It’s a bold choice that commands attention and amplifies your space. Once installed, it’s low-maintenance and adds a high-end feel to your home. Ready to reflect your style?
23. Accent Color Pop Ceiling for Visual Focus

Looking to draw attention upwards and create a focal point? An accent color on the ceiling can define the room’s personality and add unexpected flair. It’s a bold move that instantly transforms your space from ordinary to extraordinary. If you love making statements, this idea is perfect.
Visualize a ceiling painted in a vibrant hue—turquoise, coral, or emerald—that contrasts with neutral walls. The pop of color draws the eye upward, anchoring the room’s decor. When paired with matching accessories or textiles, it creates a cohesive and energetic environment. It’s like giving your ceiling a splash of personality.
Use the accent color on the entire ceiling or just a section—like a border or central panel—for different effects. Pair with neutral or complementary wall colors for balance. This style works in dining rooms, bedrooms, or creative spaces. Seasonal updates can be as simple as repainting or adding decorative trim.
Start by taping off your ceiling area to achieve clean lines. Use high-quality ceiling paint in your chosen accent color, applying multiple thin coats for even coverage. Consider using painter’s tape to create geometric or freeform shapes. For a more polished look, add a matte or satin finish. Remove tape carefully once dry.
Add lighting fixtures like spotlights or pendant lights that echo the accent color. Incorporate decorative moldings painted in the same hue for extra impact. Personalize further with patterned or textured finishes within the colored section. It’s all about making your ceiling a lively focal point.
An accent color ceiling injects energy and personality into your decor. It’s a simple change with a big visual payoff that can refresh your entire room. Once done, it’s easy to update or change with new colors or patterns. Ready to make your ceiling stand out?
24. Textured Wallpaper Overlay on Pop Ceiling
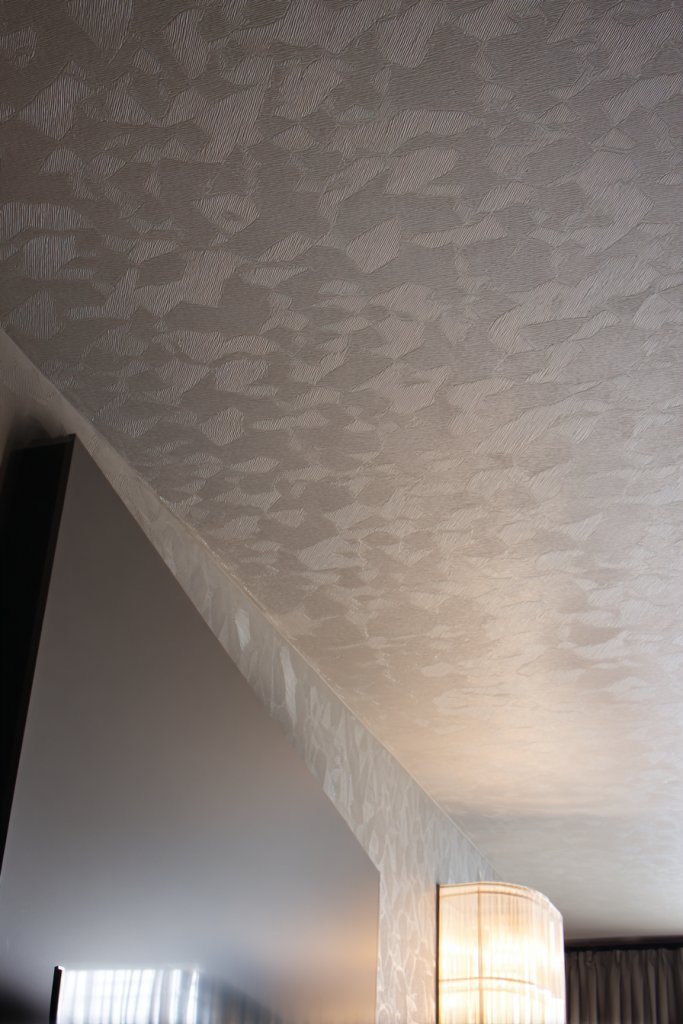
Craving a rich, tactile ceiling without a full renovation? Textured wallpaper overlays offer a quick, stylish solution to add depth and pattern. They’re perfect for hiding imperfections and creating a layered, sophisticated look. If you love tactile design, this idea is worth exploring.
Imagine intricate patterns—like damask, floral, or geometric—embossed or raised on your ceiling surface. The textured wallpaper creates shadows and highlights, giving a sense of depth and richness. When combined with subtle lighting, it enhances the tactile experience, making your ceiling a focal point of artistry.
Choose wallpapers with subtle textures for a refined look or bold patterns for a statement. Use neutral or metallic shades to complement your decor style. This approach suits traditional, eclectic, or modern interiors. Seasonal accents like metallic paints or trims can refresh the look over time.
Prepare your ceiling by cleaning and smoothing the surface. Apply a primer suitable for wallpaper adhesion. Carefully measure and cut the textured wallpaper to fit your ceiling dimensions. Use a high-quality adhesive and a smoothing tool to avoid bubbles. Finish with a sealant or protective coating for longevity.
Highlight the texture with directional lighting or concealed LED strips. Incorporate metallic or gloss finishes for extra shine. Personalize with painted motifs or border trims to frame the wallpaper. It’s a simple way to add tactile luxury and visual interest.
A textured wallpaper overlay turns an ordinary ceiling into an elegant feature. It’s a cost-effective, customizable upgrade that ages gracefully. Once installed, it’s low-maintenance and endlessly stylish. Ready to add tactile richness?
25. Smart Ceiling with Hidden Speakers and Mood Lighting
Dreaming of a home that’s both stylish and smart? A ceiling integrated with hidden speakers and mood lighting offers a futuristic touch that enhances entertainment and relaxation. It’s perfect for audiophiles and tech enthusiasts alike. If you want your ceiling to be as functional as it is fashionable, this idea is for you.
Picture a sleek ceiling with discreet speakers embedded within a textured or painted surface. Soft, adjustable LED lighting surrounds the speakers, creating a customizable ambiance. When activated, the system fills the room with music or ambient sounds, all while blending seamlessly into your decor. It’s like having a personal concert hall overhead.
Choose concealed or flush-mounted speakers that blend into the ceiling surface. Use smart lighting systems that can change color and intensity via app or voice control. This setup suits modern, minimalist, or high-tech interiors. Seasonal or mood-based lighting allows for endless customization.
Plan your layout carefully, locating speaker and lighting positions for optimal sound and light distribution. Use in-ceiling speakers with appropriate wiring and secure them within a supportive frame. Connect the system to a smart home hub and test all components before sealing. Finish with paint or textured finishes that hide all wiring and fixtures.
Sync the system with your favorite playlists or ambient sounds. Incorporate voice control for hands-free operation. Customize lighting scenes for different activities—dinner, movie night, relaxation. Personal touches like decorative trims or textured accents complete the high-tech look.
A smart ceiling elevates your home’s functionality and style, making everyday life more enjoyable. It’s a modern luxury that impresses guests and simplifies your routines. Once installed, it’s easy to control and maintain. Ready to upgrade your ceiling to a smart hub?
Conclusion
From sleek modern patterns to intricate decorative designs, the variety of Hall Pop Ceiling ideas showcased here can elevate any home. These inspiring options encourage you to experiment and personalize your space with confidence. Don’t hesitate to try one or combine several ideas to create a ceiling that truly reflects your style. Elevate your home decor today and make your hall a stunning centerpiece!