Ever wondered how a few simple touches can completely transform your home? DIY Easy Home Decor Ideas are incredibly popular because they allow you to personalize your space without breaking the bank, adding charm and character with minimal effort.
In this article, you’ll find a variety of creative and easy-to-follow ideas that will inspire you to make your home uniquely yours. From quick updates to more detailed projects, there’s something for everyone looking to add a personal touch and elevate their living environment.
1. Create Custom Mason Jar Candle Holders for Cozy Ambiance
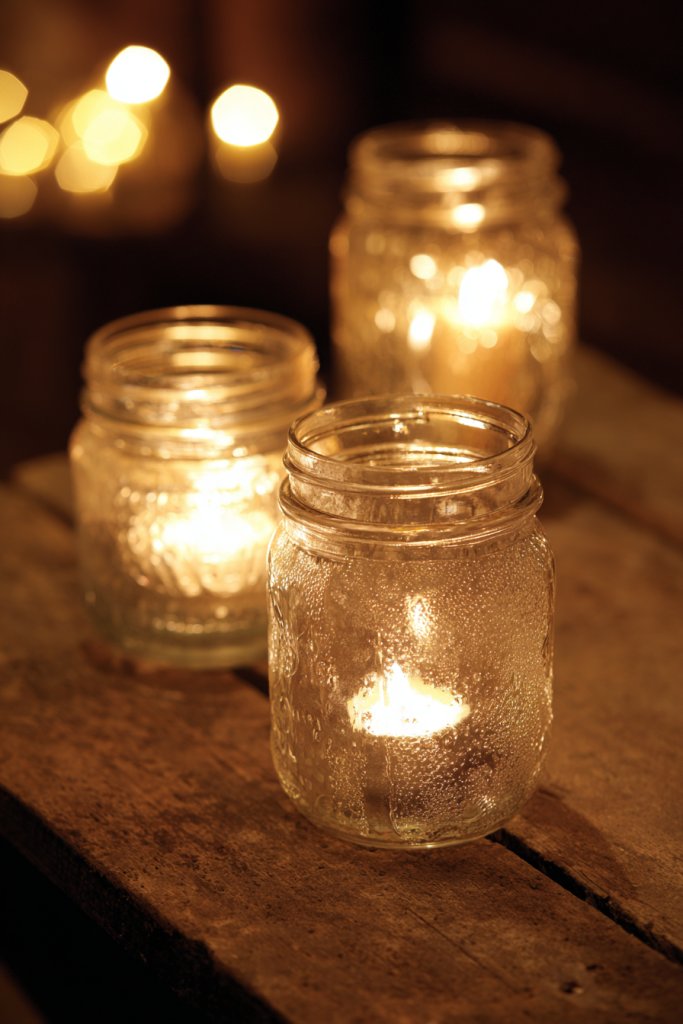
Ever find yourself craving that warm, inviting glow at home but tired of generic lighting options? Custom mason jar candle holders are the perfect way to add a personal touch and cozy ambiance without breaking the bank. They turn plain jars into charming decor pieces that make your space feel more intimate and relaxed. Plus, they’re super easy to customize to match your style.
Picture a collection of glass jars painted in soft pastel shades, wrapped with rustic twine, and filled with flickering candles. The warm light dances across textured surfaces, casting gentle shadows on your walls. Decorative stones or dried flowers inside add a touch of nature, creating a calming atmosphere. These holders sit on shelves, side tables, or mantels, instantly elevating your home’s coziness.
You can choose minimalist monochrome designs for sleek modern spaces or go for vibrant colors and patterns for boho vibes. Seasonal themes work well, like painted snowflakes for winter or bright florals for spring. DIY options include adding metallic accents or decoupage for extra flair. They fit perfectly in small apartments or larger homes, easily scaled up or down.
Start by collecting empty mason jars and choosing your paint or decorative elements. Use spray paint or acrylics for quick coverage, then add twine, ribbon, or fabric for embellishment. Insert candles—preferably LED for safety—and place stones or beads at the bottom for stability and visual interest. Seal with a clear spray if desired to protect your design. Arrange them on tables, window sills, or hang with twine for a rustic look.
Add initials, quotes, or seasonal motifs with paint or stickers to make each holder unique. Incorporate small charms or charms tied with string for a playful touch. Mix and match different jar sizes and colors for an eclectic display. Use scented candles inside to add a fragrant layer to your cozy setup. Personal touches turn these simple holders into heartfelt decor.
Creating your own candle holders is a fun project that boosts your creative confidence. They make thoughtful handmade gifts, too. With just a few supplies, you can transform everyday jars into statement pieces that warm up any room. Ready to craft your own cozy corner? Your home deserves a personal touch that’s as charming as you are.
2. Make a Chic Wall Chalkboard for Family Messages or Quotes
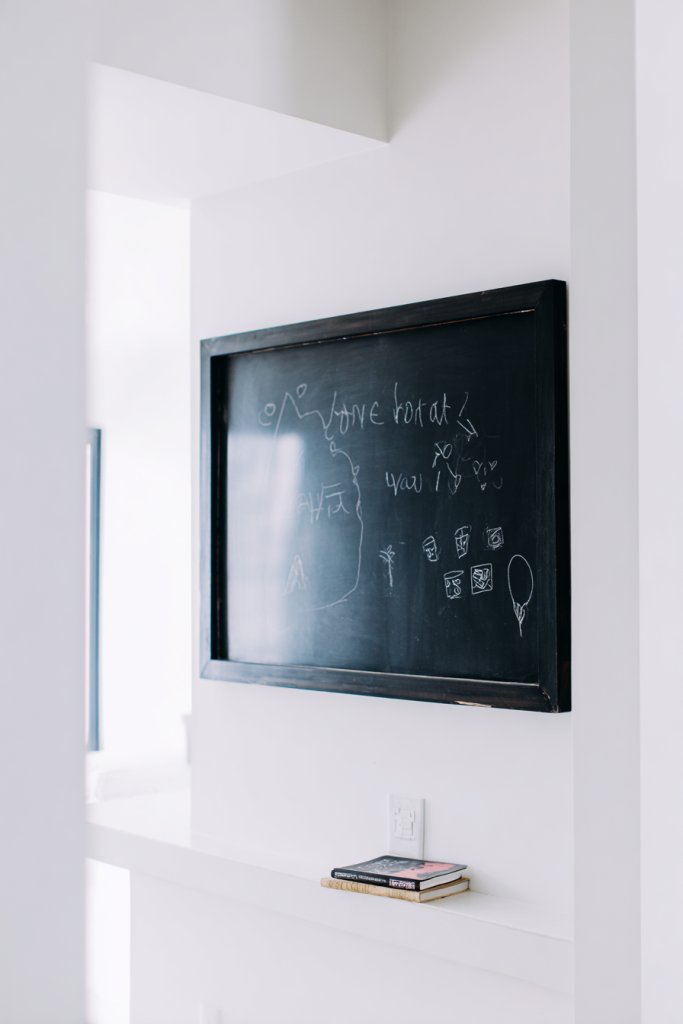
Ever wish you had a stylish yet functional spot for reminders, motivational quotes, or doodles? A chic wall chalkboard combines practicality with aesthetic appeal, making everyday communication more fun. It’s perfect for families, roommates, or anyone who loves to add a personal flair to their space. Plus, it keeps clutter off countertops.
Imagine a sleek framed chalkboard hanging above a kitchen counter or entryway. The surface is matte black with crisp white chalk lettering, showcasing inspirational quotes or your daily schedule. Surround it with decorative trim or paint in your favorite color to match your decor. Chalk dust softly settles on the frame, giving a rustic charm that invites frequent use.
Choose from various frame styles—vintage, modern, or boho—to suit your aesthetic. Seasonal themes like autumn leaves or holiday motifs can be easily added with colored chalks. Use magnetic strips or clips to hold small notes or photos. For compact spaces, opt for smaller boards or incorporate it into a larger gallery wall for visual interest.
Begin by selecting a sturdy frame and a smooth chalkboard surface or painting a piece of MDF with chalkboard paint. Attach the frame securely to the wall using appropriate anchors. Write your messages with quality chalk or chalk markers for clean lines. Seal the surface to prevent chalk dust from smudging if needed. Keep cleaning supplies nearby for quick updates.
Decorate the frame with washi tape, stencils, or painted accents. Add a small ledge beneath the board for holding chalk and erasers, or hang a stylized container nearby. Personalize it with your favorite colors or themes, like botanical prints or geometric shapes. This makes the chalkboard a central, ever-changing piece of your home.
A wall chalkboard turns a simple wall into a canvas for daily expression. It encourages organization and creativity while adding a chic touch to your space. Plus, it’s a budget-friendly way to update your decor without extensive renovations. Who knew a little chalk could make such a big impact?
3. Craft a Colorful Gallery Wall with DIY Framed Prints
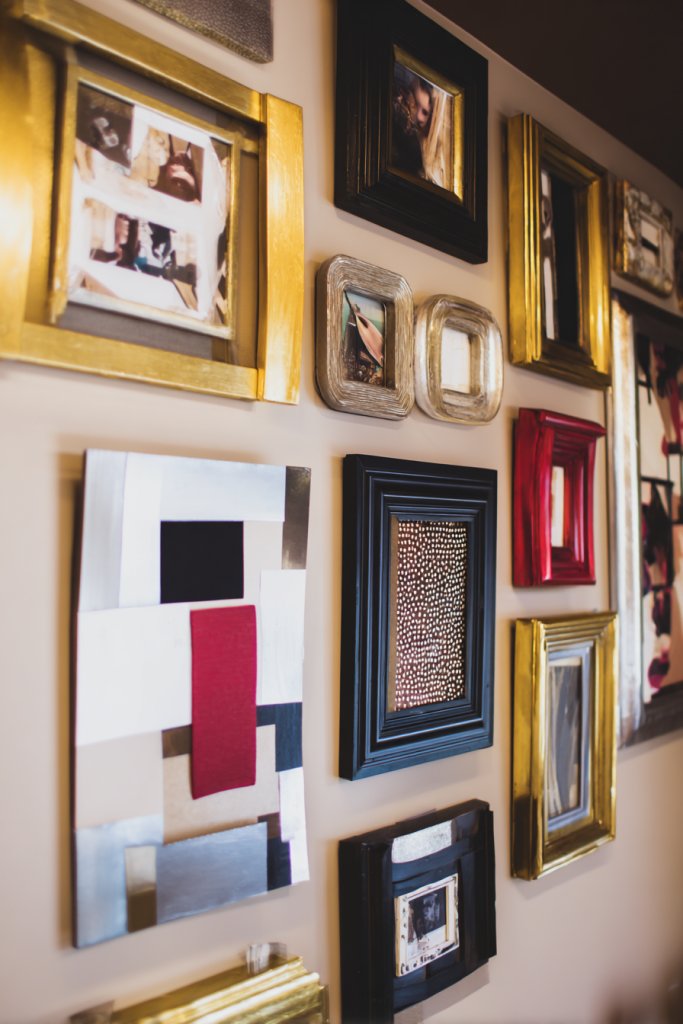
Looking to add personality and color to your walls without spending a fortune? A DIY gallery wall with framed prints is a fantastic way to showcase your favorite photos, quotes, or artwork in a cohesive and vibrant display. It’s a surefire method to turn blank walls into eye-catching focal points. Plus, it’s customizable to your style.
Picture a wall filled with mismatched but harmonizing frames in various shapes and sizes, all painted in bold hues or metallic finishes. Inside, you insert your favorite photos, abstract prints, or even fabric swatches. The arrangement feels lively yet curated, with textures and colors playing off each other. Soft lighting highlights the collection, creating a gallery-like ambiance.
Use different frame styles—vintage wood, sleek metal, or colorful plastic—to suit your decor theme. Mix in other elements like fabric or textured papers for depth. For small spaces, cluster a few high-impact prints rather than filling an entire wall. Seasonal themes or monochrome palettes can change the vibe quickly.
Start by selecting your favorite images or prints and choosing frames that complement each other. DIY options include spray-painting frames for a uniform look or repurposing thrifted finds. Arrange the frames on the floor first, then measure and mark their placement on the wall. Use picture hanging strips or nails, depending on weight. Keep spacing consistent for an organized look or intentionally uneven for a more eclectic feel.
Add decorative mats or borders around your prints for extra pop. Incorporate handwritten quotes on paper or fabric to add a personal touch. Rotate your prints seasonally or when you change your mood. Incorporating small DIY elements like painted accents on the frames can tie everything together beautifully.
Creating your own gallery wall is a rewarding project that reflects your personality. It encourages you to curate and display memories or inspirations uniquely tailored to you. With a little planning, you can transform a plain wall into a dynamic art collection that grows over time. Ready to turn your space into an artful showcase?
4. Style a Unique Macramé Plant Hanger (Without Plants) for Artistic Flair
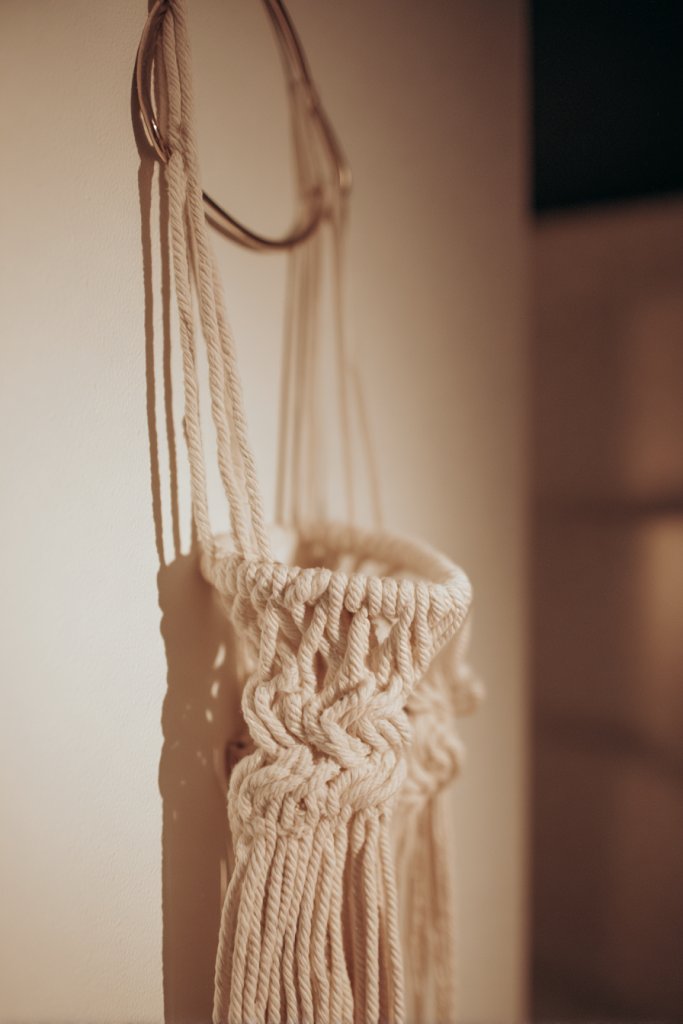
Ever wanted that boho chic vibe without committing to actual plants? A macramé plant hanger without plants offers a stylish, artistic touch to your decor while keeping your space clutter-free. It’s perfect for those who love texture and handcrafted details but prefer minimal greenery or no plants at all. Plus, it’s a creative project to showcase your knotting skills.
Imagine a beautifully knotted, intricate textile hanging from the ceiling or wall, with empty space inside or holding decorative objects like LED lanterns, shells, or ornaments. The textured cords create a focal point, adding depth and interest to any corner. The neutral tones or bold colors of the macramé contrast beautifully with smooth wall surfaces, giving a layered, tactile feel.
Use different knotting techniques—square knots, spiral knots, or fringe embellishments—to create varied textures. Choose natural fibers like cotton or jute for a rustic look, or synthetic fibers for vibrant colors and durability. Hang the piece near windows or above furniture to add visual interest. You can also incorporate metallic or painted cords for a modern twist.
Start by measuring the desired length and selecting durable cords. Practice different knots to achieve your preferred pattern. Attach the top loop to a sturdy hook or ceiling anchor. Decorate the cords with beads, tassels, or metallic accents if desired. Hang the finished piece in an empty corner or above a console table for an artsy statement. No need for actual plants—just pure decorative appeal.
Create symmetrical or asymmetrical designs based on your taste. Embellish with charms or painted elements for a custom look. Use different cord thicknesses or colors to match your decor palette. Incorporate LED string lights or fairy lights for a subtle glow that elevates the artistic vibe. It’s all about making it uniquely yours.
Mastering macramé knots can be surprisingly relaxing and rewarding. Even without plants, these hangers add a tactile, handcrafted element that exudes personality. They’re a conversation starter and a testament to your creativity. Ready to craft a piece that’s both functional and artful? Let your inner artisan shine!
5. Assemble a Rustic Wooden Tray for Serving or Decorative Display

Tired of boring trays that lack character? A rustic wooden tray combines function with farmhouse charm, making it a versatile piece for serving or decor. It adds warmth and texture to your space, whether you’re entertaining or simply organizing. Plus, building one yourself means you get exactly the style you want.
Imagine a weathered wood tray with distressed paint or natural grains, filled with candles, coasters, or small plants. It sits on a coffee table or countertop, creating a cozy vignette. The rough textures and imperfect finishes evoke a rustic, inviting atmosphere. When light hits the wood, it accentuates the natural grains and knots, adding depth.
Choose different wood types—pine, cedar, or reclaimed pallets—for varied textures. Customize the finish with stain, paint, or sealant to match your decor theme. You can add handles or metal accents for a more industrial look. For seasonal decor, layer with textiles or small decorative objects that suit the time of year.
Start by sourcing or repurposing wood planks, then cut to your desired size. Sand the surface thoroughly to remove splinters. Apply stain or paint in a distressed or smooth finish. Attach handles using screws, or leave the edges raw for added rustic charm. Seal with a clear finish for durability. Arrange on your table or countertop, and you’re ready to serve or style.
Decorate the tray with stenciled sayings, painted patterns, or monograms. Use it to display everyday essentials or seasonal accessories. Incorporate leather or metal handles for a custom touch. For a layered look, place a cloth or runner underneath and add seasonal accents on top. Personal touches make it an heirloom-like piece.
A rustic wooden tray is a simple DIY project that adds instant charm to any room. It’s a functional piece that can be tailored endlessly—perfect for beginners and seasoned crafters alike. Once finished, it’s satisfying to see your handiwork holding everything from coffee mugs to decorative objects. Your home will thank you for the warm, handcrafted touch.
6. Design a Custom Fabric-Covered Bulletin Board for Organization and Style
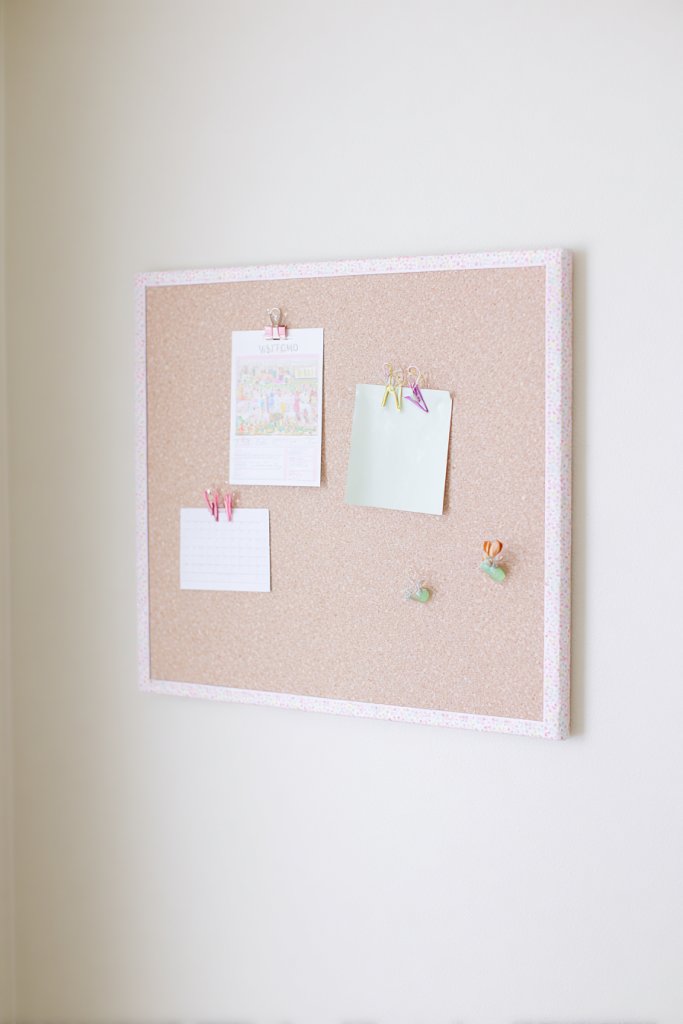
Struggling with cluttered notes and lost reminders? A custom fabric-covered bulletin board offers a stylish solution for staying organized. It combines practicality with a personal touch, making your space look intentional and neat. Plus, it’s a quick project that transforms a plain wall into a functional art piece.
Envision a large cork board wrapped in vibrant or neutral fabric, secured with staples or spray adhesive. The fabric adds softness and color, elevating the functional surface. Pins and clips hold notes, photos, or small mementos, creating a colorful collage. It hangs on the wall with a decorative frame that complements your decor style.
Choose fabrics that match your color palette or seasonal themes—think bold prints or subtle textures. Use contrasting piping or trim for a polished look. For a more eclectic vibe, mix fabrics or add decorative patches. You can also incorporate magnetic strips or clipboards for added versatility.
Start by cutting your fabric slightly larger than the cork board. Spray the board with adhesive or stretch the fabric tightly around the edges, securing with staples or tacks. Attach a decorative frame or paint the edges for a finished look. Hang the board at eye level, and decorate with colorful pins and clips. Keep it updated as your needs change.
Add decorative touches like tassels, embroidered patches, or painted accents around the edges. Personalize with monograms or quotes stitched onto the fabric. Use different fabrics for sections dedicated to different areas—work, family, or hobbies. This creates a dynamic, personalized organizational hub.
A fabric-covered bulletin board is a simple way to keep your space tidy and stylish. It encourages you to stay organized without sacrificing aesthetic appeal. Plus, customizing it with your favorite fabrics makes it uniquely yours. Once complete, you’ll enjoy a clutter-free, charming spot for your daily reminders.
7. Make a DIY Fabric Wall Hanging Using Tapestry Techniques
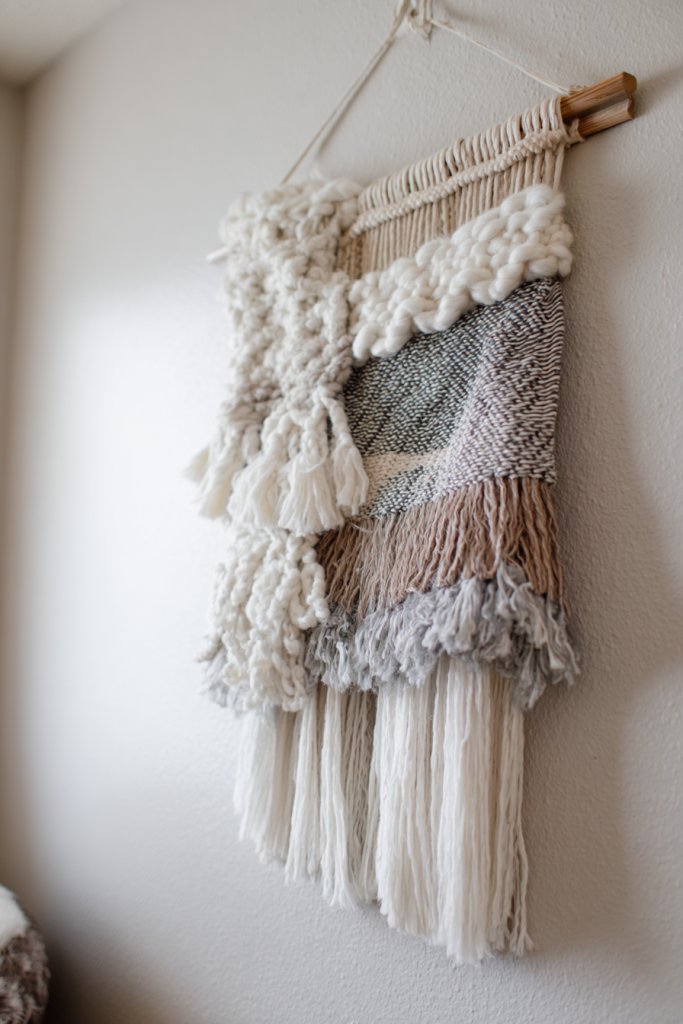
Looking to add texture and personality to your walls without committing to artwork? A DIY fabric wall hanging offers a cozy, artisanal vibe that’s easy to customize. It’s perfect for softening stark walls or creating a focal point with tactile interest. Plus, it’s a fun craft project anyone can try.
Picture a vibrant textile suspended from a wooden dowel or branch, with fringed or knotted ends flowing freely. The fabric features woven patterns, tassels, or layered textiles in your favorite colors. It drapes beautifully over a wall, adding softness and depth to the space. The tactile fibers invite touch and create a warm, inviting atmosphere.
Use different textile techniques—braiding, knotting, or weaving—to achieve various textures. Incorporate mixed materials like yarn, ribbons, or embroidery for added dimension. Hang in a single panel or layer multiple fabrics for a boho look. Seasonal colors or themes can be swapped out easily.
Select fabrics with complementary textures and colors. Attach the fabric to a wooden dowel or branch using clips, knots, or sewn loops. Hang the piece on a nail or hook, adjusting for the desired length and flow. Add decorative elements like tassels or beads for extra flair. Position it at eye level for maximum visual impact.
Create a signature style by choosing fabrics with patterns or textures that reflect your personality. Add painted or embroidered details to make it unique. Combine different lengths for a layered effect. Incorporate metallic or contrasting fibers for a modern twist, or keep it natural and earthy.
A fabric wall hanging is a versatile DIY project that combines artistry with home decor. It’s a cozy addition that elevates your style effortlessly. With each piece, you build confidence and discover new creative skills. Ready to craft a soft, textured centerpiece for your wall?
8. Personalize a Set of DIY Painted Coasters for Practical Decor
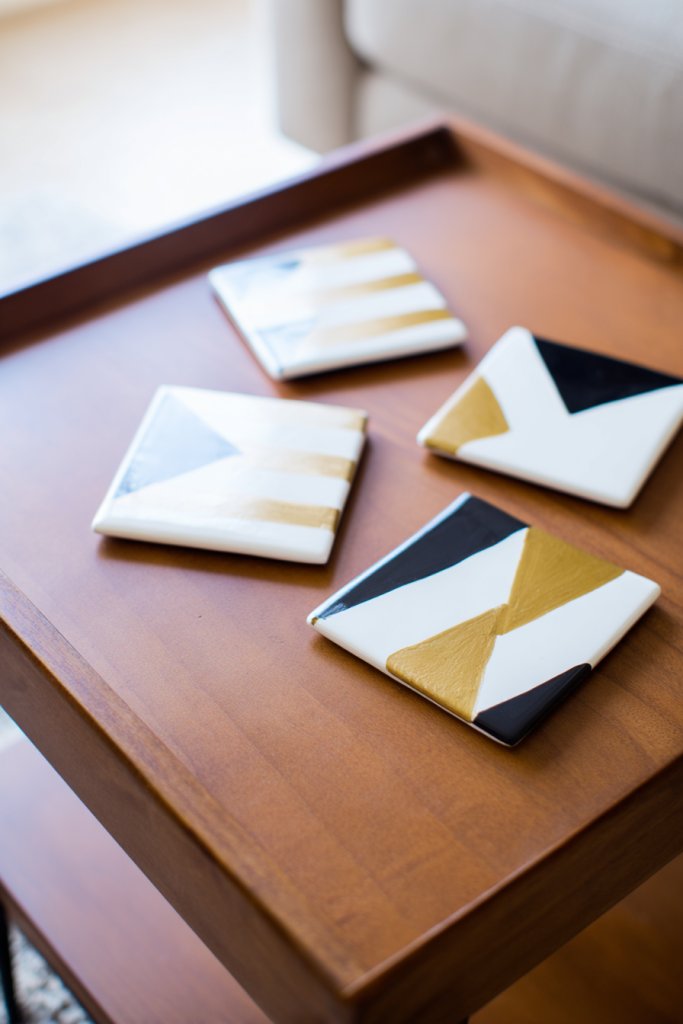
Tired of boring, generic coasters that don’t reflect your style? DIY painted coasters are a fun way to add personality and protect your surfaces with flair. They’re practical, easy to customize, and make great gifts. Plus, you get to showcase your artistic side, even if you’re a beginner.
Visualize a set of ceramic tiles painted with playful patterns, monograms, or abstract designs. Each coaster has a glossy or matte finish, depending on your preference. Bright colors or metallic accents create eye-catching pieces that stand out on your table. They sit neatly together or can be used separately, adding a splash of personality.
Use painter’s tape for clean lines, stencils for consistent shapes, or freehand designs for a personal touch. Incorporate themes like geometric patterns, floral motifs, or quotes. For a cohesive look, stick to a color palette or mix and match for an eclectic vibe. Different shapes—square, round, or hexagon—add variety.
Start with plain ceramic tiles or cork bases. Use acrylic paint, ceramic markers, or decoupage techniques for decorating. Seal each coaster with a clear waterproof sealant to protect your artwork. Arrange them on a tray or store in a decorative jar. These DIY coasters combine style with function effortlessly.
Add personal touches like initials, favorite quotes, or small illustrations. Mix different designs for variety or create themed sets—coastal, boho, or minimalist. Incorporate textured elements like glitter or metallic foil for extra sparkle. Regularly update the set with new designs or seasonal motifs.
Personalized coasters turn a simple everyday item into a statement piece. They’re a practical way to showcase your creativity and add a custom touch to your home. Making them boosts your confidence and inspires further DIY projects. Ready to craft your own set that’s both functional and fabulous?
9. Create a Unique Decor Tray with Decoupage or Stenciling
Want to add a personalized touch to your serving ware or display pieces? A decor tray with decoupage or stenciling brings individuality and style to simple surfaces. It’s a quick DIY upgrade that makes your space feel curated and custom. Plus, it’s a creative outlet that’s surprisingly easy to master.
Picture a plain wood or plastic tray transformed with vintage paper, botanical prints, or geometric stencils. The surface is layered with decorative paper or painted patterns, sealed with a glossy finish. It now serves as a charming centerpiece for coffee tables or vanity setups. The intricate designs catch the light and invite admiration.
Choose themes or color schemes that match your decor—rustic, modern, or eclectic. Use decoupage with tissue paper, magazine cutouts, or fabric for texture. Stencils allow for bold patterns like chevron, floral, or abstract shapes. Add handles or painted edges for a polished look.
Start by selecting a sturdy tray and preparing the surface with light sanding if needed. Cut or choose your decorative paper or stencil shapes. Apply decoupage glue or stencil paint, carefully adhering or painting in layers. Seal with a clear varnish for durability. Attach handles if desired for easier carrying.
Incorporate your favorite images, quotes, or patterns to make it truly yours. Use metallic or glitter accents for extra flair. Customize the size or shape for specific needs—like a jewelry tray or snack platter. Personal touches turn a simple tray into a treasured keepsake.
A decoupage or stenciled decor tray is a versatile project that combines design with function. It inspires you to experiment with different techniques and materials. When finished, it adds a handcrafted charm that elevates your space effortlessly. Your DIY skills will thank you.
10. Build a Simple, Stylish Floating Shelf Using Brackets and Wood
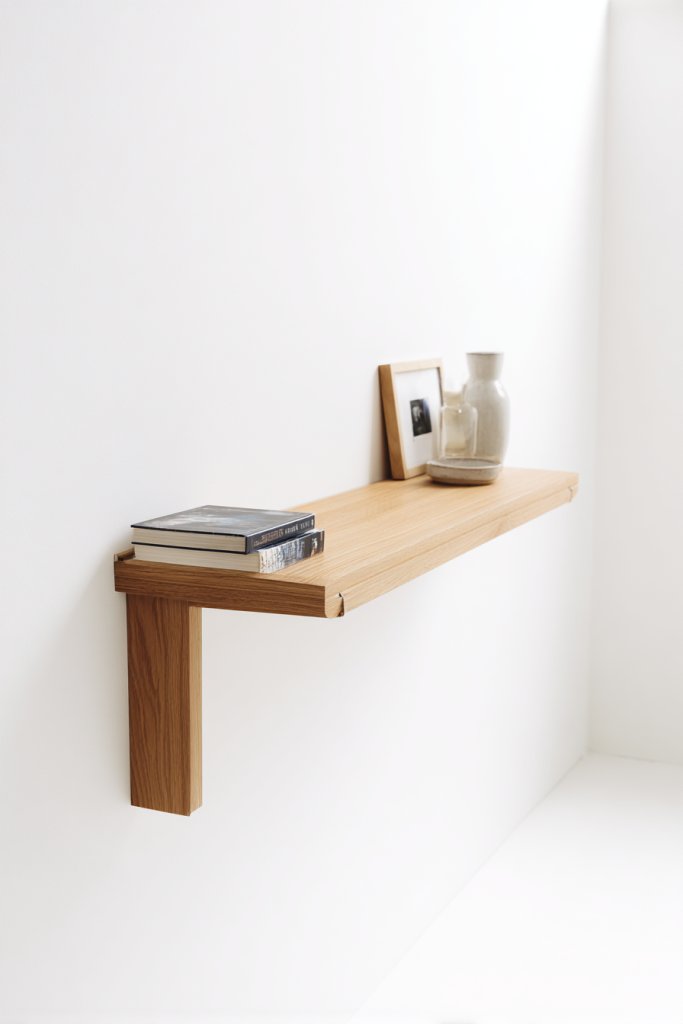
Looking for a sleek way to display your favorite items without cluttering surfaces? A floating shelf provides a minimalist yet stylish solution. It’s perfect for showcasing books, decorative objects, or even plants—if you’re feeling brave. Best of all, building one is a straightforward DIY that adds instant modern charm.
Imagine a narrow wooden plank mounted seamlessly to the wall with hidden brackets, creating the illusion of a floating surface. The natural or painted wood adds warmth and texture, contrasting with smooth painted walls. Accessories like framed photos, candles, or sculptural objects sit confidently on the shelf, adding layers of visual interest.
Use different wood finishes—light, dark, or painted—to match your decor. Vary the length and thickness for different visual weights. Install multiple shelves at varying heights for a dynamic look. For small spaces, a single narrow shelf works best; larger rooms can handle multiple tiers.
Start by measuring the desired length and marking the wall. Drill holes for the brackets and attach them securely to wall studs or anchors. Cut your wood to size, sand edges smooth, and finish with stain or paint. Position the shelf on the brackets, ensuring level alignment. Mount everything tightly for safety and stability.
Add decorative brackets in contrasting finishes for a custom look. Incorporate small LED strip lights underneath for a soft glow. Decorate with your favorite small objects—books, jars, or framed quotes—keeping the display curated and intentional. Change items seasonally for fresh appeal.
A floating shelf elevates your decor with simplicity and style. It encourages DIY confidence and offers endless customization options. Once installed, it’s a chic yet functional upgrade that makes your space feel more open and curated. Ready to add sleek storage and display space effortlessly?
11. Design a Monogram Wall Art with Wooden Letters and Paint
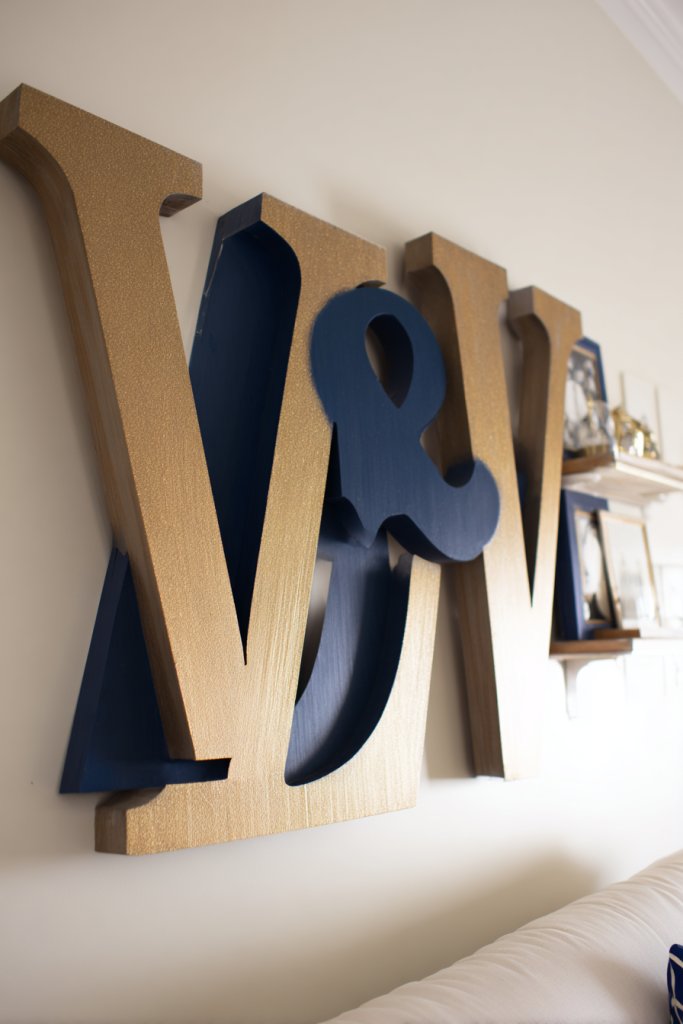
Want to add a meaningful, personalized touch to your walls? Monogram wall art with wooden letters combines sentiment with style, making your space truly yours. It’s a simple way to celebrate your family, initials, or favorite words. Plus, it’s an easy DIY project that packs a big visual punch.
Picture large wooden initials painted with bold colors or metallic finishes, hung prominently above a sofa or entryway. Decorate with stenciled patterns, glitter, or decals for extra flair. The letters create a focal point that draws the eye and adds a layer of personality. They’re often complemented by other decor elements like hooks or small shelves.
Choose between natural wood for a rustic look or painted finishes for a modern vibe. Use different fonts or styles for a layered effect. Incorporate additional motifs like hearts, stars, or floral patterns. For a family monogram, combine multiple initials in a creative arrangement.
Purchase or cut your wooden letters, then sand edges smooth. Paint or stain in your chosen colors, applying multiple coats for even coverage. Add decorative details with brushes or stencils. Mount on the wall using nails, hooks, or adhesive strips. Position at eye level for maximum impact.
Add embellishments like washi tape, decals, or hand-painted designs. Personalize further with small accessories like hanging charms or decorative ribbons. Mix sizes and colors for a dynamic display. Change or update the design over time to keep it fresh and relevant.
A monogram wall art not only decorates but also celebrates your identity. It’s a DIY project that feels sophisticated and personal. Once completed, it’s a proud display of your creativity and style. Ready to craft your own meaningful initials?
12. Make a DIY Photo Garland with String and Paper or Fabric Banners
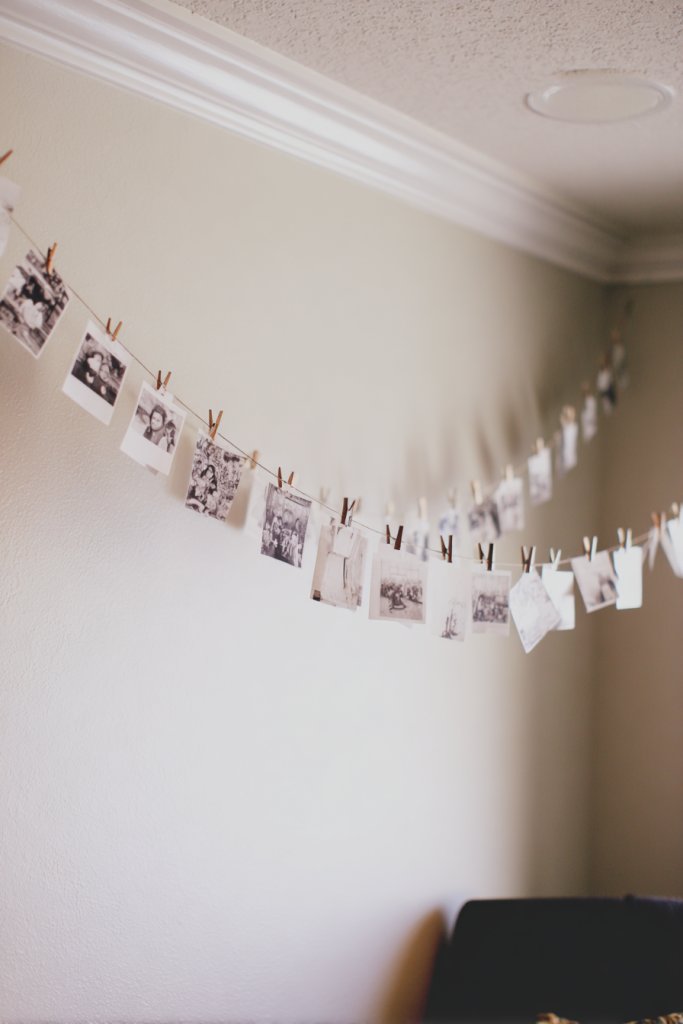
Looking for a simple way to add warmth and personality to your space? A DIY photo garland with string and banners creates a cozy, personalized atmosphere. It’s perfect for special occasions or everyday decoration. Plus, it’s an easy craft that instantly makes any room feel more inviting.
Imagine a string of twine or wire hung across a wall, with photos clipped or pinned along the length. Interspersed with fabric or paper banners featuring patterns, quotes, or motifs, the garland adds layers of texture and color. The photos and banners sway gently, creating movement and visual interest. It’s a charming, handcrafted display that captures memories.
Use different materials—burlap, linen, or patterned paper—for banners that match your decor style. Incorporate string lights or fairy lights for a soft glow. Vary the length and spacing for a dynamic look. Personalize with handwritten messages, doodles, or themed images for holidays or seasons.
Cut banners from fabric or paper in desired shapes and patterns. Attach photos using mini clothespins, clips, or washi tape. Hang the string at eye level with hooks or nails. Arrange the photos and banners for balance and symmetry, then secure everything tightly. Update the photos regularly to keep your decor fresh.
Add decorative elements like tassels, beads, or painted details to banners. Incorporate special dates, quotes, or favorite sayings. Use themed colors for holidays or celebrations. Mix in small mementos or souvenirs for a truly personalized touch.
A photo garland is a delightful way to showcase memories while adding a handmade touch. It encourages creativity and personal expression. Once hung, it creates a warm, nostalgic ambiance that’s perfect for any space. Ready to craft your own memory lane?
13. Assemble a Colorful DIY Vase Using Repurposed Containers and Paint
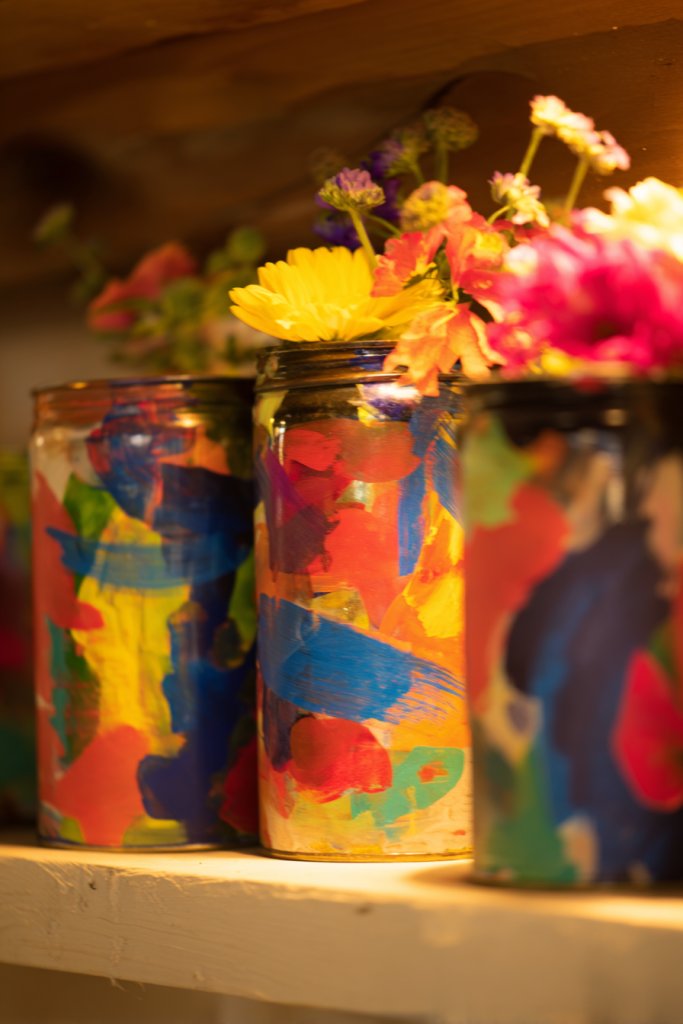
Tired of plain, boring vases that don’t match your decor? A colorful DIY vase made from repurposed containers is a budget-friendly way to add vibrancy and personality. It’s perfect for flowers, utensils, or just as standalone decor. Plus, giving new life to old jars feels pretty satisfying.
Picture an assortment of glass jars, tins, or bottles painted in bright hues or metallic finishes. They sit grouped on a shelf or windowsill, holding fresh or faux flowers, or simply standing alone as decorative objects. Textured or patterned paint adds visual interest, making each piece unique. The glossy or matte finish reflects your style.
Use painter’s tape to create stripes or geometric designs, or sponge on color for a textured effect. Mix different container shapes and sizes for an eclectic display. For a seasonal touch, add glitter, decoupage, or small charms. Coordinate colors with your room’s palette for a cohesive look.
Clean and dry your containers thoroughly. Apply a primer if needed, then paint with your chosen colors, layering for opacity. Use stencils or tape for precise designs. Seal with a clear coat for durability. Fill with flowers or decorative stones, or leave empty as art pieces. Display on shelves or tables.
Add labels, quotes, or initials with paint or stickers for extra customization. Incorporate themed elements—like sea shells for a beach vibe or feathers for boho style. Use different textures and finishes to give each vase a distinct personality. Change decorations seasonally for a fresh look.
A DIY vase is a fun, eco-friendly project that sparks creativity. It transforms everyday containers into artful accents. They make thoughtful gifts and can be tailored completely to your taste. Once finished, they brighten any space with color and personality. Ready to upcycle and beautify?
14. Craft a Personalized Key or Jewelry Organizer from Upcycled Items
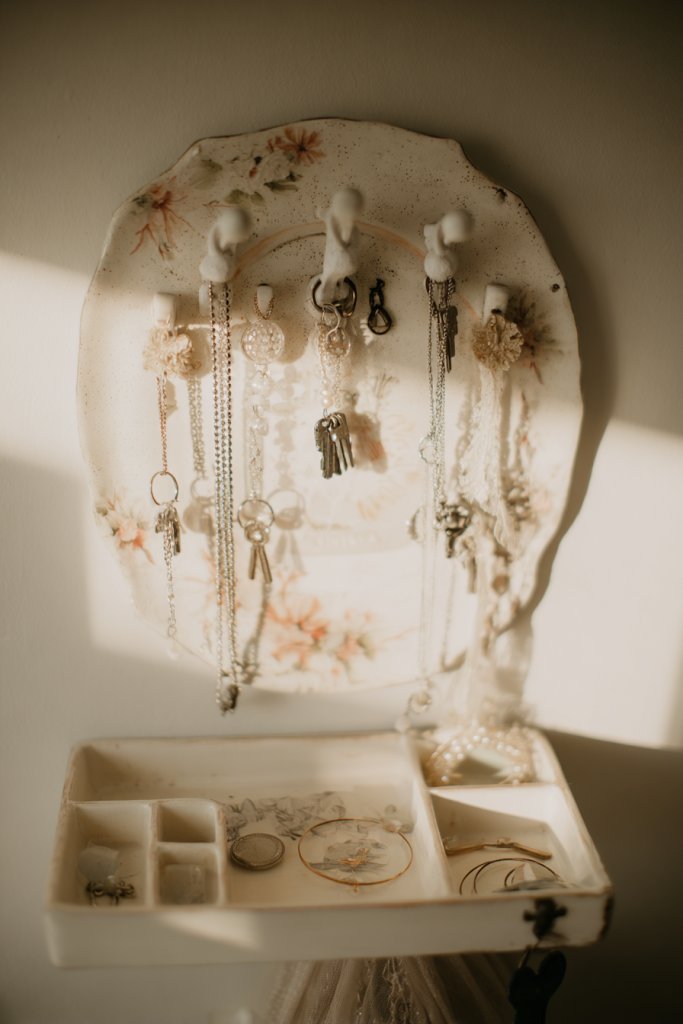
Ever lose your keys or struggle with tangled jewelry? A personalized organizer made from upcycled items solves this chaos with style. It’s a practical project that keeps your essentials neat and adds a fun, crafty vibe to your entryway or bedroom. Plus, it’s a great way to reduce waste.
Envision a vintage plate or tray decorated with hooks, clips, or small containers, all mounted on a wall or placed on a table. It’s decorated with paint, decals, or fabric for a personalized look. Keys hang in one spot, necklaces drape over hooks, and bracelets are organized in small compartments. The arrangement is both functional and charming.
Use different upcycled items—old picture frames, tin cans, or wooden pallets—as bases. Decorate with paint, washi tape, or decoupage to match your decor. Incorporate hooks, knobs, or even small baskets for versatility. For a rustic look, keep materials natural; for modern, go sleek and minimal.
Gather your upcycled items and clean thoroughly. Attach hooks or knobs with screws or strong adhesive. Decorate and paint as desired, then mount on the wall or set on a surface. Organize your keys, jewelry, or small accessories according to your routine. Regularly update or change the look for freshness.
Add initials or motifs with paint or stickers. Incorporate decorative elements like faux flowers or charms for a whimsical touch. Mix and match materials for eclectic appeal. Use different containers for different item types—earrings, rings, or keys—and keep everything within reach.
An upcycled key or jewelry organizer is a practical, eco-conscious DIY that adds personality and order. It’s a satisfying way to reuse old items and showcase your style. Once complete, you’ll enjoy a clutter-free space that’s uniquely yours. Ready to craft your own functional art?
15. Decorate Plain Throw Pillows with Fabric Paint or Embroidery

Ever find your sofa cushions looking a bit plain or uninspired? Maybe your throw pillows are missing that personal touch or unique flair that makes your space truly yours. It’s frustrating when a room feels generic, even when you’ve invested in décor. Luckily, transforming simple pillows into statement pieces is easier than you think, and it costs less than buying new ones.
Picture a soft cream throw pillow with a hand-stitched monogram in bold, contrasting thread. Or imagine a vibrant geometric pattern painted with stencils that pop against neutral fabric. The textures vary from embroidered embellishments to smooth painted surfaces, adding depth and personality. These pillows sit casually on your sofa, instantly elevating the vibe of your living room with a handcrafted charm.
You can customize pillows to match seasonal themes—think snowflakes on winter, florals for spring, or abstract art for a modern look. Different fabric types, from linen to velvet, can influence the feel and style. For a more boho aesthetic, use tassels or embroidery, while minimalist rooms benefit from sleek painted motifs. Mix and match sizes and shapes to create an eclectic, curated look.
Start by choosing plain pillows in your preferred size and fabric. Select fabric paint or embroidery floss suited for the material. Use stencils or freehand designs for painted patterns, and a fine needle for embroidery. Make sure to secure your fabric to prevent slipping, and work in a well-lit area. Allow paint to dry completely before fluffing and arranging on your couch. For embroidery, patience is key—don’t rush, or your stitches might look uneven.
Add your initials, favorite quotes, or even small doodles that reflect your personality. Use metallic or glow-in-the-dark paint for extra fun effects. You can also sew on decorative patches or appliqués for a textured finish. Swap out covers seasonally or for special occasions to keep your decor fresh and personalized. The goal is to make each pillow a mini canvas for your creativity.
Custom pillows turn your space into a reflection of your style, and the best part is, you don’t need to be a pro. With some basic supplies, you can produce professional-looking results that impress friends and family. Plus, these DIY projects boost your confidence to experiment with other home crafts. So go ahead, get creative and make your living space uniquely yours!
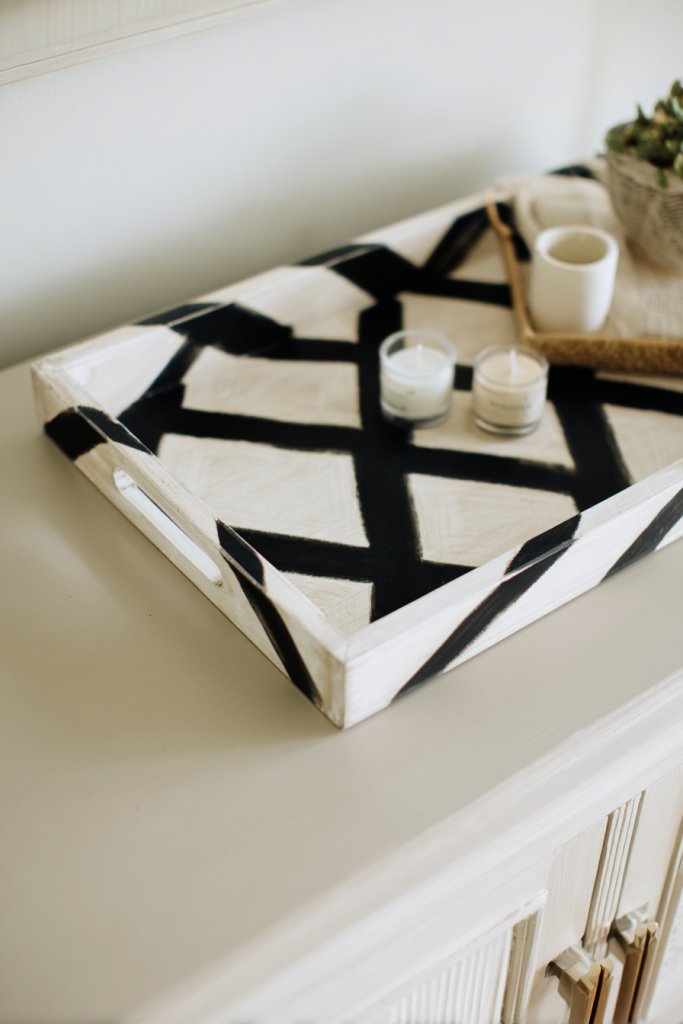
16. Make a DIY Decorative Tray Using Canvas or Cardboard and Paint
Tired of cluttered surfaces and boring trays? Sometimes, the plain trays you find in stores just don’t match your vibe or are way too expensive. Creating a custom decorative tray can organize your essentials and add a splash of personality—all without breaking the bank. It’s the perfect way to elevate your coffee table or vanity with minimal effort.
Imagine a sturdy cardboard base covered in a vibrant, patterned fabric or painted with bold geometric shapes. The edges are finished with decorative tape or a simple border, giving it a polished look. The surface hosts a mix of candles, a stack of books, or a small sculptural piece, transforming the tray into a focal point. The colors and textures draw the eye, making even a simple setup feel curated and stylish.
You can tailor your tray to match seasonal themes—use metallic paints for holiday sparkle or pastel shades for spring freshness. For a rustic vibe, opt for distressed wood effects or chalk paint finishes. Small, portable trays work great for serving snacks, while larger ones serve as decorative catch-alls. Creative borders, like tassel trim or decorative washi tape, can add extra flair.
Begin by selecting a sturdy base—cardboard, plywood, or even an old tray you want to refurbish. Prime the surface if using paint, then apply your chosen design—stencils, freehand painting, or decoupage with decorative paper. Seal your work with a clear acrylic spray for durability. Attach decorative tape along the edges for a clean finish, or glue on embellishments for extra texture. Let everything dry thoroughly before using.
Add your initials, favorite quotes, or motifs that resonate with your style. Incorporate metallic or glitter accents for a luxe feel. For a layered look, use different paint textures or patterns in sections. You could also attach small handles or knobs for easy carrying or lifting. Rotate the design seasonally to keep your décor fresh and aligned with your mood.
This DIY tray proves that you don’t need fancy materials to craft something beautiful. It’s an accessible project with big visual impact, perfect for beginners. Once you see how a little paint can transform a plain surface, you’ll be inspired to explore more home crafts. Your guests will wonder where you bought it—trust me, they’ll be shocked when you say you made it yourself!
17. Design a Custom Mirror Frame with Decorative Tape or Paint
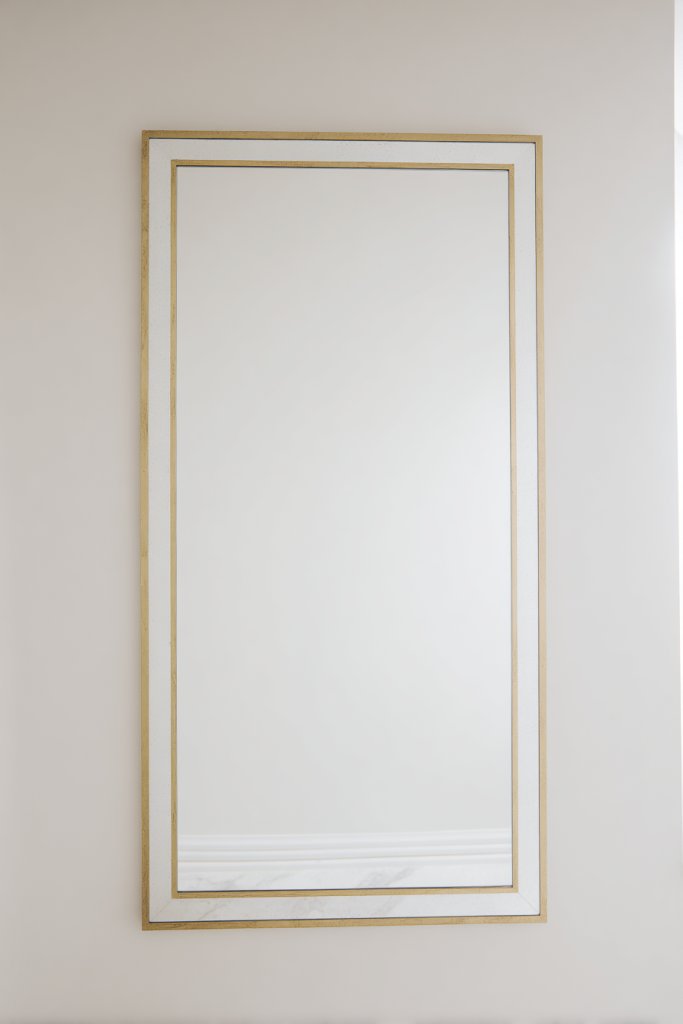
Ever feel like your mirror is just a functional piece, lacking personality? A plain mirror can seem boring or uninspiring, especially in a space that calls for a bit of flair. Giving your mirror a custom frame instantly boosts its style quotient and can tie your room’s decor together. Plus, it’s a quick, budget-friendly upgrade that anyone can do.
Visualize a sleek, frameless mirror transformed by a bold border of colorful washi tape or painted accents. The tape adds a playful pattern, while paint can create a sophisticated, modern look. The frame’s design can range from geometric shapes to organic, free-flowing lines, depending on your taste. The overall effect is a personalized art piece that reflects your style, making your reflection even more fabulous.
Choose colors and patterns that complement your existing decor—metallics for glam, soft pastels for shabby chic, or monochrome for minimalism. Seasonal variations can include glitter accents or metallic tape for holiday sparkle. You can also experiment with different widths of tape or layered paint techniques for a textured, multi-dimensional look. This method works well in bathrooms, bedrooms, or entryways.
Start by cleaning your mirror thoroughly. Decide on the design—either tape borders or painted patterns—and gather your supplies. For tape, measure and cut strips to fit your design, then carefully apply along the edges. For paint, mask off areas for clean lines, then use painter’s tape for geometric shapes or freehand for organic patterns. Use a small brush to add details or accents. Allow everything to dry fully before unmasking or hanging.
Add metallic or glitter paint for a luxe touch, or incorporate your favorite colors for a pop of personality. Use stencils for intricate patterns or initials for a truly personalized look. You might also hang small decorative hooks or attach embellishments for extra detail. This project allows endless customization options, making your mirror a statement piece.
A custom mirror frame proves that small details can make a big difference. It’s a simple way to refresh a space without a full overhaul. When you see your reflection framed in your unique design, you’ll feel a sense of pride and creativity. It’s a small project with a big impact—perfect for boosting your confidence in DIY home decor.
18. Build a Simple Wooden Crate or Box for Storage and Decor
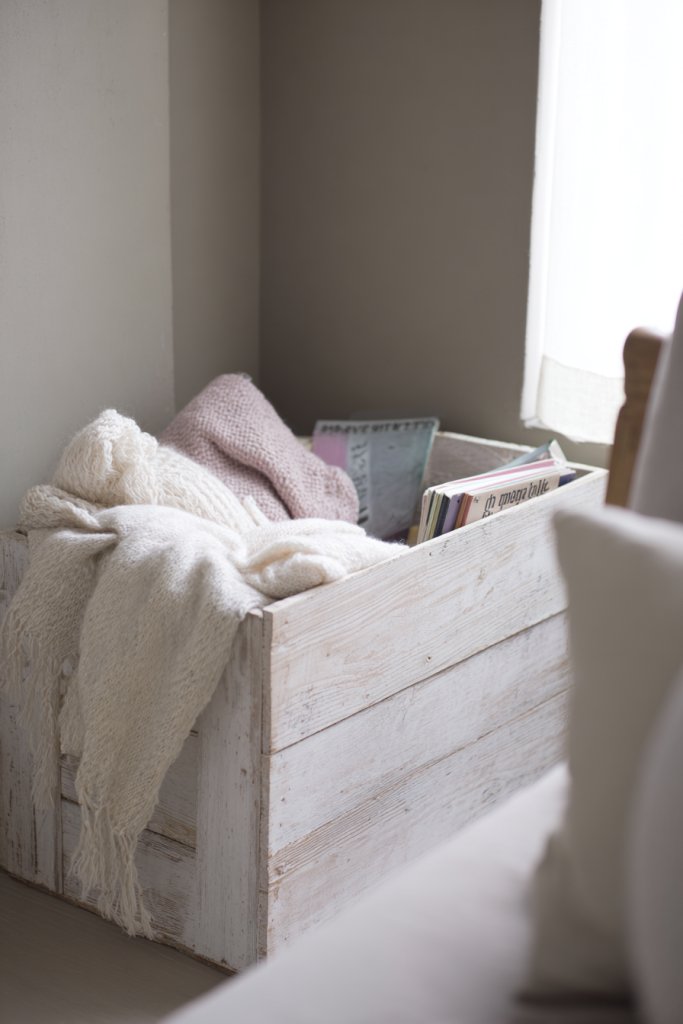
Clutter piling up and no stylish storage solution in sight? Wooden crates and boxes are the perfect answer—functional, versatile, and surprisingly easy to customize. They can hide away clutter or serve as decorative elements, giving your space a rustic or modern vibe. Plus, they’re budget-friendly and can be repurposed from old wood or purchased cheaply.
Picture a weathered wooden crate painted in a soft pastel or stained to highlight its natural grain. It’s filled with cozy throws, toys, or magazines, and placed next to a sofa or in a corner. Or imagine a sleek, black-painted box used to display decorative objects or house smaller accessories. The textures range from rough-hewn to smooth, blending seamlessly into farmhouse, industrial, or contemporary styles.
Use different finishes—paint, stain, or leave it natural—to match your decor. Small crates can be stacked for modular storage, while larger ones serve as coffee table accents. You can add handles, label tags, or decorative trims for a personalized touch. Seasonal decorations, like faux greenery or fabric liners, can change the look for different times of year.
Start with choosing the right size and type of wood—pallet wood works well for rustic looks. Sand surfaces smooth to avoid splinters. Apply paint or stain for your desired finish, then seal with a protective coat. Attach handles or hinges if you want a lid or easy access. For added durability, reinforce corners with metal brackets. Use a drill to assemble pieces securely, and customize with stencils or decals if desired.
Label your crates for organization—think ‘towels,’ ‘toys,’ or ‘craft supplies.’ Decorate with stenciled patterns or decals for a custom look. Add fabric liners inside for a softer touch or to hide contents. You can also attach small casters for mobility or stack them to create storage towers. These crates become both practical and charming decor elements.
Making your own wooden crate or box is a great way to add a personal touch to your storage. It’s a project that combines practicality with creativity and can be adapted endlessly. Seeing your DIY crate in action will give you confidence to try other woodworking or refurbishing projects. Your home will look more organized and thoughtfully decorated—win-win!
19. Craft a DIY Wall Clock with Reclaimed Materials or Personal Art
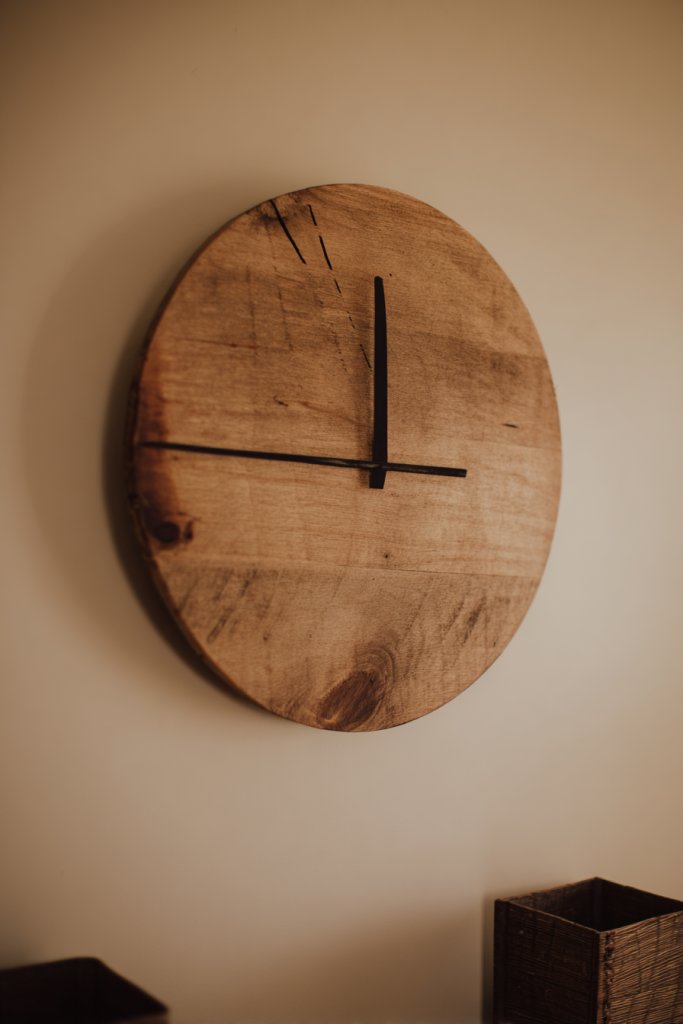
A plain wall clock is functional but often uninspiring. Want to turn a basic timepiece into a focal point? Creating your own wall clock using reclaimed materials or personal art gives your space a truly unique touch. It’s a chance to showcase your personality while keeping track of time in style. Plus, it’s a fun project that doesn’t require special skills.
Visualize a round wooden disc made from reclaimed wood, painted with bold numbers or left with a natural finish. The clock face is decorated with your favorite patterns, quotes, or even a collage of personal photos. The hands are simple, contrasting metal or painted to match your theme. It hangs proudly on your wall, drawing attention with its distinctive, handcrafted look. It’s more than just a clock; it’s a piece of art.
Match the clock’s design to your decor style—rustic, modern, vintage, or eclectic. Use colorful paints, stencils, or decoupage to add personality. Sizes can vary from small, delicate pieces to large statement clocks. For a minimalist look, stick with monochrome or subtle patterns. Seasonal accents, like holiday motifs or metallic finishes, can make it versatile.
Begin by sourcing reclaimed wood or sturdy cardboard. Cut the base into your desired shape—circle, square, or even abstract forms. Decorate the face with paint, collage, or stencils. Attach clock movement mechanisms, ensuring the hands are balanced and move freely. Mount a hook or hanging wire on the back for easy installation. Test the mechanism and make sure it keeps accurate time.
Add initials, favorite symbols, or meaningful quotes to make it personal. Use metallic or glitter paints for a luxe touch. Incorporate different textures—wood grain, fabric patches, or textured paint—to create visual interest. You can also attach small decorative elements or motifs that reflect your hobbies or personality. This clock will be a conversation starter for sure.
Building a DIY wall clock pushes your creative boundaries and results in a functional art piece. It’s rewarding to see your personal touch on something so visible every day. Once completed, you’ll feel more confident tackling other home projects. Your space will feel more curated, personalized, and uniquely yours.
20. Personalize a Set of DIY Coiled Rope or Twine Baskets for Organization
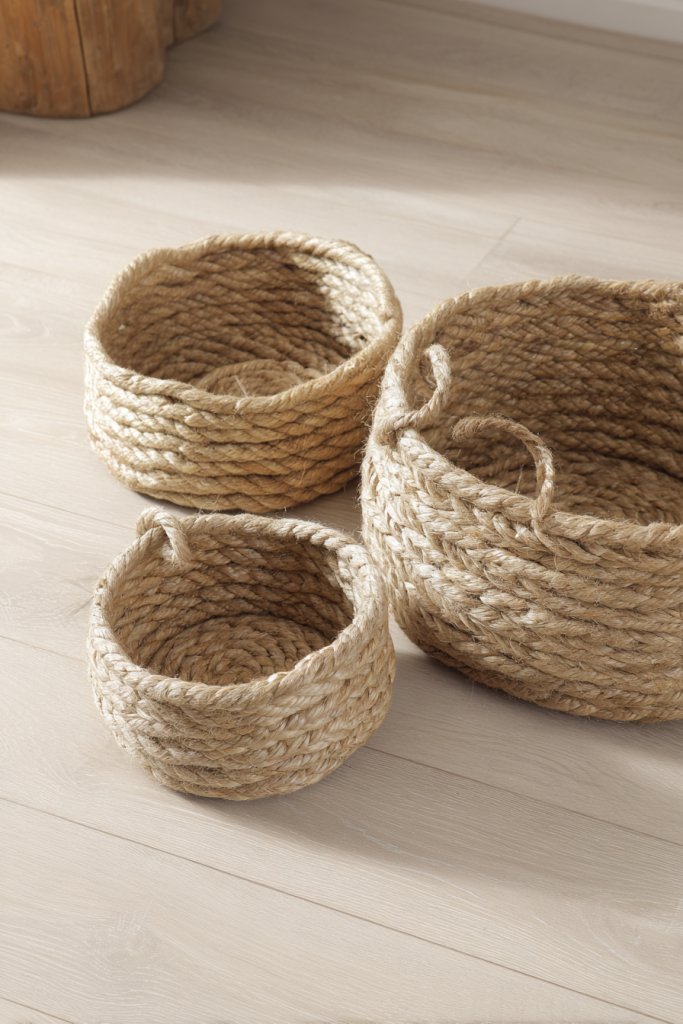
Cluttered drawers and messy shelves can make your space feel chaotic. Want an easy way to organize small items that also looks stylish? Coiled rope or twine baskets are the perfect solution—functional, affordable, and customizable. They turn everyday organization into a creative craft, making tidying up more enjoyable.
Imagine a soft, neutral-colored rope basket with a chunky, woven texture sitting on your shelf, holding remote controls or keys. Or picture a brightly colored twine basket with a tight spiral pattern, perfect for storing craft supplies or snacks. The natural, tactile quality of the coiled material adds warmth and texture, transforming plain storage into a decorative element. They look cozy and inviting, blending into boho, rustic, or modern interiors.
Choose different colors or thicknesses of rope to match your aesthetic. Use natural jute for a rustic look or bright acrylic yarn for playful vibes. Incorporate decorative elements like fabric liners or painted accents. Vary the size and shape—small bowls, medium baskets, or large bins—to suit your needs. These baskets work well in bedrooms, offices, or bathrooms.
Start by winding the rope or twine into a tight spiral, gluing each layer securely with hot glue. Use a sturdy base, like cardboard or a plastic container, to help shape the basket. Continue coiling until you reach your desired height. Reinforce the edges with extra glue or a decorative trim. For a finished look, add a fabric lining or paint the exterior. Allow glue to dry completely before use.
Personalize with painted patterns, initials, or colorful accents. Use different textures of yarn or rope for visual interest. Attach handles made from extra rope or fabric for easy carrying. Label baskets with DIY tags or decorative stickers. Mix and match sizes for a cohesive, eclectic look that adds personality to your organization system.
Creating your own coiled baskets proves that organization can be stylish and easy. These projects boost your confidence in handling basic craft supplies and inspire further DIY home upgrades. When you see how a simple coil can turn into a functional piece, you’ll feel motivated to explore more creative storage ideas. Plus, your home will look more curated and less cluttered—just how it should be.
21. Decorate Plain Candle Holders with Washed-Out or Metallic Paints
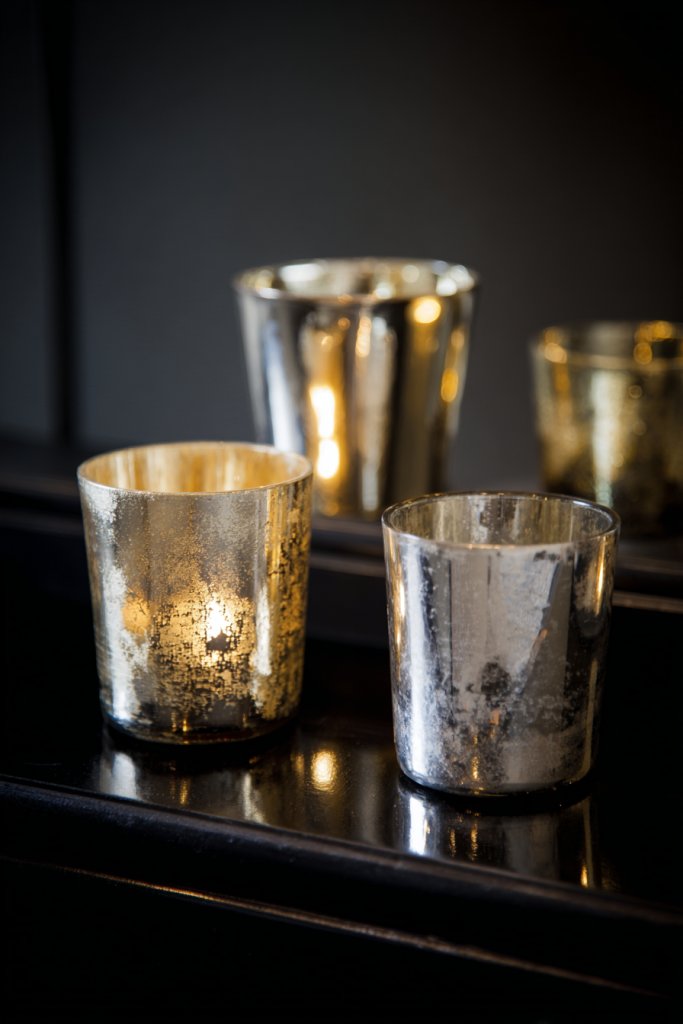
Plain candle holders can look dull and uninspired, especially when you want to add a touch of elegance or glam without buying new decor. Rethinking your existing holders with a splash of paint can completely change their look. It’s a simple, cost-effective way to elevate your ambiance and match your decor theme effortlessly.
Visualize a simple glass holder brushed with metallic gold paint, catching the light beautifully. Or imagine distressed, washed-out finishes on ceramic holders that give a vintage feel. The textures range from sleek metallic sheen to matte, weathered looks, creating visual interest. When lit, they cast warm, shimmering glows that set the mood in any room, from romantic dinners to cozy nights.
Use different colors to match seasonal palettes—silver and blue for winter, pastels for spring, or bold jewel tones for a modern look. Metallic paints add a luxe feel, while washed-out or distressed finishes suit rustic or shabby chic styles. Apply patterns or stencils for a more intricate design, or keep it simple for understated elegance. These painted holders can be grouped or used as standalones.
Start by cleaning your candle holders thoroughly. Choose your paint—metallic, matte, or distressed—based on your desired effect. Use a small brush or spray paint for smooth coverage, and consider layering different finishes for depth. For washed-out effects, dilute the paint with water and lightly brush onto the surface, then wipe excess. Allow ample drying time between coats. Seal with a clear protective spray if you want longevity.
Add personalized touches like initials, small decals, or decorative motifs with contrasting paint. Experiment with two-tone designs or ombre effects for a trendy look. You can also embellish with rhinestones, charms, or washi tape for added flair. Switch out candles seasonally and coordinate holder colors for a cohesive aesthetic. These small updates make a big impact.
Transforming simple candle holders proves DIY can be both fun and stylish. It encourages you to see everyday objects as potential canvases for creativity. Once you master this, you’ll feel inspired to personalize other decor pieces around your home. Brighten your space with your own artistic touch and enjoy the process as much as the result.
Conclusion
With a wide range of DIY home decor ideas, you now have countless opportunities to infuse your space with personality and style. Whether you choose simple accents or more involved projects, these ideas are perfect for anyone eager to make their home truly their own. Get started today and turn your house into a beautiful reflection of you!