Your teen’s room is more than just a space—it’s a reflection of their personality, passions, and evolving style. That’s why teen room ideas are so popular; they allow for creativity, self-expression, and a personal touch that makes the space truly theirs.
In this article, you’ll find a diverse range of ideas sure to inspire transformation, from cozy reading nooks to bold color schemes and stylish decor accents. Whether you’re decorating on a budget or aiming for a trendy makeover, these tips will help you craft a space that is both functional and fabulous for your teen’s unique vibe.
1. Custom Wall Decals for a Unique Backdrop
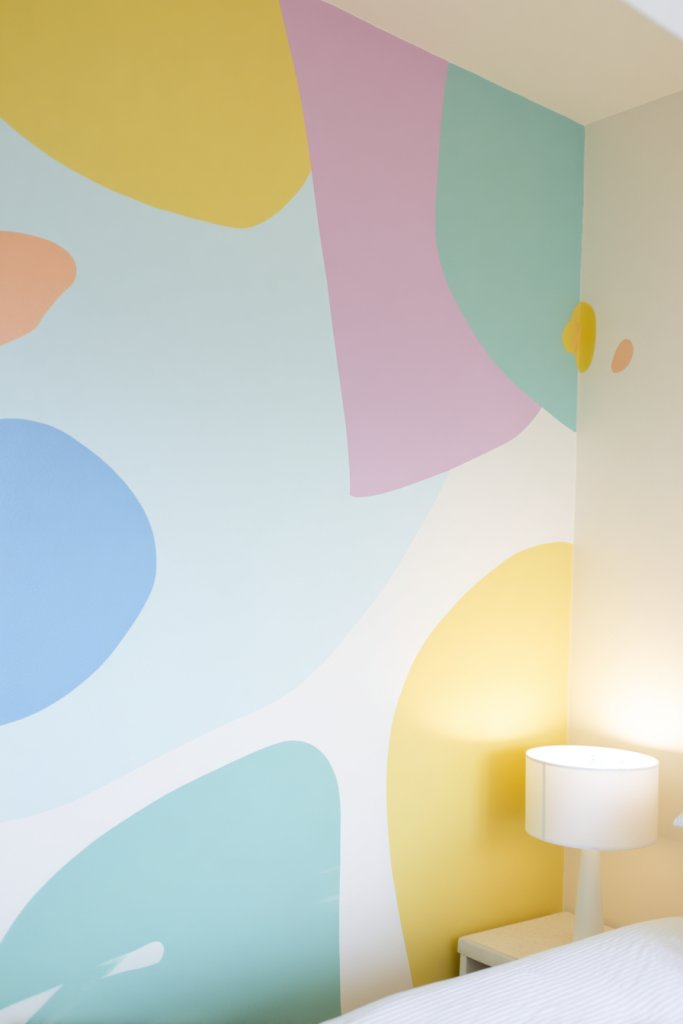
Ever feel like your bedroom walls are just blank canvases begging for personality? A boring backdrop can make the whole room feel dull and uninspired. Custom wall decals are the perfect fix, giving your space a personal touch without the hassle of paint or permanent fixtures. They let you express your style and mood instantly.
Imagine large, removable decals featuring your favorite quotes or playful patterns that instantly catch the eye. Bright colors, fun shapes, or even abstract designs can transform a plain wall into a vibrant focal point. The decals cling seamlessly and peel off easily, leaving no damage behind. They create a layered, textured look that adds depth and personality.
You can choose decals that match different themes, from minimalist monochromes to bold, colorful motifs. For seasonal updates, swap out decals to reflect holidays or new interests. Small decals work well above desks or beds, while larger ones dominate a feature wall. They suit all room sizes and can be tailored for a playful or sophisticated vibe.
Start by measuring your wall space to determine decal size. Pick designs that resonate with your personality—quotes, patterns, or motifs—and ensure they’re removable. Clean the surface thoroughly before application to avoid bubbles or misalignment. Use a level or ruler for straight lines and smooth out air bubbles with a squeegee or credit card. Most decals come with easy-to-follow instructions. For perfect results, apply in a dust-free environment.
Personalize decals further by combining different shapes or layering them with fabric or textured wallpaper. Add a few metallic or glitter accents to make them pop. You could also create a mural by combining several decals into a scene or theme. Custom decals with your initials or favorite symbols make it uniquely yours. Change them seasonally to keep your room feeling fresh.
Custom wall decals turn your room into a true reflection of yourself, boosting confidence and creativity. They’re affordable, fun, and super easy to update, making your space feel alive and adaptable. With a little effort, you can craft a backdrop that’s as unique as your personality and impress your friends every time they visit.
2. Repurposed Vintage Furniture with a Modern Twist
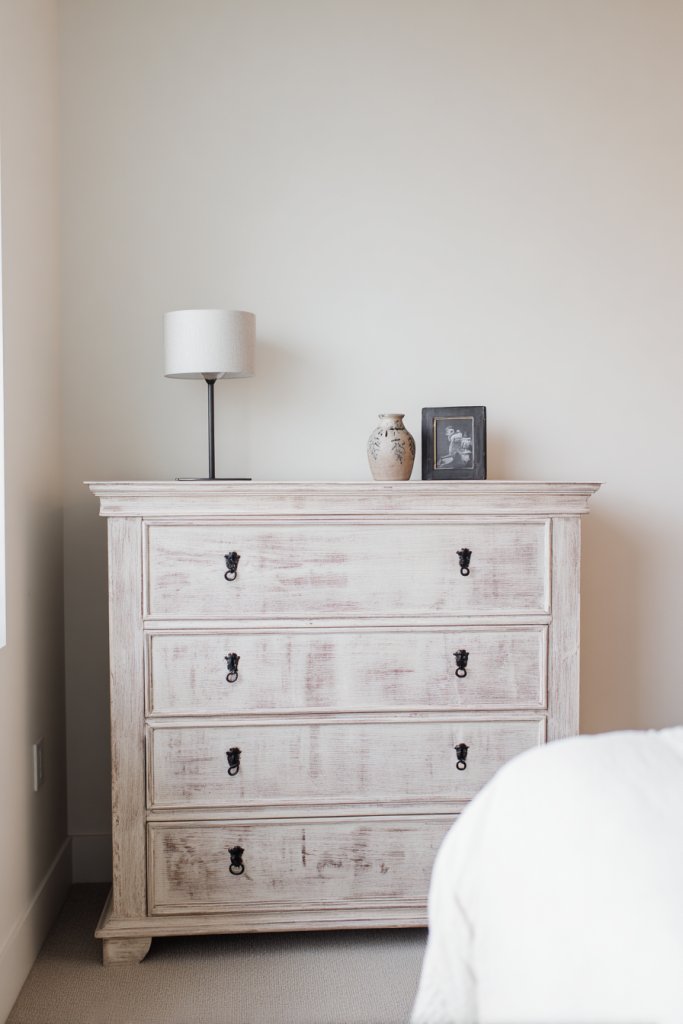
Tired of generic furniture that feels soulless? Vintage pieces bring history and character into your space, but sometimes they need a fresh update. Repurposing thrifted or old furniture with a modern touch makes your room stand out and shows off your creativity. It’s eco-friendly and budget-savvy too.
Picture a classic wooden dresser painted in a sleek matte black or pastel shade, with new hardware added for a contemporary feel. Or a vintage armchair reupholstered in trendy fabric with bold patterns or textures. Combining old craftsmanship with modern design elements creates a layered, eclectic look that’s both charming and stylish. The contrast between eras makes your furniture a conversation starter.
Choose furniture that fits your room’s size and style—mid-century modern, shabby chic, or industrial. Update with a fresh coat of paint, new knobs, or upholstered cushions to match your personality. Seasonal accents like cozy throws or decorative pillows can complement the look. Larger pieces can serve as statement elements, while smaller refinished items add personality on shelves or desks.
Scan thrift stores, flea markets, or online marketplaces for vintage furniture within your budget. Sand the surfaces thoroughly before painting or reupholstering. Use primer and quality paint suitable for furniture, applying multiple thin coats for durability. Replacing hardware with modern options gives a quick, impactful upgrade. For upholstery, measure and cut fabric carefully, stapling or sewing for a clean finish. Protect your new look with a sealant if needed.
Decorate repurposed furniture with personalized accessories like stenciled patterns or hand-painted details. Mix and match different styles for an eclectic vibe or keep it uniform for a streamlined look. Add decorative trays, storage baskets, or unique lamps nearby to enhance functionality. Personal touches like vintage signs or custom labels give it a one-of-a-kind feel.
Upcycled vintage furniture adds charm and history to your space, making it distinctly yours. It’s a rewarding project that boosts your confidence in DIY and design skills. Plus, you’ll love knowing you’re giving old furniture a new life, all while creating a cozy, personalized environment that’s both stylish and sustainable.
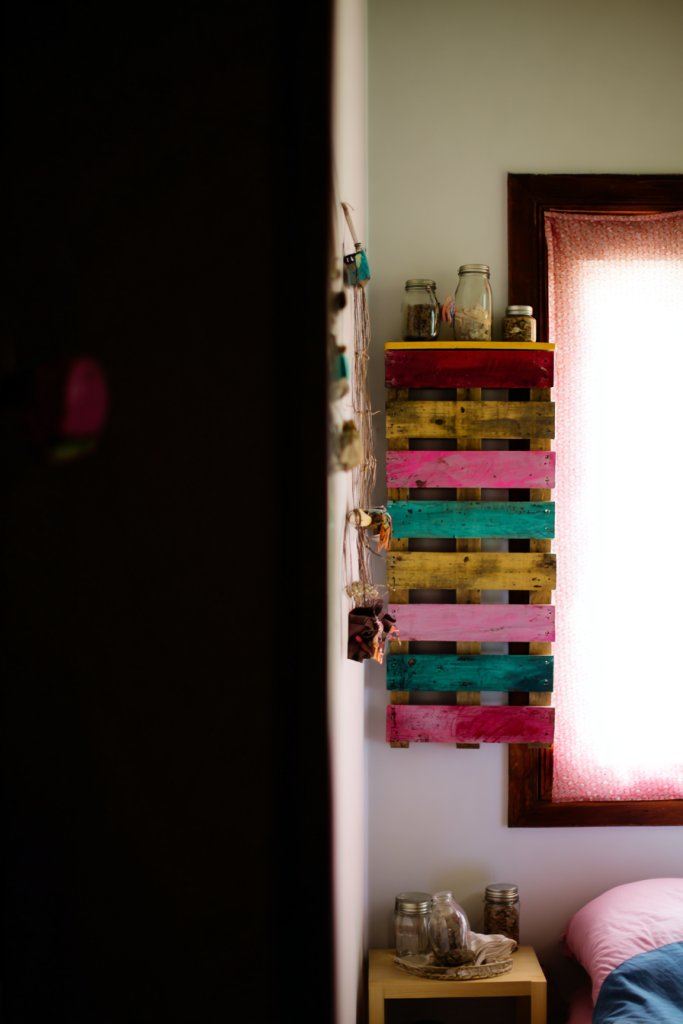
3. Customized Shelving with Personal Items
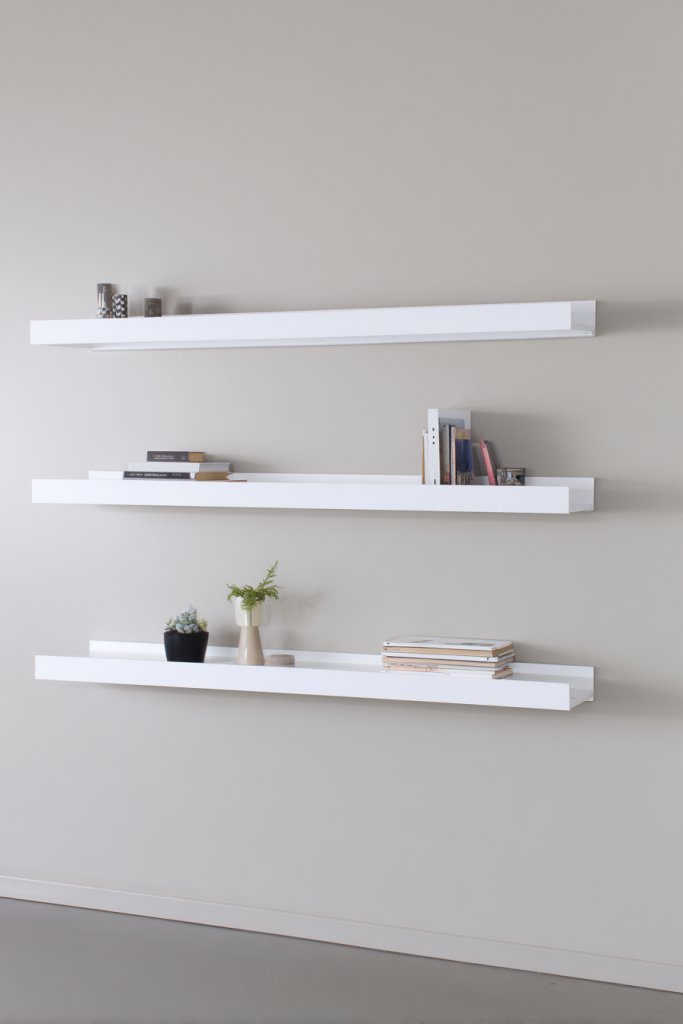
Is your room cluttered and chaotic, making it hard to relax or focus? Customized shelving helps you organize while showcasing your personality. It’s a simple way to add structure and style, turning plain walls into curated art displays. Plus, it makes finding your favorite books or collectibles way easier.
Envision open shelves painted in your favorite color, filled with neatly arranged books, trinkets, or DIY crafts. Incorporate different sizes and shapes of shelves for visual interest, creating a dynamic display. Decorative brackets or supports add a touch of industrial or modern flair. Items are arranged in a way that reflects your interests—music, travel, or art—giving your room a personal narrative.
Use floating shelves for a sleek, minimalist look or more elaborate corner units for a bold statement. Adjust the spacing depending on the items you want to display—closer for small collectibles, wider for large books or framed photos. Seasonal accessories or themed decor can be swapped in and out easily. For a cozy vibe, mix in textiles or storage baskets underneath.
Select sturdy wall anchors and appropriate brackets for your shelf weight. Paint or stain the shelves beforehand to match your decor. Measure and mark the wall for even spacing, using a level to keep everything straight. Secure the shelves with screws, ensuring they’re flush and stable. Arrange your items thoughtfully, balancing visual weight and personal significance. Keep frequently used items within easy reach for convenience.
Add small decorative accents like vintage cameras, framed photos, or potted textiles (like fabric baskets). Use labels or tags on containers for a tidy look and easy access. Incorporate LED strip lighting underneath for a subtle glow that highlights your collection. Change displays seasonally or whenever you want a refresh, making your space feel alive and personalized.
Customized shelving transforms blank walls into storytelling showcases, boosting your confidence in interior styling. It’s a flexible solution that grows with your interests and needs. When your shelves reflect your passions, your room becomes an inspiring sanctuary you love to spend time in.
4. Creative DIY Bulletin Board or Pinboard
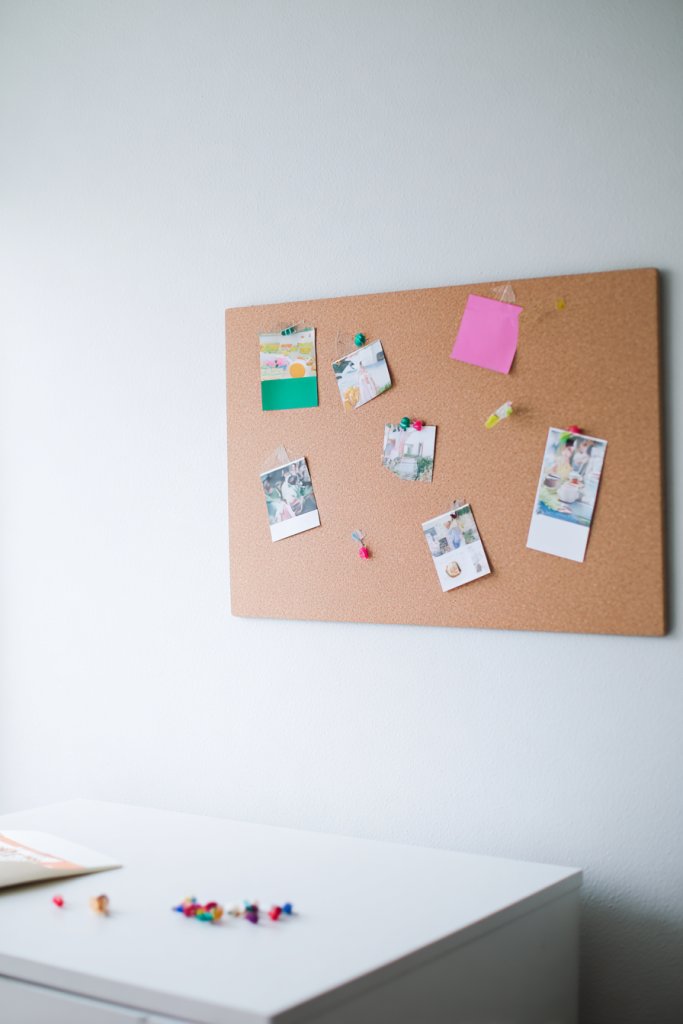
Ever feel overwhelmed by cluttered desks and scattered notes? A DIY bulletin board keeps your important stuff organized while adding a creative touch. It’s a fun project that turns a plain wall or space into a functional, stylish hub. Plus, it’s super customizable to match your vibe.
Imagine a fabric-covered corkboard in your favorite color or pattern, adorned with notes, photos, and inspiring quotes. You can add decorative borders or trim for extra flair. Pins hold up reminders, tickets, or doodles, creating a collage of your life and goals. The texture of fabric or DIY painted frames adds richness and warmth to your room.
Cover a large corkboard with fabric for a soft, textured look or paint a frame directly onto the wall for a sleek finish. Incorporate magnetic strips or clips for versatility. Use multiple small boards for different themes, like one for inspiration and another for schedules. Seasonal decorations or themed accessories keep it fresh and engaging.
Choose a sturdy board size suited to your wall space and aesthetic. Cover with fabric or paint the frame to match your decor. Mount it securely using wall anchors and screws, ensuring it’s level. Decorate with washi tape, stickers, or painted designs to personalize it further. Start pinning your favorite items, keeping it organized by categories or color schemes. Regularly update and refresh to keep motivation high.
Add small decorative elements like quotes, hand-drawn doodles, or themed stickers to enhance visual appeal. Incorporate string lights or fairy lights around the frame for a cozy glow. Use decorative pushpins or clips that reflect your style—metal, colorful, or vintage. Personalize with small keepsakes or tokens that inspire you daily.
A DIY bulletin board keeps you focused and motivated while showcasing your personality. It’s a creative outlet that encourages organization and self-expression. Over time, it becomes a visual reminder of your goals and achievements, helping you build confidence in your personal style and planning skills.
5. Themed Corner with Hobby or Interest Displays
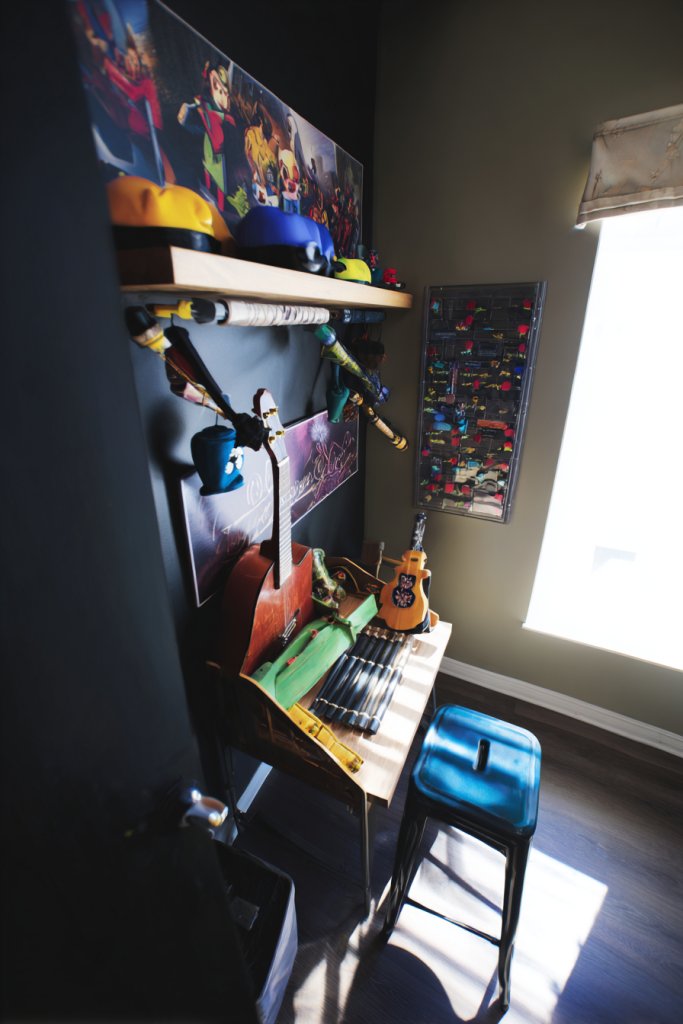
Does your room feel a little generic, lacking that personal spark? Dedicating a corner to your hobbies or interests turns your space into a reflection of who you are. It’s a fun way to showcase your passions and inspire creativity. Plus, it makes your room feel more alive and uniquely you.
Picture a small nook decorated with themed elements—musical instruments, sports gear, or fashion accessories—arranged thoughtfully. Use color-coordinated storage, display shelves, or even fabric backdrops to highlight your interest. Incorporate related decor like posters, sculptures, or themed textiles to create a cohesive look. This corner becomes your personal oasis, telling your story through visual cues.
Adjust the size and complexity based on your space and passion level. For music lovers, include instrument racks or a small stage. For athletes, display medals and gear with shelves or hooks. Fashion enthusiasts can add a clothing rack or jewelry displays. Change up the theme seasonally or as interests evolve for ongoing excitement.
Choose a corner that naturally draws attention, like near your desk or window. Use open shelves, hooks, or small display tables to showcase items. Decorate with textiles, like a themed rug or curtain, to add atmosphere. Arrange items in a way that balances functionality and aesthetics. Incorporate storage for accessories or equipment, keeping the space tidy. Personalize with small DIY touches such as painted signs or customized containers.
Add personalized touches like monogrammed labels or custom-made decor pieces. Change the display items periodically to reflect your current passions. Use thematic lighting—colorful or soft—to set the mood. Incorporate your own artwork or photos to make it even more personal. Keep the space flexible so you can adapt it as your interests grow.
A dedicated hobby corner makes your room a place of inspiration and growth. It boosts your confidence by celebrating your passions openly. Seeing your interests displayed proudly encourages ongoing creativity and self-expression. It’s a reminder that your space is a reflection of your unique identity.
6. Personalized Door Sign or Welcome Plaque

Feeling like your room lacks that special welcoming touch? A personalized door sign or welcome plaque instantly sets your space apart. It’s a simple project that makes your room feel more inviting and uniquely yours. Plus, it’s a small detail that creates a big impact.
Visualize a handcrafted wooden sign with your name or a favorite quote, painted in your signature colors. Decorate it with embellishments like beads, stickers, or glitter—whatever matches your vibe. Hang it above your door or on the wall to greet visitors with personality. The sign acts as a tiny piece of art that communicates your style at first glance.
Use different materials—wood, acrylic, fabric, or metal—to match your aesthetic. Customize the font and colors for a cohesive look. For seasonal updates, switch out the sign with holiday or themed versions. Incorporate LED lights or layered textures for added dimension. Keep it simple or elaborate, depending on your preference.
Start with a rough design or template, then gather your materials—paint, markers, or adhesive embellishments. Use stencils or freehand your lettering for a personal touch. Seal the sign with a clear coat for durability. Mount it securely with nails, hooks, or adhesive strips. Position it at eye level near your door or bed for maximum visibility. Regularly update or re-decorate to reflect your evolving style.
Add small decorative elements like charms, mini banners, or themed charms that reflect your hobbies. Use different textures or layered effects to give it depth. Incorporate your favorite colors or motifs to match your room’s palette. Personalize it further with hand-painted designs or embellishments that showcase your personality.
A custom door sign elevates your space and boosts your pride in your personal style. It’s a welcoming detail that makes your room feel special and complete. Every time you see it, you’ll feel more connected to your environment and confident in your creative choices.
7. Fun and Functional Storage Solutions
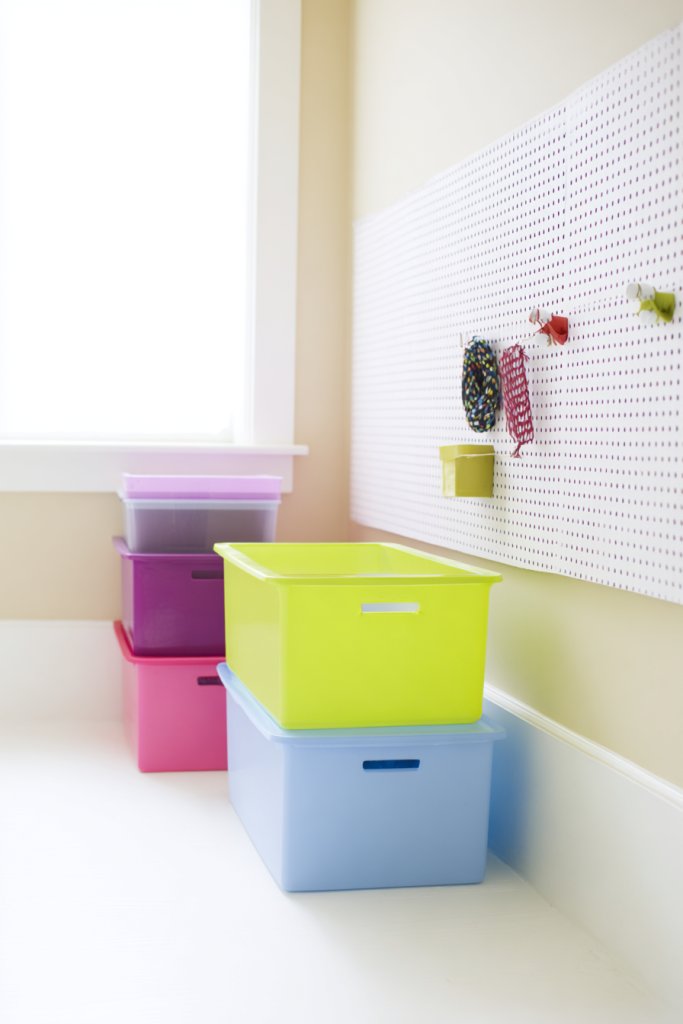
Clutter can turn a cozy room into a chaotic mess, killing your vibe. Fun and functional storage keeps your space tidy while adding style. It’s a win-win that makes cleaning easier and your room more inviting. Who says organization can’t be cool?
Imagine colorful bins stacked neatly, or vintage crates repurposed as storage units. Use hanging organizers for accessories or small items, hanging from hooks or behind doors. Incorporate decorative labels, fabric drawers, or patterned boxes for extra style. These solutions turn chaos into charm, with everything easily accessible and visually appealing.
Choose storage that matches your room’s theme—bright colors for playful spaces, sleek black for modern aesthetics. Mix open and closed containers to balance display and concealment. Use wall-mounted racks for items you want to access quickly. Seasonal decor can be swapped into storage containers, keeping your room fresh and organized.
Identify the items you need to store—clothes, books, supplies—and select containers accordingly. Use stackable bins, baskets, or modular units for flexibility. Secure hanging organizers with hooks or adhesive strips in convenient spots. Label each container clearly for easy retrieval. Regularly purge to maintain a clutter-free space. For added flair, choose storage options that double as decor, like wicker baskets or painted boxes.
Decorate storage containers with stickers, paint, or fabric covers that match your room style. Incorporate personalized labels or tags with your name or favorite motifs. Use decorative knobs or handles for a custom look. Keep your favorite items within reach by placing them in easy-to-access containers. Rotate storage solutions seasonally to keep the look fresh.
Fun storage transforms your room into a tidy and stylish retreat, encouraging responsibility and pride. It’s a practical solution that makes daily routines smoother. Seeing everything organized and attractive boosts your confidence in maintaining a beautiful space you love.
8. DIY Canvas or Wall Art Projects
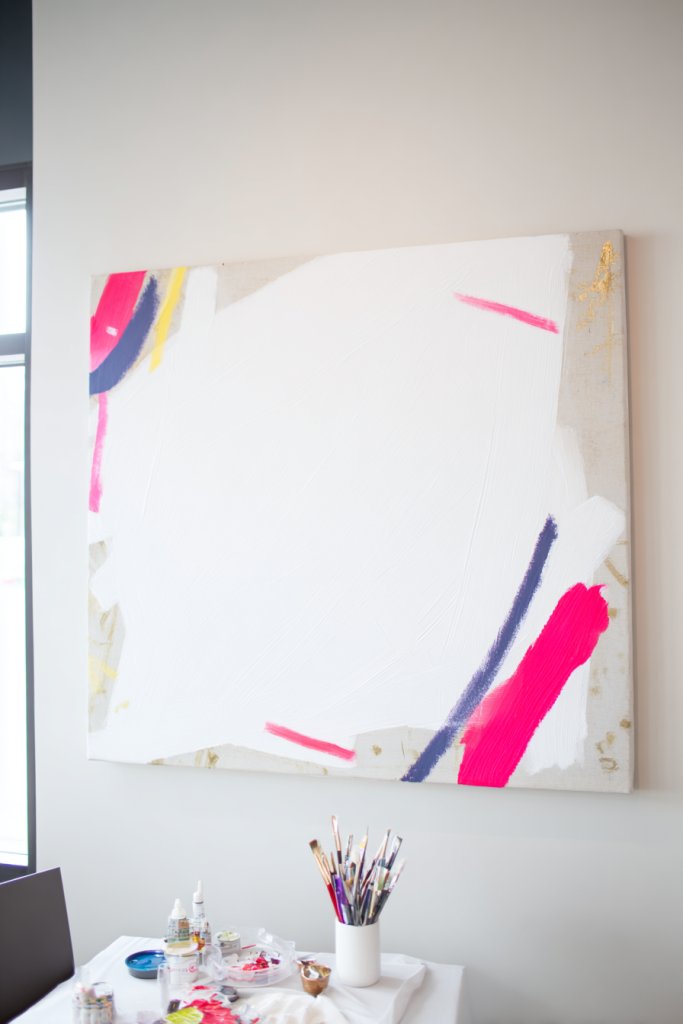
Bored with generic wall decor that lacks personality? DIY canvas or wall art projects let you create a one-of-a-kind masterpiece. They add a personal touch and a splash of creativity to your space. Plus, making your own art is a fun, rewarding activity.
Imagine a large canvas with an inspiring quote, abstract strokes, or a collage of your favorite images. Use stencils, brushes, or collage techniques to bring your vision to life. Bright colors or subtle tones can set the mood—whimsical, calming, or energetic. The textured layers or mixed media add depth, making your art stand out.
Choose themes that reflect your personality—geometric patterns, floral designs, or pop art. Experiment with different sizes and framing options. For a cohesive look, create a series of smaller pieces or a large statement canvas. Seasonal colors or motifs can be incorporated for variety. Use different materials like fabric, paper, or textured paint for a tactile effect.
Start by sketching your design or selecting images and colors. Prepare your canvas with a primer if needed. Use stencils, painter’s tape, or freehand techniques to create your design. Layer paints or collage elements for texture and interest. Once dry, add details or highlights. Frame or hang your art with sturdy hooks or wires, ensuring level placement. Regularly update your wall with new projects.
Add personal touches like hand-lettered quotes or doodles. Incorporate textured or metallic paints for a luxe effect. Use washi tape or fabric accents around the edges for a finished look. Create themed collections or series that tell a story or reflect your mood. Rotate or swap out art seasonally to keep your space fresh.
DIY canvas art boosts your confidence in your creative abilities and makes your room feel uniquely yours. It’s a fulfilling project that adds aesthetic value and personal meaning. Showing off your artwork reminds you daily of your talent and individuality.
9. Cozy Reading Nook with Plush Pillows and Throws
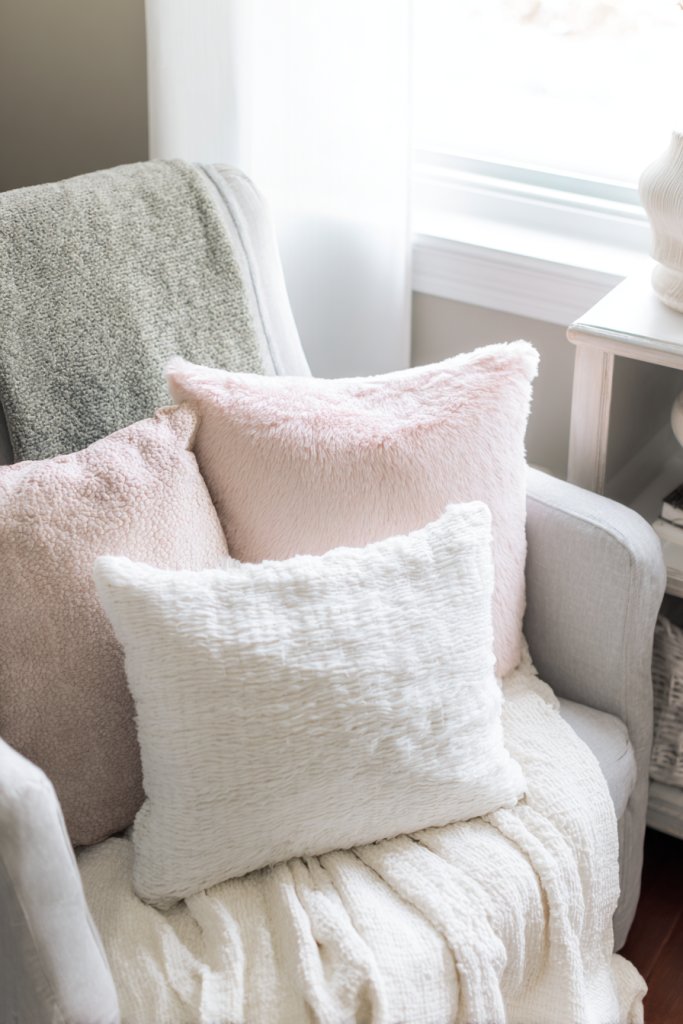
Ever wish your room had a dedicated space just for relaxing and escaping into a good book? A cozy reading nook turns an ordinary corner into your personal sanctuary. It’s a perfect retreat for winding down or fueling your imagination. Plus, it makes your room look inviting and thoughtfully designed.
Visualize a small corner with a comfy chair or a floor cushion layered with plush pillows and soft throws. Use textured fabrics, like faux fur or chunky knits, to add warmth and tactile appeal. Add a small side table or a stack of books nearby for easy access. The lighting—be it a soft lamp or string lights—creates a warm glow. A plush rug anchors the space and makes it feel even more inviting.
Choose furniture that fits your space—an armchair, a bean bag, or even a daybed. Decorate with a variety of pillows in different shapes, sizes, and textures. Seasonal throws or blankets keep the area cozy year-round. Incorporate a small bookshelf or wall-mounted shelves to hold your favorite reads. For a pop of color, select fabrics that match your room’s palette.
Identify a quiet, accessible corner or underused space. Select a comfortable seat and layer with multiple pillows and throws. Add lighting that provides enough brightness without being harsh—think of a small table lamp or fairy lights. Use a soft rug underneath to define the area. Decorate with personal touches like framed quotes or DIY accessories. Keep the space tidy with small baskets or organizers for books and blankets.
Personalize with themed pillows, custom-made covers, or hand-painted signs. Incorporate accessories like fairy lights or scented candles to enhance ambiance (sans plants or vases). Create a mini gallery with your favorite photos or artwork nearby. Rotate your books and blankets seasonally to maintain freshness. Add a cozy blanket in your favorite color for extra comfort.
A dedicated reading nook encourages relaxation and self-care, boosting your mental well-being. It’s a space you’ll want to spend time in, fostering a love for reading and quiet moments. Feeling comfortable and inspired in your space can positively influence your mood and confidence every day.
10. Bold Rug or Carpet with Patterned or Textured Designs
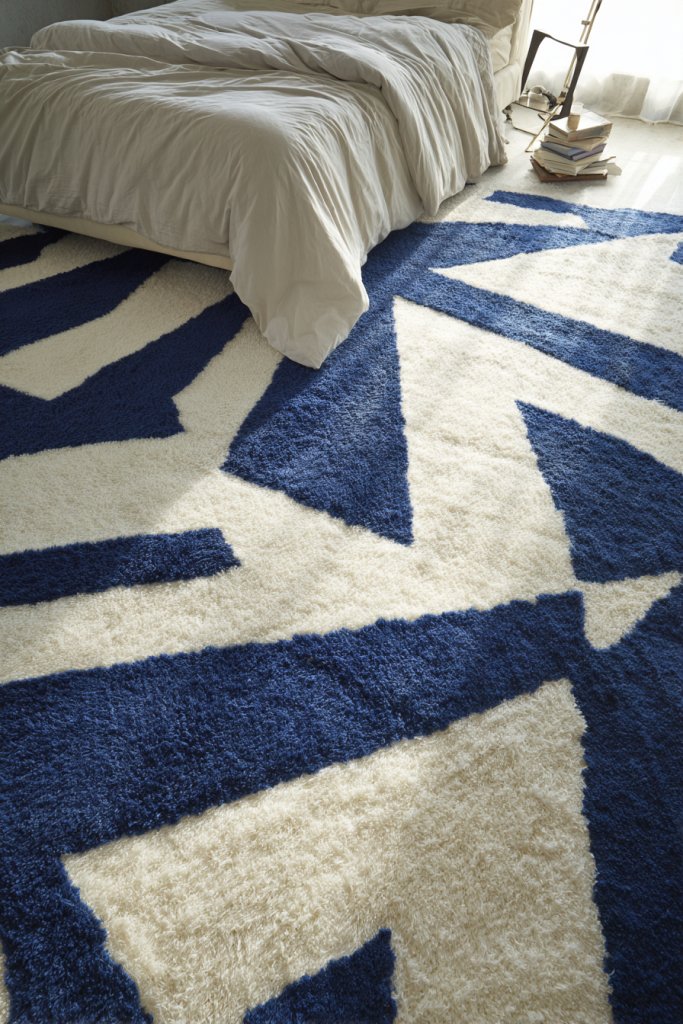
Does your room feel flat or uninspired? A statement rug can instantly energize the space and anchor your decor. It adds color, pattern, and texture, making your room look complete and inviting. Plus, it’s a simple way to express your style without a huge overhaul.
Imagine a rug with a geometric pattern, vibrant colors, or plush texture that complements your furniture. A textured or shaggy rug adds tactile interest, inviting you to sink your toes in. The right pattern can tie together various elements—colors, furniture, and accessories—creating a cohesive look. When layered with textiles or furniture, it defines zones and adds warmth.
Choose a rug that matches your aesthetic—modern, boho, or eclectic. Use bold patterns for a lively vibe or neutral textures for calm. Size matters—larger rugs work well in bigger rooms, while smaller ones can highlight specific areas. Seasonal updates can be as simple as switching out rugs or layering with different textiles.
Measure your space carefully and select a rug that fits proportionally—ideally, with furniture partially on it. Look for durable materials suited for high traffic, like wool or synthetic fibers. Lay the rug flat and secure edges if needed. Position your furniture to frame the rug, creating a balanced look. Keep it clean with regular vacuuming and spot cleaning for longevity.
Add personalized touches by layering smaller rugs or mats in different textures. Coordinate the rug colors with your bedding, curtains, or accessories for harmony. Incorporate trims or fringes for extra detail. Use it as a base for your furniture arrangement or as a focal point in the room.
A bold rug transforms your room into a lively, stylish space. It’s a simple but effective way to boost your confidence in interior styling. When your space feels warm and inviting, it encourages you to spend more time there and express yourself creatively.
11. String or Neon Light Accents
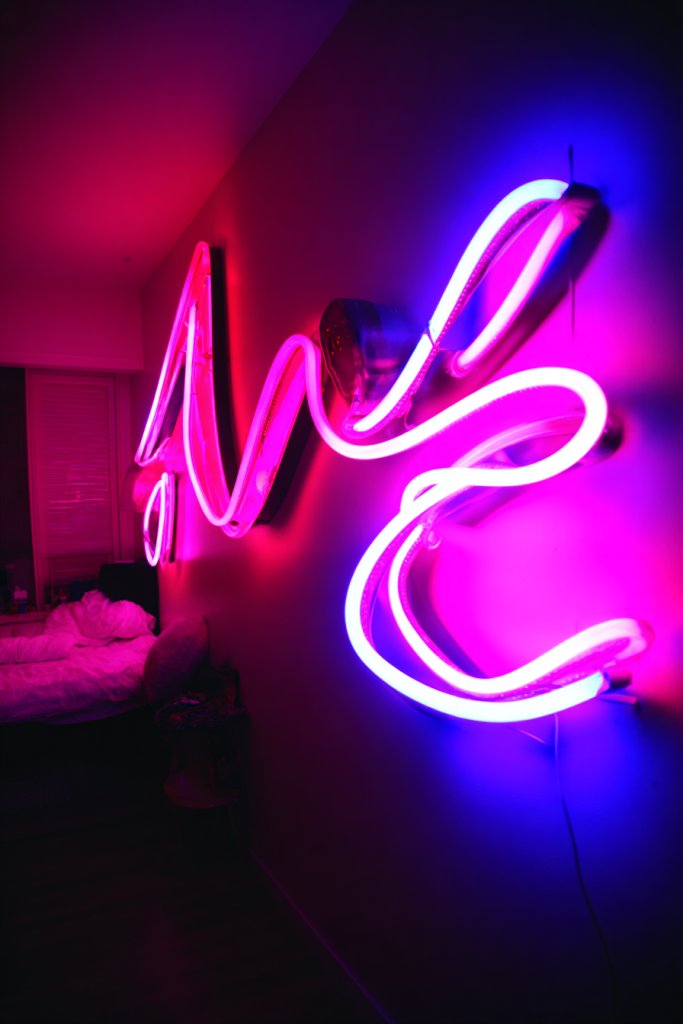
Looking to add some pizzazz and ambiance to your room? String or neon lights are the easiest way to create a lively, energetic atmosphere. They turn a dull space into a fun, trendy environment perfect for relaxing or entertaining. Plus, they’re super affordable and easy to install.
Imagine a wall illuminated with soft, colorful glow from flexible neon strips or fairy string lights. The lights outline your bed, mirror, or shelves, adding depth and dimension. Neon signs with inspiring words or symbols can serve as statement pieces that reflect your personality. The gentle glow creates a cozy, inviting vibe that’s perfect for unwinding.
Choose warm white for a calming effect or vibrant colors for a playful look. Hang string lights in swooping curves or zigzag patterns—whatever matches your style. Neon signs can be customized with your favorite quotes or symbols, making the space uniquely yours. Use clips, hooks, or adhesive strips for easy installation and repositioning.
Decide where you want the lights to go—around mirrors, headboards, or along the ceiling. Measure and plan the layout before securing. Use command hooks or adhesive clips to avoid damaging walls. Connect your lights to a power source and test the effect. Consider dimmable options for adjustable ambiance. Regularly check and replace any malfunctioning bulbs for consistent glow.
Incorporate themed neon signs or string lights matching your interests—music, movies, or quotes. Layer multiple light sources for a more dramatic effect. Use colored gels or filters to change the mood. Combine with other decor elements like textiles or art for a cohesive look. The key is balancing bright accents with softer lighting for comfort.
String and neon lights instantly elevate your room’s style and mood, making it feel trendy and personalized. They’re a fun way to experiment with lighting and design without a big investment. When your space feels lively and warm, your confidence in your decorating skills will grow naturally.
12. Personalized Jewelry or Accessories Display
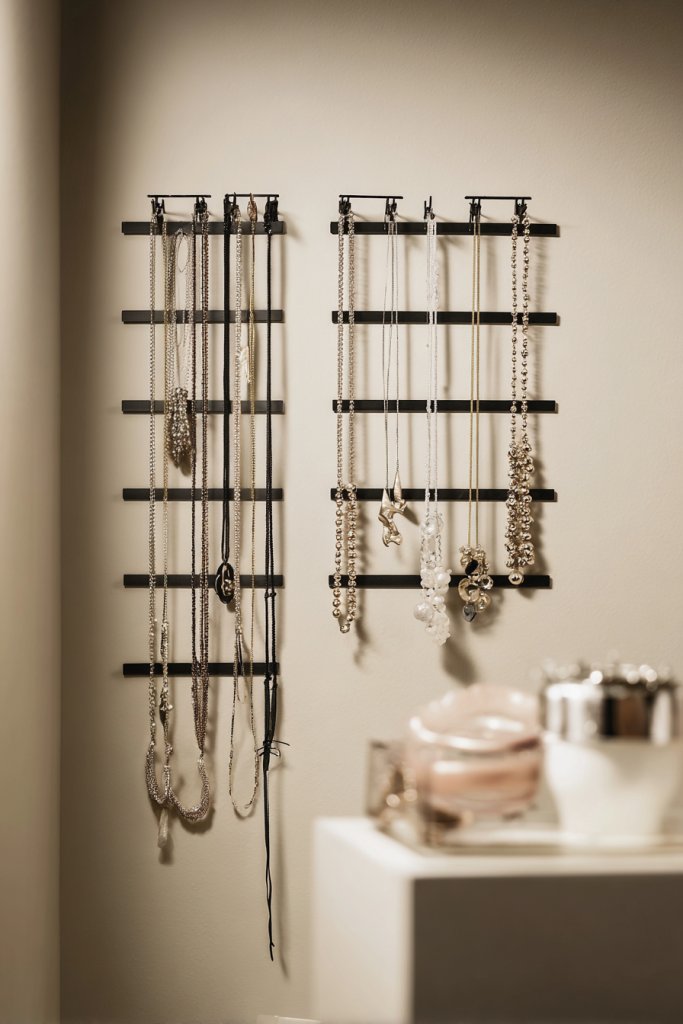
Tired of digging through drawers for your jewelry or accessories? A personalized display turns chaos into order and adds a chic touch to your room. It’s a simple way to showcase your favorite pieces while keeping everything accessible. Plus, it makes your space look more curated and stylish.
Picture a wall-mounted grid or small shelves with hooks, painted in your favorite color. Your jewelry—necklaces, earrings, bracelets—hang neatly and beautifully, adding a touch of sparkle. You might also use shadow boxes or small frames to display accessories like hats, sunglasses, or even keepsakes. The arrangement creates a mini-gallery of your personal style.
Use a jewelry tree, pegboard, or decorative hooks for a versatile look. Incorporate small trays or boxes for rings and watches. Choose materials like wood, acrylic, or metal depending on your decor. Arrange items by color, type, or theme for visual harmony. Add decorative elements like fairy lights or faux foliage (not real plants) for extra flair.
Measure available wall or surface space and select a display type accordingly. Install hooks or shelves securely, ensuring they can handle the weight of your items. Decorate the backing with paint, fabric, or decorative paper. Hang or arrange your jewelry and accessories, organizing by type or style. Use labels or tags for added clarity and aesthetic appeal. Regularly update your display to reflect new favorites.
Personalize with monogrammed or painted initials, themed motifs, or custom engravings. Incorporate decorative elements like beaded curtains or small framed photos. Use matching or contrasting colors to make your display stand out. Rotate accessories seasonally or for special occasions. This keeps your space fresh and inspiring.
A personalized jewelry display elevates your decor and encourages you to wear your favorites more often. It’s a visual reminder of your style and taste, boosting confidence in your personal choices. Seeing your accessories organized and showcased makes your room feel more intentional and polished.
13. DIY Message Board or Chalkboard Wall
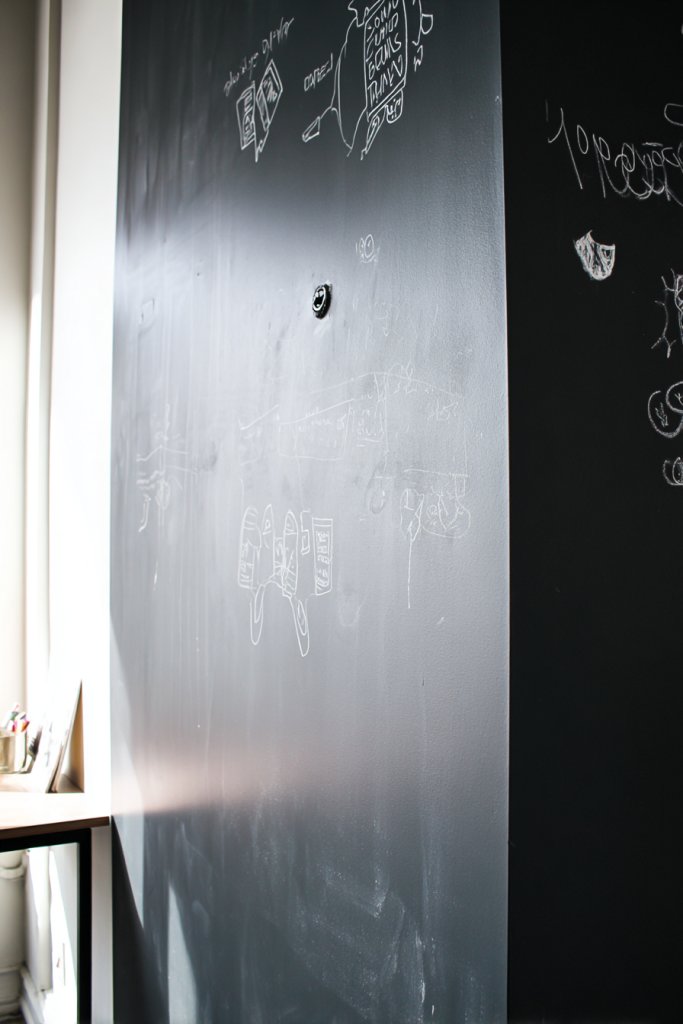
Do you ever forget important dates, goals, or cute doodles? A DIY message board or chalkboard wall keeps your reminders front and center while adding a playful touch. It’s a creative way to stay organized and inspired every day. Plus, it’s a fun project that lets you showcase your personality.
Imagine a wall section painted with chalkboard paint or framed with colorful trim. You can write your daily goals, motivational quotes, or doodles in chalk or markers. Add decorative borders, stickers, or washi tape to customize it further. The space becomes a dynamic canvas for your ideas, art, and reminders, blending function with fun.
Use a large wall area for a full chalkboard or create smaller message zones with framed corkboards or whiteboards. Incorporate colorful chalk or erasable markers for variety. Decorate the frame with washi tape, paint, or stickers to match your room’s theme. Change the layout seasonally or for different moods.
Prepare the wall with a primer if painting with chalkboard paint. Measure and mark the desired area, then apply the paint in even coats, following manufacturer instructions. For framed boards, assemble the frame and mount it securely. Decorate with personal touches like stickers or painted accents. Use it daily for notes, doodles, or motivational messages. Clean regularly to keep it fresh.
Add decorative elements like themed borders or illustrations. Incorporate inspirational quotes or personal mottos in colorful lettering. Use different colored chalks or markers to create visual interest. Update messages frequently to keep yourself motivated and inspired. Personal touches make the space feel lively and uniquely yours.
A DIY message or chalkboard wall keeps you organized and motivated, making your space more functional and fun. It’s a canvas for your creativity and daily intentions. Seeing your goals and art in one place fosters a sense of achievement and self-expression, boosting your confidence to tackle each day.
14. Artistic DIY Headboard or Bed Frame Accent
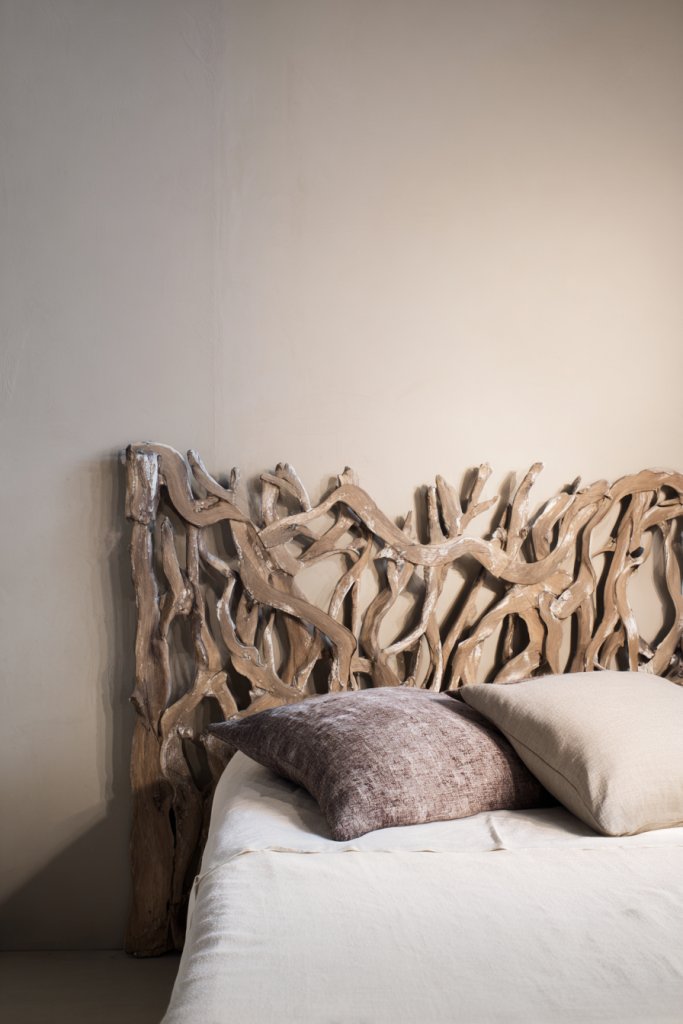
Is your bed feeling a little plain or uninspiring? An artistic DIY headboard or bed frame can transform your entire room. It adds personality and a focal point that reflects your style. Plus, making it yourself ensures it’s exactly what you want—no compromises.
Picture a headboard crafted from reclaimed wood, painted in bold colors, or upholstered with textured fabric. You might add decorative elements like stencils, painted patterns, or even mosaic accents. The design can be minimalist, boho, or glam—whatever matches your vibe. When lit with ambient lighting, your bed becomes a cozy, stylish sanctuary.
Use different materials—wood, fabric, or even metal—to suit your decor. For a modern look, go for sleek lines and neutral tones; for a boho style, add textured textiles and layered elements. Customize the height and width based on your space and comfort. Seasonal or theme-based designs keep things fresh. Incorporate DIY details like painted patterns or handcrafted embellishments.
Start by sketching your design and gathering materials—wood planks, fabric, paint, or decorative nails. Cut and assemble the frame, ensuring stability and comfort. Paint or upholster the headboard, adding decorative touches as desired. Secure it to your bed frame or wall with appropriate hardware. Add lighting or accents to enhance its visual appeal. Finish with protective sealant or finishing touches for durability.
Personalize with your favorite colors, motifs, or patterns. Add small DIY embellishments like painted initials, textured layers, or decorative buttons. Incorporate lighting fixtures or string lights around the headboard for a cozy glow. Match it to your room’s theme by coordinating textiles or accents. Update the design seasonally or whenever you want a fresh look.
A custom DIY headboard makes your bed the centerpiece, elevating your entire room’s style. It’s a project that boosts your confidence in crafting and decorating. Every night when you see your personalized creation, you’ll feel more connected to your space and proud of your handiwork.
15. Functional Desk Area with Custom Organizer
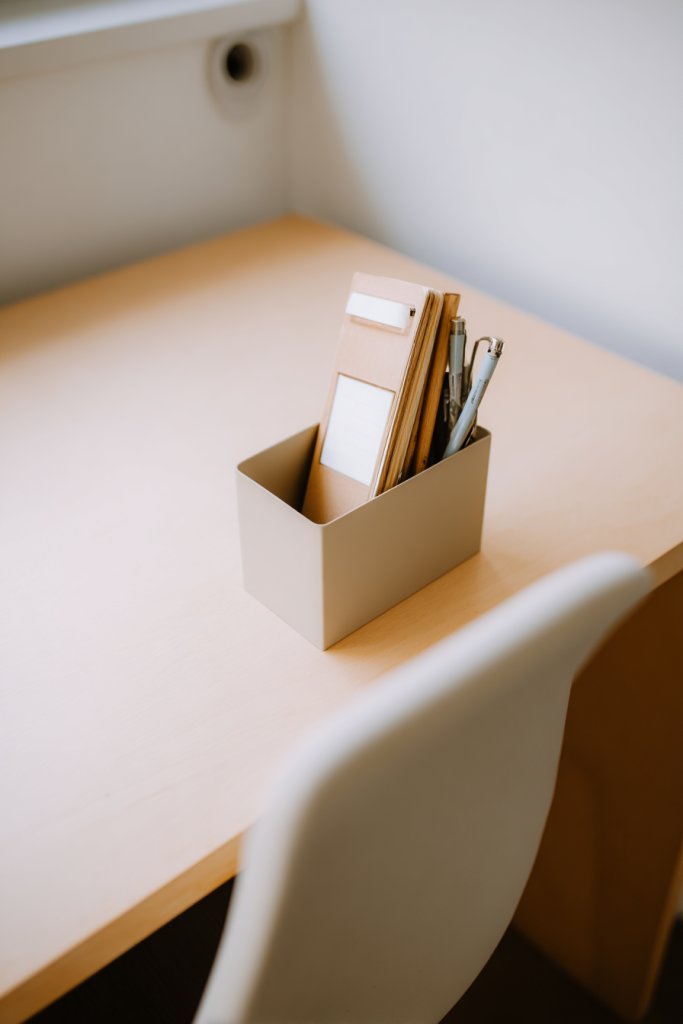
Struggling to stay productive in a cluttered or uninspiring workspace? A functional desk area with a custom organizer can turn chaos into clarity. It helps you focus, stay motivated, and makes homework or creative projects more enjoyable. Plus, a personalized setup feels more inviting and less like a chore.
Imagine a clean, organized desk with colorful containers holding pens, notebooks, and tech accessories. Custom drawers or trays are tailored to your needs, with labels or decorative elements. Use vibrant colors or sleek finishes to match your room’s aesthetic. Add a corkboard or pegboard above the desk for notes, inspiration, or DIY decor. The space feels curated and motivating.
Choose from open shelving, drawer units, or modular organizers depending on your space. Incorporate colorful or neutral tones based on your style. Use decorative washi tape or paint to personalize containers and labels. Adjust the layout for different tasks—art projects, studying, or gaming. Seasonal or theme updates keep the setup fresh and inspiring.
Measure your desk area and plan your storage needs. Gather organizers—bins, trays, or custom-built components. Paint or decorate them to match your room. Arrange items logically—frequently used tools within reach, less-used items stored away. Secure larger units or shelves to prevent accidents. Keep the workspace tidy by regularly sorting and updating your storage.
Add special touches like monogrammed labels, themed stickers, or decorative handles. Incorporate small DIY projects, such as painted trays or custom pen holders. Use motivational quotes or artwork nearby for inspiration. Rotate items seasonally or according to your projects. Personal touches make your workspace feel like a reflection of you.
A well-organized desk boosts your confidence to tackle tasks efficiently. It encourages good habits and makes your room more functional. When your space is personalized and practical, you’ll feel motivated to create, learn, and grow every day. Your confidence in your organizational skills will grow along with your productivity.
16. Themed Textile Accents in Bedding and Curtains
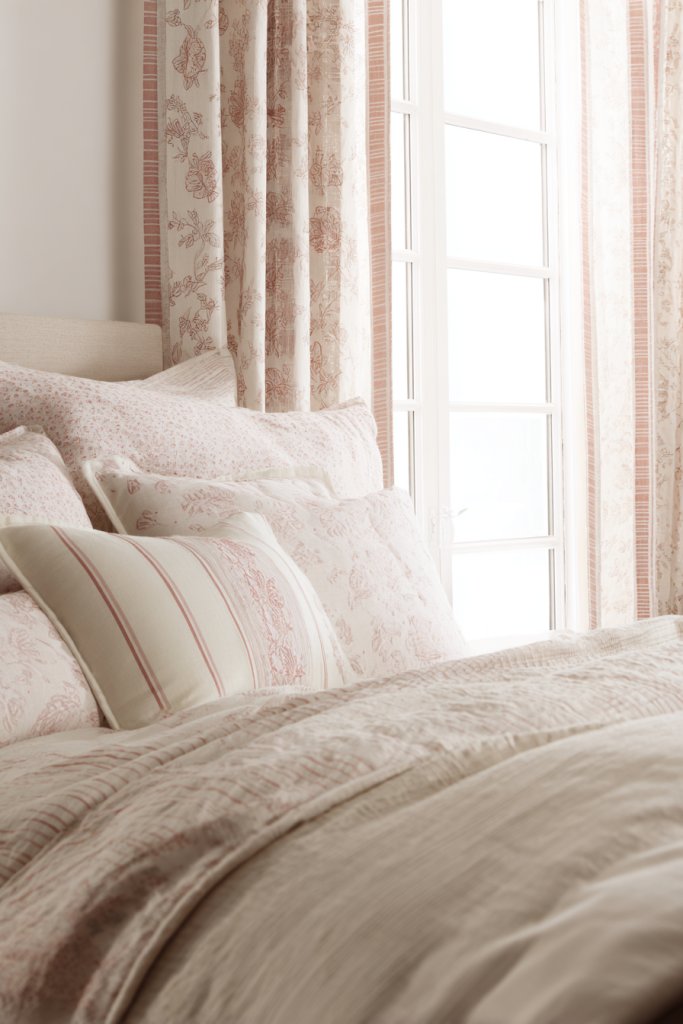
Does your room lack that cozy, put-together vibe? Themed textiles in bedding and curtains instantly add personality and warmth. They tie your room’s look together while reflecting your style. Plus, swapping out textiles is an easy, affordable way to refresh your space.
Picture a bed dressed in a duvet cover with a fun pattern—florals, geometric shapes, or favorite colors. Curtains in complementary hues or patterns frame your windows and add softness. Layer textures with plush throws, decorative pillows, or textured fabrics that invite you to relax. The textiles create a layered, inviting atmosphere that’s uniquely you.
Mix and match patterns and textures for a playful or sophisticated look. Seasonal textiles—light and airy fabrics for summer, cozy knits or flannel for winter—keep your room feeling fresh year-round. Use blackout curtains for better sleep or sheer fabrics for a light, airy feel. Coordinate bedding and curtains with your room’s color palette for harmony.
Choose textiles that suit your climate, style, and budget. Measure your bed and window openings carefully. Select fabrics that are easy to wash and durable. Layer different textiles—blankets, throws, and pillows—to add dimension. Hang curtains securely, using appropriate hardware for your wall type. Change out textiles seasonally or whenever you want a quick update.
Add decorative trims, embroidery, or custom prints on your textiles for a personal touch. Incorporate embroidery patches or hand-sewn details if you’re crafty. Use themed or color-coordinated textiles to match your decor. Personalize with monograms or small appliques that reflect your personality. Regular updates keep your space feeling fresh and styled.
Themed textiles make your room feel warm, inviting, and completely personalized. They boost your confidence by showing off your style and attention to detail. When your bed and curtains reflect your personality, you’ll love spending time in your space and sharing it with friends.
17. Upcycled Craft Projects as Decor Elements
Looking for eco-friendly ways to decorate without breaking the bank? Upcycled craft projects are perfect for adding charm and personality to your room. They turn old or discarded items into stylish decor. Plus, creating your own pieces feels satisfying and makes your space truly unique.
Visualize jars turned into lanterns with fairy lights inside or old wooden crates painted brightly for storage or display. Use textiles, buttons, or paint to customize everyday items into decorative pieces. These upcycled elements add texture, color, and personal history to your decor. They create a cozy, vintage-inspired vibe that’s both trendy and sustainable.
Choose items that match your decor style—rustic, boho, or industrial. Paint or stain wood, add embellishments, or combine different materials for contrast. Incorporate upcycled art like framed fabric scraps or decorative mobiles. Use small projects as accents on shelves, desks, or walls. Seasonal or themed updates keep your decor fresh and engaging.
Identify items you can upcycle—jars, cans, wood pieces, textiles. Clean and prepare surfaces: sand, wash, or prime as needed. Decorate with paint, fabric, or embellishments—stencils, buttons, or stickers. Assemble or arrange your pieces creatively, balancing colors and textures. Secure items with appropriate adhesives or hardware. Regularly refresh or add new elements to keep your decor exciting.
Personalize with hand-painted designs, embroidered patches, or themed motifs. Incorporate your favorite colors or patterns. Use upcycled containers for storage, planters, or display trays. Combine multiple projects into themed arrangements or collages. These DIY elements showcase your creativity and eco-conscious mindset.
Upcycled decor demonstrates your resourcefulness and style. It’s a fulfilling way to personalize your room sustainably. Seeing your creative projects in use boosts your confidence and encourages ongoing DIY adventures. Your space becomes a reflection of your values and artistic flair.
18. DIY Mirror Frame with Artistic Touches
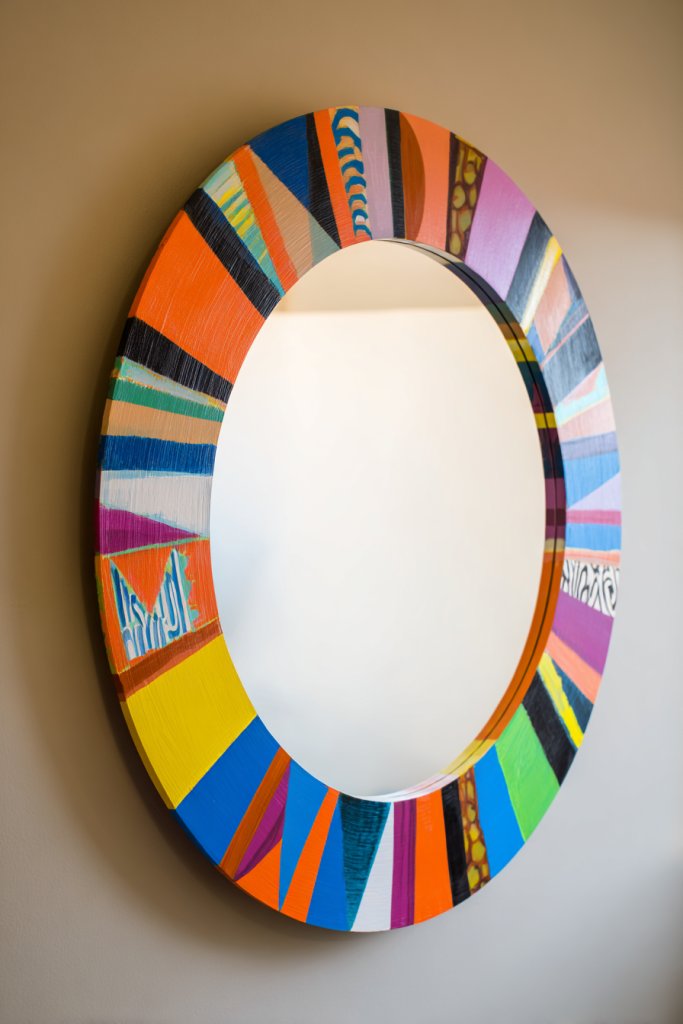
Does your plain mirror lack personality? An artistic DIY frame turns a simple mirror into a statement piece. It adds style and a personal touch to your space. Plus, it’s a fun project that lets you express your creative side and elevate your decor.
Imagine a mirror surrounded by a frame decorated with painted patterns, mosaic tiles, or textured elements like fabric or rope. Use bright colors, metallic finishes, or natural materials to match your room’s vibe. The artistic touches make the mirror a focal point and reflect your personality. When you look into it, you see not just yourself but your creative expression.
Create a frame from reclaimed wood, painted foam board, or decorative molding. Add embellishments like beads, shells, or painted motifs for texture. Match the frame to your room’s theme—boho, industrial, or minimalist. Decorate with layered paints, stencils, or collage elements for a mixed-media look. Adjust the size and shape for different mirror styles.
Measure your mirror’s dimensions and sketch your design. Gather materials—wood, foam, paint, adhesive, or decorative items. Cut and assemble the frame, then decorate with your chosen artistic touches. Secure it firmly around the mirror using glue or mounting hardware. Hang the finished piece at eye level using appropriate hooks or brackets. Seal or protect the design for durability.
Add personalized elements like initials, motifs, or quotes painted onto the frame. Use textured or metallic paints for a luxe effect. Incorporate small DIY accents like stickers, beads, or fabric for extra detail. Coordinate the frame’s colors with your room’s palette. Regularly update or add new touches to keep it fresh.
A DIY mirror frame with artistic touches boosts your confidence in crafting and decorating. It transforms a functional item into a personalized art piece. Every time you see it, you’re reminded of your creativity and effort. It’s a simple way to make your space more inspiring and uniquely yours.
Conclusion
Exploring these teen room ideas reveals a world of possibilities to personalize and energize your teen’s space. From playful accents to sophisticated touches, there’s something for every style and budget. Don’t hesitate to try out different ideas and make the room a true reflection of your teen’s personality. Let your creativity shine and turn this space into their favorite place to relax, study, and express themselves!