Your living room ceiling might just be the most overlooked element of your home’s design, but it holds incredible potential for making a dramatic statement. Unique ceiling designs have gained popularity because they add depth, character, and a touch of luxury to any space, transforming an ordinary room into something extraordinary.
In this article, you’ll explore a wide variety of ceiling design ideas that can elevate your living room’s ambiance. From bold colors and intricate patterns to innovative lighting and textured finishes, these ideas are sure to inspire your next home makeover and help you create a captivating focal point.
1. Coffered Ceiling with Bold Paint Accents for Architectural Drama
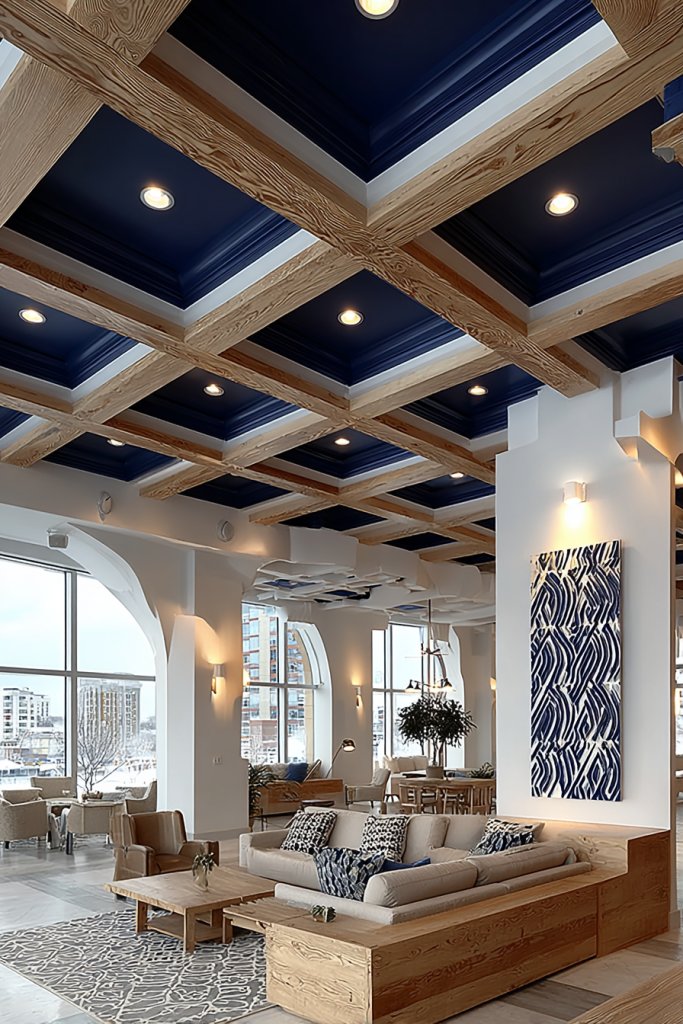
Ever feel like your living room is missing that wow factor? A coffered ceiling with bold paint accents instantly transforms a plain space into something striking. It’s perfect for those craving architectural depth but unsure how to achieve it without gutting their entire ceiling. This idea offers a way to add sophistication without a full renovation.
Imagine a ceiling with deep rectangular panels outlined by crisp moldings, painted in a rich jewel tone that contrasts with the neutral walls. The shadows cast by the recessed sections add depth, making the room feel more expansive. The bold color draws your eyes upward, creating a focal point that screams style. It’s like giving your ceiling a designer makeover that everyone notices.
You can keep it subtle with muted tones or go full-on with vibrant hues for maximal impact. For a more traditional look, pair the coffered design with classic crown molding. If your space is small, opt for a monochromatic palette to avoid overwhelming the room. Seasonal changes can also influence your paint choices—think warm tones in winter or cool shades in summer.
Start by sketching your ceiling layout or consulting a designer. You’ll need crown molding or beams to create the grid pattern, along with high-quality paint in your chosen accent color. Use painter’s tape to delineate sections and ensure clean lines. If you’re not handy, hiring a contractor might be wise, especially for precise measurements and cuts. Consider adding a light primer before painting to ensure the bold color pops.
Add metallic or matte finishes to the paint for different effects. Incorporate subtle patterns within the panels using stencils for extra flair. Complement the ceiling with matching or contrasting wall decor, like textured wallpaper or decorative trim. Custom accents like gold leaf or glitter can give your coffered ceiling an extra layer of luxury.
A bold painted coffered ceiling creates an instantly upscale vibe. It shows you’re not afraid to take risks and can elevate any living space. Ready to make your ceiling the star of the show? Go bold, and watch your room transform into a true showstopper.
2. Floating Ceiling Panels with LED Backlighting for Modern Elegance
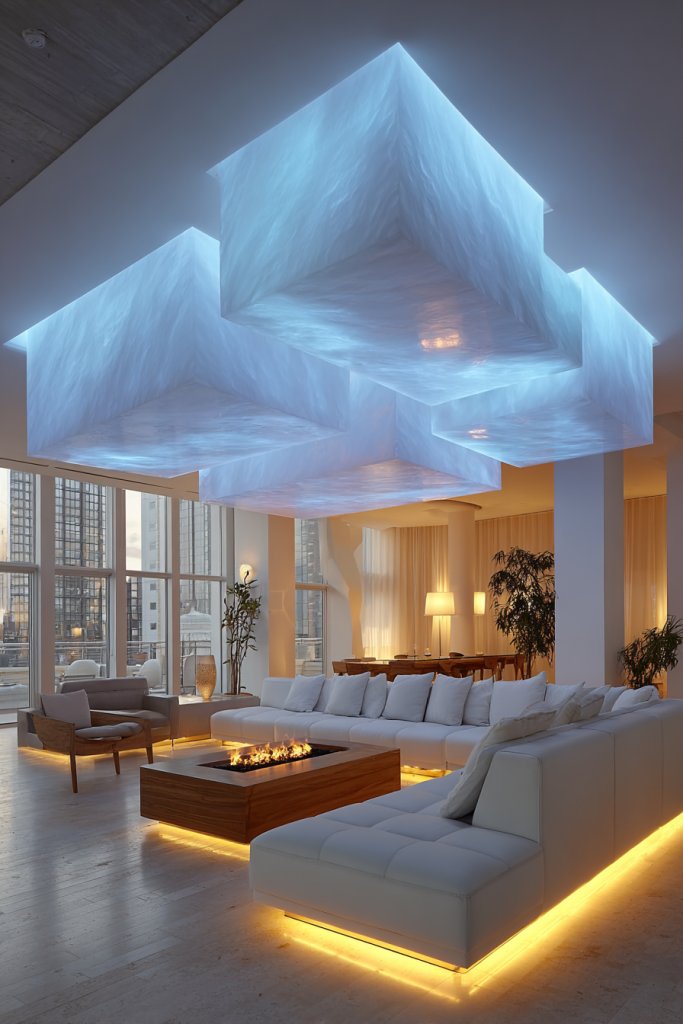
Tired of boring, flat ceilings? Want to add a sleek, futuristic touch that catches everyone’s eye? Floating ceiling panels with LED backlighting are the perfect upgrade for modern spaces. They bring a subtle glow while hiding imperfections or old wiring, giving your living room a fresh, contemporary feel.
Picture a ceiling with sleek, rectangular panels suspended at varying heights, softly illuminated by hidden LED strips. The glow creates a floating illusion, adding depth and dimension. The diffused light reflects gently off the ceiling, casting a calming ambiance. It’s like your ceiling becomes a giant, ambient light sculpture, blending form and function seamlessly.
Choose different panel sizes or shapes to match your aesthetic, from minimalist rectangles to intricate geometric patterns. Color temperature of the LEDs can shift from warm to cool tones, depending on your mood. For seasonal updates, consider changing the LED color or adding dimming features. This concept suits both open-plan living rooms and cozy nooks alike.
Begin by planning your panel layout and measuring your ceiling space. Purchase lightweight panels made from materials like MDF, aluminum, or PVC, which are easy to install and lightweight. Install a sturdy grid or mounting system, then affix the panels securely. Hide the LED strips behind the panels or in the gaps, connecting them to a dimmer switch or smart home system for control. Ensure electrical wiring is done safely—consult a pro if unsure.
Customize the lighting with color-changing LEDs or programmable scenes to match your mood or activity. Add decorative trim or textured finishes to the panels for extra depth. Complement the lighting with modern furniture and minimal decor to keep the aesthetic sleek. Incorporate sensors or voice control for a truly high-tech experience.
Floating LED panels are a statement of sophistication and innovation. They turn a simple ceiling into an artful feature that elevates your entire room. Feeling inspired? You’re just a few steps away from a ceiling that’s as modern as your lifestyle.
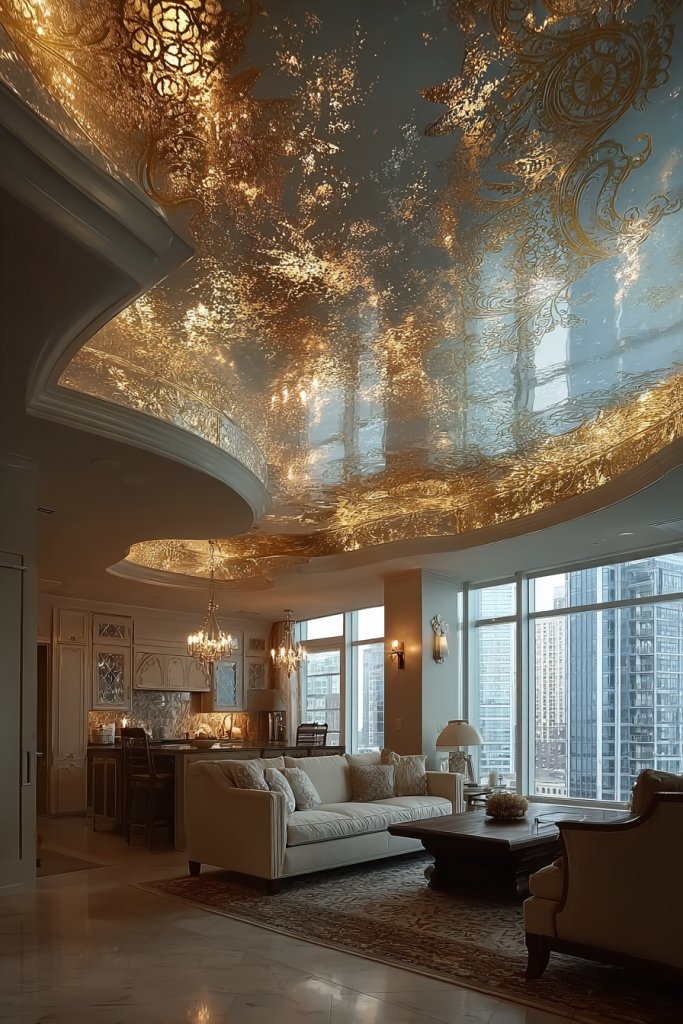
3. Textured Plaster Ceilings with Subtle Metallic Sheen for Luxurious Touches
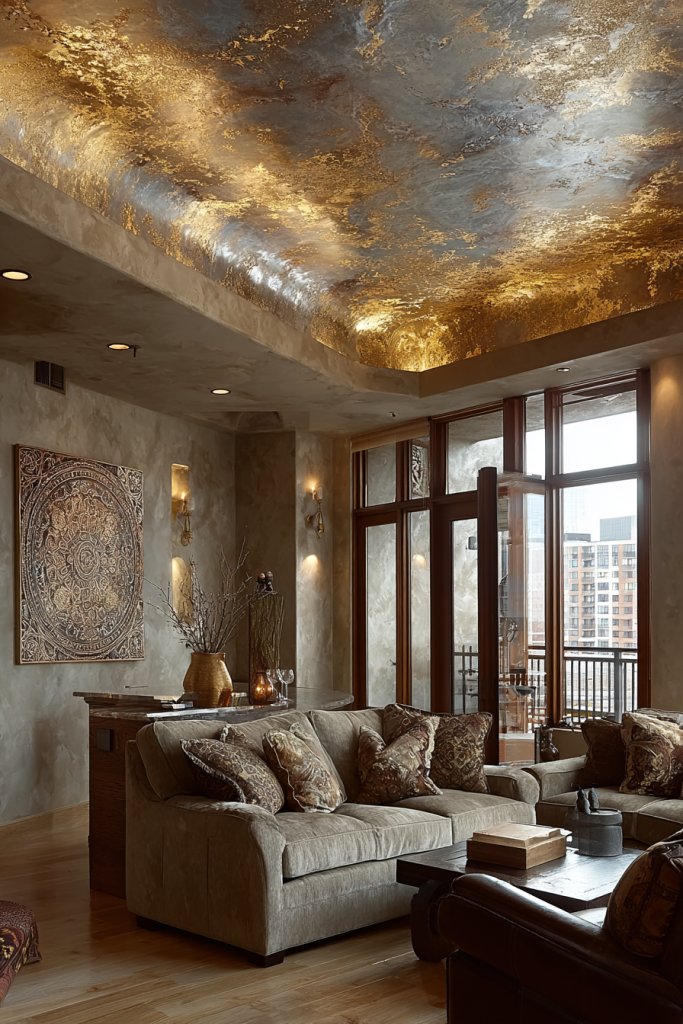
Looking to add a touch of luxury without going full opulence? Textured plaster ceilings with a metallic sheen offer a sophisticated upgrade that feels rich yet subtle. They’re perfect for creating a tactile experience and elevating your living room’s ambiance, especially if you love classic elegance with a contemporary twist.
Imagine a ceiling with a soft, uneven plaster finish, catching the light with a delicate shimmer. The metallic sheen lends a glow that changes throughout the day, revealing different depths and textures. The subtle sparkle adds a layer of depth, making the ceiling appear almost sculptural. It’s like turning your ceiling into a piece of fine art that invites curiosity.
Opt for warm metallic tones like gold or bronze for a cozy, inviting feel, or go silver or platinum for a more modern vibe. Keep the texture light for a more understated look or increase the roughness for dramatic effect. This style pairs well with traditional, transitional, or even eclectic decor. Seasonal accents like faux candles or soft lighting enhance the sheen.
Start with a high-quality plaster or stucco mix designed for ceilings, and apply with trowels or spatulas for textured effects. Use metallic additives or paints mixed into the plaster to achieve the sheen. Multiple layers may be needed to build the desired texture, allowing each to dry thoroughly. Finish with a clear sealant that enhances the metallic luster and protects against moisture. For best results, hire a professional or experienced plasterer.
Add subtle color washes over the textured surface for extra depth. Incorporate decorative moldings or borders with metallic accents for a finished look. Use accent lighting—like small spotlights or uplights—to highlight the texture’s shimmer. Mix in other luxe materials like velvet or silk drapes to complement the tactile ceiling.
A textured metallic ceiling elevates your space from ordinary to extraordinary. It’s a timeless look that works with many decor styles, from vintage to modern. Feeling inspired? This approach proves that luxury can be subtle, tactile, and uniquely yours.
4. Exposed Wooden Beams with Dark Stain for Rustic Charm
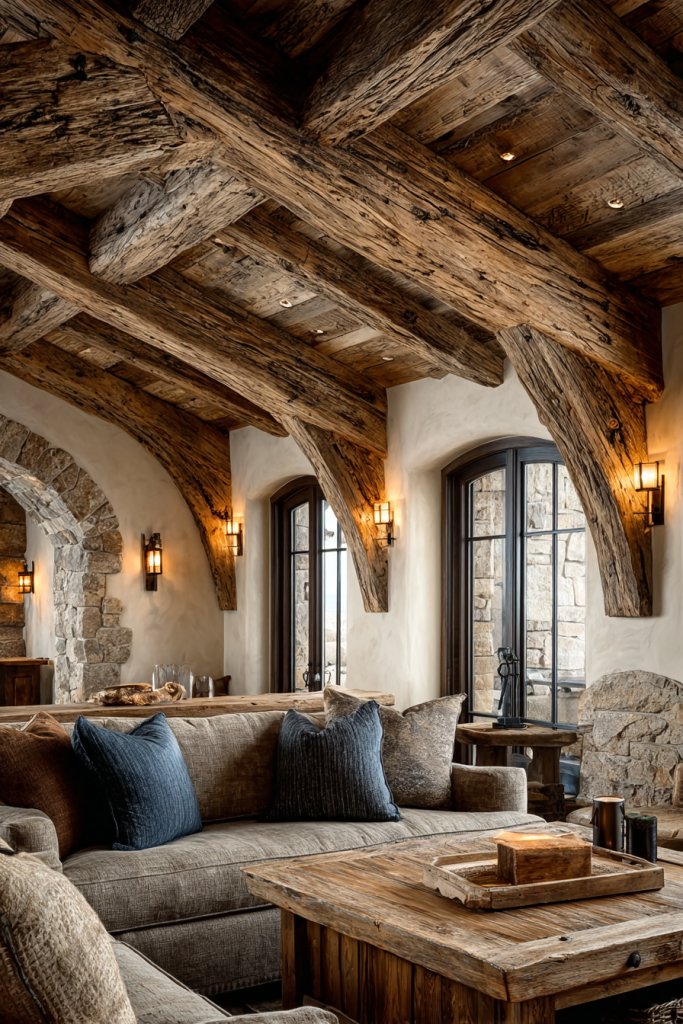
Want to add instant warmth and character to your living room? Exposed wooden beams stained in a dark finish create a rustic, cozy vibe that’s hard to beat. They bring a sense of history and craftsmanship that makes any space feel inviting and grounded.
Picture beams with deep, rich stain running across a high, vaulted ceiling. The natural grain and knots in the wood add texture and authenticity. When paired with warm lighting, the beams cast gentle shadows that enhance the room’s depth. It’s like bringing a piece of the countryside into your urban home, but with modern comforts.
Keep the beams natural or stain them in a dark hue for contrast against lighter ceilings. For a more contemporary look, pair exposed beams with sleek furniture and minimalist decor. If space allows, add decorative corbels or rustic brackets for extra detail. Seasonal decorations like cozy throws or vintage accessories can complement the rustic charm.
Start with selecting sturdy, kiln-dried wood beams suitable for your ceiling span. Sand and stain the wood to your desired darkness, then attach securely to your ceiling joists with heavy-duty brackets or lag bolts. Ensure the beams are level and properly supported. To preserve the finish, apply a clear sealant or oil-based topcoat. Consider hiring a carpenter for precise installation, especially in high or vaulted ceilings.
Decorate the beams with string lights or lanterns to enhance their rustic appeal. Add decorative metal accents or carved details for a bespoke touch. Use complementary textures in your upholstery and rugs to tie the look together. Incorporate vintage or handcrafted items to deepen the rustic ambiance.
Exposed wooden beams transform a plain ceiling into a statement feature filled with character. They evoke a sense of craftsmanship and warmth that’s timeless. Ready to embrace the rustic charm? It’s a bold move that can redefine your space’s personality.
5. Geometric Ceiling Patterns with Contrasting Colors for Visual Impact
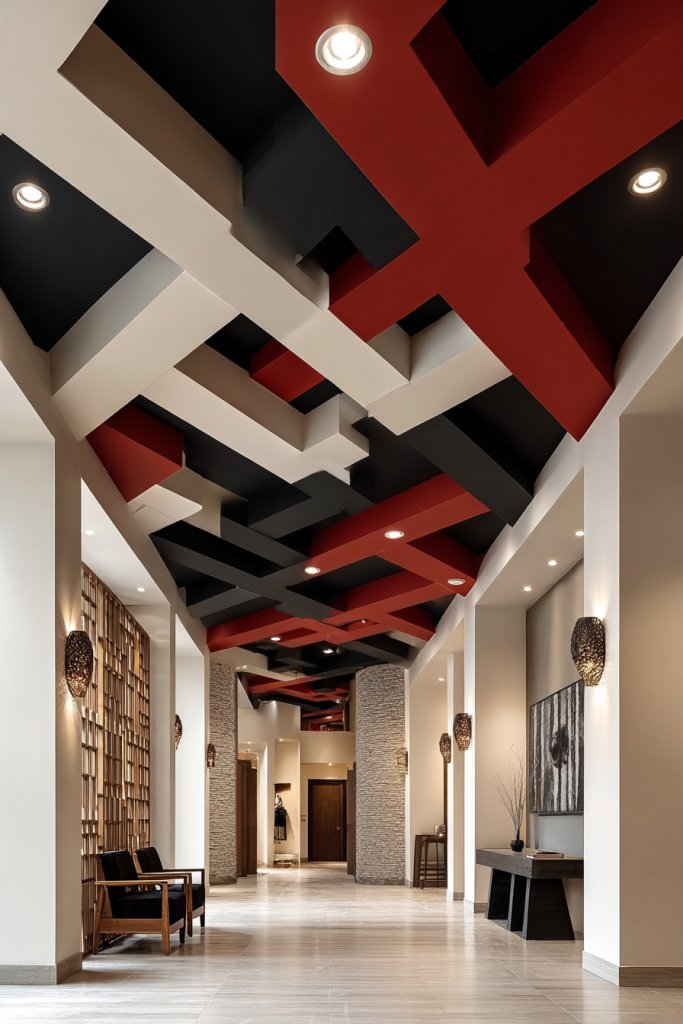
Looking to create a ceiling that’s anything but boring? Geometric patterns with contrasting colors turn your ceiling into a dynamic focal point. They add visual interest and modern flair, perfect for those who love bold design statements.
Envision a ceiling divided into triangles, hexagons, or chevrons painted in sharp contrasting hues—like black and white or navy and gold. These patterns add depth, making the ceiling appear multi-dimensional. The geometric shapes guide the eye across the space, creating a sense of movement and energy. It’s like turning your ceiling into a work of abstract art.
Choose subtle monochromatic patterns for a sophisticated look or go high-contrast for maximum impact. Play with scale: small intricate designs suit compact rooms, while larger shapes work best in spacious areas. Mix patterns with different textures—matte paint with gloss or metallic finishes—to add layers of interest. Seasonal accents can be added with complementary decor or textiles.
Start with a detailed sketch or stencil of your chosen pattern. Use painter’s tape for sharp lines, and apply high-quality, contrasting paint shades. For complex designs, consider hiring a mural artist or using wall decals adapted for ceilings. Make sure to tape edges thoroughly to prevent bleeding. Multiple coats may be necessary for vibrant colors, and sealing the pattern with a clear topcoat preserves the sharpness.
Add metallic or iridescent paints to certain shapes for a touch of luxe. Incorporate lighting effects like spotlights or hidden LEDs to highlight the pattern. Decorate the room with geometric rugs, cushions, or art to reinforce the theme. Personalize with initials or symbols within the pattern for a unique signature.
This bold ceiling design screams modern confidence and creativity. It sets your space apart and shows off your personality. Feeling ready? Geometric patterns are an eye-catching way to express your style and make a statement that lasts.
6. Mirrored Ceiling Panels to Expand Space and Add Glamour
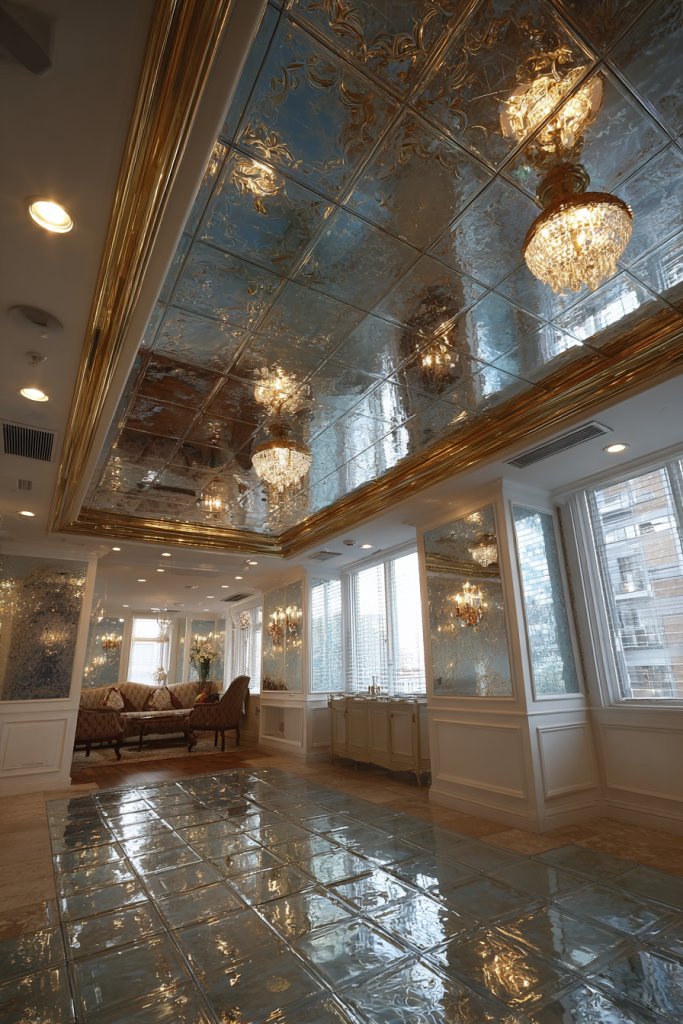
Ever wish your living room felt bigger and more glamorous? Mirrored ceiling panels are the quick fix to create an illusion of space while adding a touch of luxe. They’re perfect for small rooms or for anyone wanting to amp up the elegance factor.
Imagine a ceiling covered in large, glossy mirror panels reflecting the room below. The reflections bounce light around, making the space appear larger and brighter. The shiny surfaces add a sleek, glamorous vibe that instantly elevates the decor. When light hits the mirrors, it creates sparkling highlights, giving your ceiling a starry, upscale appearance.
Opt for frameless, seamless mirrors for a minimalist look, or choose decorative frames for a more ornate style. You can arrange the panels in geometric patterns or a grid for a structured effect. For a softer look, pair mirrored panels with matte walls to avoid overwhelming the room. Seasonal decor can be reflected in the mirrors, changing the ambiance easily.
Begin by measuring your ceiling and selecting mirror panels of appropriate size. Use specialized adhesive for mirrors or professional mounting for safety. Ensure the panels are level and securely attached, especially in high-traffic areas. Consider installing LED strip lighting along the edges to enhance the reflective glow. Regular cleaning with glass cleaner keeps the mirrors shining and clear.
Create a custom framed border with decorative molding to define the mirrored area. Incorporate colored or textured lighting to play with reflections. Use the mirrored ceiling as a backdrop for statement chandeliers or artistic installations—just avoid clutter that could detract from the sleekness. Keep the room clutter-free to maximize the reflective effect.
Mirrored ceilings are a bold statement that instantly adds drama and sophistication. They make your space seem larger than life and more inviting. Confidence is key—this daring choice shows you’re not afraid to push design boundaries. Ready to reflect your style and expand your horizon?
7. Tray Ceiling with Layered Lighting for Depth and Warmth
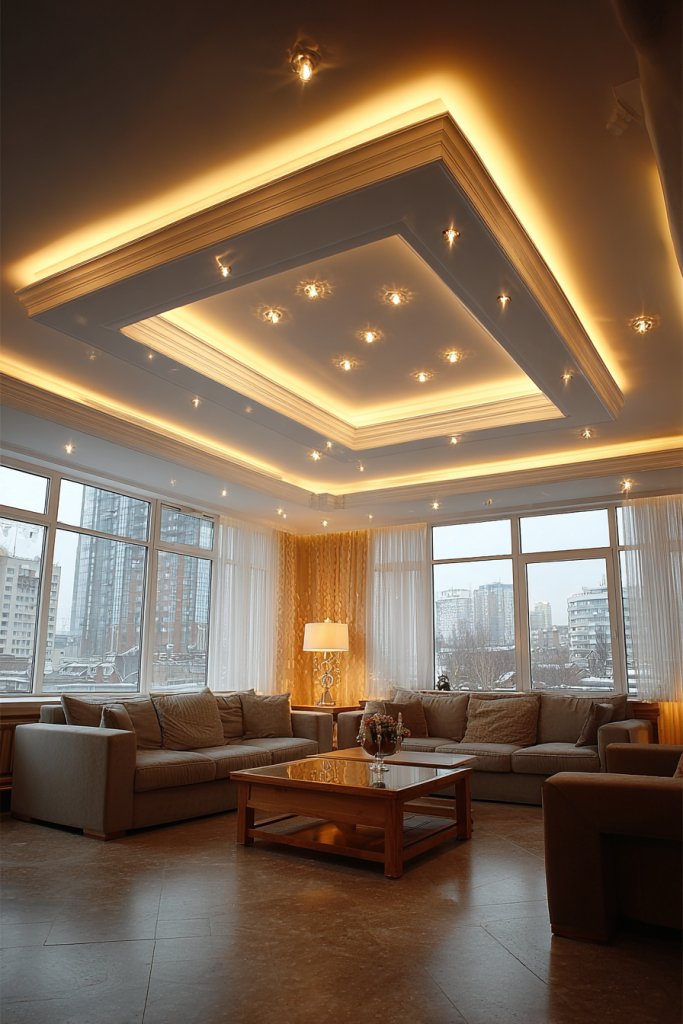
Feeling like your ceiling is flat and uninspired? A tray ceiling with layered lighting instantly adds depth and dimension. It creates a cozy atmosphere while giving your living room a sophisticated architectural feature that’s surprisingly easy to install.
Picture a recessed ceiling with soft cove lighting along the edges, casting a warm glow inward. The central part of the ceiling is slightly lower, framed by moldings or trim, creating a visual ‘tray’ effect. The layered lighting adds warmth and highlights the architectural detail, making the ceiling the room’s focal point. It’s like giving your ceiling a gentle hug of light.
Choose warm white or amber tones for a cozy vibe, or cool whites for a more modern feel. Use dimmable LEDs to adjust the mood from bright and lively to soft and intimate. The tray can be painted in a contrasting color or kept neutral for a seamless look. Larger rooms benefit from multiple layers of lighting, while smaller spaces should keep it simple.
Start by designing your tray layout, deciding on the depth and width. Install a box or framing structure, then add drywall or plaster for a smooth finish. Conceal LED strip lights or small recessed fixtures within the tray’s perimeter. Connect lighting to dimmers or smart controls, and test the effect before finalizing. Finish with paint or wallpaper to complement your decor.
Add decorative molding or trim in a contrasting color to emphasize the tray. Incorporate small accent lights or spotlights inside the tray for focused illumination. Use textured wall finishes or wallpaper on the tray surface for added interest. Layer textiles like plush rugs or velvet curtains to enhance the cozy atmosphere.
A tray ceiling with layered lighting is a subtle yet powerful way to elevate your space. It shows thoughtful design and creates a welcoming environment. Feel confident in experimenting with colors and lighting controls—this feature adapts to your style and mood. Ready to add depth and warmth? Your ceiling will thank you.
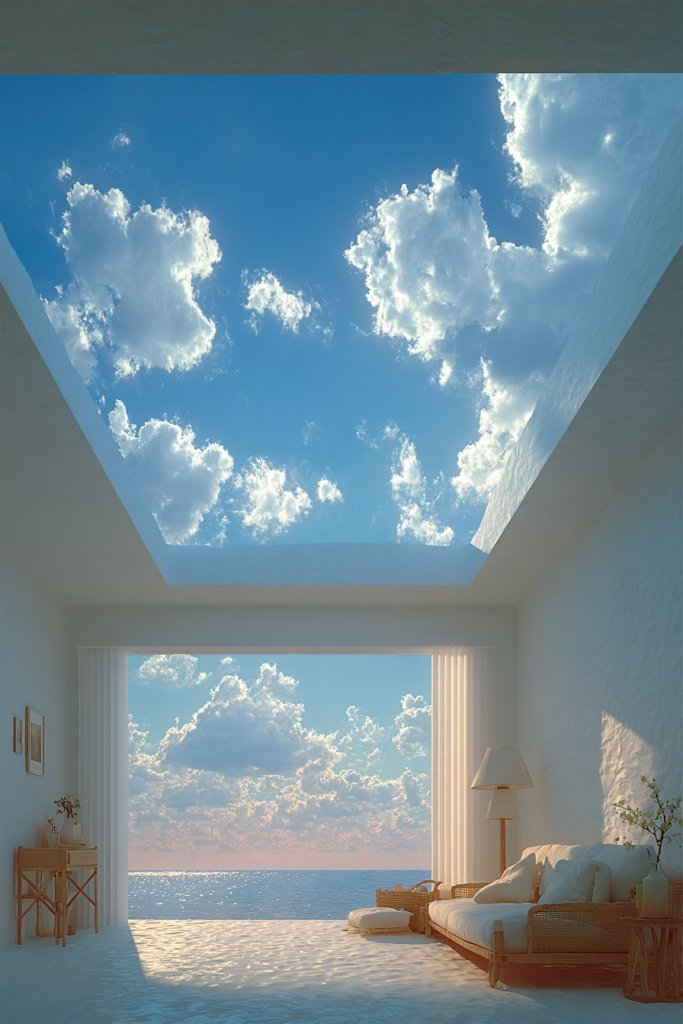
8. Artistic Ceiling Murals or Decorative Paint Techniques for Unique Flair
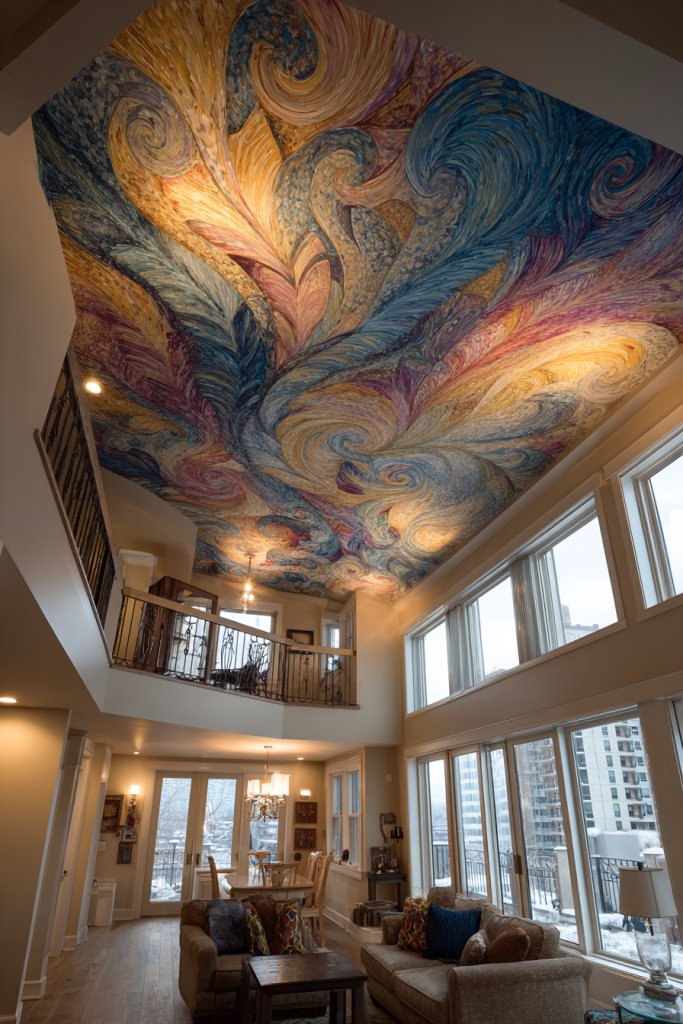
Want your living room ceiling to stand out in a crowd? Artistic murals or decorative paint techniques turn a plain surface into a masterpiece. It’s perfect for creative souls or anyone craving a personalized touch that reflects their style.
Imagine a sprawling mural depicting a serene sky, abstract shapes, or intricate patterns that stretch across the ceiling. The artwork adds depth and personality, making the ceiling a visual centerpiece. The textures and colors create a layered effect, inviting viewers to look up and get lost in the details. It’s like having a piece of art that’s always on display.
Opt for hand-painted murals or stenciled designs depending on your budget and skill level. Use bold colors for a dramatic effect or soft pastels for subtle elegance. Incorporate metallic or pearl accents to add shimmer. Seasonal themes or abstract designs can be swapped out easily or layered over existing paint for versatility.
Start with a clear concept or hire an artist to execute the design. Prepare the ceiling by cleaning and priming the surface. Use high-quality paints and brushes suited for ceilings, and consider stencils for precision. Seal the artwork with a clear protective coat to prevent fading and damage. For DIY projects, practice on a small area first to perfect your technique.
Frame the mural with decorative molding or borders for a finished look. Incorporate textured paints or 3D elements for added dimension. Use lighting to highlight the artwork—think spotlights or LED strips along the mural edges. Personal touches like initials or symbols can make the mural uniquely yours.
A ceiling mural turns your living room into a personal gallery. It showcases your personality and artistic flair, making the space truly one-of-a-kind. Feeling inspired? This approach proves that with a little creativity, your ceiling can become a stunning focal point that sparks conversations.
9. Metallic Foil or Leaf Accents for a Touch of Opulence
Dreaming of a ceiling that screams luxury without the hefty price tag? Metallic foil or leaf accents add a subtle shimmer that instantly elevates any room. They’re perfect for those wanting to introduce a touch of opulence with minimal fuss.
Visualize sections of your ceiling covered in delicate gold or silver leaf, shimmering as light hits them. The reflective surfaces catch ambient light, creating a glow that makes the room feel richer. These accents can be applied in intricate patterns or as a simple highlight, adding a luxe touch that’s both understated and striking. It’s like adding jewelry to your ceiling.
Use metallic accents sparingly for subtle sophistication or go bold with large leafed sections for maximum impact. Pair with matte walls to prevent overwhelming the space. Gold or silver isn’t the only option—copper and rose gold add unique warmth. Incorporate textured or embossed patterns for extra richness.
Apply adhesive to the selected areas and carefully lay down metallic foil or leaf using burnishing tools for a smooth finish. Seal with a protective topcoat to prevent tarnishing and damage. Use stencils or freehand designs for creative effects. For best results, hire a professional with experience in gilding or leafing.
Add complementary metallic accents in light fixtures or decorative hardware to tie the look together. Incorporate textured wall finishes to balance the smooth shimmer. Use lighting to accentuate the metallic surfaces, creating a warm glow or cool shine as desired. Personal touches like monograms or symbols can make the effect even more bespoke.
Metallic accents on your ceiling radiate luxury and confidence. They’re a timeless way to add richness without overwhelming your decor. Inspired to try? This simple idea can dramatically change your space’s atmosphere and style.
10. Skylight or Solar Tube Installations for Natural Drama
Want to flood your living room with natural light and reduce energy bills? Installing skylights or solar tubes creates a dramatic, airy atmosphere that transforms your space. It’s a natural way to brighten up your home and connect with the outdoors.
Imagine a sleek glass or acrylic panel set into your ceiling, letting sunlight pour in during the day. The light bounces around the room, highlighting textures and colors naturally. Solar tubes, with their reflective interior, channel sunlight from the roof into darker corners, creating a dynamic play of light and shadow. It’s like inviting sunshine indoors, anytime you want.
Choose large fixed skylights for expansive views or smaller, operable units for ventilation. For more privacy or style, opt for tinted or frosted glass. Seasonal coverings or shades can control light intensity. In colder climates, ensure proper insulation around the installation to prevent energy loss.
Start by assessing your roof’s structure and consulting a professional for feasibility. Properly sealing and flashing the skylight or tube is critical to prevent leaks. The installation involves cutting into the roof, attaching flashing, and securing the unit according to manufacturer instructions. Inside, finish around the opening with trim or ceiling material that matches your decor.
Add remote-controlled shades or diffusers to modulate sunlight. Incorporate reflective surfaces or light-colored ceilings to maximize brightness. Use window treatments or decorative screens to control glare or add privacy. Seasonal decorations or plants can be placed near the interior openings to enhance the natural vibe.
Natural light improves mood and makes your space feel larger and more inviting. Installing a skylight or solar tube is a smart upgrade that adds value and eco-friendliness. Feeling inspired? Let the sunshine in and enjoy a brighter, more lively living room.
11. Layered Ceiling with Multiple Levels for Architectural Drama
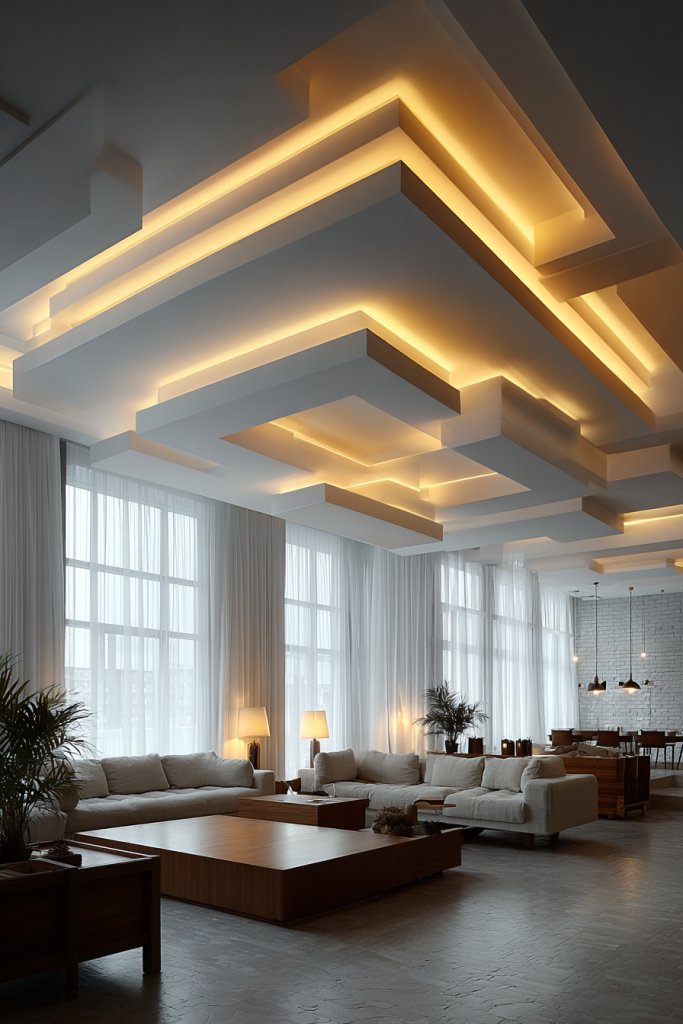
Does your living room lack depth and architectural interest? A layered ceiling with multiple levels instantly adds dimension and sophistication. It’s a bold statement that transforms a flat space into a dynamic focal point, perfect for ambitious decor lovers.
Picture a ceiling with a series of recesses and protrusions, each level painted in complementary shades. The interplay of shadows and highlights creates a sculptural effect, drawing the eye upward. Lighting installed within or around the layers illuminates the different levels, adding warmth and depth. It’s like turning your ceiling into a piece of modern architecture.
Opt for sleek, minimal levels for a contemporary look, or ornate, detailed moldings for a more traditional vibe. Vary the heights to suit your space—higher in larger rooms, more subtle in smaller ones. Use contrasting colors or textures between levels for added interest. Seasonal accents can be added with decorative trim or fabric panels.
Begin with detailed measurements and a clear design plan. Construct a framework using drywall, wood, or metal to create the different levels. Install lighting within the recesses to emphasize the depth. Finish with paint, wallpaper, or decorative finishes that match your overall decor. Structural stability is key—consider professional help for complex designs.
Add decorative moldings or cornices to each level for elegance. Incorporate indirect lighting or spotlights for dramatic effects. Use textured finishes or painted patterns to differentiate the layers further. Personal touches like motifs or monograms can make the design uniquely yours.
Layered ceilings showcase your boldness and design confidence. They add architectural richness that makes your living room unforgettable. Ready to elevate your decor? This feature turns a simple room into a stunning statement of style and craftsmanship.
12. Suspended Fabric Canopy or Installations for Soft, Textural Contrast
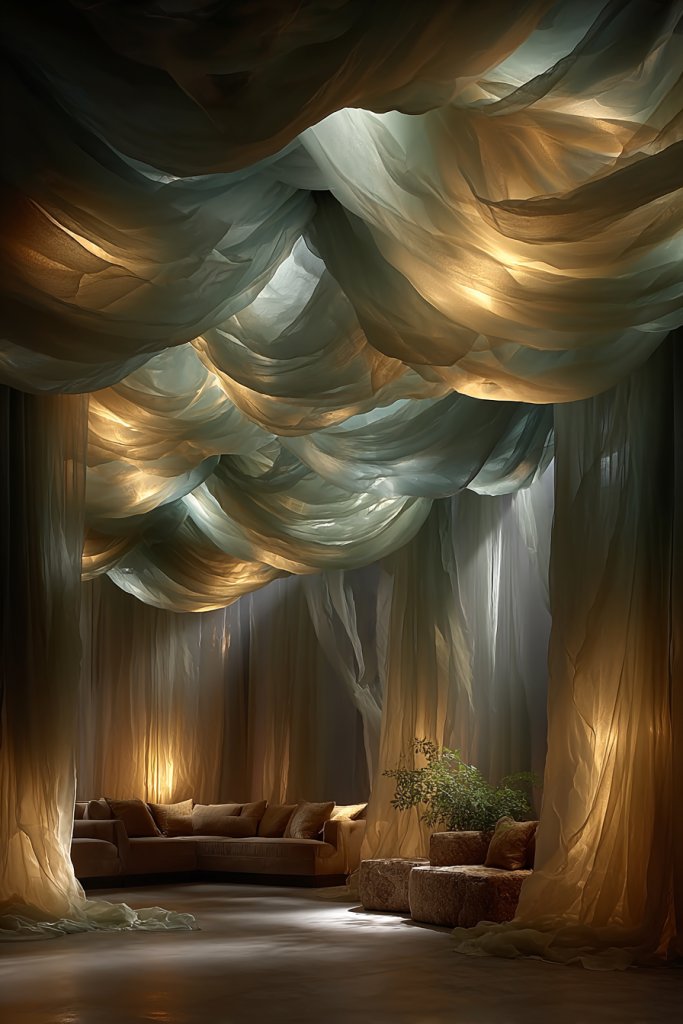
Want to soften the look of your living room ceiling while adding a touch of elegance? Suspended fabric canopies or artistic fabric installations create a dreamy, cozy atmosphere. They introduce texture and movement, perfect for boho, modern, or eclectic styles.
Imagine flowing fabric draped from the ceiling, creating a layered canopy that adds softness and privacy. The fabric’s gentle folds catch light and shadow, creating a dynamic visual effect. When lit from beneath or behind, it produces a warm, inviting glow. It’s like turning your ceiling into a cloud of comfort and style.
Choose lightweight fabrics like linen, silk, or voile in neutral or bold colors to match your decor. For a more structured look, opt for scalloped or pleated designs. Incorporate decorative trims or fringes for added detail. Seasonal changes are easy—swap fabrics for different textures or colors.
Securely attach mounting points or beams to the ceiling to support the fabric. Use durable, weight-tested hardware and sturdy cords or rods. Drape and arrange the fabric in layers or cascades, securing it with clips or ties. Incorporate lighting features like string lights or hidden LED strips to enhance the softness.
Add decorative accents such as tassels, beads, or embroidery to the fabric. Use colored lighting to create mood effects—warm amber or cool white. Personalize with motifs or symbols sewn into the fabric for a bespoke touch. Incorporate matching textiles in nearby furniture or drapes for a cohesive look.
A fabric canopy adds softness and whimsy, making your living room feel like a retreat. It’s a creative way to introduce texture without heavy construction. Feeling inspired? This flexible, artistic feature lets you experiment with color and form, turning your ceiling into a statement of style.
13. Black or Dark-Colored Ceilings for Cozy, Intimate Atmosphere
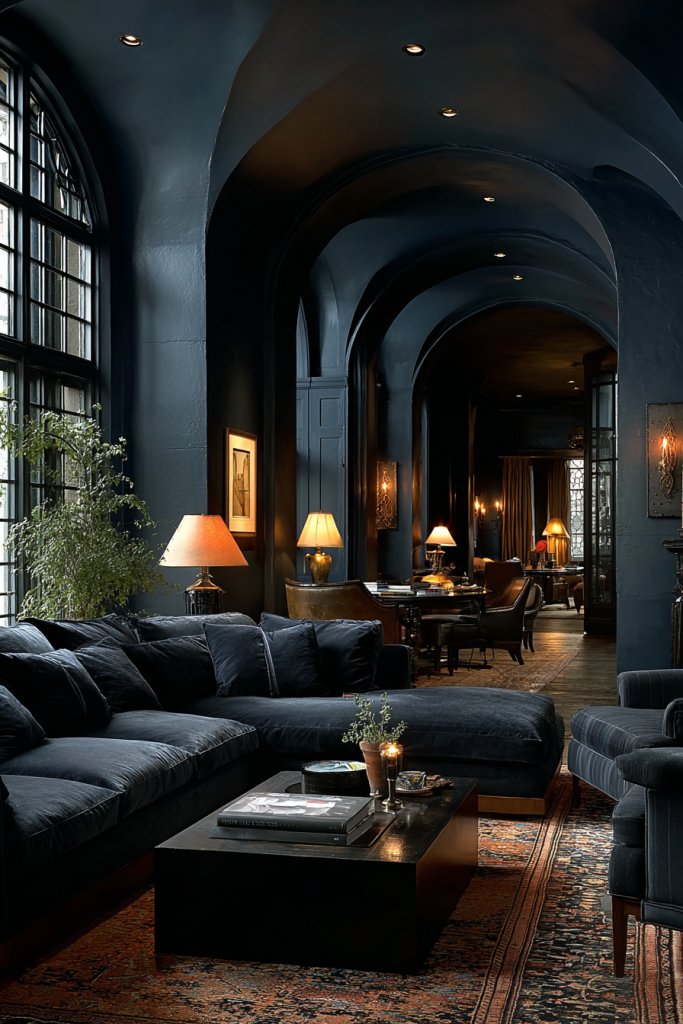
Ever wish your living room felt more intimate and cozy? Painting the ceiling in deep hues like charcoal, navy, or black can dramatically transform the space. It creates a cocooning effect, making the room feel warm and inviting, especially in larger or open-plan areas.
Picture a ceiling painted in matte midnight black, contrasting sharply with light-colored walls and furniture. The dark surface absorbs excess light, giving the room a plush, enveloping feel. When paired with warm lighting, the space feels intimate and luxurious. The ceiling becomes a bold, grounding element that anchors the room’s design.
Use dark ceilings in rooms with plenty of natural light to prevent the space from feeling closed in. Pair with light or neutral walls and furnishings to create contrast. Incorporate metallic or textured decor to add depth and prevent the ceiling from appearing flat. Seasonal lighting, like candles or amber LEDs, enhances the cozy vibe.
Prepare the ceiling surface by cleaning and priming for even paint application. Use high-quality matte or satin paint designed for ceilings, and apply with rollers or brushes. Multiple coats may be required for an even, rich color. Finish with a protective sealant if desired. Consider professional help for high ceilings to ensure even coverage.
Decorate the space with plush textiles, rugs, or throws that complement the dark ceiling. Use warm, layered lighting like sconces or indirect uplighting to soften shadows. Add metallic accents or textured wallpaper on walls to balance the darkness overhead. Personal touches like artwork or decorative objects add visual interest.
A dark ceiling creates a dramatic, intimate environment that feels luxurious and unique. It’s a bold choice that shows confidence and style. Ready to embrace the cozy side of design? This look proves that sometimes, going dark is the way to go.
14. Recessed Niches or Indentations with Accent Lighting for Subtle Sophistication
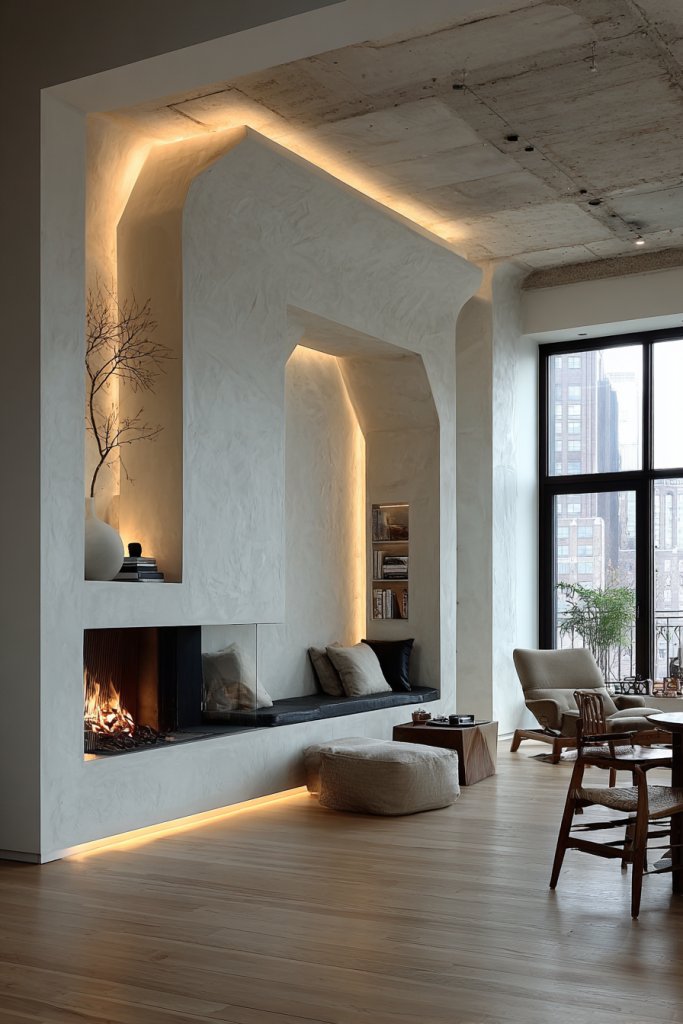
Want to add subtle architectural detail that elevates your living room? Recessed niches or indentations with hidden accent lighting provide a sophisticated, layered look. They add visual interest without cluttering the space, perfect for minimalist or modern interiors.
Envision a ceiling with shallow recesses that house soft, concealed LED lights. The niches create a sense of depth, while the lighting highlights their edges, casting gentle glows. This setup draws attention upward and adds a refined, curated feel. It’s like giving your ceiling a secret, glowing dimension that’s both elegant and understated.
Use different depths or shapes—rectangles, circles, or abstract forms—to suit your style. Keep the color palette neutral or match the niches to your ceiling for seamlessness. For more impact, add textured or patterned surfaces within the niches. Seasonal decor or art can be placed in the recesses for versatility.
Start by designing the layout with precise measurements. Use drywall or custom-built panels to create the recesses. Install LED strip lights or small spotlights inside the niches, wiring them discreetly. Finish with paint or wallcoverings that match or contrast with your ceiling. Ensure all wiring is concealed and secure.
Highlight the niches with colored or dimmable lighting to change moods. Incorporate decorative trims or moldings for a finished look. Personalize with small sculptures, vases, or textured surfaces that add character. Use reflective or matte finishes to play with light and shadow.
Recessed niches add depth and sophistication, elevating your decor effortlessly. They show a refined eye for detail and craftsmanship. Feeling inspired? These subtle features make your ceiling a quiet but impactful statement of style.
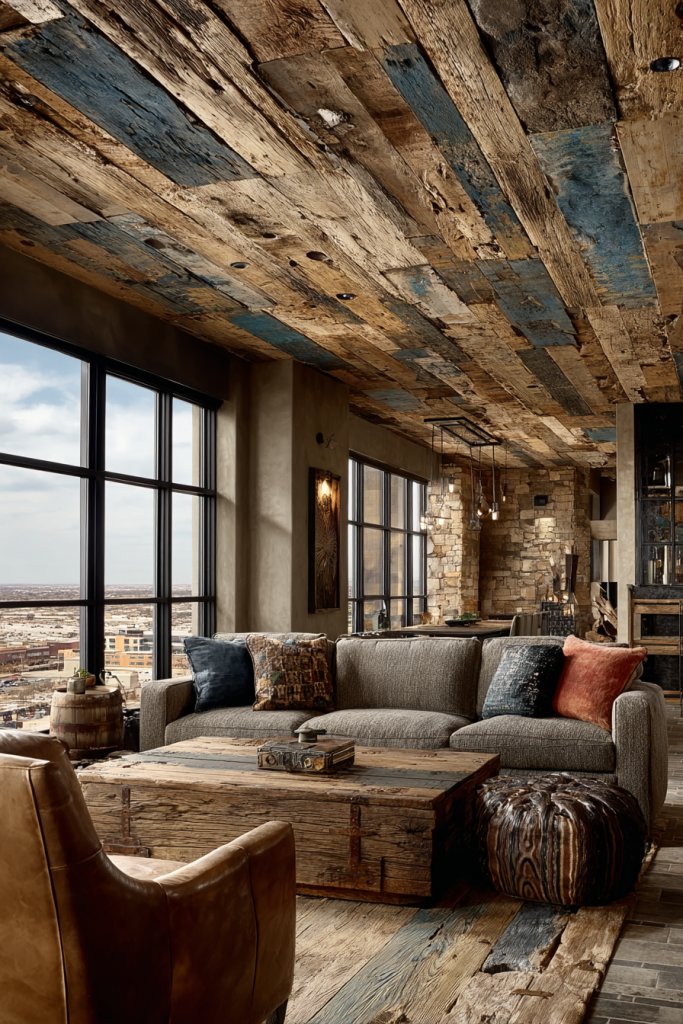
15. Patterned Ceiling Tiles or Wood Planks for Vintage or Industrial Style
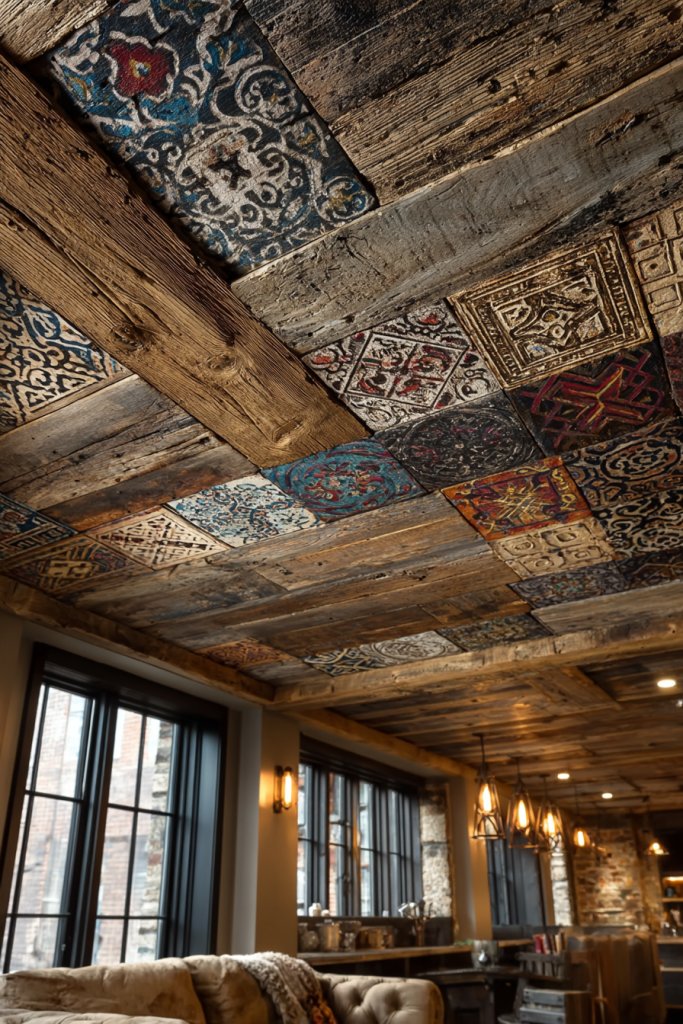
Looking to add vintage charm or industrial edge to your living room? Patterned ceiling tiles or reclaimed wood planks instantly bring character and texture. They’re a practical way to create a focal point with historic or rugged appeal.
Imagine a ceiling covered with vintage tin tiles featuring intricate patterns or reclaimed wood planks with weathered finishes. The textures add depth and warmth, making the ceiling an eye-catching feature. When paired with exposed fixtures or vintage bulbs, the look becomes authentic and inviting. It’s like giving your ceiling a story to tell.
Select ornate tiles for a classic look or rustic wood for a more industrial vibe. Mix and match with modern elements for eclectic charm. Keep the colors neutral or add painted details for extra interest. Seasonal accents like warm textiles or vintage accessories further enhance the style.
Install the tiles or wood planks directly onto your existing ceiling using appropriate adhesive or fasteners. For wood, ensure proper sealing or finishing to prevent damage. For tiles, use a strong adhesive and grout where necessary. Prepare the ceiling surface, and follow manufacturer instructions carefully. Consider professional installation for larger or complex layouts.
Add decorative metal accents or painted patterns to the tiles or wood for extra detail. Incorporate vintage lighting fixtures or Edison bulbs to complete the aesthetic. Use complementary wall decor—like old signage or metal accents—to reinforce the theme. Regular maintenance preserves the textured look.
Patterned tiles and wood planks create instant history and character. They show off your appreciation for craftsmanship and vintage style. Feeling inspired? These choices turn a simple ceiling into a nostalgic or industrial centerpiece that speaks volumes.
16. Artistic Plaster Relief or 3D Wall Paneling on the Ceiling for Texture
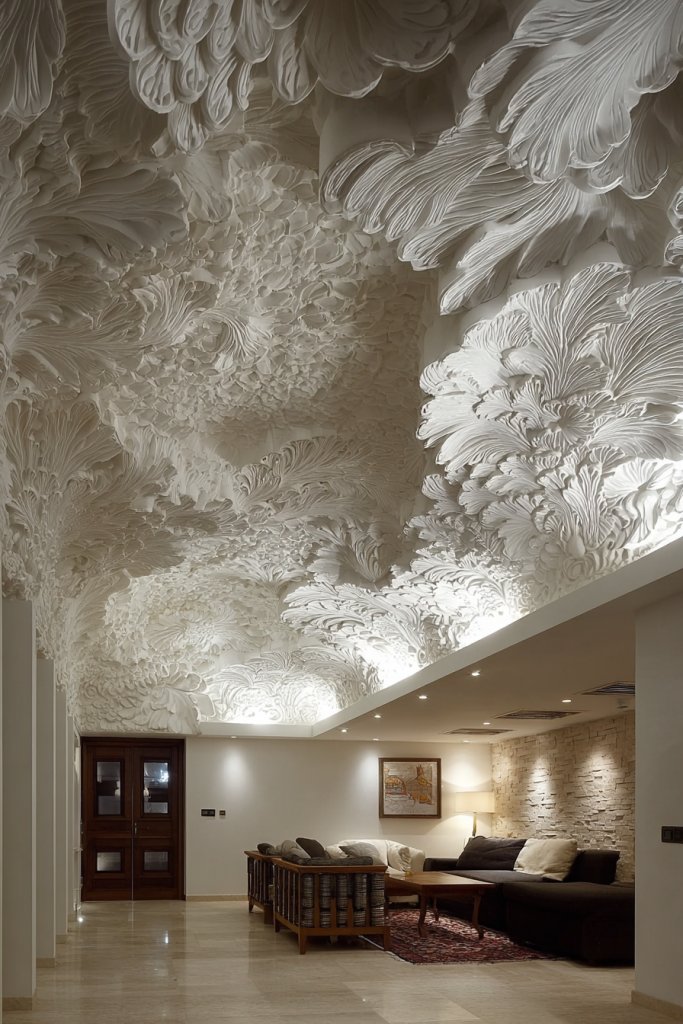
Want to add texture and depth to your ceiling that feels both artistic and sophisticated? Artistic plaster reliefs or 3D wall paneling bring a tactile dimension that’s impossible to ignore. They’re perfect for making a bold statement with a touch of artistry.
Visualize a ceiling adorned with intricate plaster relief patterns or sculptural wall panels that extend across the surface. The three-dimensional textures catch light and shadow, creating an ever-changing play of visuals. It’s like turning your ceiling into a gallery of tactile art, inviting viewers to explore its details.
Choose reliefs with floral, geometric, or abstract motifs to match your style. Keep the overall palette neutral to emphasize texture or add color accents for vibrancy. Combine with minimalist lighting to highlight the reliefs without overwhelming them. Seasonal or thematic motifs can be layered into the design.
Start by selecting plaster reliefs or 3D panels suited for ceilings. Professional installation ensures the reliefs are securely attached and properly aligned. Use high-quality adhesives and finishing techniques to blend joints seamlessly. Finish with paint or protective coatings, and add accent lighting to emphasize the texture. For DIY, practice on a small section first.
Add metallic paints or gilding to highlight specific features. Integrate indirect lighting or spotlights for dramatic effects. Decorate with complementary textures—like velvet or silk—to reinforce the tactile theme. Personal touches such as monograms or custom motifs make the design uniquely yours.
3D reliefs and textured panels turn your ceiling into a sculptural masterpiece. They showcase your artistic side and dedication to unique decor. Feeling inspired? This feature is a statement of craftsmanship and bold taste, elevating your entire space.
17. Colored Ceilings with Complementary Wall Tones for Cohesive Drama

Looking to craft a truly dramatic and cohesive space? A bold-colored ceiling paired with complementary wall tones instantly creates a seamless, immersive environment. It’s an easy way to express personality while adding depth and vibrancy.
Imagine a deep emerald green ceiling that perfectly matches or contrasts with rich, warm walls. The color draws the eye upward, giving the room a sense of height and intimacy. When combined with layered lighting, the hues glow softly, enveloping the space in a warm embrace. It’s like wrapping your room in a vibrant, stylish blanket.
Choose high-contrast combinations for maximum impact or analogous shades for harmony. Light-colored ceilings with darker walls also work beautifully, creating a balanced look. Incorporate textures and patterns to prevent the color from feeling flat. Seasonal color updates or accessories can refresh the mood easily.
Prepare your ceiling and walls by cleaning and priming. Use high-quality paint in your chosen hues, applying multiple coats for rich color. Consider using painter’s tape for clean edges and precise lines. Finish with a clear sealant to protect the color and enhance vibrancy. For larger rooms, hiring a professional ensures flawless application.
Add decorative moldings or accents in contrasting colors for a layered look. Use lighting—like colored LEDs or dimmable fixtures—to reinforce the mood. Incorporate textiles, furniture, or accessories that echo the color scheme for a unified aesthetic. Personal touches like monograms or patterns can make the space uniquely yours.
A colored ceiling transforms your room into a bold, expressive space. It’s a statement of confidence and creativity that invites admiration. Inspired to experiment? This simple change can redefine your entire decor style with vibrant personality.
18. Chandeliers or Statement Light Fixtures as Focal Points
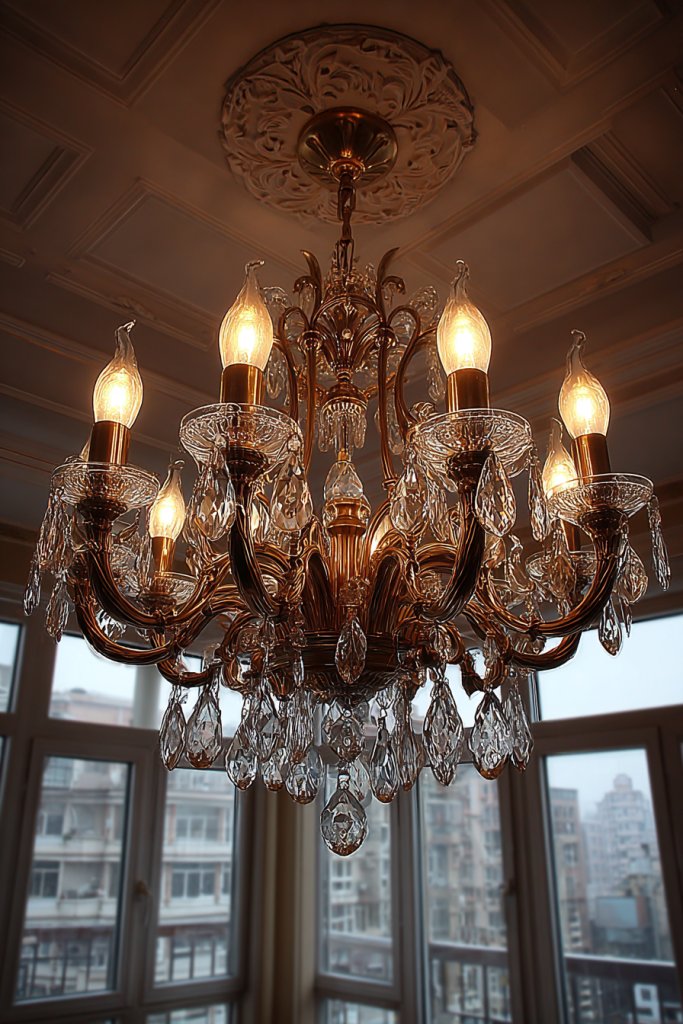
Want to draw attention upward and add instant glamour? A stunning chandelier or statement light fixture can be the centerpiece that elevates the entire room. It’s a classic move that never goes out of style, perfect for adding a touch of luxury.
Picture a grand chandelier with sparkling crystals hanging from a high ceiling or a sculptural fixture with bold shapes and finishes. The light reflects and refracts, creating shimmering effects that fill the space with elegance. It becomes a visual anchor, guiding the eye and setting the tone for the room’s decor.
Choose a fixture that matches your style—classic, modern, industrial, or eclectic. Scale is key: a large chandelier suits spacious rooms, while smaller fixtures work in intimate settings. Use dimmable bulbs to adjust ambiance, and coordinate finishes with hardware or accents in the room.
Ensure your ceiling can support the fixture’s weight—consult a professional if needed. Install the fixture securely following manufacturer instructions, paying attention to wiring and grounding. Consider adding a ceiling medallion or decorative canopy for extra detail. Test the lighting and make adjustments to height and focus for perfect effect.
Add decorative crystals, shades, or colored bulbs for unique effects. Complement with layered lighting—wall sconces or LED strips—to enhance the centerpiece. Use textiles or decor around the fixture to reflect its style—think velvet drapes or metallic accents. Personalize with custom-made or vintage fixtures for a distinctive look.
A statement fixture transforms your ceiling into a focal point of luxury and style. It shows confidence in design choices and elevates your decor instantly. Ready to make a statement? This feature is a surefire way to impress and inspire.
19. Minimalist Ceilings with Subtle Cove Lighting for Understated Elegance
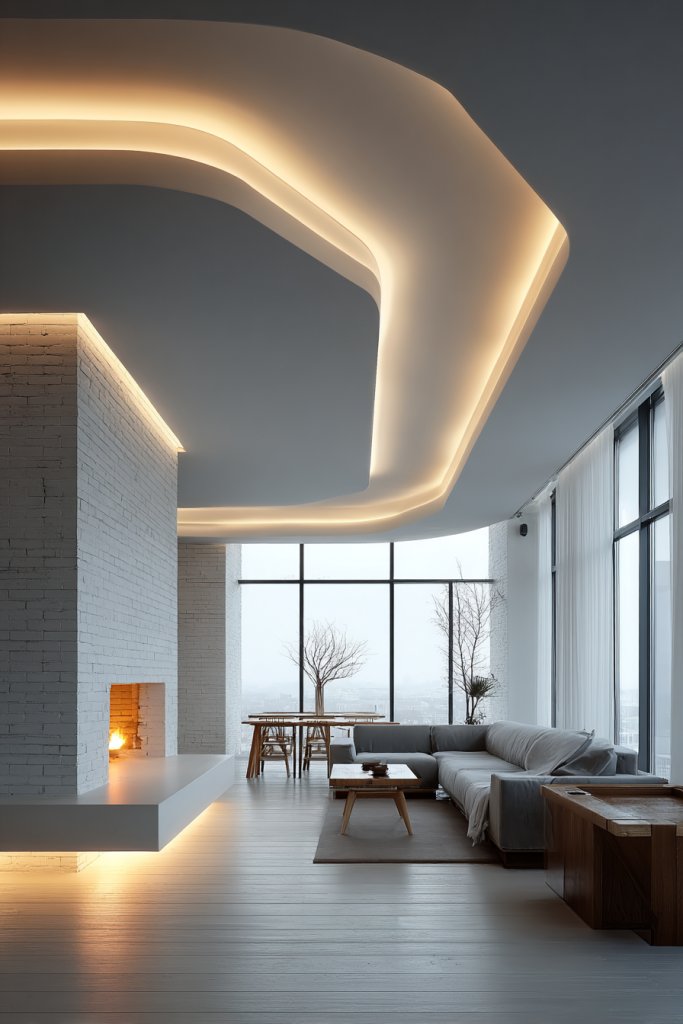
Craving a clean, uncluttered ceiling that exudes understated elegance? Minimalist ceilings with subtle cove lighting offer a sleek, modern look that’s both calming and sophisticated. It’s perfect for those who prefer subtlety over fuss.
Imagine a smooth, flat ceiling with hidden LED strips installed within a narrow recess along the perimeter. The soft glow creates a gentle halo effect, emphasizing clean lines and open space. The absence of ornamentation keeps the focus on form and light, making your room feel airy and serene. It’s like a gentle whisper of design.
Keep the ceiling monochromatic or in neutral shades for maximum simplicity. Pair with minimal decor—think sleek furniture and simple textures. For warmth, choose warm white lighting; for a cooler vibe, opt for daylight tones. This setup adapts well to small and large spaces alike.
Plan your ceiling layout and install a narrow ledge or recess around the perimeter. Use flexible LED strip lighting and conceal wiring with trim or molding. Finish the ceiling with smooth paint or a matte finish to enhance the minimalist aesthetic. Test lighting levels before finalizing the setup for a perfect glow.
Add subtle textured wall finishes or artwork to complement the clean ceiling. Use layered textiles and soft furnishings to create a cozy atmosphere. Incorporate smart controls to adjust brightness and color temperature easily. Keep accessories minimal to preserve the sleek look.
A minimalist ceiling with cove lighting embodies modern sophistication. It shows restraint and confidence in design, creating a space that feels both peaceful and stylish. Inspired? This elegant approach proves less is often more.
20. Artistic Ceiling Borders or Molding with Decorative Finishes for Classic Charm
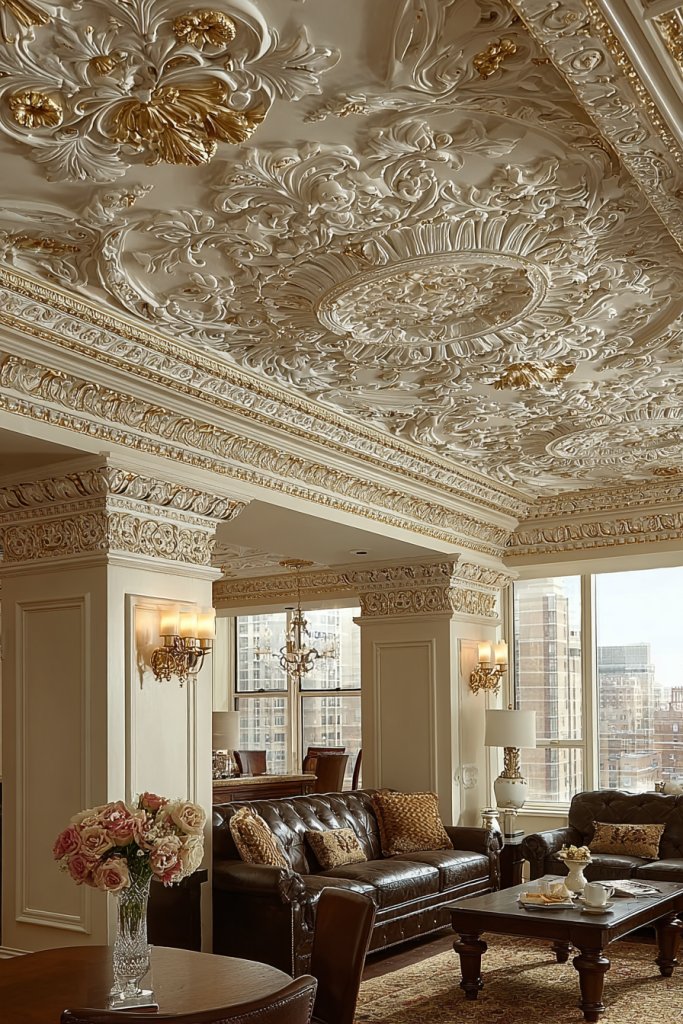
Looking to add timeless charm and architectural interest? Artistic ceiling borders or moldings with decorative finishes instantly elevate your space. They bring a classic, refined touch that’s perfect for traditional or vintage-inspired decor.
Picture ornate crown moldings framing a ceiling painted in a soft, coordinating hue. The intricate detailing adds depth and sophistication, drawing the eye upward. Decorative finishes like gilding or faux plaster effects enhance the moldings’ elegance. It’s like framing your ceiling with jewelry, making it a true centerpiece.
Choose from elaborate designs with floral motifs or simpler geometric patterns for a more understated look. Pair the borders with textured or patterned ceiling surfaces. Gold or metallic accents add luxury, while painted or aged finishes create vintage appeal. Seasonal touches like ribbons or floral arrangements can be added for special occasions.
Install the moldings using adhesive or nails, ensuring they are level and secure. Fill joints with putty and sand for smoothness, then paint or finish as desired. For complex designs, consider hiring a skilled carpenter or decorator. Finish with protective topcoats to preserve the decorative finishes and prevent damage.
Highlight moldings with accent lighting or small spotlights for extra drama. Add decorative medallions or motifs that reflect your personality. Use contrasting colors or metallic paints within the borders for a layered, opulent look. Incorporate seasonal or thematic accents for special occasions.
Elegant borders and moldings evoke a sense of tradition and craftsmanship. They demonstrate your appreciation for detailed design and timeless style. Feeling inspired? This classic feature adds value and character, making your ceiling a crown jewel of your decor.
21. Eco-Friendly, Reclaimed Material Ceilings for Sustainable Style
Want to make your living room more eco-conscious without sacrificing style? Reclaimed or sustainable materials for ceilings prove that beauty and sustainability can go hand in hand. It’s a bold statement for environmentally minded design lovers.
Visualize a ceiling crafted from reclaimed wood, vintage tin tiles, or recycled metal panels. The natural or weathered textures add authenticity and warmth, creating a cozy, earthy vibe. The eco-friendly materials often develop a unique patina over time, telling a story of history and sustainability. It’s like giving old materials a new life.
Choose materials that match your decor—rustic wood for country style, metal panels for industrial chic, or composite materials for modern eco designs. Combine different reclaimed elements for a layered, eclectic look. Maintain a neutral or natural palette to emphasize authenticity. Seasonal accessories like textiles and greenery can enhance the natural feel.
Source reclaimed materials from reputable suppliers or salvage yards. Prepare the ceiling surface, then attach the materials securely using nails, adhesives, or brackets. Ensure proper sealing or finishing to protect against moisture or pests. For wood, consider eco-friendly stains or oils to preserve the finish. Professional installation may be needed for large or complex layouts.
Add natural or handcrafted finishes—like beeswax or plant-based oils—to enhance the material’s character. Incorporate eco-friendly lighting, such as LED or solar-powered fixtures, to complete the sustainable look. Personalize with vintage or handcrafted decor that complements the natural materials. Seasonal accents like woven textiles or botanicals further reinforce the eco vibe.
Reclaimed and eco-friendly ceilings showcase your commitment to sustainability and style. They add warmth, texture, and character, making your home a reflection of your values. Feeling inspired? These choices prove that eco-conscious design can be both beautiful and functional, turning your ceiling into a statement of purpose.
Conclusion
With a diverse range of living room ceiling design ideas, you now have the inspiration to elevate your space and make a bold statement. Whether you opt for subtle textures or eye-catching features, these ideas can truly transform your living room into a stunning showcase. Don’t be afraid to experiment and bring your unique style to life—your dramatic, beautifully designed ceiling awaits!