Imagine stepping into a kitchen that instantly sparks your creativity and makes cooking an exciting experience! Kitchen interior design ideas have gained immense popularity because they not only enhance functionality but also reflect your unique style and personality.
In this article, you’ll find a diverse array of ideas to inspire your kitchen makeover, from cozy and rustic to sleek and modern. Whether you’re looking to maximize space, introduce vibrant colors, or incorporate trendy materials, these suggestions will help you craft a kitchen that feels both inspiring and practical—perfect for creating memorable culinary moments.
1. Open Shelving with Stylish Dishware Displays
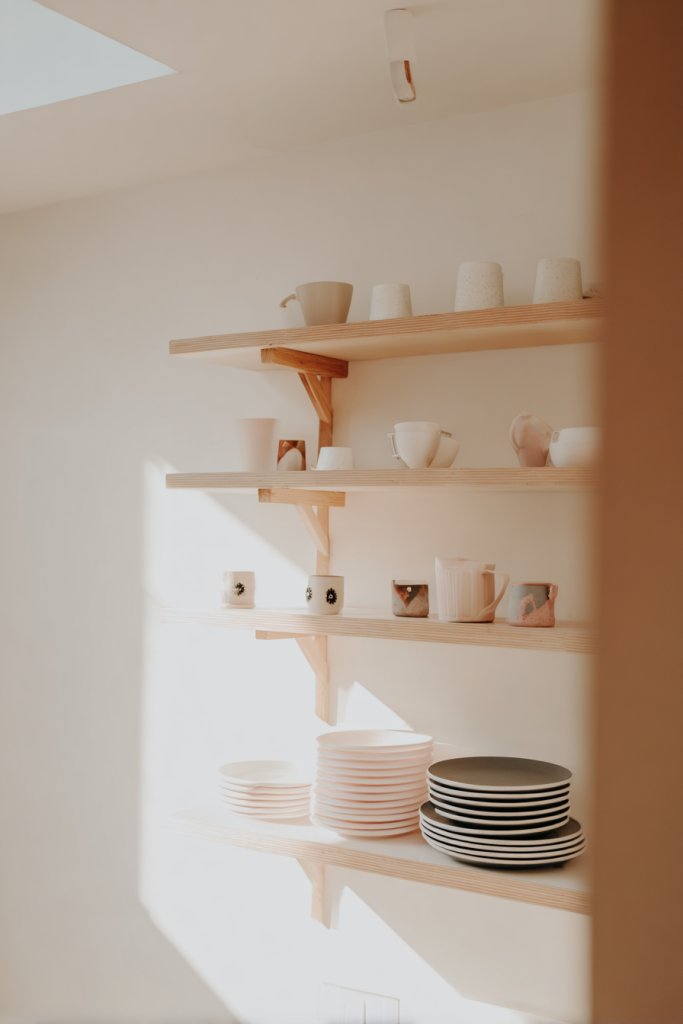
Ever feel like your kitchen is cluttered or too dull to inspire cooking? Open shelving offers a perfect solution—combining practicality with style. It allows you to keep essentials within reach while giving your space a curated, inviting vibe. Plus, it’s a chance to showcase your favorite dishware, making every meal feel special.
Picture a set of floating wooden shelves mounted against a crisp backsplash. Brightly colored plates, bowls with textured patterns, and elegant glasses are artfully arranged, catching the light and adding personality. The contrast of rustic wood with modern dishware creates a warm yet contemporary look. Soft ambient lighting from under-shelf LEDs highlights the display, making it pop.
Adjust the shelving to fit your style—sleek metal brackets with glass shelves for a modern feel or reclaimed wood for rustic charm. Use open shelves in small kitchens to maximize storage without feeling cramped. Incorporate decorative storage baskets or colorful trays for added texture and organization. Seasonal dishware can be rotated in for a fresh look throughout the year.
Start by choosing sturdy, open shelving units that match your kitchen’s aesthetic. Install at eye level for easy access, ensuring they can support the weight of your dishes. Arrange your dishware in a balanced way, mixing heights and colors for visual interest. Use under-shelf LED strips or small puck lights to illuminate your displays. Keep frequently used items at the front for convenience.
Add decorative elements like vintage mugs, artisanal ceramics, or themed dish sets to personalize your display. Incorporate small potted herbs or decorative jars (not vases) to enhance the look without cluttering the space. Change up the arrangement seasonally or for special occasions to keep it fresh. Use colorful or patterned shelf liners beneath your dishes for extra flair.
Open shelving transforms your kitchen into a gallery of your personality and taste. It encourages you to be more intentional with your dishware and organization. This simple update can make your space feel more open, welcoming, and fun to cook in. Ready to turn your kitchen into a stylish display and functional hub?
2. Bright Backsplash with Patterned Tiles
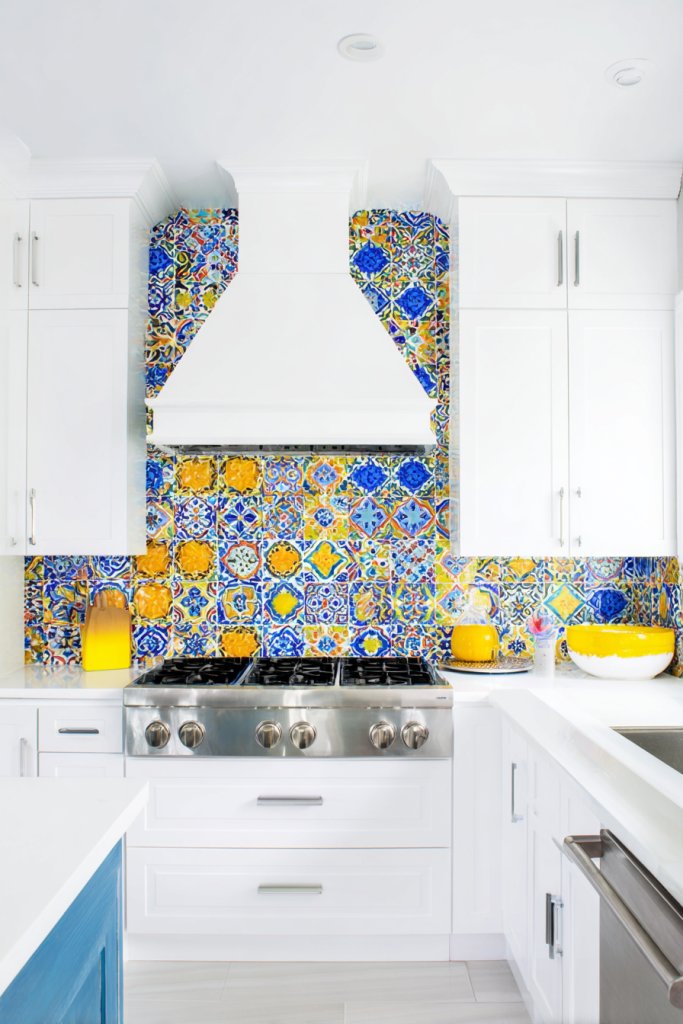
Tired of a dull, uninspiring kitchen wall that doesn’t spark joy? A vibrant backsplash with patterned tiles instantly adds personality and depth. It transforms a plain surface into a focal point that energizes the entire space. Who doesn’t want a kitchen that feels lively and unique?
Imagine a wall covered in bold, geometric tiles with rich colors like cobalt, mustard, or emerald. The intricate patterns catch the eye without overwhelming the room. The textured surfaces reflect light differently, adding dimension. This creates a lively backdrop behind your stove or sink, making everyday cooking feel like a design statement.
Choose tiles that complement your overall decor—sleek subway tiles with a twist, Moroccan-inspired patterns, or hand-painted artisanal ceramics. For smaller kitchens, lighter colors with subtle patterns keep the space feeling open. For larger spaces, go bold with oversized tiles or contrasting grout lines. Seasonal accents, like warm tones in fall, can be swapped to suit your mood.
Begin by selecting patterned tiles that fit your style and budget. Prepare the surface thoroughly—clean and level it—to ensure proper adhesion. Use a high-quality adhesive suited for ceramic or stone tiles. Lay the tiles carefully, following your chosen pattern, and apply grout that complements or contrasts for added visual interest. Seal the tiles to protect against stains and splashes. Consider hiring a pro if you’re new to tiling.
Add unique touches with custom-painted tiles or mixing different patterns for an eclectic look. Incorporate metallic or matte finishes for variety. Use coordinating accessories like colorful cookware or textiles to tie the room together. You can even add a decorative border or trim to frame the backsplash, elevating it further.
A patterned tile backsplash is a bold move that pays off—adding character and charm. It shows your personality and makes the space memorable. Once installed, it’s low-maintenance and timeless, giving you confidence to experiment with other design elements. Your kitchen will feel instantly more vibrant and inviting.
3. Multi-Functional Kitchen Island with Seating
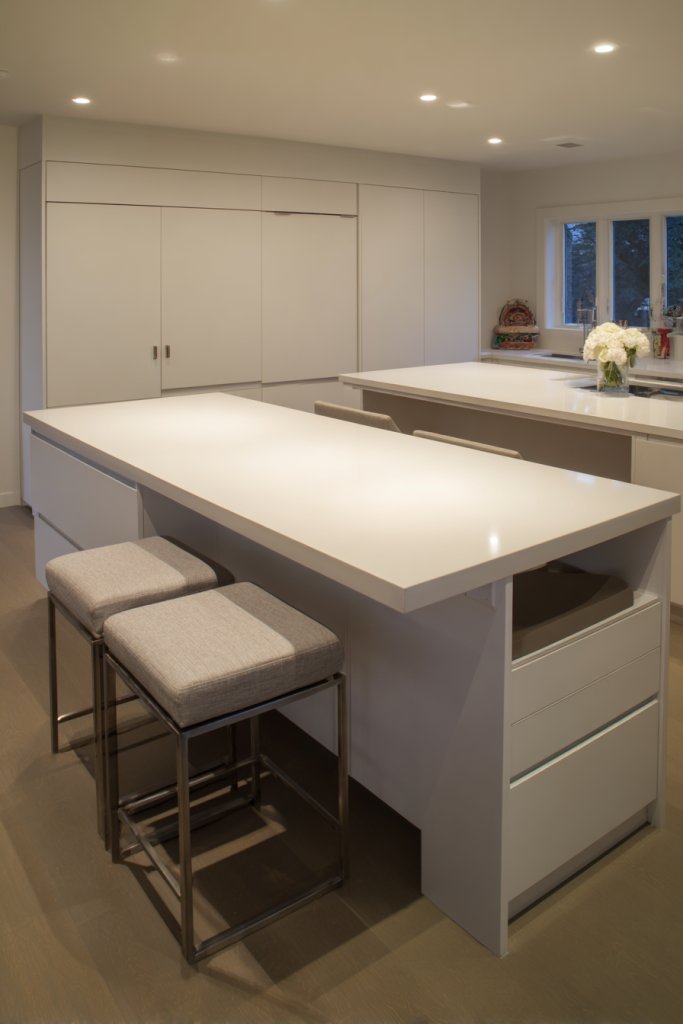
Ever wished your kitchen could do more than just cook? A multi-functional island turns a simple workspace into a social hub. It offers prep space, storage, and a casual dining area all in one. Perfect for small homes or busy families who want a central gathering spot. Who says you can’t have it all?
Picture a large island with a sleek quartz top, surrounded by stylish bar stools. Built-in shelves and drawers provide easy access to utensils and cookware. The island’s surface doubles as a breakfast bar with space for friends or family to sit and chat. Ambient pendant lighting above adds a cozy glow, inviting everyone to gather around.
Design the island to match your style—industrial with metal accents, minimalist with clean lines, or rustic with reclaimed wood. For smaller spaces, opt for a compact version with fold-away seating. Add a wine rack or hidden trash bin to keep clutter out of sight. During holidays or special occasions, expand or decorate it to create a festive vibe.
Start by measuring your space and deciding on the essential features—storage, seating, or prep area. Choose durable materials like quartz or granite for the surface. Incorporate built-in shelves, wine racks, or hidden compartments for organization. Select comfortable stools that complement your design and ensure they fit under the counter when not in use. Secure the island to the floor for stability.
Personalize with decorative elements like a colorful runner, unique hardware, or custom-made stools. Use open shelving to display cookbooks or decorative jars instead of vases. Incorporate a pull-out cutting board or extendable surface for extra prep space. Add plants or art on nearby walls to make the area feel lively and yours.
A versatile kitchen island boosts functionality and style, making your space more enjoyable. It encourages social cooking and makes entertaining effortless. When your kitchen becomes a hub of activity, you’ll love spending time there even more. Ready to create a central space that’s both practical and fun?
4. Under-Cabinet LED Lighting for Ambiance and Functionality
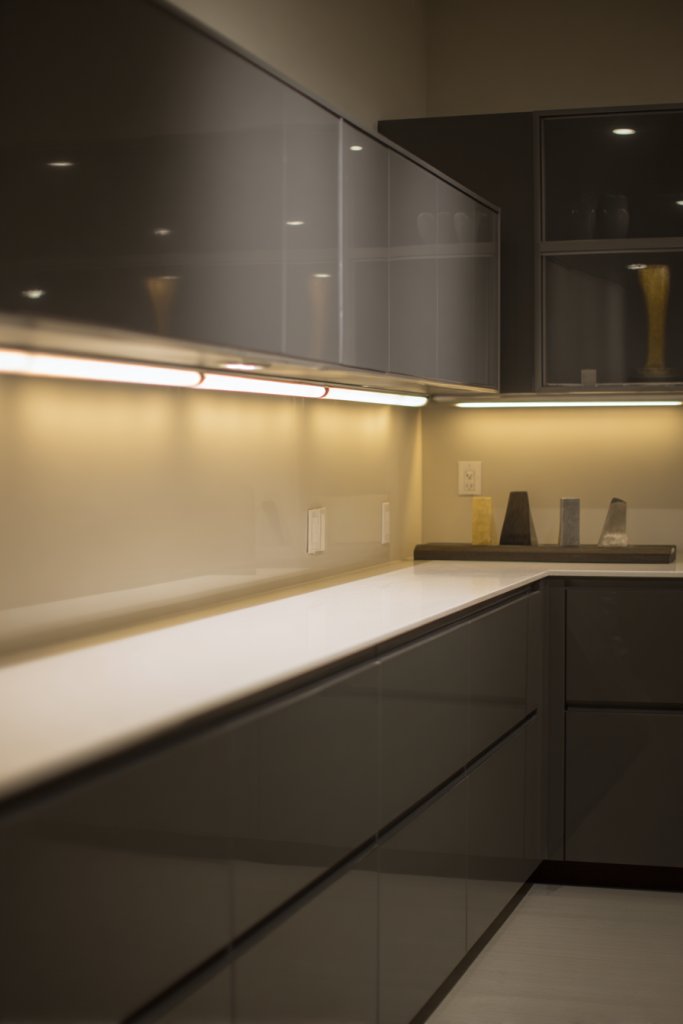
Struggling to see your countertop clearly while cooking or prepping? Under-cabinet LED lighting solves this problem—brightening your workspace and setting the mood. It adds a layer of ambiance that transforms functional lighting into a stylish feature. Who doesn’t want a kitchen that’s both practical and cozy?
Imagine sleek, strip LED lights installed just beneath your upper cabinets, casting a warm, even glow across your countertops. The soft light highlights your workspace without creating glare, making chopping and reading recipes easier. The subtle glow enhances the overall atmosphere, turning mundane tasks into a calming experience. This lighting also accentuates your cabinetry’s finish and hardware.
Choose from color-changing LEDs or warm white strips depending on your mood. For a contemporary look, go for minimalistic aluminum channels; for a rustic vibe, opt for flexible tape lights hidden behind trim. Install dimmer switches for adjustable brightness. Combine with pendant or statement lighting for layered illumination that suits different occasions.
Measure the length of your cabinets to determine the amount of LED strip needed. Use a high-quality, dimmable LED strip for longevity and energy efficiency. Attach the strips with adhesive backing—clean the surface beforehand for a strong bond. Connect the wiring to a power source and install a dimmer switch or remote control for convenience. Test the setup to ensure even lighting without hotspots.
Customize by choosing different color temperatures—warm for cozy evenings or cool for bright mornings. Add motion sensors or timers for automatic operation. Use decorative trim or profiles in metallic finishes to enhance the look. Pair with under-cabinet magnetic strips for holding small tools or notes, turning lighting into an organizational feature.
Under-cabinet LED lighting elevates your kitchen’s style and functionality effortlessly. It creates a welcoming, professional ambiance that makes cooking more enjoyable. Once installed, you’ll wonder how you ever managed without it. Ready to brighten up your culinary space?
5. Two-Tone Cabinet Color Scheme for Modern Elegance
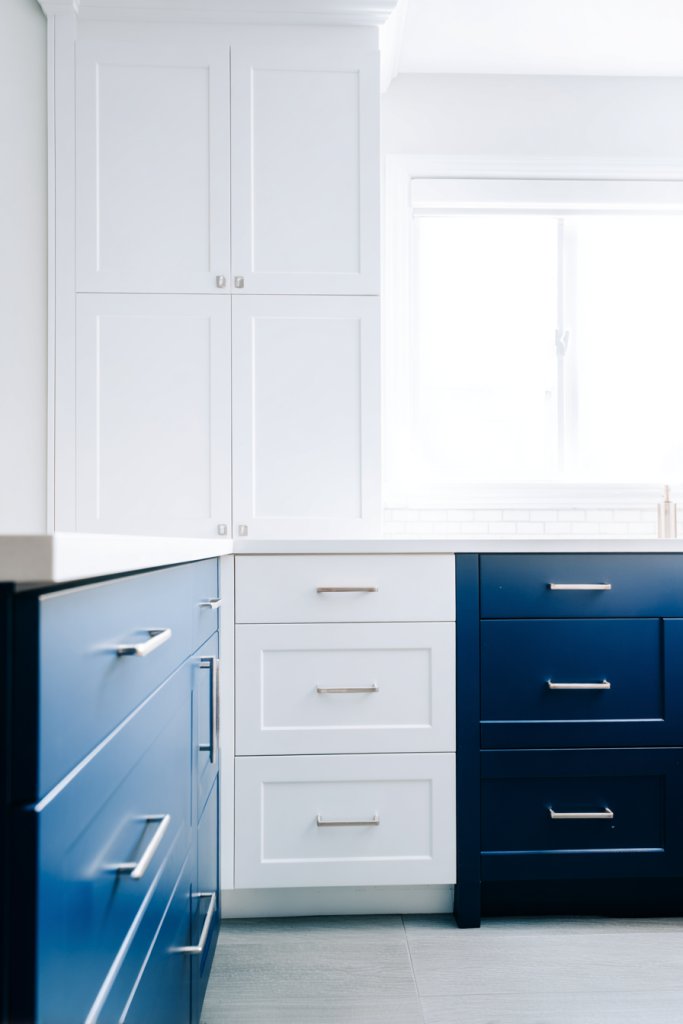
Bored with monotonous, single-color cabinetry? A two-tone color scheme injects energy and sophistication into your kitchen. It creates visual interest and depth, making your space feel more dynamic. Plus, it’s a stylish way to showcase your personal taste without going overboard.
Envision upper cabinets painted in soft matte white paired with bold, dark navy lower cabinets. The contrast draws the eye upward, highlighting architectural details. The different colors also help define zones—keeping storage stylishly separate from prep areas. The matte finish adds a contemporary touch, while the two-tone approach keeps the room lively.
Mix and match colors based on your style—pastels with neutrals for a light, airy feel or deep hues with warm wood accents for cozy ambiance. Use contrasting tones on island cabinetry versus wall cabinets to create focal points. Seasonal accents can be added with removable hardware or decorative trim. For small kitchens, light upper cabinets can open up the space visually.
Select durable, high-quality paint or laminate finishes suited for cabinetry. Start by painting the upper cabinets in your chosen light color, then carefully paint or replace lower cabinets with your darker shade. Use painter’s tape for clean lines, and apply primer for better adhesion. Allow ample drying time between coats. Consider replacing hardware to complement the new color palette. Seal with protective topcoat for longevity.
Add decorative hardware in finishes that match your color scheme—brushed brass, matte black, or antique bronze. Decorate with colorful kitchen textiles or accessories that tie into your palette. Incorporate open shelving in contrasting colors or materials for added interest. Use decals or stencils on cabinet doors for subtle patterns or accents.
A two-tone scheme is a bold yet versatile way to modernize your kitchen. It allows for creative expression while remaining timeless. Once done, it’s an upgrade that can dramatically change the vibe of your space. Ready to make your cabinets stand out?
6. Vintage-Inspired Hardware for a Touch of Charm
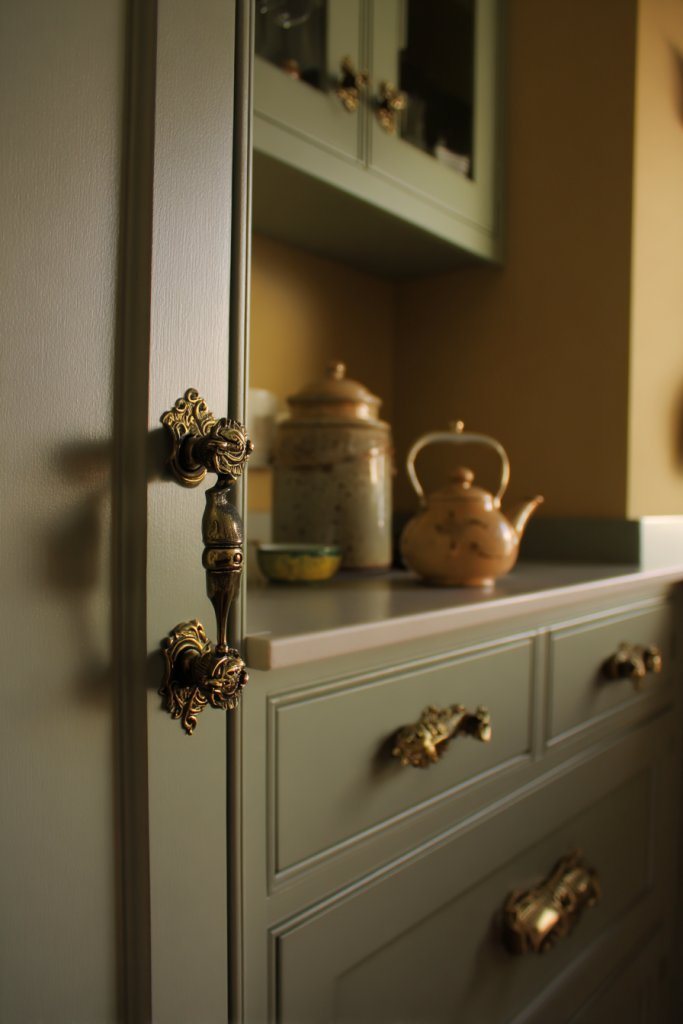
Looking to add character and a nostalgic feel to your kitchen? Vintage-inspired hardware offers a simple yet impactful way to elevate your cabinetry. It’s like giving your kitchen a little piece of history with modern functionality. Who says practicality can’t be charming?
Visualize antique brass knobs and ornate pulls adorning your cabinets. The intricate details add a layer of personality—think Victorian elegance or rustic farmhouse charm. The hardware’s warm tones contrast beautifully with sleek cabinet surfaces, creating a timeless look. When you open drawers, the tactile experience feels special, almost like a small act of indulgence.
Mix vintage hardware with modern cabinetry for an eclectic vibe, or keep everything cohesive in a classic style. Opt for matte black or distressed finishes for a more rustic feel. Change hardware seasonally—swap out shiny new pulls for aged or patina finishes to keep your kitchen fresh. Incorporate decorative backplates or ornamental hooks for added flair.
Remove existing hardware carefully, noting placement for consistent reinstallation. Select hardware that fits your cabinet holes or plan to drill new ones if necessary. Use a drill and screwdriver for precise installation, ensuring hardware sits flush and level. Clean the surfaces beforehand to prevent tarnishing or sticking. Consider adding felt pads behind hardware to reduce noise and protect cabinets.
Create a collection of hardware in different finishes for mix-and-match options. Incorporate vintage-inspired hooks for towels or utensils—these small touches build charm. Use decorative labels or tags for storage jars or spice containers. Personal touches like engraved initials or custom shapes can make your hardware uniquely yours.
Vintage hardware instantly elevates your kitchen’s style and offers a DIY upgrade with big impact. It’s a subtle detail that communicates personality and history. Once installed, you’ll enjoy a sense of craftsmanship and character that’s hard to beat. Ready to add some charm?
7. Large Windows with Minimal Window Treatments

Is your kitchen feeling dark or closed in? Large windows with minimal treatments flood the space with natural light. This brightens your mood and makes your kitchen feel more open and inviting. Plus, it’s a simple way to connect your indoors with the outdoors.
Imagine expansive floor-to-ceiling windows framing a lush garden or cityscape. The unobstructed view draws your focus outward, creating a seamless transition between inside and outside. Minimal window coverings—like sleek roller shades or sheer curtains—allow maximum light to pour in while maintaining privacy when needed. The clean lines and open view make the room feel larger and more airy.
Opt for motorized shades or blinds that can be easily raised or lowered for different times of day or seasons. Use light, neutral-colored fabrics that blend with your decor for a minimalist look. For colder climates, consider insulating window panels to keep heat in while still enjoying the view. In warmer months, outdoor shading solutions like pergolas or awnings can augment the effect.
Choose high-quality, large-pane windows that maximize natural light and energy efficiency. Ensure proper framing and sealing to prevent drafts. Keep window treatments simple—roller shades or light curtains—that can be pulled back entirely. Install hardware securely, and opt for motorized controls for convenience. Regular cleaning keeps the view clear and bright.
Decorate with subtle curtain rods or hardware in finishes that complement your fixtures. Use sheer fabrics for softness or blackout shades for privacy. Incorporate outdoor-inspired elements—like a patio or balcony—visible through the windows to extend your living space. Regularly update window treatments to keep the look fresh.
Large windows create a sense of openness that can transform your entire kitchen. They boost natural lighting, which improves mood and energy efficiency. Embrace minimal treatments for a sleek, modern vibe—your space will feel brighter and more connected to nature. Ready to let the sunshine in?
8. Open Floor Plan with Seamless Dining Area Integration
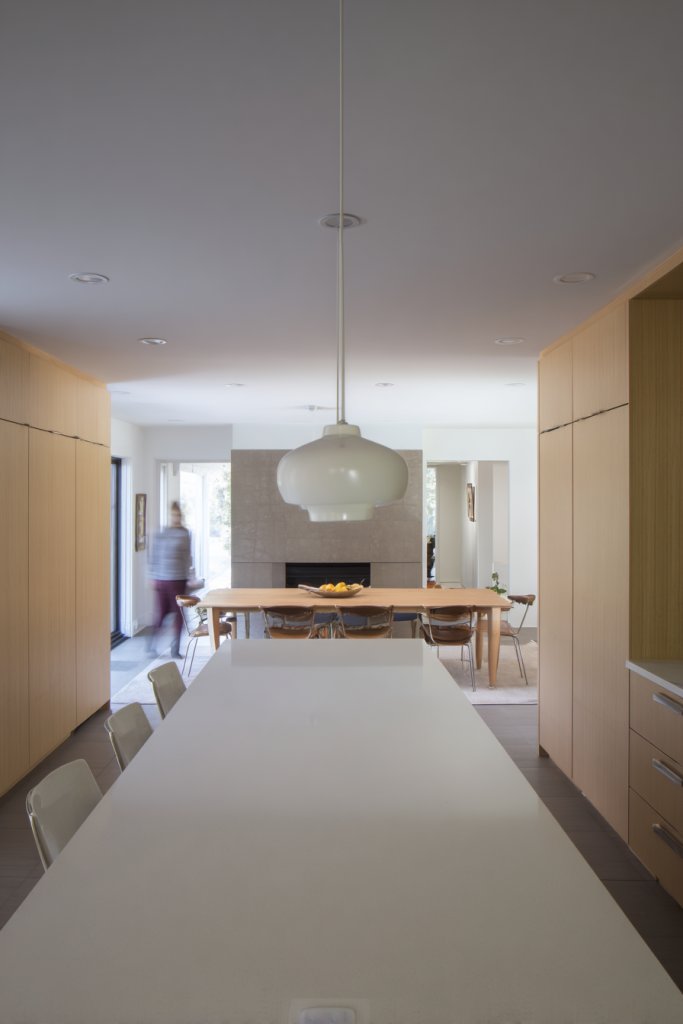
Living in a cramped, segmented kitchen can make cooking and entertaining feel disconnected. An open floor plan with a seamless dining area creates a more inviting, sociable environment. It encourages interaction, making your home feel larger and more connected. Who doesn’t love a space that flows?
Visualize a spacious kitchen with no walls dividing it from the dining zone. A large, central island with a comfortable seating area acts as the heart of the space. The flooring, color palette, and lighting unify the areas, creating a cohesive look. Natural light from large windows further enhances the openness, making everything feel bright and welcoming.
Use consistent flooring materials—like hardwood or large-format tiles—to unify zones. Incorporate a shared color scheme and complementary lighting to reinforce cohesion. For smaller homes, define zones with subtle cues like area rugs or pendant lighting. Flexible furniture, such as extendable dining tables, adapts to your needs and occasions.
Remove walls or use open archways to connect spaces, ensuring structural integrity. Keep the layout functional—place the stove, sink, and refrigerator within easy reach. Use consistent design elements to blend the kitchen and dining areas visually. Install lighting that suits both zones—ambient for the whole space and task lighting for prep areas. Plan furniture placement to maximize traffic flow.
Add personal touches like decorative chairs or custom-made cabinetry that tie the spaces together. Incorporate statement lighting fixtures over the dining table or island for focal points. Use open shelving or display areas for functional decor, avoiding clutter. Keep the space adaptable by choosing furniture that can be moved or altered for different occasions.
An open floor plan makes your home feel more spacious and welcoming. It fosters better interactions and creates a lively atmosphere. When your kitchen and dining blend seamlessly, entertaining becomes effortless. Ready to break down walls and open up your space?
9. Exposed Wooden Beams for Rustic Warmth
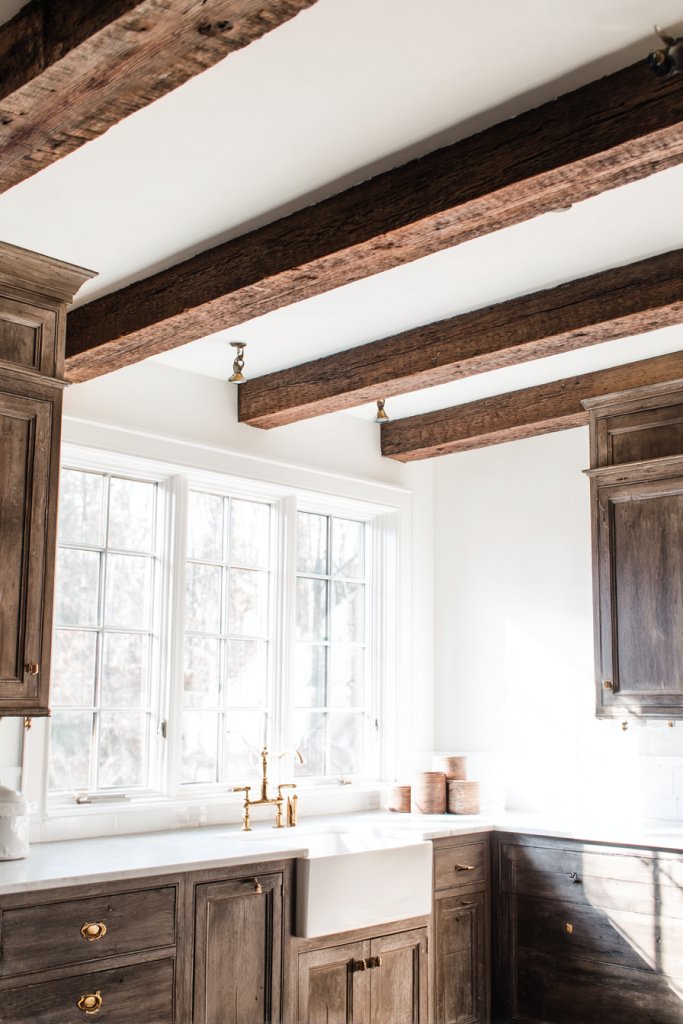
Does your kitchen lack character or feel a bit sterile? Exposed wooden beams add instant warmth and rustic charm, transforming the space into cozy and inviting. They bring a sense of history and craftsmanship that’s hard to replicate. Who wouldn’t want a hint of countryside authenticity?
Imagine dark-stained, rough-hewn wooden beams spanning the ceiling above sleek modern cabinetry. The natural wood grain adds texture and depth, creating a striking contrast against smooth walls. Combined with warm lighting, the beams evoke a cozy, lodge-like atmosphere. They draw the eye upward, making the ceiling appear higher and the space more expansive.
Opt for reclaimed wood for authenticity or smooth, sanded beams for a cleaner look. Pair with neutral or earthy color palettes—think warm taupes, creams, or deep greens. Incorporate beams into open-concept kitchens or small spaces to add visual interest without overwhelming. You can also add decorative metal accents for an industrial twist.
Consult with a structural engineer to ensure beams are load-bearing or purely decorative. Select durable, treated wood that withstands humidity and temperature changes. Install beams using heavy-duty brackets and anchors, ensuring they are securely fastened to the ceiling. Finish with clear sealant or stain to protect the wood and enhance grain. Consider adding subtle lighting underneath for a dramatic effect.
Decorate the beams with string lights or vintage lanterns for a cozy vibe. Use textiles like linen curtains or woven rugs to complement the rustic look. Incorporate natural materials—like stone countertops or woven baskets—to amplify warmth. Personalize the space with artwork or accessories that mirror the rustic theme.
Exposed wooden beams elevate your kitchen’s aesthetic, blending architecture with design. They create a timeless appeal that works with various styles—from farmhouse to modern. Once installed, they become a standout feature that boosts your space’s warmth and character. Are you ready to add warmth and authenticity?
10. Sleek, Handleless Cabinetry for a Contemporary Look
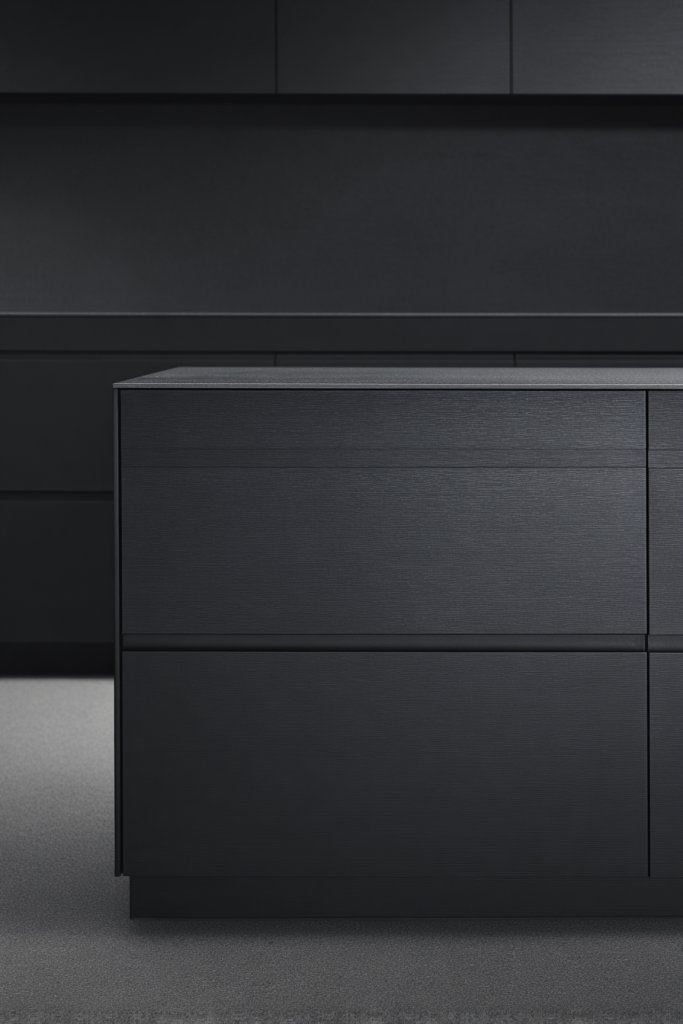
Does your kitchen feel cluttered or outdated? Handleless cabinetry offers a sleek, minimalist aesthetic that instantly modernizes your space. It creates a clean, uncluttered look that’s both functional and stylish. Who knew that removing hardware could make such a difference?
Visualize smooth, flat-front cabinets in high-gloss or matte finishes, with integrated finger pulls or push-to-open mechanisms. The lack of handles allows the cabinet fronts to flow seamlessly, creating a calming, streamlined effect. The uniform surface reflects light, making the room feel larger and brighter. It’s a design choice that screams sophistication.
Choose from various finishes—glossy, matte, textured—to match your style. Incorporate contrasting colors or materials for visual interest—like black upper cabinets with wood-toned lower ones. Use subtle detailing like beveled edges or minimal grooves to add dimension. Pair with modern fixtures and appliances for a cohesive look.
Select handleless cabinets from reputable brands, ensuring quality hardware and smooth opening mechanisms. Measure your space carefully to avoid gaps or misalignments. Use precise tools for installation—level, drill, screwdriver—and follow manufacturer instructions. Seal edges to prevent moisture ingress and ensure durability. Consider professional installation for a perfect finish.
Add visual interest with integrated lighting strips inside cabinets or under counters. Incorporate metallic accents—like brushed nickel or black hardware—to complement the sleek surfaces. Use decorative accessories like sculptural bowls or textiles on countertops to add warmth. Keep clutter hidden for a truly minimalist effect.
Handleless cabinetry elevates your kitchen with a modern, timeless appeal. It’s a versatile choice that works with various aesthetics—scandinavian, industrial, or contemporary. Once installed, it offers a clutter-free, sophisticated environment that boosts your confidence in your design choices. Ready to go handle-free?
11. Statement Pendant Lights over the Work Area
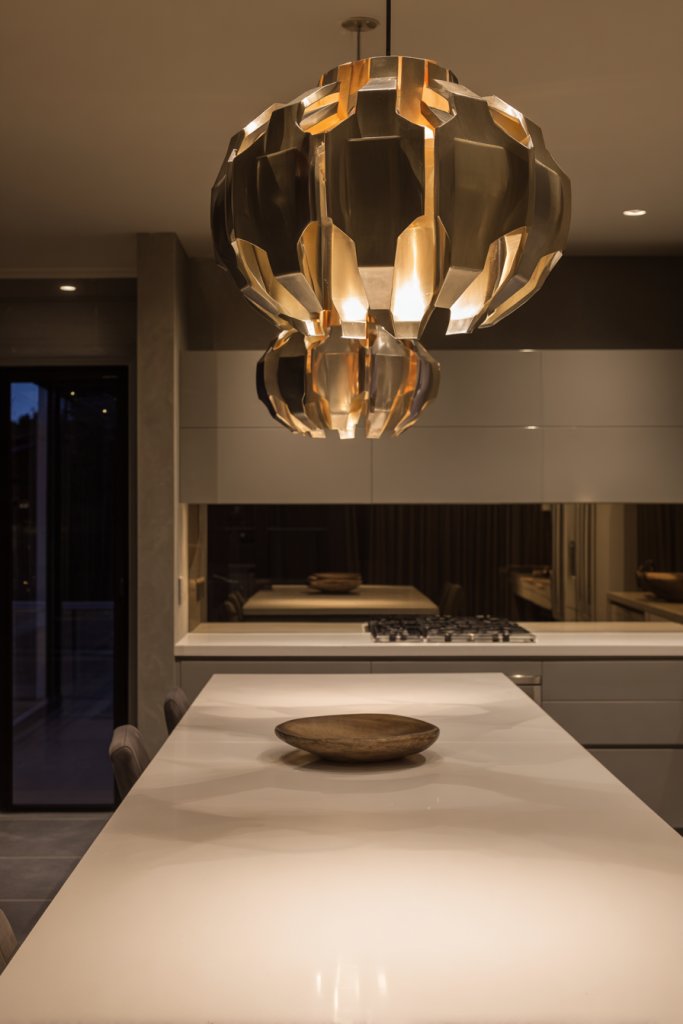
Tired of boring, uniform lighting that doesn’t inspire your cooking space? Statement pendant lights add drama and focus, turning a simple kitchen into a showstopper. They provide functional illumination while acting as a piece of art. Who says lighting can’t be a conversation starter?
Imagine a cluster of oversized metal or glass pendants hanging above your island or prep area. The fixtures come in bold shapes and finishes—brushed brass, matte black, or colorful accents—that contrast with your cabinets. The warm glow creates a cozy, intimate atmosphere, perfect for dinner parties or late-night snacks. The pendants draw attention upward and add a sense of height and grandeur.
Choose pendants that match your overall style—industrial, boho, or luxe. Play with different shapes and lengths for visual interest. For a minimalist look, select sleek, slim fixtures; for a more eclectic vibe, opt for ornate or colorful designs. Mix metals for a layered, curated feel, or keep everything monochrome for simplicity.
Determine the ideal height—about 30-36 inches above the countertop—to ensure functional lighting and aesthetic balance. Use sturdy ceiling mounts and high-quality cords or rods for support. Connect wiring following electrical codes or hire an electrician for safety. Ensure the fixtures are compatible with dimmers for adjustable ambiance. Test the lighting at different angles to perfect the look.
Personalize with unique shades or bulbs—vintage Edison, colored glass, or smart LED options. Incorporate dimmable switches to control mood lighting. Pair with complementary fixtures or wall sconces for layered illumination. Use decorative trim or shades to add personality and soften the glow.
Statement pendant lights elevate your kitchen’s style and functionality, making your space unforgettable. They reflect your personality and taste, turning everyday cooking into an experience. Once installed, they boost confidence in your bold design choices. Ready to hang your statement pieces?
12. Multi-Color Kitchen Cabinets for Playful Vibe
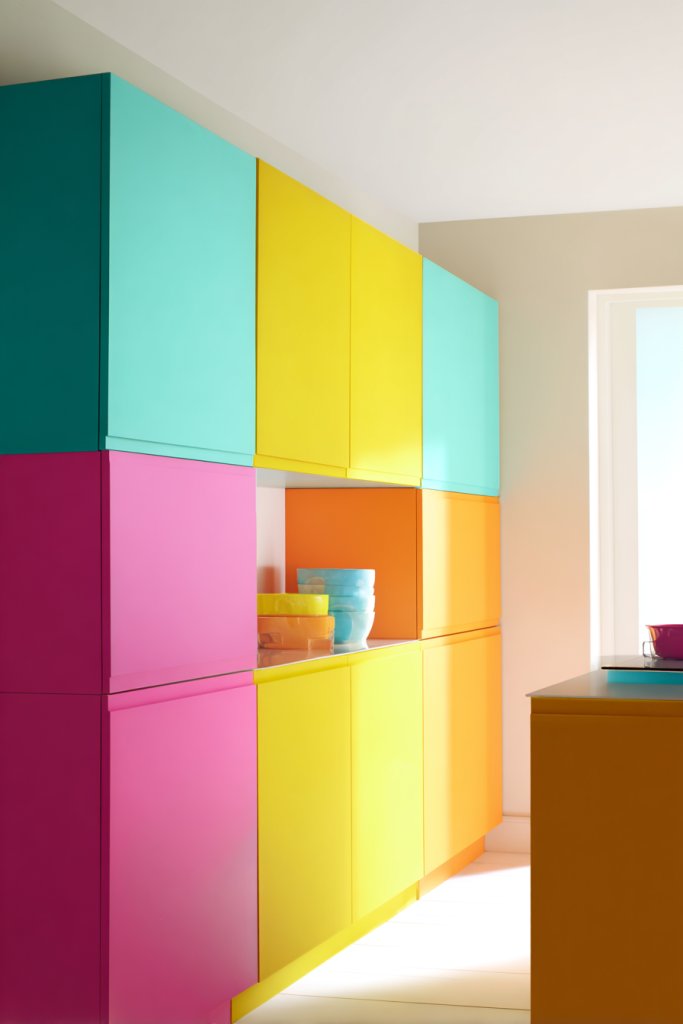
Feeling like your kitchen lacks personality or fun? Multi-color cabinets inject vibrancy and a playful spirit into your space. It’s a bold move that immediately captures attention and sets a lively tone. Who says kitchens have to be boring?
Picture upper cabinets painted in cheerful pastel pink or mint green paired with neutral lower cabinets. The contrasting colors create a dynamic visual rhythm, making the space feel energetic. Open shelving or glass-front cabinets showcase colorful dishware, adding to the playful vibe. The overall effect is youthful, fresh, and full of personality.
Mix and match colors based on your personality—bright primary hues for kids’ kitchens or muted tones for a sophisticated eclectic look. Use different finishes—matte, gloss, or textured—to add depth. Incorporate decorative hardware in contrasting or matching colors. Balance bold colors with neutral countertops and flooring for harmony.
Choose durable, high-quality paint or laminate for longevity. Prepare surfaces by cleaning and lightly sanding before painting. Use painter’s tape for clean lines between colors. Apply multiple coats for even coverage, and seal with a clear topcoat. Consider replacing hardware with colorful knobs or pulls to enhance the look. Consistency and patience are key.
Add decorative touches like colorful dishcloths, mats, or jars to complement your cabinets. Incorporate themed or seasonal accents—like holiday colors or summer shades. Use removable decals or stencils for patterns or initials. Personalize with custom-painted signs or labels for a curated feel.
Bright, multi-colored cabinets express your unique style and add energy to your home. They make everyday routines more joyful and inspire creativity. Once you see the lively transformation, you’ll be confident in taking bold design risks. Ready to embrace a playful palette?
13. Built-In Wine Storage for a Touch of Luxury
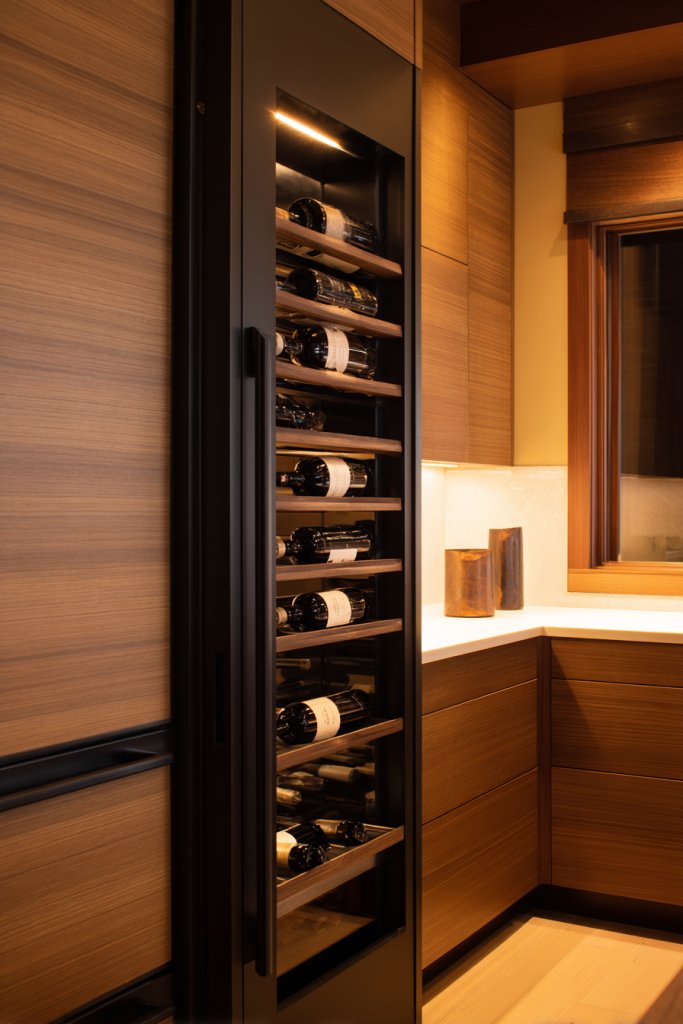
Love entertaining but hate cluttered counters with wine bottles everywhere? Built-in wine storage adds elegance and practicality, turning your kitchen into a sophisticated haven. It’s a subtle luxury that’s both functional and stylish. Who wouldn’t want their favorite bottles within arm’s reach?
Visualize a sleek, recessed wine rack integrated into your cabinetry or island, holding bottles horizontally for optimal preservation. The design can be minimalist with clean lines or ornate with decorative metal racks. Soft LED lighting illuminates your collection, highlighting your prized bottles. The storage seamlessly blends into your kitchen’s overall aesthetic.
Opt for open shelving with individual bottle slots for a display-worthy effect or enclosed cabinetry for a cleaner look. Incorporate wine coolers or refrigerators for temperature control. Use glass-front cabinets with subtle lighting for a display feature. Tailor the design to match your decor—modern, rustic, or traditional.
Plan the space carefully—measure your bottles and design for easy access. Choose materials that are moisture-resistant and durable. Install racks or cabinets with secure mounting—consider professional help for structural integrity. Include ventilation and temperature regulation if building a dedicated wine area. Integrate lighting and electrical connections seamlessly.
Personalize with engraved plaques or custom labels. Use decorative wine stoppers or accessories stored nearby for a complete look. Incorporate a small tasting area or glass storage for added luxury. Combine with other bar elements—like a wine decanter or stylish glasses—to elevate the experience.
Built-in wine storage elevates your kitchen’s style and shows your attention to detail. It’s perfect for hosting and adds a refined touch to everyday life. Once in place, it’s a feature you’ll be proud of—proof that small details make a big difference. Ready to store in style?
14. Chalkboard Wall for Recipes and Notes
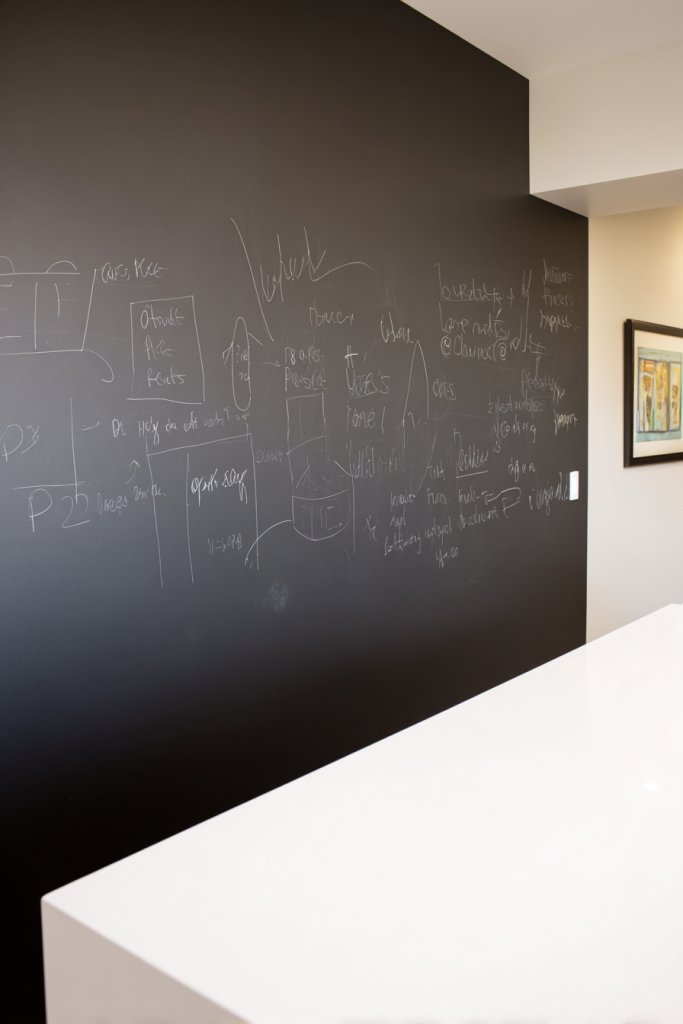
Ever wish you could jot down recipes, reminders, or inspiring quotes without cluttering your counters? A chalkboard wall offers a functional and fun space for all your notes. It’s a dynamic way to stay organized while adding a casual, artistic vibe. Who knew a simple wall could be so versatile?
Picture a large black chalkboard painted on a side wall or behind your dining area. Handwritten recipes, doodles, or motivational quotes decorate the surface, making it a lively centerpiece. Use colorful chalks for accents and artistic lettering. The contrast between the dark background and white or colored chalk creates a bold, eye-catching display.
Choose a high-quality chalkboard paint in matte black or dark gray. Frame the area with wood or metal trim for a polished look. For a less permanent option, use peel-and-stick chalkboard wallpaper or panels. Incorporate magnetic strips for notes or photos, avoiding clutter. Change the content seasonally or as needed for freshness.
Prepare the wall surface—clean thoroughly and sand if necessary. Apply multiple coats of chalkboard paint, allowing drying time between layers. Seal the edges with painter’s tape for neat lines. Use high-quality chalk or chalk markers for smooth writing. Maintain the surface by cleaning with a damp cloth regularly.
Add decorative borders or artwork around the chalkboard for a personalized touch. Use different chalk colors to categorize notes or create visual interest. Incorporate a small ledge or shelf underneath for chalk and erasers. Personalize the space with themed decorations or seasonal motifs.
A chalkboard wall makes your kitchen more interactive and lively. It encourages daily creativity and organization. Once set up, it becomes a fun, functional feature that sparks conversation. Ready to turn a blank wall into a hub of ideas and inspiration?
15. Industrial-Style Open Shelving with Metal Brackets
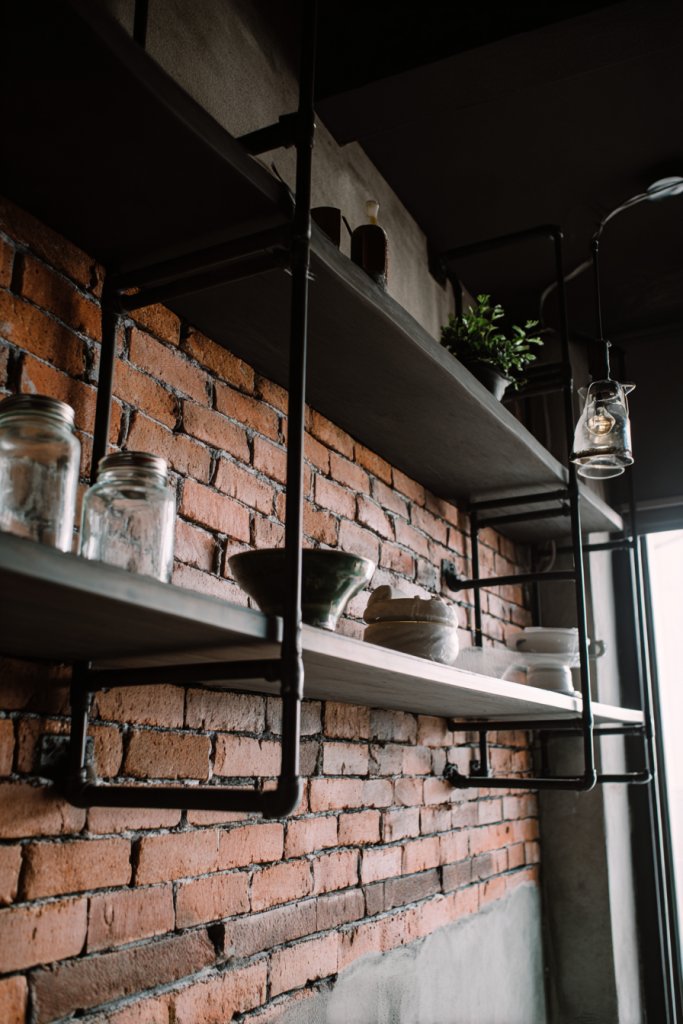
Feeling like your kitchen is missing an edgy, modern vibe? Industrial open shelving with metal brackets offers a trendy way to display essentials. It combines raw materials with sleek design, giving your space a cool, utilitarian look. Who says practicality can’t be stylish?
Imagine reclaimed wood shelves supported by black or galvanized metal brackets. The rough textures of the wood contrast with the smooth, matte finish of the brackets. Display your favorite cookware, jars, or decorative items in an organized yet relaxed manner. The open design keeps everything within reach and visually interesting.
Use different wood tones or painted finishes to match your decor—dark walnut for sophistication or lighter pine for a casual look. Mix brackets in different styles or finishes for an eclectic vibe. For smaller spaces, opt for shallow shelves; larger kitchens can handle extended units. Combine with vintage or industrial lighting for maximum effect.
Start by measuring and marking the wall where you want the shelves. Secure heavy-duty brackets into studs for stability. Cut shelves to size and sand edges for a clean finish. Mount the shelves onto the brackets, ensuring level placement. Style with cookware, plants, or decor, but keep weight limits in mind. Regularly check brackets for stability.
Personalize with different metal finishes—antique brass, matte black, or brushed nickel. Incorporate small decorative items like vintage signs or LED strip lighting beneath shelves. Use the shelves to display your collection of cookware or vintage finds. Keep the look cohesive with matching hardware or accents.
Industrial open shelving adds character and a modern edge to your kitchen. It’s a practical way to display and organize while making a bold style statement. Once installed, it becomes a focal point that showcases your personality. Ready to toughen up your kitchen with some industrial flair?
16. Monochrome Palette with Textured Materials
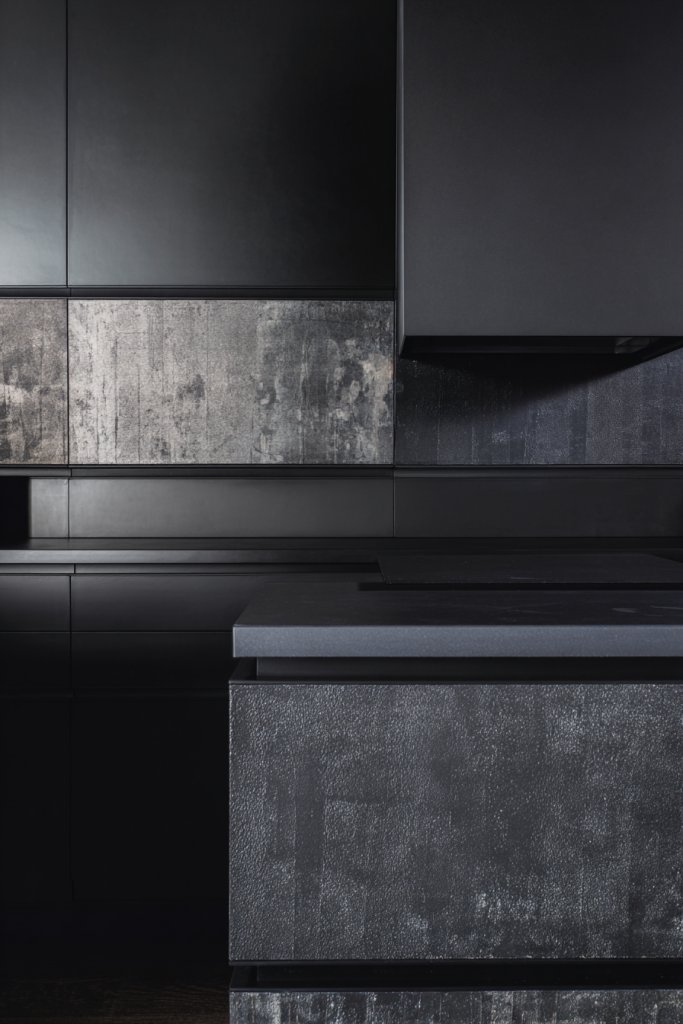
Does your kitchen lack depth or feel flat? A monochrome palette using textured materials creates a sophisticated, layered look that adds visual interest without overwhelming. It’s a sleek way to achieve elegance and cohesion all at once. Who said minimalist can’t be rich?
Visualize a kitchen with matte black cabinets, textured stone countertops, and a subtle patterned backsplash. The interplay of different textures—smooth, rough, matte, and glossy—adds depth and dimension. Soft lighting highlights these textures, creating a nuanced, inviting environment. The monochrome scheme keeps it modern and timeless.
Use shades of one color—like various grays or browns—for a subtle, calming effect. Incorporate different materials—concrete, leather, matte metals—to enhance the layered look. Switch between matte and polished finishes for contrast. For a warmer feel, incorporate wood accents within the monochrome scheme.
Select durable textured materials suited for kitchens—like quartz, high-pressure laminate, or textured tiles. Maintain a consistent color palette across cabinetry, countertops, and backsplash. Use matte or satin finishes for a sophisticated look. Incorporate layered lighting to emphasize textures. Keep surfaces easy to clean and stain-resistant.
Add decorative elements like textured textiles or sculptural accessories that complement the palette. Use subtle color accents through small appliances or utensils if desired. Incorporate natural light to enhance the textures and create shadows. Personalize with subtle details, like custom handles or inlays.
A monochrome textured kitchen exudes elegance and calm, making everyday routines feel special. It’s a versatile design that adapts easily over time. Once mastered, it offers a chic, cohesive look that always feels current. Ready to embrace texture and tone?
17. Compact Vertical Storage Solutions
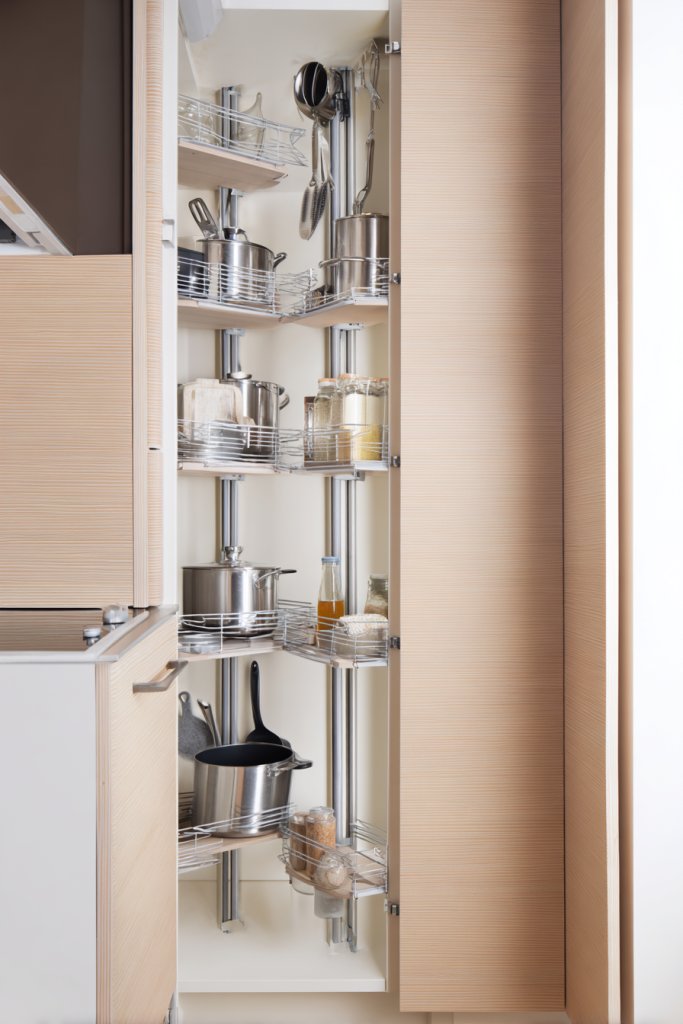
Running out of space for utensils, pots, or pantry items? Vertical storage solutions help you maximize every inch, making your kitchen more organized and functional. It’s especially perfect for small or cluttered kitchens where every square foot counts. Who says storage has to be boring?
Envision hanging racks, pegboards, or narrow wall-mounted shelves filled with neatly hung utensils, pots, or spice jars. Color-coded or uniform containers keep things tidy and easy to find. The vertical setup draws the eye upward, creating a sense of height and openness. It keeps countertops clear and frees up valuable workspace.
Choose from open pegboards, magnetic strips, or slim tiered shelves depending on your space and style. Incorporate hooks for hanging tools or baskets for small items. Use adjustable racks to accommodate different sizes. For a chic look, pick matching hardware or paint the racks in your color scheme. Rotate items seasonally for a fresh feel.
Identify high-traffic wall areas suitable for vertical storage. Mount pegboards or racks securely into studs or wall anchors. Arrange your tools and containers logically—most-used items at eye level. Use sturdy hooks or baskets for heavier items. Keep the setup flexible for changes and upgrades. Regularly tidy and reorganize for efficiency.
Customize with label stickers or color-coded containers for quick identification. Decorate with small decorative elements—like colorful silicone utensils or patterned containers. Use this space to display special or frequently used items for easy access. Keep it functional but personalized to your style.
Vertical storage solutions make your kitchen smarter and more efficient. They turn clutter into a curated display, boosting your confidence in organization. Once you get the hang of it, your kitchen will feel much more spacious and accessible. Ready to go vertical?
18. Contrasting Countertop and Cabinet Finishes
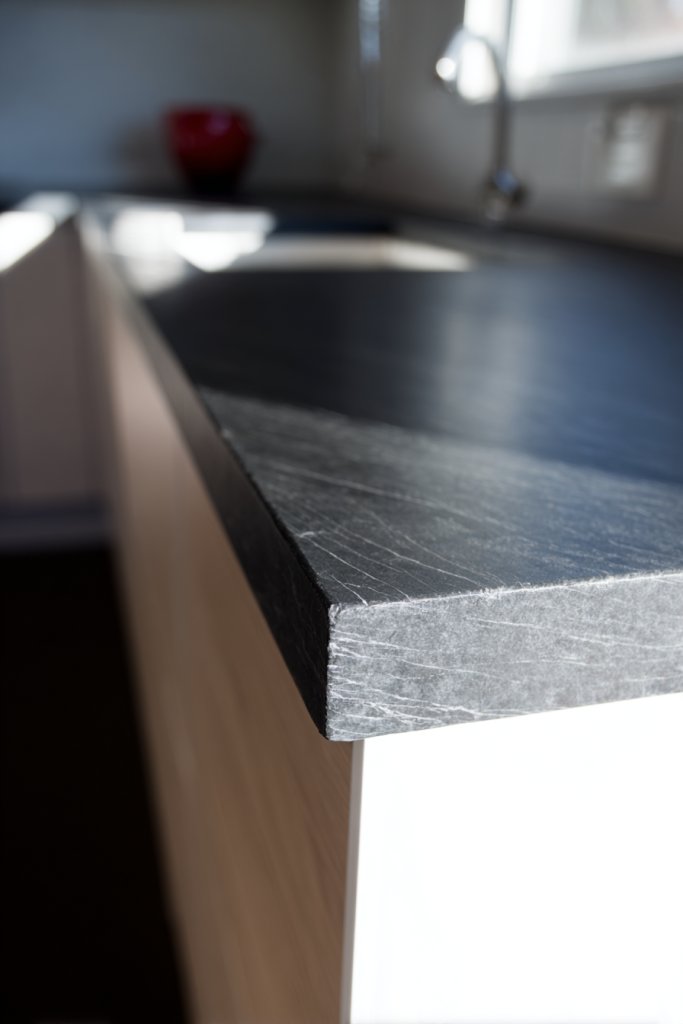
Feeling like your kitchen lacks visual interest? Contrasting finishes between countertops and cabinets create an eye-catching, layered look. It adds depth and sophistication, making your space stand out. Who says harmony can’t include a little drama?
Imagine a marble countertop with bold black matte cabinets beneath. The striking contrast draws attention to the work surface while anchoring the room. Textured or patterned countertops against sleek cabinetry create visual depth. The interplay of light and shadow highlights the contrasting finishes, creating a dynamic environment.
Pair materials like granite with painted wood, or concrete with glossy lacquer cabinets. Use color contrast—light countertops with dark cabinets or vice versa—for maximum impact. Incorporate accent details like metallic fixtures or trim that complement both finishes. For small kitchens, subtle contrasts maintain elegance without overwhelming.
Select durable, high-quality materials that withstand daily wear. Measure precisely to ensure seamless transitions and alignment. Install countertops carefully, especially when working with heavy materials like stone. Coordinate the cabinet finishes with your overall design scheme—consider sample testing before committing. Seal surfaces to prevent stains and damage.
Use decorative edging or inlays to add detail to your countertops. Incorporate accent lighting to highlight the contrast. Personalize with hardware or accessories that pick up on the color scheme. Mix textures—matte, glossy, textured—to create a layered look that’s uniquely yours.
Contrasting finishes elevate your kitchen from simple to stunning, showcasing your design confidence. They add character and modern appeal, making your space memorable. Once you see the striking difference, you’ll be inspired to experiment further. Ready for a bold new look?
19. Customized Open Pantry with Clear Storage Containers
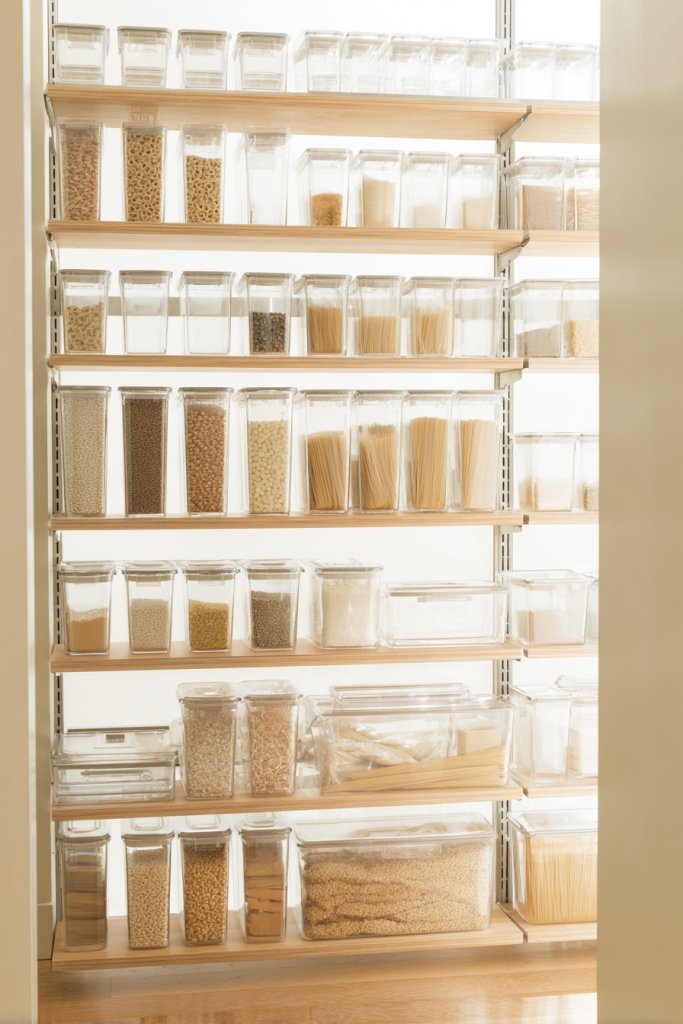
Cluttered, chaotic pantry making your mornings stressful? A customized open pantry with clear containers transforms chaos into clarity. It makes everything visible and accessible, saving you time and frustration. Who doesn’t want a kitchen that actually works?
Visualize open shelves lined with uniform, transparent containers filled with grains, pasta, and snacks. Labels keep everything organized, while the clear material allows you to see contents instantly. The open design feels inviting and makes your kitchen look tidy, even if you’re in a rush. The neat, uniform appearance adds a sense of order.
Use modular shelving units that can be customized to fit your space. Incorporate baskets or bins for larger or less frequently used items. Choose airtight containers for freshness and durability. Mix open shelving with closed cabinets to balance accessibility and concealment. Change container labels seasonally or for special themes.
Start by measuring your pantry space and selecting adjustable shelving or custom cabinetry. Invest in high-quality, clear containers that seal tightly and are stackable. Organize items by category—baking, breakfast, snacks—for efficiency. Label each container with a label maker or chalk labels. Keep frequently used items at eye level for quick access.
Decorate the shelves with small decorative jars or themed labels for a personal touch. Use color-coding or different container shapes to add visual interest. Incorporate a small chalkboard or whiteboard for notes or meal planning. Regularly purge and reorganize to maintain neatness.
An organized open pantry makes your kitchen more functional and enjoyable. It encourages healthy eating and simplifies shopping. Seeing your well-organized space boosts your confidence in keeping things tidy. Ready to create your perfect pantry?
20. Eco-Friendly Materials and Sustainable Design
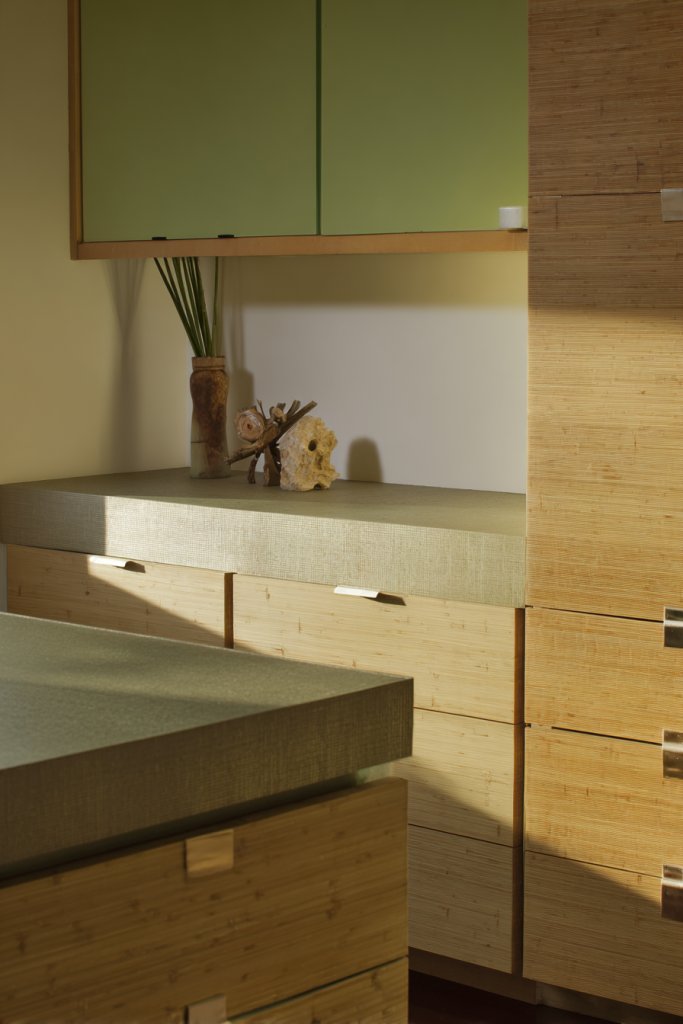
Concerned about the environmental impact of your home? Incorporating eco-friendly materials and sustainable design practices turns your kitchen into a greener space. It’s a meaningful way to reduce your carbon footprint while still enjoying style and functionality. Who says you can’t save the planet one kitchen at a time?
Imagine countertops made of recycled glass or bamboo cabinets with natural finishes. The textures and colors celebrate natural materials, creating a warm, earthy vibe. The use of sustainable textiles for curtains or seat cushions adds a soft touch of eco-consciousness. The overall aesthetic is fresh, modern, and aligned with green values.
Choose materials like reclaimed wood, cork, or recycled metal for cabinetry and surfaces. Incorporate low-VOC paints and finishes to improve indoor air quality. Use natural fiber textiles—jute, hemp—for rugs or curtains. Opt for energy-efficient appliances and LED lighting to complement the sustainable theme.
Research suppliers that specialize in eco-friendly products. Prioritize certifications like FSC, GreenGuard, or LEED for materials. Work with contractors experienced in green building practices. Install sustainable features carefully, ensuring proper handling of reclaimed or recycled materials. Maintain and clean with eco-friendly products to prolong lifespan.
Add personal touches like handcrafted, eco-friendly accessories or art made from recycled materials. Incorporate plants (not in restricted content) to improve air quality. Use natural dyes or paints for small DIY projects. Educate family members about sustainable habits to reinforce your eco-conscious space.
Choosing sustainable materials aligns your home with your values and inspires eco-friendly habits. It’s a forward-thinking approach that adds character and integrity. Once you see how stylish and functional sustainable design can be, you’ll be eager to expand it throughout your home. Ready to go green?
21. Hidden Appliances for a Seamless Look
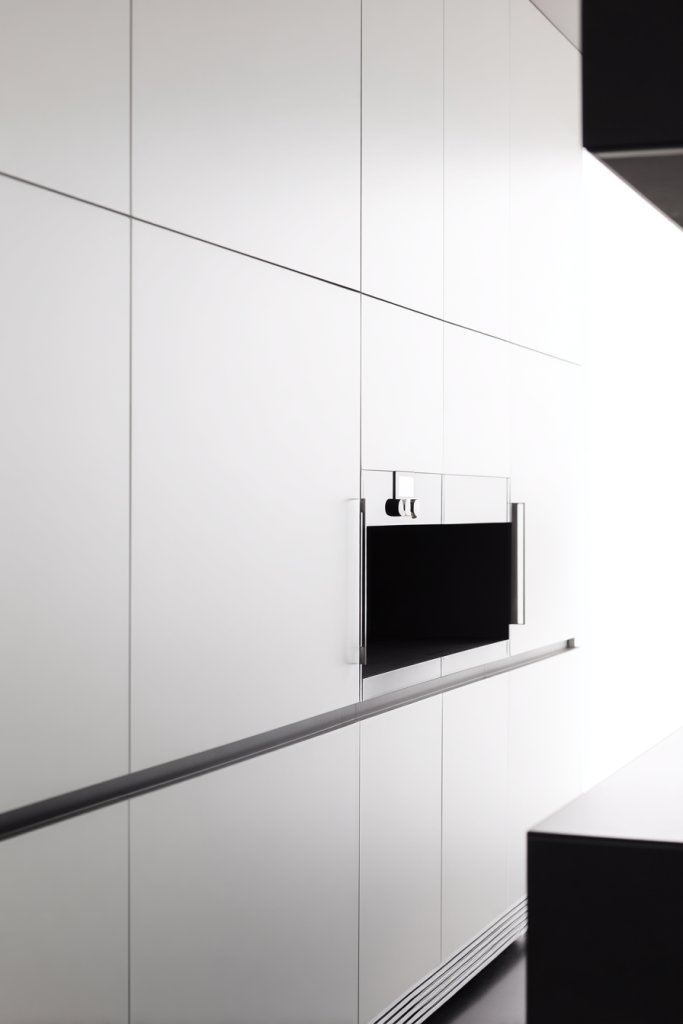
Cluttered countertops with bulky appliances disrupt your kitchen’s sleek look? Hidden appliances solve this problem by maintaining clean lines and a tidy aesthetic. They make your space appear larger and more organized, elevating your design game. Who says appliances have to shout for attention?
Picture a seamlessly integrated refrigerator behind cabinetry, with matching panels. A built-in microwave is hidden within tall cupboards, and small appliances are tucked away in drawers or cabinets. This creates a uniform surface that feels calm and uncluttered. The subtle concealment emphasizes the cabinetry and design flow.
Use panel-ready appliances that blend with your cabinetry for a cohesive look. Incorporate appliance garages or concealed drawers for small gadgets. Choose flush-mounted appliances to reduce visual bulk. Match cabinet finishes with appliance panels for a uniform appearance. Balance hidden features with accessible controls for ease of use.
Identify appliances suitable for concealment—refrigerators, dishwashers, microwaves—and plan for cabinetry modifications. Work with professionals to install panels and ensure proper ventilation and accessibility. Measure carefully to match panel sizes and align with cabinets. Use high-quality materials for panels to withstand kitchen conditions. Test all appliances for functionality after installation.
Customize panels with your choice of finishes—wood grain, matte, or gloss—to match your decor. Incorporate soft-close hinges and push-to-open mechanisms for a refined feel. Use decorative hardware or trim to enhance the seamless look. Keep frequently used appliances accessible but hidden when not in use.
Hidden appliances create a polished, professional kitchen appearance. They make your space look larger and more cohesive, boosting your confidence in your design choices. Once you master concealment techniques, your kitchen becomes a sleek, functional retreat. Ready to hide your appliances in style?
22. Functional Pot Filler Above the Stove
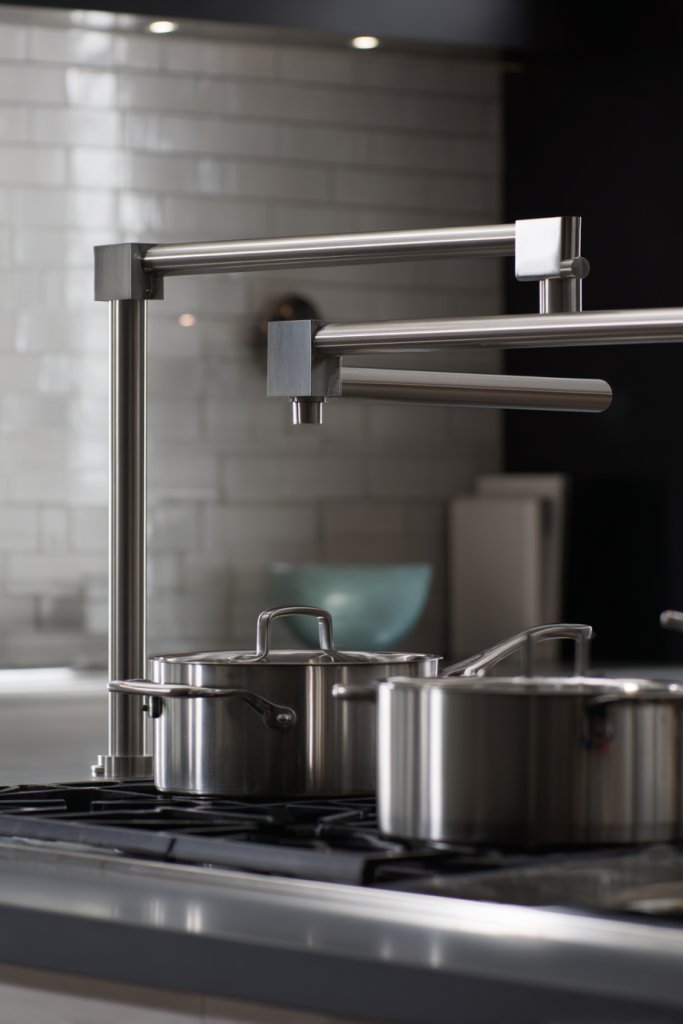
Hate lugging heavy pots from sink to stove? A pot filler faucet above your cooktop solves this hassle, making your cooking more efficient and enjoyable. It’s a practical luxury that saves time and effort during meal prep. Who wouldn’t want a professional-grade feature at home?
Visualize a sleek, chrome or matte black faucet mounted just above your stove, easily reachable with a simple flip of the handle. It connects directly to your water supply, providing a steady stream right where you need it. The clean installation blends into your backsplash, adding a subtle touch of convenience and sophistication.
Choose from different finishes—brushed nickel, matte black, or brass—to match your fixtures. Opt for a swing-arm design for extra flexibility or a fixed mount for minimalism. Incorporate a shut-off valve or extendable hose for versatility. Pair with a matching faucet or keep it as a standalone feature for a modern look.
Work with a plumber to determine the best placement—usually centered above the stove. Ensure the wall can support the fixture and that water supply lines are accessible. Install the faucet securely, following manufacturer instructions, and test for leaks. Consider adding a protective backsplash or cover plate for a finished look. Regular maintenance keeps it functioning smoothly.
Decorate with branded or custom handles, or add a matching soap dispenser. Use the faucet to fill large pots, water plants, or clean the stove area efficiently. Pair with high-quality, easy-to-clean surfaces around your cooktop for a cohesive style. Keep the area clutter-free for maximum functionality.
A pot filler elevates your kitchen’s efficiency and adds a touch of professional style. It’s a feature that impresses guests and simplifies your cooking routine. Once installed, it becomes a go-to tool for everyday meal prep. Ready to upgrade your stove area?
23. Minimalist Design with Hidden Storage Solutions
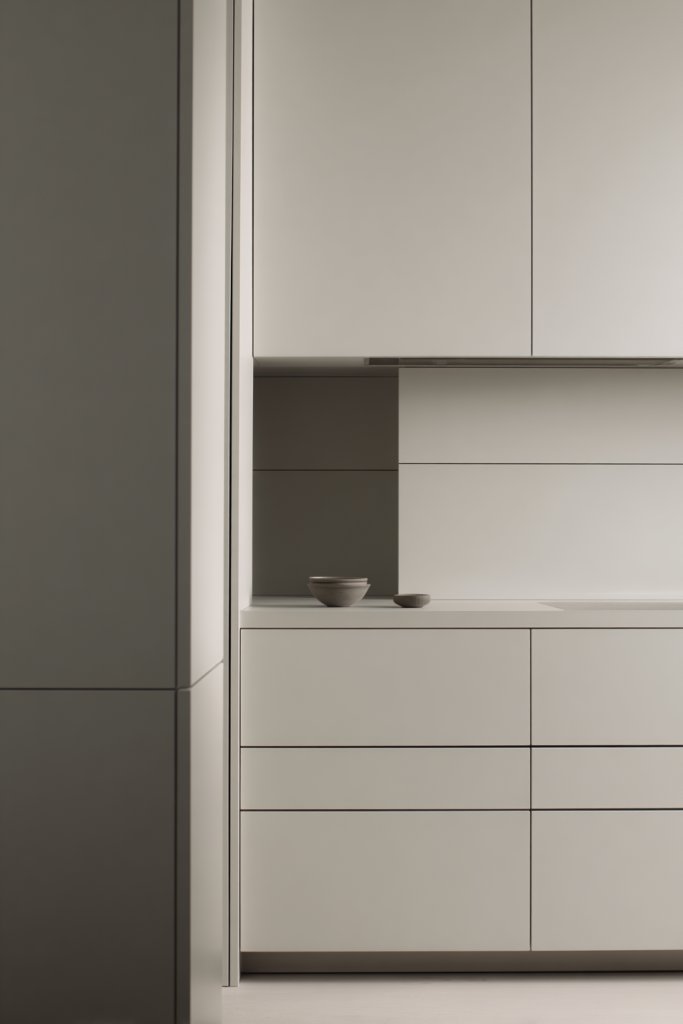
Does your kitchen feel cluttered despite your best efforts? Minimalist design with hidden storage creates a sleek, organized space that hides clutter behind clean surfaces. It’s about achieving a calm, functional environment where everything has its place. Who says simplicity can’t be smart?
Picture handleless cabinets with push-to-open mechanisms, sleek integrated appliances, and seamless countertops. The surfaces are free of knobs, pulls, or clutter, emphasizing a smooth, uninterrupted flow. Cleverly concealed drawers and cabinets keep utensils, pots, and pantry items out of sight but easily accessible. The result is a clutter-free, modern aesthetic.
Choose flat-front cabinetry in monochrome or subtle textures. Use hidden compartments or pull-out drawers for appliances and small items. Incorporate integrated trash and recycling bins for a tidy look. Use soft-close mechanisms to ensure quiet, smooth operation. Adapt storage solutions for your specific needs—baking supplies, utensils, or cleaning tools.
Design your cabinetry with multiple hidden compartments and smart organization features. Work with professionals to ensure precise installation and seamless finishes. Select durable, high-quality materials that withstand daily use. Use soft-close hardware and push-to-open mechanisms for an effortless experience. Keep your layout logical and accessible, with a focus on minimal visual clutter.
Add subtle lighting inside cabinets or under countertops to reveal hidden spaces. Customize with personal touches—like engraved handles or color accents—inside drawers. Use hidden storage for valuable or seldom-used items. Regularly review and reorganize to maintain the minimalist aesthetic.
A minimalist kitchen with hidden storage showcases your taste for clean design and efficiency. It simplifies daily routines and reduces stress. Once you master this approach, your space becomes a sanctuary of calm and order. Ready to embrace the beauty of hidden space?
24. Colorful Bar Stools for a Pop of Brightness
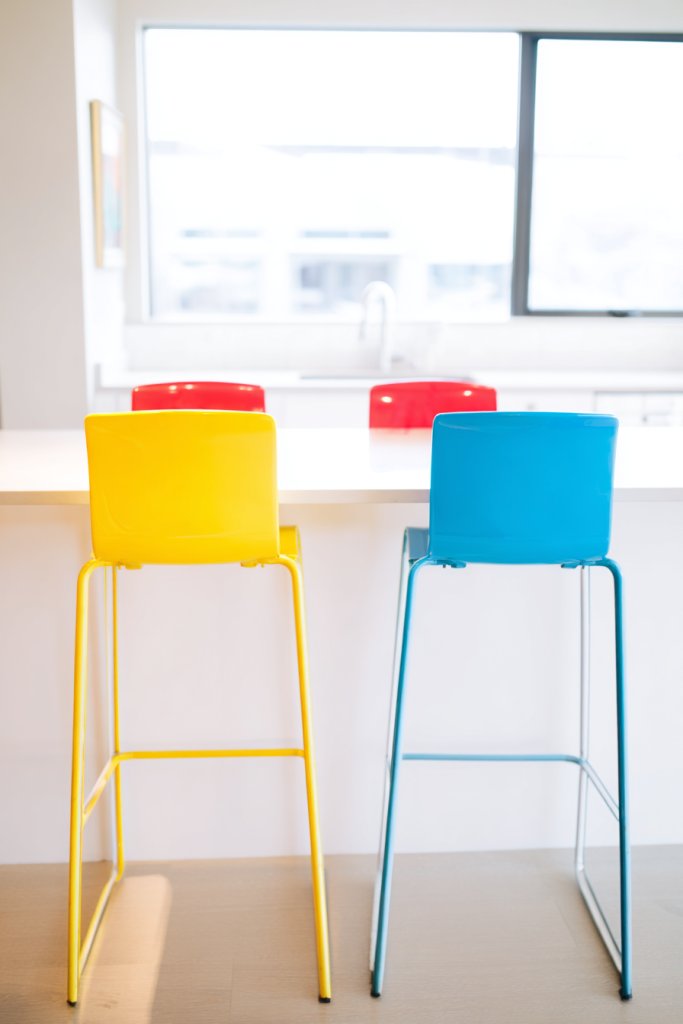
Feeling like your kitchen lacks personality and fun? Bright, colorful bar stools instantly add vibrancy and a playful vibe. They inject energy into your space and serve as a focal point. Who says seating has to be dull?
Picture a row of stools in bold hues—turquoise, sunny yellow, or coral—around a sleek island or breakfast bar. The vivid colors contrast beautifully with neutral cabinetry and countertops. The playful seating invites family and friends to gather, making your kitchen a lively hub. The varied shades add depth and visual interest.
Mix and match colors for a lively, eclectic look or select a monochrome palette for a more cohesive feel. Choose different styles—industrial metal, molded plastic, or upholstered—for variety. Incorporate cushions or throws that complement the color scheme. Use bold or patterned fabrics for added personality.
Select durable, easy-to-clean materials suitable for daily use. Measure your counter height to choose the correct seat height. Consider stacking or nesting stools for easy storage when not in use. Coordinate finishes—metal, wood, or plastic—to match your decor. Incorporate protective pads to prevent scratching your flooring.
Add decorative elements like patterned cushions or personalized embroidery. Use the stools to display thematic accents—like summer motifs or holiday themes. Incorporate small decorative accessories on your island or bar area to tie everything together. Keep the look fresh by swapping out cushions or accessories seasonally.
Colorful stools turn your kitchen into a cheerful, inviting space. They reflect your personality and make everyday meals more fun. Once you see how a splash of color transforms the vibe, you’ll be inspired to experiment more. Ready to brighten up your seating?
25. Artistic Backsplash with Subtle Texture
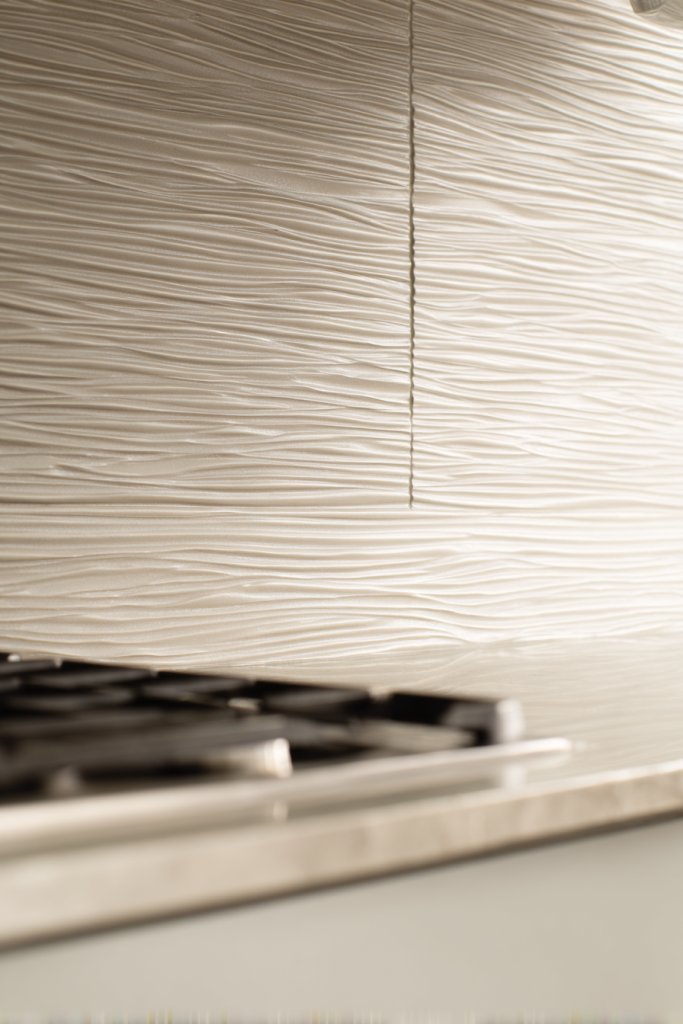
Tired of plain, boring backsplashes that lack personality? An artistic backsplash with subtle texture adds depth and sophistication without overwhelming your design. It’s an elegant way to make your kitchen stand out while maintaining versatility. Who said subtle can’t be stunning?
Imagine a backsplash with a softly textured marble or matte ceramic tiles with a gentle embossed pattern. The subtle textures catch light differently, creating a layered, dynamic surface. The design adds interest and depth, elevating even simple color schemes. It’s like wearing a statement piece that’s understated but impactful.
Choose textures like embossed tiles, subtle geometric patterns, or tactile stone finishes. Keep the color palette neutral or monochrome to emphasize texture. Incorporate metallic or matte finishes for added sophistication. For a more eclectic look, mix textures and patterns carefully, balancing visual weight.
Select high-quality textured tiles that suit your style and budget. Prepare the wall surface properly—clean, level, and dry. Use appropriate adhesive for textured surfaces to ensure durability. Lay tiles carefully, following your pattern, and grout with a color that complements or contrasts subtly. Seal if necessary to preserve texture.
Add small decorative elements or metallic accents to highlight the texture. Use lighting—under-cabinet LEDs or spotlights—to accentuate surface details. Incorporate coordinated countertops and cabinetry to tie the look together. Regular cleaning and gentle maintenance keep textures looking fresh.
A textured backsplash adds understated luxury and depth to your kitchen design. It’s a subtle detail that elevates the entire space. Once you see how texture transforms the environment, you’ll be eager to experiment further. Ready to add tactile interest?
Conclusion
With a wide range of kitchen interior design ideas at your fingertips, you’re ready to transform your cooking space into a beautiful and functional haven. Experiment with different styles, colors, and layouts to find what truly resonates with you. Take the leap and turn your kitchen into a place where inspiration and culinary delights flourish—your dream kitchen awaits!