Your living room is the heart of your home, and giving its walls a fresh, creative touch can completely transform the entire space. Living Room Wall Design Ideas are incredibly popular because they allow for personal expression, add visual interest, and can set the mood for your entire home. Whether you’re into bold statements or subtle elegance, there’s something for everyone seeking to make their living area uniquely theirs.
In this article, you’ll find a diverse array of ideas that cater to different styles, tastes, and budgets. From artistic wall murals to cozy gallery walls, each concept is designed to inspire and help you craft a space that truly reflects your personality. Get ready to explore creative ways to elevate your living room walls and turn them into the standout feature of your home.
1. Gallery Wall of Geometric Frames for Modern Elegance
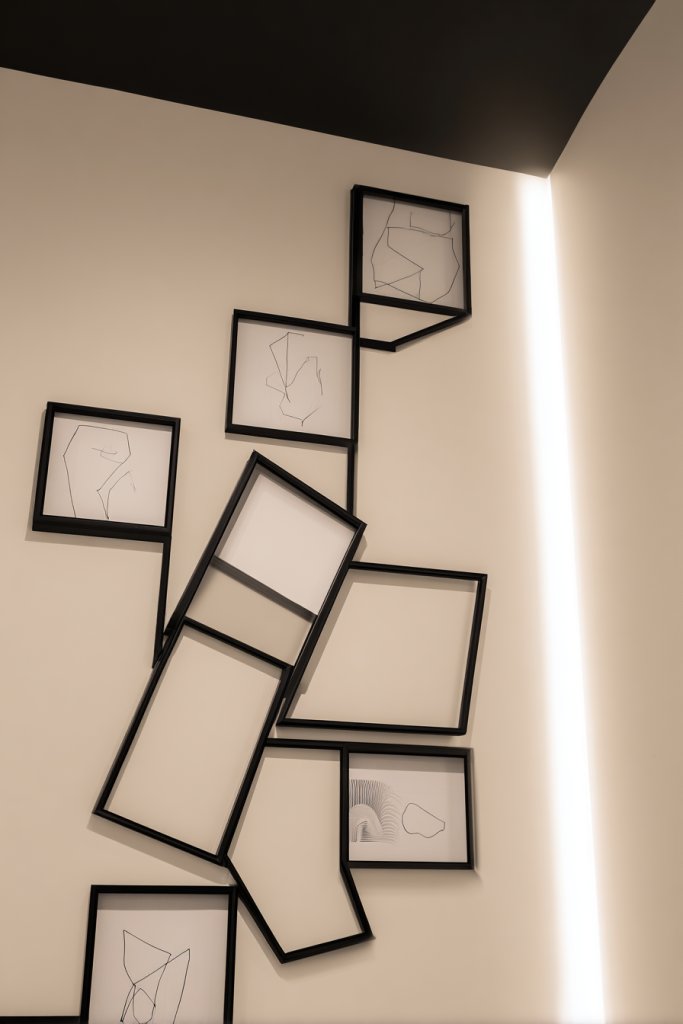
Ever feel like your living room needs that wow factor but struggle with finding the right focal point? A gallery wall of geometric frames offers a fresh, modern solution that transforms blank walls into eye-catching art. It’s a simple way to add personality without cluttering your space. Plus, it’s surprisingly easy to pull off even if you’re not a design pro.
Picture a wall adorned with frames in various geometric shapes—triangles, hexagons, diamonds—arranged in an asymmetrical but balanced pattern. The frames have sleek metallic finishes, matte black, or bold colors, creating visual contrast. Inside each frame, instead of traditional photos, you might use minimalist prints or textured papers. The overall effect is dynamic, sophisticated, and effortlessly chic.
This concept works well in different styles, from ultra-modern to eclectic. You can customize the color palette to match seasonal moods—warm tones in winter, cool shades in summer. For small spaces, keep the arrangement tight and symmetrical; in larger rooms, go for a sprawling, freeform layout. Mixing materials like wood, metal, and acrylic adds further depth and versatility.
Start by selecting a collection of geometric frames—these can be bought pre-made or DIYed with foam core and painter’s tape. Lay out your design on the floor first to experiment with arrangement. Use painter’s tape or a level to mark the positions on your wall for precise hanging. Choose lightweight prints or textured papers to slide into the frames easily. Use a cordless drill or hammer for secure mounting, and step back frequently to assess balance.
Inject your personality by customizing the content inside each frame—favorite quotes, abstract art, or minimalist illustrations. Incorporate metallic or matte black frames for a sleek look, or add colorful accents for a playful vibe. You could also layer in small decorative objects on shelves nearby to enhance the geometric theme. Changing out prints seasonally keeps the wall fresh and engaging.
A geometric gallery wall isn’t just trendy—it’s a statement of style and creativity. It shows you can create a stunning focal point with simple shapes and thoughtful placement. Once you see the impact, you’ll feel more confident experimenting with other wall arrangements and decor ideas. Ready to turn your wall into a modern masterpiece?
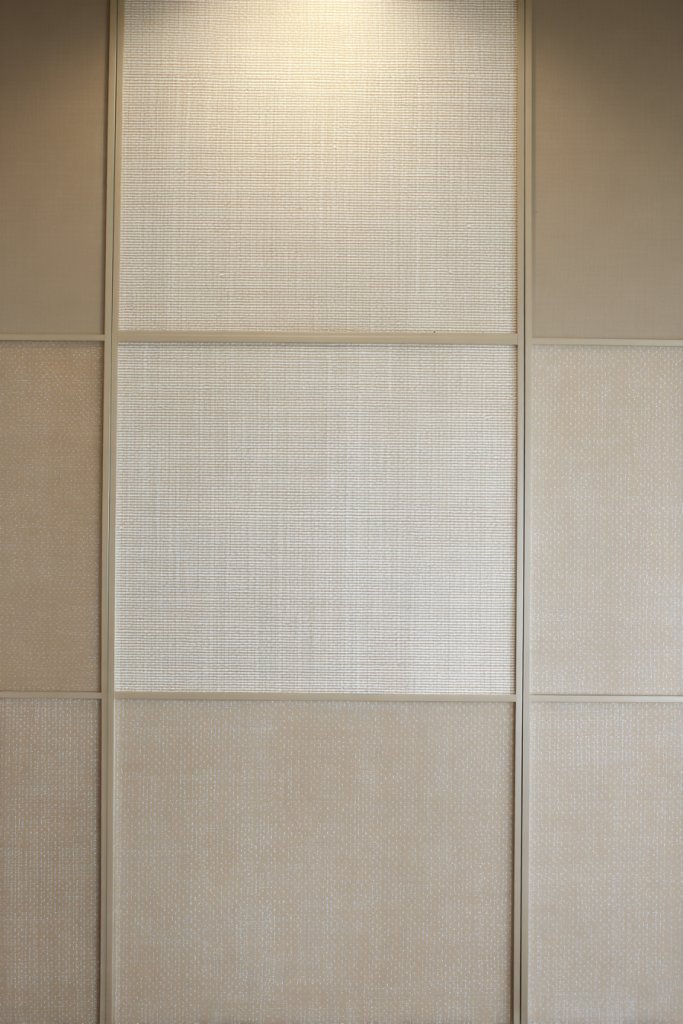
2. Textured Wall Panels for Depth and Dimension
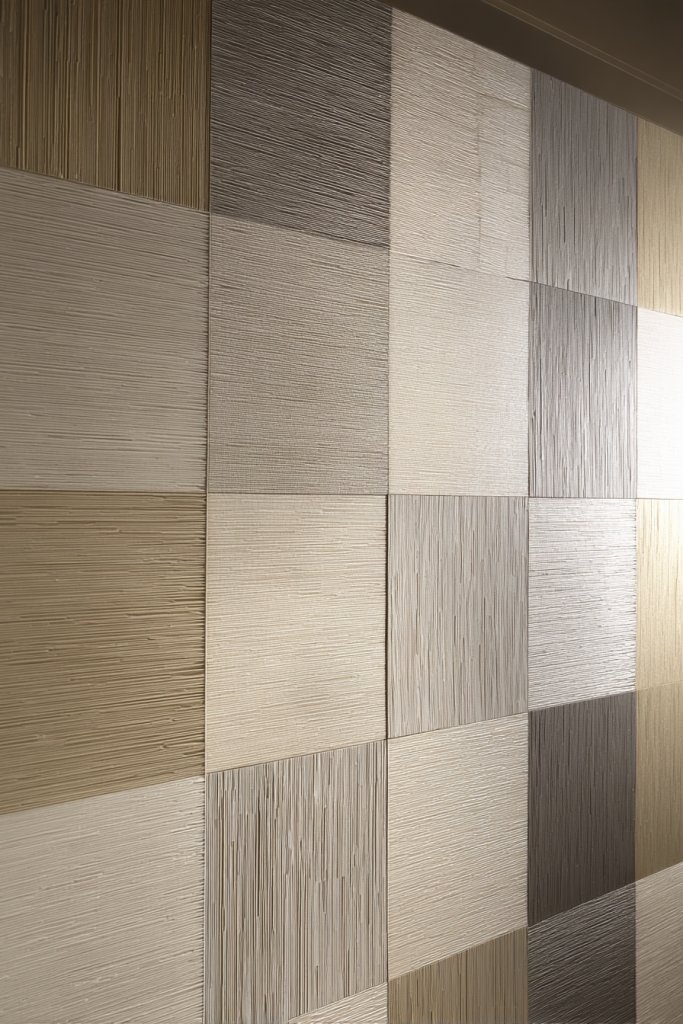
Does your living room feel a bit flat or uninspired? Textured wall panels can add that much-needed visual punch and create a sense of depth that transforms the entire space. It’s a great way to make a statement without overwhelming the room. Plus, it’s an easy upgrade that doesn’t require a complete overhaul.
Imagine standing in front of a wall covered in 3D panels that resemble rippling waves or geometric patterns. The textured surface catches the light differently depending on the time of day, creating subtle shadows and highlights. The tactile quality invites you to touch and explore the surface, adding a sensory layer to your living room decor. Choose panels in neutral tones or playful colors to suit your style.
Textured panels suit many aesthetics—from minimalist to industrial. For a cozy vibe, opt for soft, fabric-like textures; for a sleek, modern look, go for metallic or geometric designs. Small rooms can benefit from vertical panels to elongate the space, while larger areas can handle bold, oversized patterns. Seasonal color changes are easy—just repaint or replace panels for a quick refresh.
Begin by selecting the right type of panels—materials include PVC, MDF, fabric, or metal. Measure your wall carefully and plan your layout. Use adhesive or mounting brackets designed for your panel material to ensure stability. Prepare the wall surface by cleaning and smoothing it out, and then carefully apply the panels, aligning seams precisely. Finish with caulking or paint touch-ups to create a seamless look.
Enhance the textured panels with LED strip lighting behind or along the edges to highlight their dimensionality. Incorporate contrasting wall colors or metallic accents for extra flair. For a more eclectic look, combine different textures and patterns in a mosaic-like arrangement. Personalize the space further by complementing the panels with minimal furniture and decor.
Textured wall panels turn plain walls into artful focal points and showcase your eye for detail. They’re a subtle yet impactful way to add depth and sophistication. Once installed, you’ll enjoy a richer, more inviting atmosphere that elevates your entire living space. Ready to give your wall a tactile makeover?
3. Floating Shelves with Curated Decor
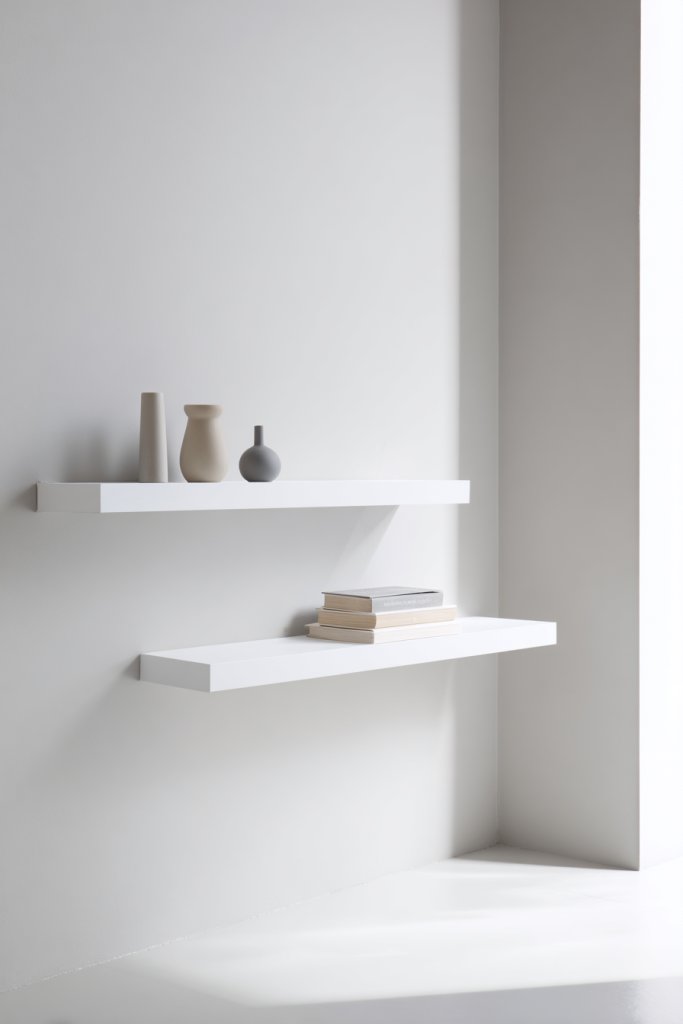
Ever wish your living room looked more styled without feeling cluttered? Floating shelves offer a clean, minimalist way to display your favorite items while maintaining an organized look. They’re versatile, functional, and add visual interest to any wall. Plus, you can change up the decor whenever your mood or seasons shift.
Imagine sleek, matte black or natural wood floating shelves arranged asymmetrically across a wall. They hold a curated mix of decorative objects like unique ceramics, sculptural pieces, or meaningful keepsakes—no clutter, just statement pieces. The floating design creates a sense of lightness and openness, making the room feel more spacious. The layered arrangement adds depth and invites the eye to explore.
Floating shelves can be customized to match your decor style—industrial metal pipes, Scandinavian light woods, or painted bold colors. Use them in small nooks or full walls for maximum impact. Mix and match shelf lengths and orientations for a dynamic look. In different seasons, swap out decor items for fresh accents, like cozy textiles or metallic sculptures.
Start by measuring the wall space and deciding on the shelf arrangement. Choose durable, wall-mountable shelves that can handle your decor weight—consider wall anchors if needed. Use a level to ensure perfect alignment and mark the spots with a pencil. Drill holes, insert anchors, and mount the shelves securely. Arrange your decor thoughtfully, balancing height, color, and texture for visual harmony.
Personalize your shelves with a mix of functional and decorative items—such as small storage baskets, candles, or vintage finds. Incorporate textiles like soft throws or woven baskets underneath for added warmth and texture. Change up accessories seasonally to keep the display fresh. Use lighting like clip-on LED lights or small spotlights to highlight key pieces.
Floating shelves are a simple yet impactful way to elevate your wall decor. They allow your personality to shine through curated objects while keeping clutter at bay. Once you see how much style they add, you’ll be motivated to experiment further with wall design. Your living room will look effortlessly sophisticated in no time.
4. Bold Accent Wall with Vibrant Paint or Wallpaper
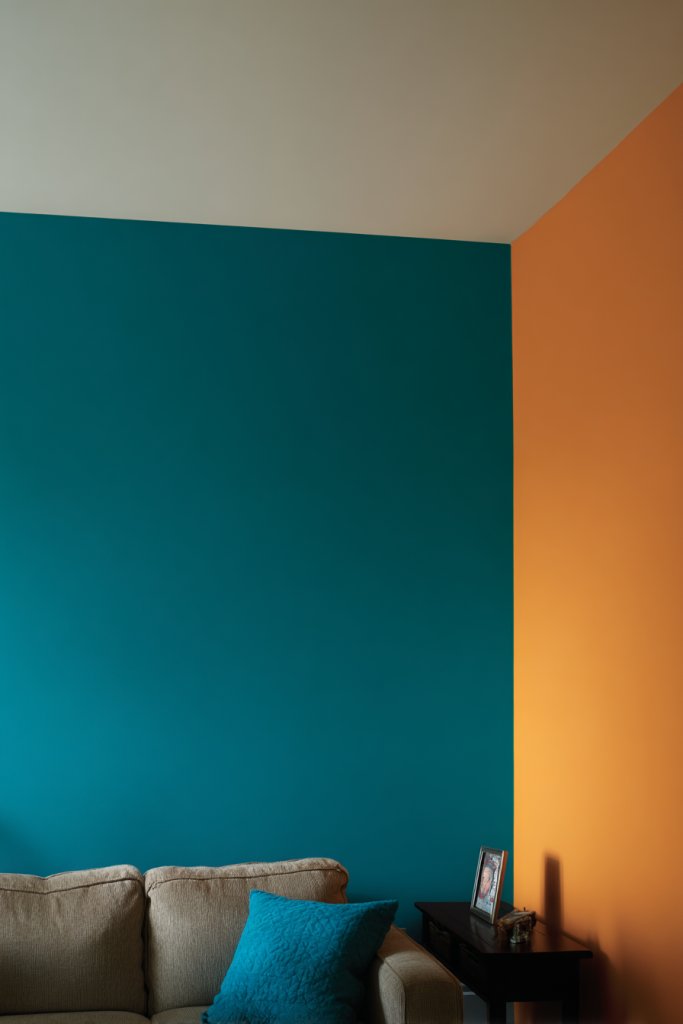
Does your living room lack that punch of personality? A bold accent wall can instantly change the vibe, making the space feel lively and curated. It’s a simple trick to add drama without overhauling the entire room. Plus, it’s a chance to showcase your favorite color or pattern.
Envision one wall painted in a deep navy or emerald green, or covered in vibrant patterned wallpaper with geometric or floral motifs. The contrast draws the eye immediately and creates a focal point that anchors the room. Complement it with neutral furniture and textures like soft textiles or matte finishes to balance the intensity. The result is a space that feels polished yet inviting.
Choose colors or patterns that align with your personality—bright and cheerful or moody and sophisticated. In small rooms, consider a single wall to maximize impact without overwhelming the space. For larger rooms, extend the color or pattern across multiple walls for a more immersive effect. Seasonal updates are easy—repaint or swap out wallpaper to refresh the look.
Start by selecting your paint or wallpaper—go for quality brands to ensure longevity. Prepare the wall by cleaning and patching any holes. Use painter’s tape to create clean edges if painting, and a level to keep lines straight. For wallpaper, carefully align patterns and use a smoothing tool to eliminate bubbles. Use painter’s drop cloths and masking tape for a neat finish.
Add metallic or matte trim to frame the accent wall for a tailored look. Incorporate contrasting textiles or furniture to enhance the color scheme. Consider adding removable decals or wall stencils for extra detail. Personal touches like hanging a statement mirror or art nearby enhances the overall effect.
A bold accent wall transforms your space into a design statement. It’s a simple, cost-effective way to update your decor and showcase your style. Once done, you’ll feel more confident experimenting with other daring decor choices. Your living room will become a reflection of your bold personality.
5. Vertical Wood Slat Wall for Warmth and Style
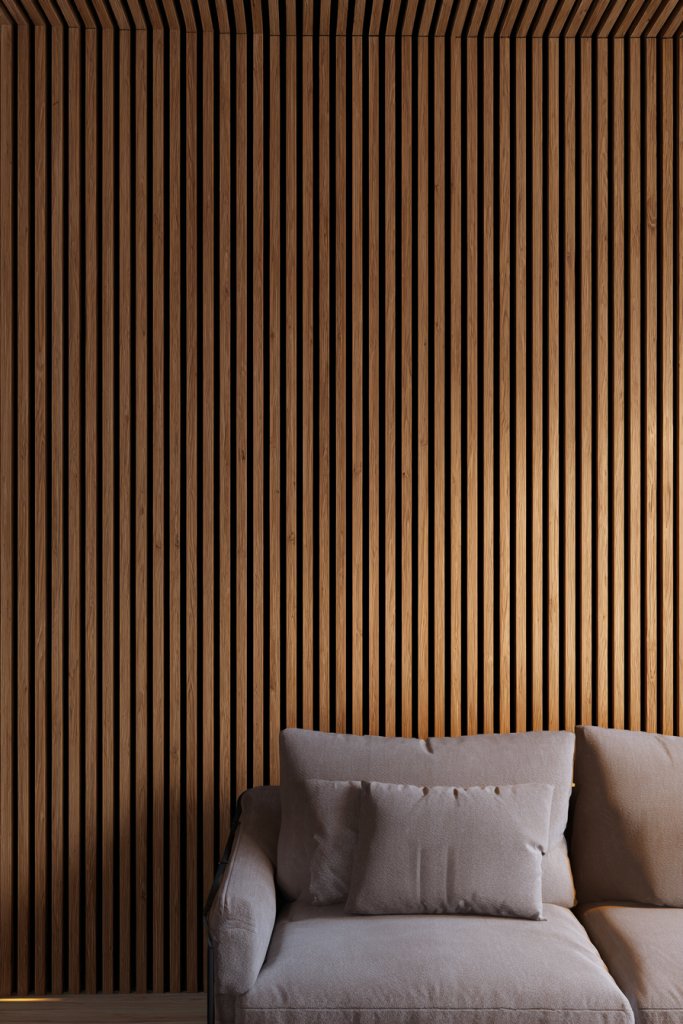
Ever wish your living room felt warmer and more inviting? A vertical wood slat wall provides instant coziness and adds a natural, rustic touch that’s still modern. It’s a statement piece that makes your space feel thoughtfully curated. Plus, it can be a DIY project that saves money while looking high-end.
Picture narrow, evenly spaced wooden slats running from floor to ceiling, creating a textured, rhythmic pattern. The warm tones of the wood contrast beautifully with neutral walls or colorful accents. The vertical lines draw the eye upward, making the room seem taller and more spacious. Soft lighting accentuates the natural grain, adding depth and warmth.
Choose from different wood finishes—light oak, dark walnut, or painted options—to match your decor. For a minimalist approach, keep the slats uniform and simple; for a more eclectic vibe, mix in different widths or incorporate decorative panels. This feature works well in living rooms, entryways, or even bedrooms. Seasonal accents like cozy throws or textured textiles complement the natural wood.
Plan your wall layout and measure carefully to ensure even spacing. Use a level and a straight edge to mark the placement of each slat. Secure the slats with nails or adhesive, depending on the material and wall type. Sand and finish the wood for a smooth surface, then seal or stain for durability. Lighting can be added to highlight the texture and create ambiance.
Add decorative elements like metal accents, LED strip lighting, or framed mirrors to enhance the wood slat feature. Layer in textiles like a plush rug or soft cushions to soften the overall look. Change the finish or stain seasonally to keep the look fresh. Personal touches make the feature wall uniquely yours.
A vertical wood slat wall adds natural elegance and a cozy vibe that elevates your entire decor. It’s a timeless look that can adapt to various styles, from rustic to contemporary. Installing it boosts your confidence in DIY projects and interior design. Your home will radiate warmth and style, inviting everyone in.
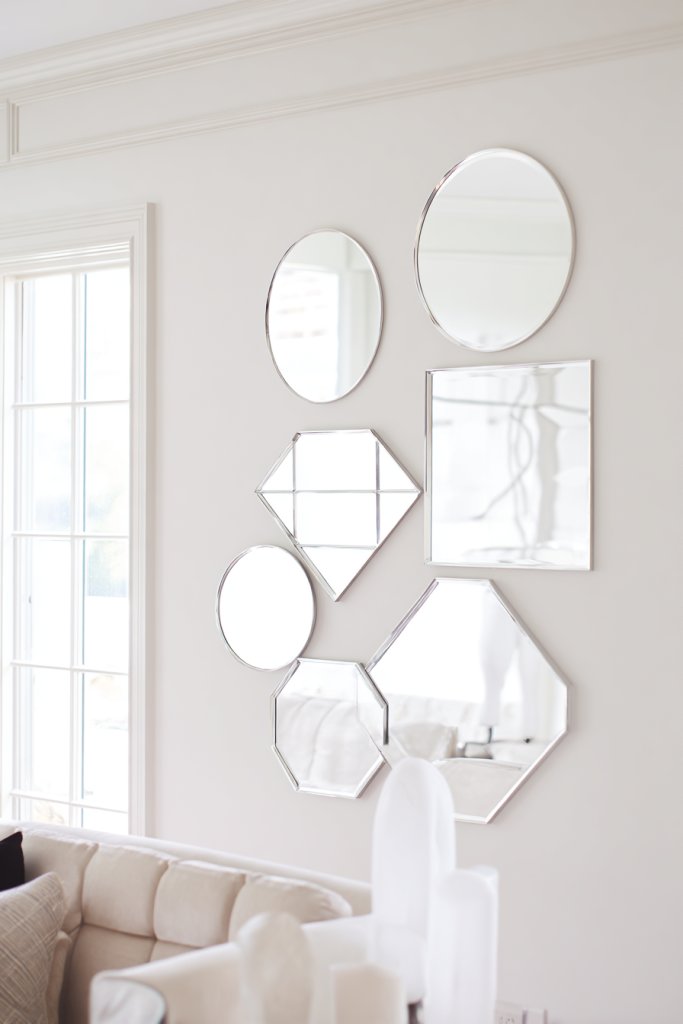
6. Mirror Clusters to Enhance Light and Space
Feeling like your living room is a bit dark or cramped? Strategically placing a cluster of mirrors can make a huge difference by bouncing light around and visually enlarging the space. It’s a clever trick that adds both function and style without taking up any real estate. Plus, mirrors are always in style.
Imagine a collection of mirrors in various shapes—round, oval, square—arranged in a playful yet balanced cluster. The frames could be metallic, wooden, or minimalist, depending on your style. Reflections of your room’s decor and natural light create a lively, dynamic effect. The mirrors’ arrangement instantly brightens the space and adds a touch of glamour.
Arrange mirrors symmetrically for a formal look or asymmetrically for a more eclectic vibe. Use them above a console table or fireplace, or as a focal point on a large blank wall. Seasonal decor can be added with subtle accessories nearby for a fresh look. Small or large mirrors can be mixed based on the room’s scale.
Choose mirrors with sturdy hooks or adhesive options suitable for your wall type. Lay out your design on the floor first, then transfer it to the wall using painter’s tape and a level. Secure each mirror carefully, ensuring even spacing. Clean the glass with a streak-free cleaner before hanging. Step back regularly to check overall balance.
Frame the mirrors with decorative trim or paint the frames in bold colors for a custom look. Add LED backlighting or small sconces nearby to enhance the reflective effect. Incorporate small decorative objects on nearby shelves or furniture to complement the mirrors. Rotate or rearrange seasonally to keep the space lively.
Clustered mirrors create a playful yet elegant vibe that lifts your entire living room. They’re a practical way to boost light and perceived space, making your home feel more open. Once installed, you’ll love how easy it is to change the look and feel simply by swapping out or repositioning mirrors. Your space will feel instantly more upscale and welcoming.
7. Artistic Wall Stencils for Custom Patterns
Looking to add a personal touch to your living room walls without committing to expensive artwork? Wall stencils offer a budget-friendly, creative way to craft custom patterns that reflect your style. It’s a fun DIY project that results in a unique, handcrafted look. Who says decorating can’t be playful?
Imagine delicate, symmetrical motifs or bold geometric shapes painted directly onto your wall using stencils. The patterns can be as subtle as fine lines or as dramatic as large motifs covering an entire wall. Choose colors that complement your existing decor—think muted neutrals or vibrant hues. The result is an eye-catching feature that shows off your personality.
Opt for intricate patterns for a sophisticated look or simple shapes for a modern vibe. You can stencil an entire accent wall or just a section for a subtle detail. Seasonal or thematic patterns, like snowflakes or leaves, can be added for a personalized touch. Mix and match stencil styles in different rooms for a cohesive yet varied aesthetic.
Start by selecting high-quality stencils and paints suitable for walls. Prepare the wall surface—clean and smooth—then use painter’s tape to secure the stencil. Use a sponge or brush to dab paint onto the stencil, controlling the amount to avoid bleed. Carefully lift the stencil, reposition if needed, and repeat. Seal the design with a clear coat for durability.
Add metallic or contrasting paint accents to highlight certain areas of your pattern. Incorporate complementary textiles or decor items nearby to enhance the handcrafted feel. Custom stencil designs can be created for special occasions or themes. Rotate or add new patterns over time to keep your wall fresh.
Artistic wall stencils empower you to create a one-of-a-kind backdrop that’s full of personality. They’re an affordable way to add visual interest and showcase your creativity. Once you see the vibrant patterns come to life, you’ll be inspired to experiment further with DIY wall art projects. Your home will look uniquely yours.
8. Chalkboard or Whiteboard Wall for Interactive Fun
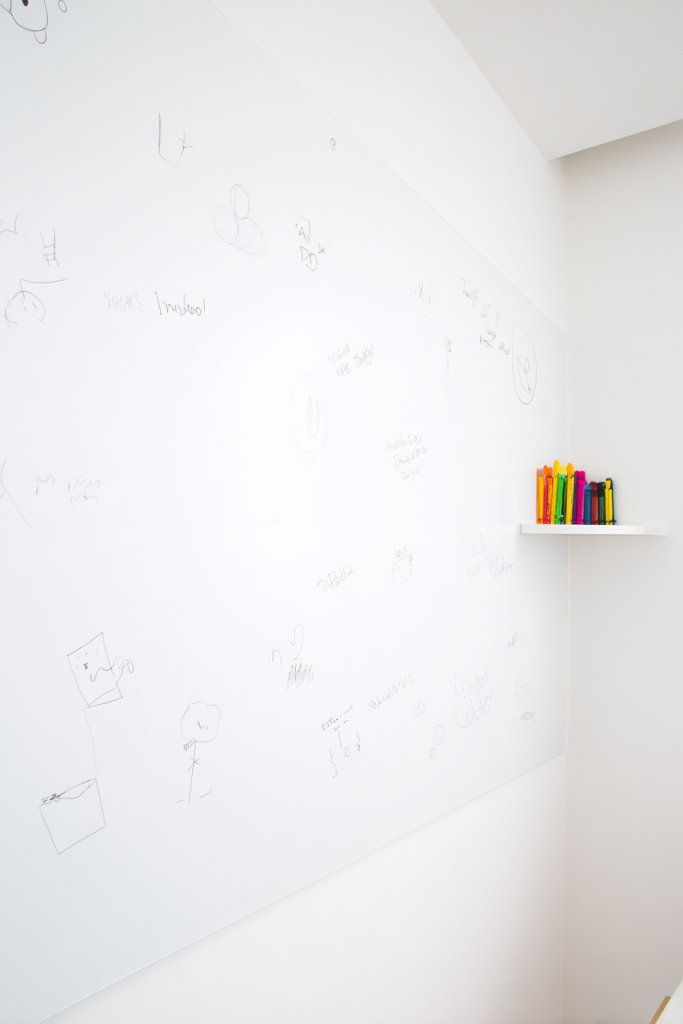
Want to add a playful, functional element to your living room? A chalkboard or whiteboard wall turns an ordinary space into an interactive canvas for notes, doodles, or inspiring quotes. It’s perfect for families, creatives, or anyone who loves to personalize their environment. Plus, it’s a great way to keep things organized.
Visualize a large section of wall painted with chalkboard paint or fitted with a sleek whiteboard surface. It invites spontaneous sketches, to-do lists, or motivational messages. The blackboard surface contrasts beautifully with light-colored walls, creating a focal point that’s both practical and fun. You can also add magnetic accessories or colorful chalk for extra flair.
Choose a full wall or a large panel for maximum impact. Frame the board with decorative molding or paint a geometric border around it for a polished look. Change the content seasonally—holiday messages, menus, or kids’ art. Use removable decals or grid patterns to organize your notes visually. This feature works well in open-concept living rooms for easy access.
Select high-quality chalkboard or whiteboard paint and prepare the wall by cleaning and sanding if necessary. Use painter’s tape to mask off edges for a clean application. Apply multiple coats, allowing drying time in between, and finish with a clear sealant if needed. Install accessories like a ledge for chalk or markers. Regular cleaning keeps it looking fresh and functional.
Decorate the border with washi tape or decorative trim to add style. Incorporate colorful chalk or markers for a vibrant touch. Personalize with custom decals or labels for different sections—like a family schedule or creative zone. Add small baskets or shelves nearby for supplies, keeping everything tidy.
A chalkboard or whiteboard wall brings fun and practicality together, making your living space more lively. It encourages creativity and communication, perfect for families or artistic souls. Once you see how much personality and functionality it adds, you’ll be motivated to keep it updated regularly. Your home will become a hub of ideas and inspiration.
9. Hanging Rope or Macramé with LED Lighting
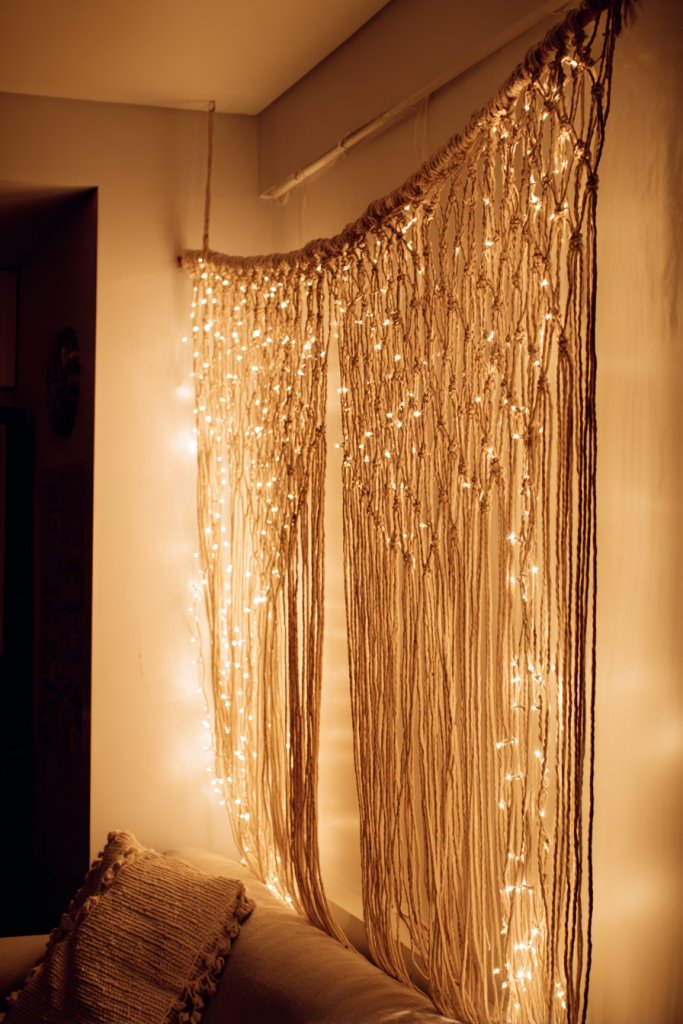
Looking for a cozy, bohemian vibe in your living room? Hanging rope or macramé wall hangings with integrated LED lighting create a warm, inviting atmosphere. They add texture and softness to your space while providing subtle illumination. It’s a stylish way to make your walls stand out and feel more personal.
Picture intricate macramé patterns hanging in soft, natural fibers, softly illuminated by concealed LED strips or fairy lights. The textured knots and fringes create a tactile appeal, while the warm glow adds ambiance. The combination of organic materials and gentle lighting transforms your wall into a calming focal point, perfect for relaxing evenings or cozy gatherings.
Design options vary from simple, modern geometric knots to elaborate boho designs with tassels. The light source can be hidden behind or within the hanging for a seamless look. Use different fiber colors and thicknesses to match your decor. Seasonal accents like fairy lights or lanterns can be added for special occasions.
Choose durable macramé cords or ropes in natural fibers like jute or cotton. Securely attach the hangings to the wall using hooks or nails, ensuring even tension. Conceal LED strips behind or within the knots, connecting to a power source. Use a remote or app-controlled lighting system for adjustable ambiance. Keep the installation symmetrical or asymmetrical for personality.
Add decorative elements like wooden beads, shells, or metal charms to your macramé. Change lighting colors or intensities to suit different moods. Incorporate small shelves or hooks within the design for added functionality. Personal touches make the display uniquely yours and adaptable to your evolving style.
Macramé with LED lighting combines craftsmanship with ambiance, elevating your decor effortlessly. It’s a statement piece that also invites relaxation. Once installed, you’ll enjoy the cozy, stylish environment it creates, inspiring you to explore more DIY wall art ideas. Your space will feel warm and welcoming all year round.
10. Monochrome Art with Metallic Accents
Want a sleek, sophisticated look in your living room? Monochrome art with metallic accents provides a modern touch that elevates your decor without overwhelming it. It’s perfect for minimalist lovers or anyone seeking a chic, understated statement. Plus, it’s surprisingly versatile and easy to coordinate.
Imagine a large black-and-white photograph or abstract print framed in a slim metallic border—gold, silver, or bronze. The contrast between matte prints and shiny metallic frames adds depth and interest. Positioning multiple pieces in a grid or salon style creates a gallery effect, turning your wall into a focal point that exudes elegance.
Mix different monochrome prints—photographs, sketches, typographic art—for visual variety. Use matching or complementary metallic frames to unify the display. This style suits both modern and traditional interiors, adapting with different frame finishes or print styles. Seasonal changes can be made by swapping out prints or updating the frames.
Select high-quality prints or create your own monochrome artwork. Use sleek, slim-profile frames with metallic finishes for a polished look. Arrange the art in a balanced grid, or go for an eclectic salon style with various sizes. Use a level and measuring tape for precise placement. Mount securely with appropriate wall anchors or hooks.
Add metallic accents through small decorative objects, like sculptures or vases, placed nearby. Incorporate textured textiles or soft lighting to complement the metallic sheen. Personalize further with custom typography or quotes in monochrome. Rotate art pieces seasonally for fresh visual interest.
Monochrome art with metallic details creates a timeless, sophisticated vibe that enhances your entire living space. It’s an easy way to achieve a high-end look with minimal effort. Seeing your curated gallery grow will motivate you to experiment with other stylish decor ideas, transforming your home into a modern haven.
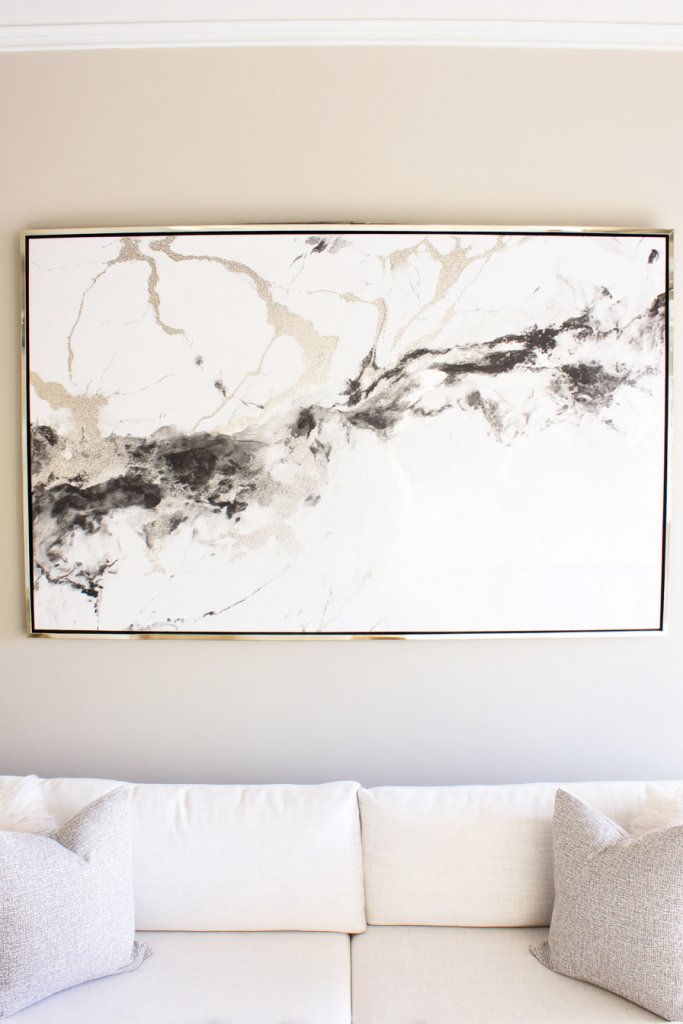
11. Multi-Panel Canvas Art for a Statement Piece
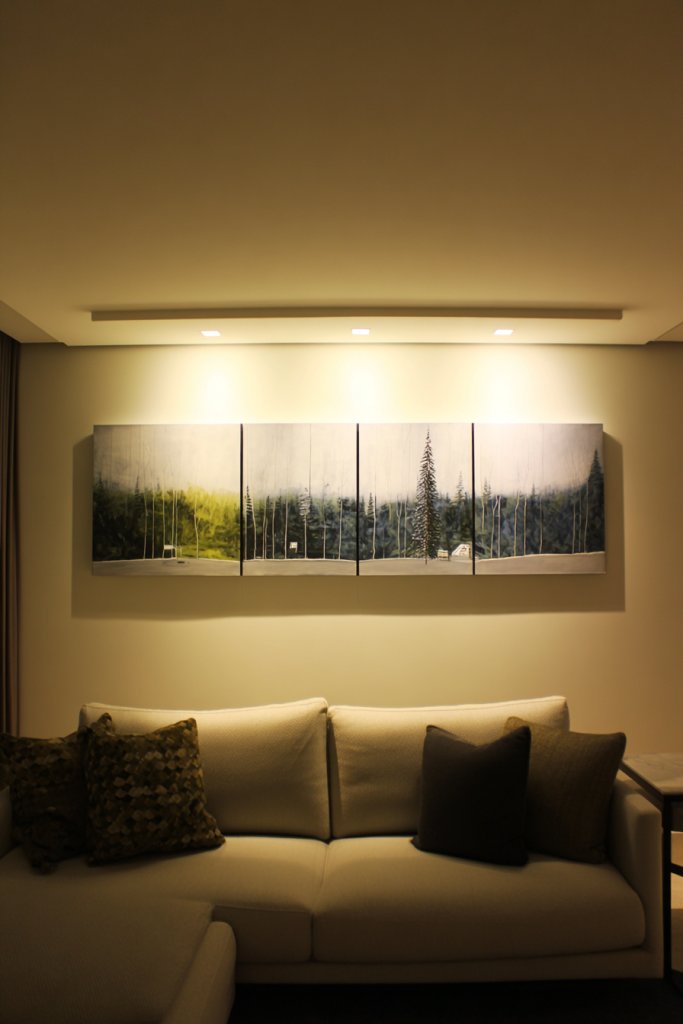
Looking to make a bold statement in your living room? Multi-panel canvas art offers a striking, contemporary focal point that commands attention. It’s a powerful way to showcase large-scale artwork without the expense or hassle of framing one massive piece. Plus, it’s surprisingly easy to install.
Picture a triptych or a five-panel piece depicting an abstract landscape or cityscape in vibrant colors. The panels align with some space between them, creating an intriguing segmented effect. The overall impact is dramatic and modern, adding depth and dynamism to your wall. The artwork’s size and placement define the room’s entire aesthetic.
Choose images that evoke emotion or complement your decor palette—think bold abstracts, nature scenes, or geometric patterns. Play with different panel configurations—grid, linear, or staggered—to suit your space. Seasonal art swaps keep the display fresh, and different color schemes can match your evolving style.
Select high-quality canvas prints and decide on the panel layout early. Measure your wall space and plan for even spacing between panels. Use a level and painter’s tape to mark where each piece will go. Hang each panel with appropriate hooks or nails, ensuring alignment. Adjust spacing for visual harmony and secure all mounts firmly.
Enhance the artwork with subtle lighting, like picture lights or LED strips, to highlight the details. Mix in smaller complementary pieces or decorative objects on nearby shelves. Customize the look by choosing different framing options or adding textured overlays. Regularly update or rotate your multi-panel art for variety.
Multi-panel canvas art creates a gallery-quality focal point that instantly elevates your decor. It shows off your taste for contemporary design and confidence in bold choices. Once installed, it becomes a conversation starter and a source of pride. Your living room will look stylish and curated effortlessly.
12. Reclaimed Wood Art Installations
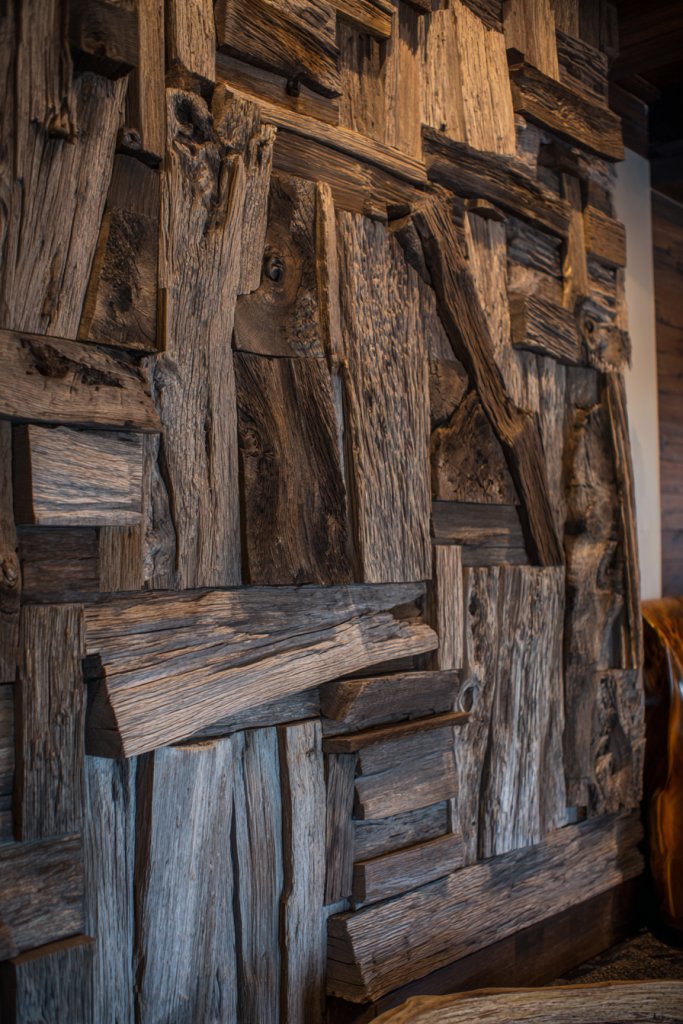
Craving a rustic or eco-friendly vibe? Reclaimed wood art installations bring warmth, character, and sustainability into your living room. They’re perfect for adding an organic touch that feels authentic and timeless. Plus, repurposing old wood gives your decor a meaningful story.
Imagine geometric or abstract patterns crafted from weathered, reclaimed wood planks arranged on a wall. The varied textures and tones—from aged gray to warm honey—bring visual richness. The natural imperfections, knots, and grain patterns add personality. This creates a focal point that’s both artful and environmentally conscious.
Use reclaimed wood in different forms: panels, plaques, or sculptural pieces. Mix with modern elements like metal or glass for contrast and balance. This style suits industrial, farmhouse, or eclectic interiors. Seasonal accents like cozy textiles or vintage accessories complement the rustic aesthetic.
Source reclaimed wood from reputable suppliers or salvage yards. Cut and assemble the pieces into your desired design—geometric, abstract, or natural. Sand edges for safety and apply a finish or sealant for protection. Mount the pieces securely using heavy-duty anchors or brackets. Ensure the installation is level and stable.
Personalize with engraved quotes or symbols on the wood. Incorporate LED lighting behind or underneath for a subtle glow. Layer with complementary decor like vintage ceramics or textiles. Change the arrangement or finish over time to keep the look fresh and meaningful.
Reclaimed wood art embodies sustainability and craftsmanship, adding character to your space. It’s a conversation starter that reflects your eco-conscious values. Seeing your unique piece come to life boosts confidence in DIY and creative decor. Your home will radiate authenticity and warmth.
13. Industrial Pipe Shelves with Decorative Items
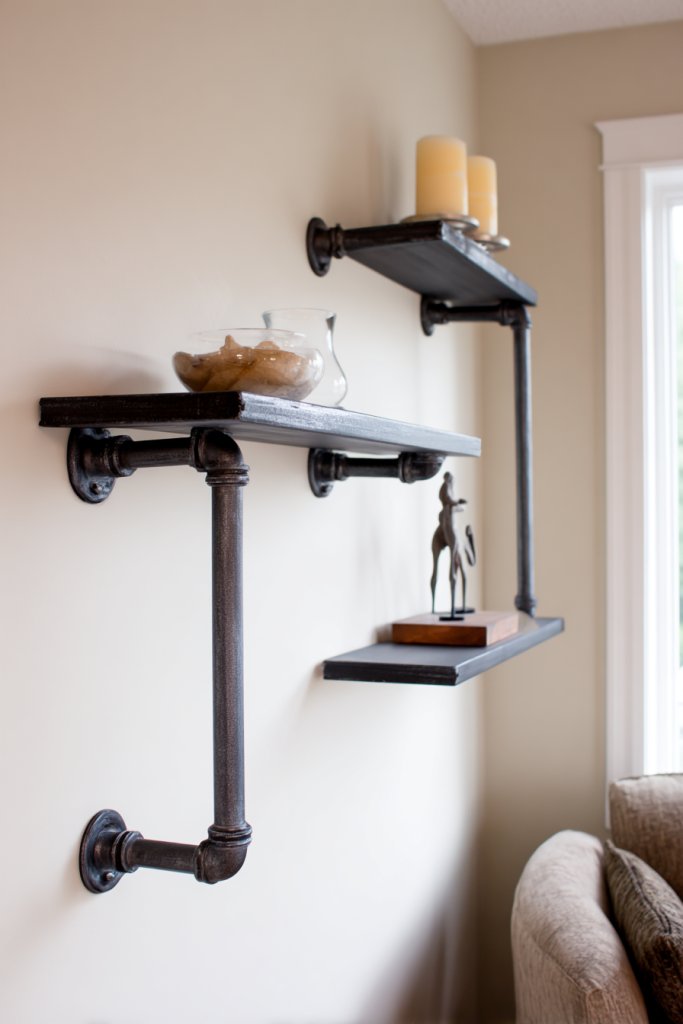
Craving an edgy, industrial vibe that still feels warm and inviting? Pipe shelving combines rugged materials with sleek design, adding a bold statement to your living room. It’s practical and stylish, perfect for showcasing your favorite decor pieces without cluttering surfaces. Ready to upgrade your wall space?
Picture black metal pipes mounted in geometric configurations, supporting wooden or glass shelves. These shelves hold decorative objects like vintage clocks, sculptures, or books—no vases or plants required. The raw metal and wood contrast create a rugged yet refined aesthetic. Ambient lighting along the pipes enhances the industrial charm.
Adjust the pipe length and configuration to fit your space—single large shelves or a grid of smaller ones. Use reclaimed wood for a rustic touch or polished metal for a more contemporary feel. Mix in different textures such as concrete or leather nearby for a layered, industrial look. Seasonal or themed decor can be swapped easily for freshness.
Measure your wall space and decide on the pipe layout. Attach wall anchors and secure the pipes with brackets, ensuring level placement. Place sturdy shelves on the pipe supports, tightening screws for stability. Decorate with your selected items—think sculptural objects, candles, or vintage finds. Finish with a clear sealant or paint for durability.
Add LED strip lighting underneath or along the pipes for extra ambiance. Incorporate metallic or textured objects nearby to complement the industrial theme. Use hooks or small racks on the pipes for hanging accessories or tools. Personal touches like monogrammed initials or custom signs can make the display uniquely yours.
Industrial pipe shelves add a bold, architectural element that elevates your decor. They’re customizable and adaptable, perfect for showing off your style. Once installed, you’ll love how they blend functional storage with statement-making design. It’s a winning combo that boosts your confidence in DIY wall upgrades.
14. Minimalist Line Art Prints in Sleek Frames
Looking for a clean, sophisticated way to add art without clutter? Minimalist line art prints offer a sleek, modern aesthetic that complements any decor style. They’re subtle enough for a subtle accent or bold enough to serve as a focal point. Plus, they’re easy to swap out as your tastes evolve.
Imagine a series of black or metallic line drawings—faces, animals, abstract shapes—mounted in simple frames. The thin lines and negative space create an airy, calming effect. Arranged in a grid or salon style, these prints add visual interest without overpowering the room. The minimal design makes your space look curated and effortless.
Mix different subjects or stick to a monochrome theme for consistency. Use sleek black or metallic frames for a contemporary look; opt for natural wood for warmth. Group several in varying sizes or create a linear arrangement along a hallway or large wall. Change out prints seasonally or for special occasions.
Choose high-resolution line art prints or create your own with digital tools. Frame with slim-profile mats or frameless for a modern touch. Use a level and measuring tape to align the frames perfectly. Hang with appropriate hooks or wires, ensuring even spacing. Keep the prints protected with UV glass or acrylic.
Add metallic or matte finishes to the frames for extra style. Incorporate LED backlighting or small spotlights to highlight the artwork. Personalize by commissioning custom line art or adding subtle colored accents. Rotate or upgrade the prints over time for a fresh look.
Minimalist line art elevates your decor with simplicity and class. It’s a timeless style that’s easy to personalize and update. Seeing your curated collection grow will inspire you to explore more modern art ideas. Your living room will radiate effortless elegance.
15. Textured Tapestry or Fabric Wall Hanging
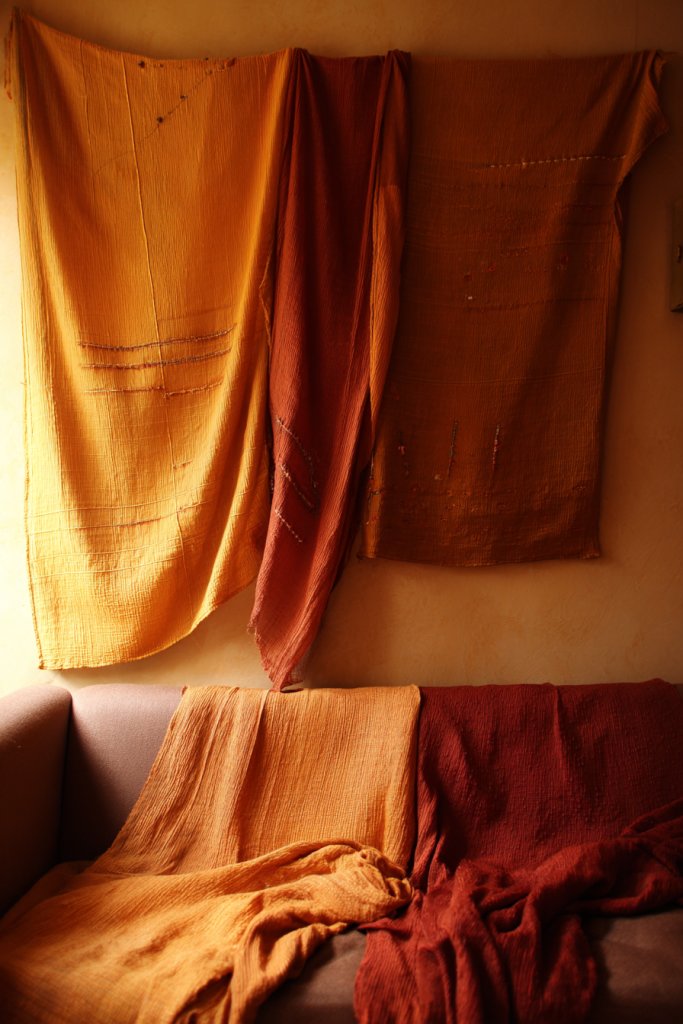
Want to add softness and warmth to your living space? A textured tapestry or fabric wall hanging creates an inviting atmosphere that feels cozy and stylish. It’s an easy way to introduce color, pattern, and tactile interest without overwhelming your decor. Plus, it’s a simple DIY or purchase option.
Picture a large woven tapestry with intricate patterns or soft, neutral fabrics with textured weaves hanging gracefully. The fabric’s texture adds depth, while the patterns create visual intrigue. Light, airy textiles soften sharp lines and create a layered, inviting vibe. The hanging becomes a focal point that exudes comfort and personality.
Choose from different textures—knit, woven, embroidered, or quilted—to match your style. Hang over a blank wall or layer with other decor for a boho, rustic, or modern look. Change the textile seasonally—think lightweight linen for summer, chunky knits for winter. Use decorative rods or frames to enhance the presentation.
Select a fabric or tapestry that fits your space and style. Use a sturdy rod or a decorative dowel to hang the textile securely, attaching with rings or clips. Ensure it’s centered and straight for a polished look. Add hooks or nails to the wall, and consider using adhesive strips if you prefer no damage. Keep the textile clean with regular gentle vacuuming or laundering.
Incorporate fringe, tassels, or embroidery for added detail. Layer with lights or small decorative objects nearby to enhance texture. Personalize with fabric dyes or paints for a custom touch. Mix different textiles or patterns for a unique, layered effect that reflects your personality.
Textured wall hangings instantly add a cozy, artistic vibe that makes your room feel warmer and more inviting. They’re versatile, affordable, and easy to change, giving you confidence to experiment with textures and patterns. Your space will feel more personal and thoughtfully styled, encouraging ongoing creativity.
16. Artistic Metal Wall Sculptures
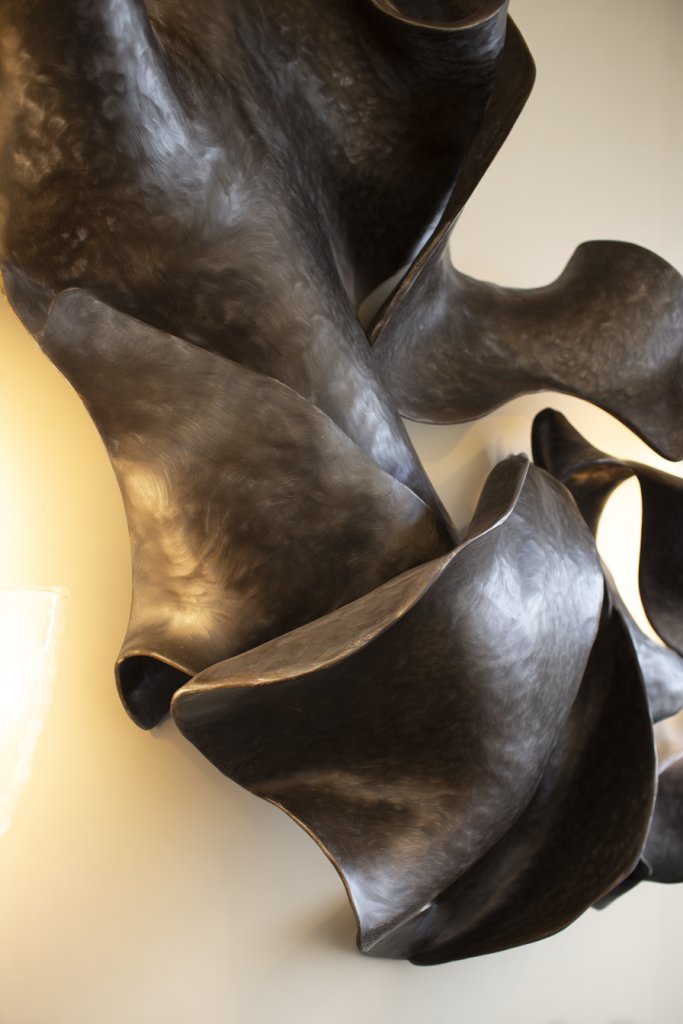
Craving a bold, modern centerpiece that commands attention? Artistic metal wall sculptures bring a contemporary, edgy vibe that elevates your living room instantly. They’re perfect for adding depth, shine, and a sense of movement. Plus, they work with a wide range of decor styles, from industrial to luxe.
Imagine abstract, geometric, or organic shapes crafted from brushed or polished metals—copper, brass, blackened steel—mounted in a dynamic composition. The interplay of light and shadow creates a constantly changing visual. These sculptures can be large or small, adding instant sophistication and personality to your wall.
Choose sculptures that reflect your style—minimalist lines, intricate designs, or bold focal pieces. Mount them over a neutral wall for contrast or among other textured elements. Combine with lighting to highlight their shine or shadows. Seasonal or thematic sculptures can be swapped out for variety.
Select a sturdy mounting system—hooks, brackets, or anchors—appropriate for your wall material. Position the sculpture with measurements to ensure balance and visual flow. Secure it firmly, checking for level and stability. Clean the surface regularly with a soft cloth to maintain shine and prevent tarnish.
Personalize with custom finishes, patinas, or added details like colored enamel. Incorporate small lighting fixtures to cast shadows or highlight textures. Pair with minimalist frames or textured backgrounds for added contrast. Rotate sculptures seasonally or for special occasions to keep your decor fresh.
Metal sculptures add an artistic, modern edge that can redefine your entire decor scheme. They’re a statement of bold taste and craftsmanship. Once you see how they transform your wall, you’ll be inspired to explore more artful and creative decor options. Your living room will radiate confidence and style.
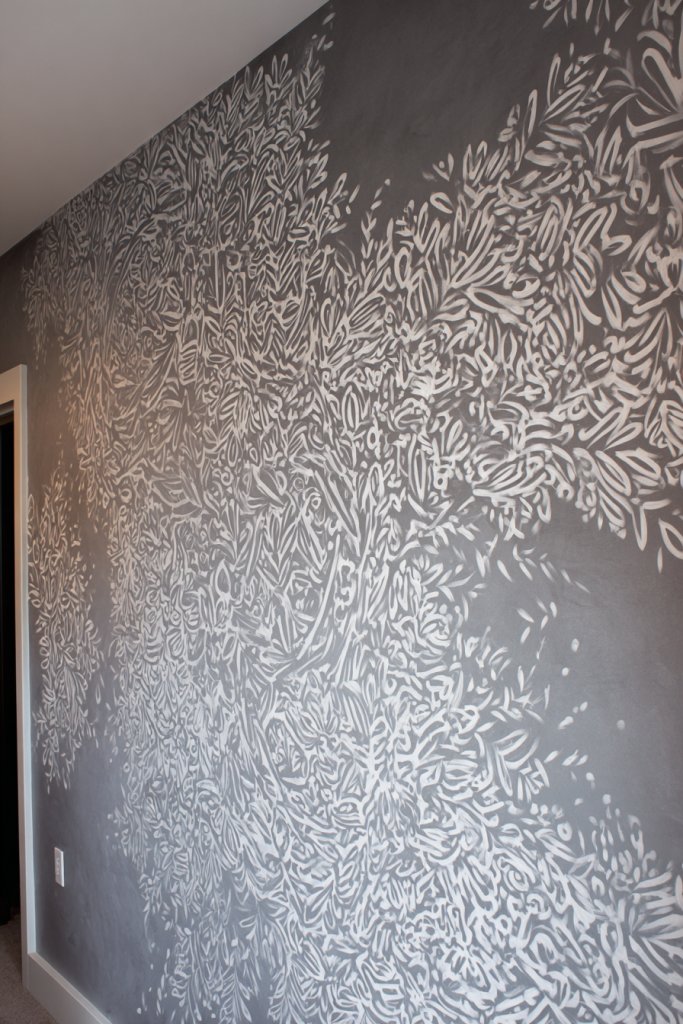
17. DIY Painted Murals or Geometric Shapes
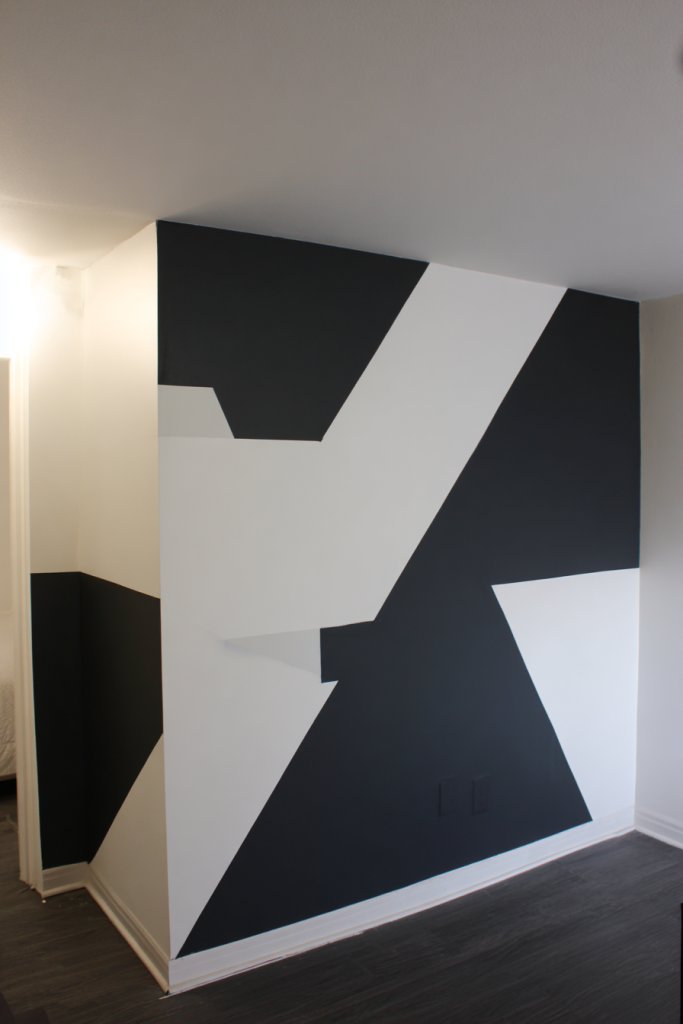
Ever feel like your living room wall is just begging for a splash of personality? Sometimes, a blank wall feels more like a missed opportunity than a canvas for creativity. You want something eye-catching but don’t want to hire an artist or spend a fortune. The solution? DIY murals or geometric shapes that you can customize to match your vibe.
Imagine a bold geometric pattern in contrasting colors that pops against a neutral background. Or a hand-painted mural of abstract shapes that adds depth and character. The textured brush strokes give a tactile feel, and the vibrant hues energize the space. It’s like turning your wall into a piece of modern art, but with your own personal flair. Think of it as a giant, living Pinterest pin come to life.
You can keep it simple with only a few shapes or go all out with a full wall mural. For seasonal updates, switch colors or patterns to reflect holidays or moods. Small apartments might opt for subtle geometric accents, while larger rooms can handle bigger, more complex murals. Use painter’s tape for sharp lines or freehand for a more organic, artistic vibe. The key is to match your skill level and style preferences.
Start by sketching your design on paper or using stencils for precision. Gather supplies like painter’s tape, high-quality acrylic or latex paint, brushes, and sponges. Protect your floors with drop cloths and tape off edges for clean lines. For geometric shapes, use a measuring tape and level to ensure symmetry. Take your time to layer colors and let each section dry thoroughly. Have fun experimenting with different shapes and textures to create a truly unique look.
Add metallic accents or glow-in-the-dark paint for extra flair. Incorporate personal symbols or motifs that resonate with your story. Try layering different textures, like adding raised elements with textured paste or stencils. Customize the color palette to match your existing decor, and don’t be afraid to mix abstract with minimalist elements. Your wall should reflect your personality and make a statement.
Creating your own mural isn’t just fun—it boosts your confidence in DIY projects and interior design. Plus, it’s a budget-friendly way to transform a space. Once finished, you’ll feel proud knowing you crafted something uniquely yours. Ready to turn your blank wall into a masterpiece? It’s easier than you think and totally worth the effort!
18. Faux Brick or Stone Wall Coverings

Ever wish your living room had that industrial loft vibe or rustic charm? Real brick or stone can be expensive and messy to install, so many settle for boring painted walls. But there’s a clever solution—faux brick or stone coverings that give you that textured look without the hassle. Who says you need a construction crew to get that raw, gritty aesthetic?
Picture a wall layered with faux brick panels in warm, earthy tones. Or a sleek gray stone veneer that feels like a mountain retreat. The textured surfaces catch the light differently throughout the day, adding depth and interest. The roughness and irregularities mimic real materials, creating an authentic feel. It’s like bringing a piece of old-world charm or urban edge into your modern living space.
Choose between thin panels for a subtle upgrade or full-depth veneers for maximum impact. For a cozy winter vibe, opt for darker, weathered stones, while lighter bricks brighten up small rooms. You can install faux brick on an entire accent wall or just a section behind a fireplace or media console. Seasonal decor can be enhanced with rugged textiles or metal accents to complement the textured background.
Begin by measuring your wall and selecting the appropriate panels or veneers. Clean and prepare the surface thoroughly to ensure adhesion. Use specialized adhesive or interlocking panels, following manufacturer instructions carefully. Trim panels with a utility knife for perfect fit and seal joints with grout or caulk for a seamless appearance. For DIYers, a bit of patience and careful handling will produce a professional-looking result.
Add lighting fixtures like wall sconces or uplights to highlight the texture. Incorporate decorative elements like vintage signs or metal accents that complement the rustic look. You can also paint some sections for contrast or weathered effects. Personal touches like family photos mounted on a contrasting wall color can make the space uniquely yours, balancing rough textures with personal warmth.
Faux brick and stone coverings are a smart way to elevate your decor without breaking the bank. They’re versatile, durable, and easy to maintain, making them perfect for busy households. Plus, they instantly add character and a sense of history to your space. Ready to create that trendy industrial or cozy rustic vibe? It’s simpler than you think and highly impactful!
19. LED Strip Lighting with Dynamic Color Effects
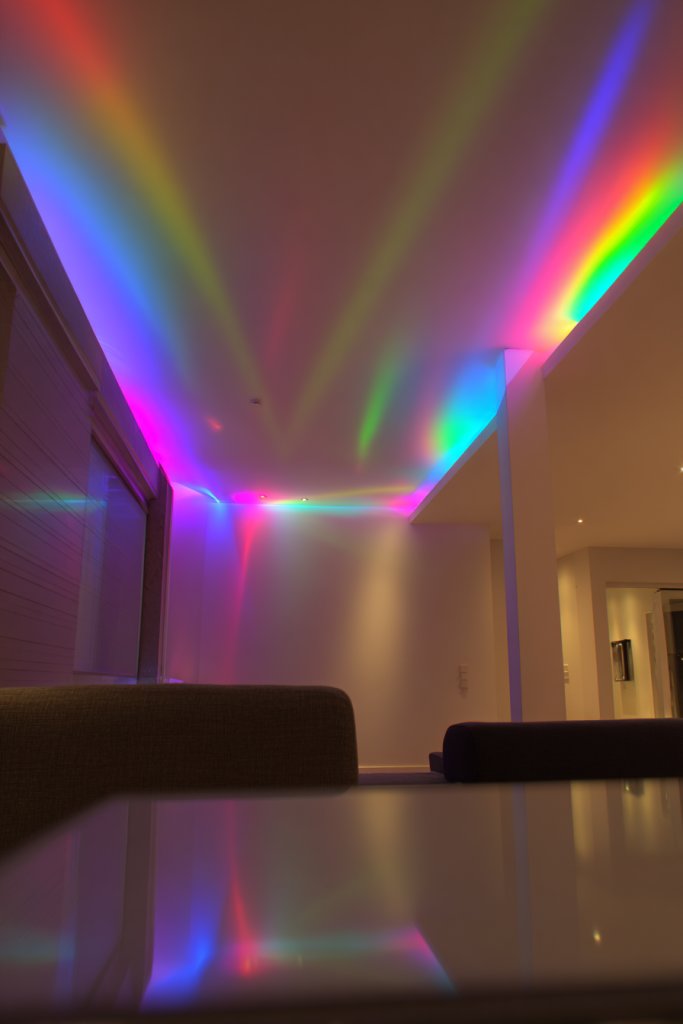
Feeling like your living room lighting is stuck in the dark ages? Standard overhead fixtures can be dull and uninspiring. LED strip lights offer a flexible, modern solution to flood your space with color and mood. Imagine transforming your room at the push of a button—no electrician required. It’s the easiest way to add a high-tech, customizable glow.
Visualize a soft, shifting rainbow of colors illuminating your walls, syncing with your music or mood. The sleek LED strips are hidden behind crown molding, under shelves, or along the edges of your ceiling for a seamless look. The vibrant hues reflect off textured walls or matte finishes, creating a lively, dynamic environment. Whether you want a relaxing blue or energetic red, controlling the lighting feels like having your personal light show.
Use color-changing strips for parties or cozy movie nights, or keep a calming hue for everyday relaxation. Install in different configurations—around the perimeter, behind furniture, or highlighting architectural features. For a minimalist aesthetic, hide strips behind molding or within wall recesses. Seasonal themes can be achieved by adjusting colors, making your space feel festive or tranquil all year round.
Measure your wall or ceiling perimeter and choose LED strips with compatible controllers. Clean surfaces thoroughly before applying adhesive-backed strips for a secure fit. Connect the strips to a power supply and sync with a remote or app for easy control. Use connectors for corners or complex shapes, and secure loose wires with clips or cable ties. Test all settings before finalizing the installation to ensure smooth operation. No need for professional wiring—just a bit of patience.
Create custom lighting scenes tailored to different activities or times of day. Integrate with smart home systems for voice control or automation. Pair with minimalist wall features or textured finishes to enhance the reflective qualities of the colors. Use the lighting to accentuate artwork or architectural details without cluttering your space. Personalize the experience with your favorite color schemes or dynamic effects.
LED strip lighting is a game-changer for mood setting and space transformation. It’s affordable, versatile, and easy to install, making it accessible even for beginners. Once set up, you’ll love how it makes your living room feel instantly more modern and lively. Ready to elevate your space with a splash of color? It’s a small upgrade with big impact!
20. Shelving with Decorative Baskets or Storage Boxes
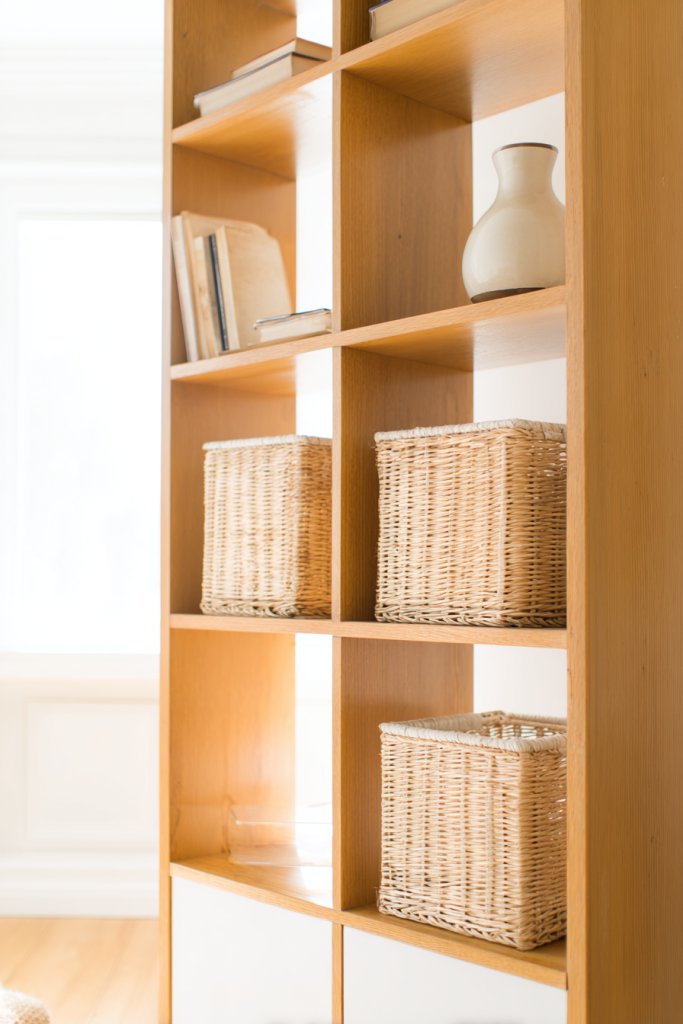
Tired of clutter taking over your living room? Open shelving is a stylish way to organize essentials without sacrificing decor. But plain shelves can look sterile or too cluttered if not styled right. The secret? Combining functional shelves with decorative baskets or storage boxes that hide mess and add texture. It’s a simple trick to keep things tidy and visually appealing.
Picture a floating shelf lined with woven baskets in neutral tones, contrasting with sleek ceramics or books arranged neatly. The baskets break up the visual monotony of the shelf and add warmth and softness. Or imagine a row of colorful fabric bins that make organizing toys, magazines, or remotes effortless. This layered approach creates a curated, inviting look that balances practicality with style. The textures make the space feel cozy and intentional.
Use baskets with different textures—rattan, fabric, wire—to suit your decor theme. For a minimalist look, choose monochrome or sleek black containers. For a boho vibe, opt for woven or tassel-adorned baskets. Seasonal swaps can include bright colors or patterns for holidays or festivals. Adjust the spacing and height of shelves based on your storage needs and room size. The goal is to create a balanced mix of open and concealed storage.
Start by selecting sturdy, stylish shelving units or floating shelves. Measure your space carefully to determine ideal shelf spacing. Choose baskets or boxes that fit comfortably and complement your decor. Mount the shelves securely using appropriate wall anchors or brackets. Arrange your items thoughtfully—group similar items and vary container sizes for visual interest. Keep frequently used items within easy reach, and stash away seasonal or rarely used items in the back or higher shelves. Regular tidying keeps the look fresh.
Add decorative labels or tags to baskets for easy identification. Incorporate small decorative objects like candles or sculptures on the shelves to break up storage containers. Use colorful or patterned baskets to inject personality and match your seasonal decor. Consider adding LED strip lighting underneath the shelves for a subtle glow. Personal touches make your storage both functional and an extension of your style.
This approach transforms clutter into curated displays, elevating your everyday space. It’s a practical way to keep your living room organized without sacrificing aesthetics. Plus, it’s flexible—update your baskets and arrangements whenever your style or needs change. You’ll be amazed at how a few well-chosen containers can make your space feel calmer and more inviting. Ready to organize like a pro?
21. Cluster of Small Mirrors in Different Shapes and Sizes
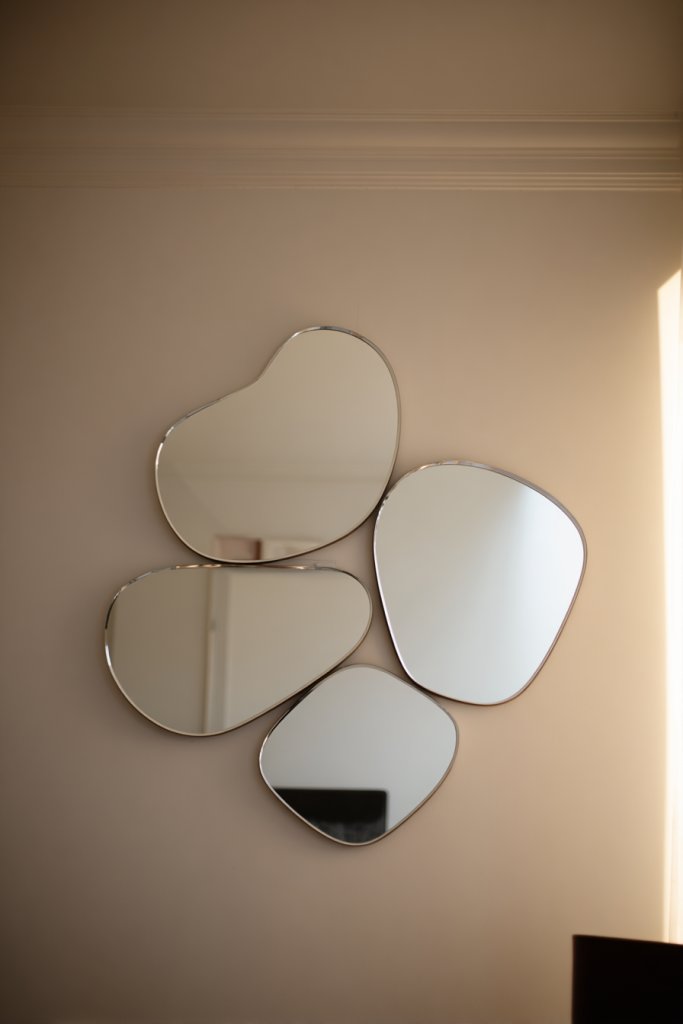
Ever feel like your living room needs a little extra sparkle? Mirrors are great for bouncing light and making spaces appear larger, but a single large mirror can sometimes feel too plain. Why not create a playful, eclectic cluster of small mirrors in various shapes and sizes? This trick adds personality and a touch of whimsy while enhancing light and space.
Visualize a wall filled with a collection of small mirrors—some round, others rectangular, with star or diamond shapes—arranged in a seemingly random but balanced pattern. The reflective surfaces catch and amplify natural light, creating a lively, shimmering effect. The different shapes and sizes add visual interest and a dynamic rhythm to the wall. It’s like a modern mosaic of sparkle that makes your room feel brighter and more energetic.
Mix metallic frames with matte or painted finishes to match your decor. Keep the arrangement casual for a boho look or align the mirrors in a grid for a more structured vibe. Use command hooks or adhesive strips for easy rearrangement without damaging walls. This idea works well in small spaces or above side tables, fireplaces, or entryways. Seasonal accents like fairy lights or decorative motifs can add extra charm.
Gather a variety of small mirrors from thrift stores, craft shops, or online. Plan your layout on the floor before hanging to achieve the perfect composition. Use appropriate hooks, adhesive strips, or picture hangers suited for each mirror’s weight. Space the mirrors evenly, leaving enough room for each piece to stand out. Make sure to use a level for a tidy, balanced look. Adjust the arrangement until it feels just right and secure all mirrors properly.
Incorporate decorative elements like small LED lights behind some mirrors for a glowing effect. Add a few framed photos or artwork in between for a personal touch. Change the arrangement periodically to keep the look fresh and interesting. Use mirrors with textured or patterned frames to add contrast and complement your overall decor theme. The key is to keep it playful and reflective of your personality.
This mirror cluster idea makes a bold style statement and instantly upgrades your space. It’s budget-friendly and easy to change whenever you want a new look. Plus, it’s a fun DIY project that keeps your creative juices flowing. Once hung, you’ll notice how much brighter and more lively your living room feels. Ready to add some sparkle and personality to your walls?
22. Framed Fabric or Patterned Wallpaper Samples
Sometimes, a full wall of wallpaper feels overwhelming or too permanent. But you still want to add texture and pattern to your space without the commitment. Framing fabric or wallpaper samples offers a clever, budget-friendly way to create a textured art display. It’s like bringing a piece of design magazine into your living room, one sample at a time.
Imagine a gallery wall featuring framed fabric swatches in lush textures like velvet, linen, or silk. Or a collage of patterned wallpaper snippets in bold prints and subtle motifs. The frames add a finished look, and the diverse textures invite touch and curiosity. The arrangement creates a tactile, layered effect that adds depth and personality. It’s a playful way to experiment with colors and patterns without permanent changes.
Mix and match textures and patterns for an eclectic vibe or keep it uniform for a more refined look. Use ornate or minimalist frames depending on your style. Switch out samples seasonally or as trends evolve for a fresh feel. Incorporate metallic or wooden frames to enhance the texture. This approach works well in small nooks or as a feature wall in living rooms or bedrooms.
Collect fabric swatches and wallpaper samples from stores or online. Mount each sample on foam core or cardboard for stability. Frame them with simple or decorative frames to match your decor. Arrange the frames on your wall using painter’s tape first to find the best layout. Use picture hooks or adhesive strips to hang, ensuring even spacing. Switch out samples easily whenever you want a new look.
Add metallic or painted frames for a modern touch. Incorporate small accessories like fabric tassels or embellishments for added texture. Create themed clusters, like floral or geometric, to reflect your style. Combine with other wall decor, such as minimal art or quotes, for a layered look. It’s a flexible way to keep your decor fresh and personalized.
This idea lets you play with textures and patterns creatively without permanent commitment. It’s a fun, budget-friendly way to personalize your space and showcase your style. Plus, swapping out samples keeps the wall interesting and evolving. You’ll love how a simple idea can add so much character and visual intrigue!
23. Vintage Signage or Retro Typography Art

Looking to add a nostalgic, trendy vibe to your living room? Vintage signage and retro typography art are perfect for injecting personality and a sense of history. They create a focal point that’s both stylish and meaningful. Plus, they’re super easy to incorporate without a major overhaul. Who says nostalgia can’t be chic?
Picture a weathered wooden sign with bold, vintage lettering spelling out a favorite quote or phrase. Or a collection of retro-inspired posters in colorful, distressed frames. The mix of old and new creates a layered, eclectic look that feels authentic. These pieces can evoke memories or inspire daily motivation while adding visual depth to your walls. It’s like bringing a piece of the past into your modern home.
Use large signs for a statement piece or cluster smaller signs for a playful gallery. Mix different fonts, colors, and materials—metal, wood, or distressed paper—for variety. Change signs seasonally or for holidays to keep the look fresh. Pair with vintage furniture or industrial accents for a cohesive aesthetic. This style adapts easily to both small nooks and large feature walls.
Search for vintage signage online, at flea markets, or craft stores. Mount signs using appropriate hardware to handle weight and material. For a distressed look, lightly sand or paint over new signs for a weathered effect. Arrange signs in a grid or freeform layout, using painter’s tape for precision. Hang securely and at eye level to maximize impact. Mix and match styles for an authentic, curated feel.
Personalize signs with your own quotes, family names, or meaningful dates. Add decorative elements like string lights or small shelves to enhance display. Incorporate complementary decor, such as vintage accessories or industrial fixtures, to tie the theme together. Keep the arrangement lively and unpredictable for a fun, nostalgic vibe. It’s all about telling your story in a stylish way.
Vintage signage and retro typography art bring history and character into your home effortlessly. They’re versatile, affordable, and easy to swap out, making them perfect for evolving tastes. Once hung, these pieces become conversation starters and mood enhancers. Ready to add a charming, nostalgic touch? Your walls will thank you.
24. Floating Art Boards with Mixed Media Displays
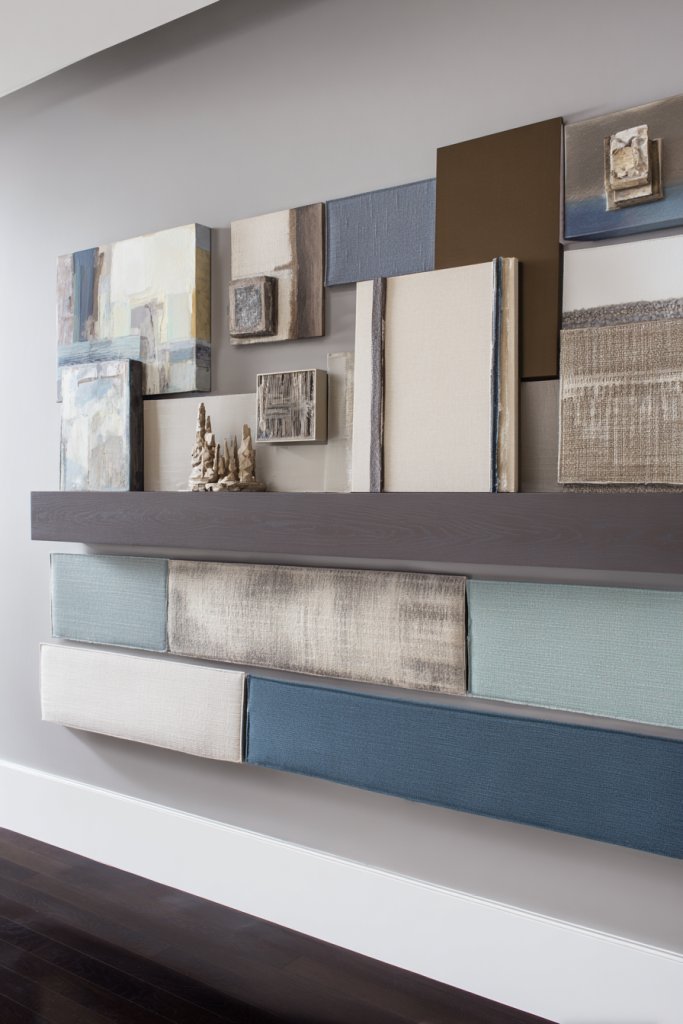
Want to showcase your creative side without cluttering your walls? Floating art boards are a sleek, modern way to display mixed media—paintings, fabrics, textures—in a clean, organized manner. They turn your living room into a personal gallery and make changing artwork or displays a breeze. Who says art can’t be easily interchangeable?
Imagine a series of floating panels in varying sizes, each holding a different textured or painted piece. The layered arrangement creates depth and invites close inspection. Incorporate fabrics, textured paper, or even small sculptures mounted on the boards for a tactile experience. The floating design makes each piece stand out while maintaining a minimalist aesthetic. It’s like building a dynamic, multi-dimensional collage.
Use monochrome backgrounds for a sleek, uniform look, or mix vibrant colors for a lively gallery vibe. Mount the boards in a grid, linear, or freeform pattern depending on your space and style. Swap out pieces seasonally or whenever inspiration strikes. Incorporate different textures—smooth, rough, glossy—to add visual interest. These boards work well over sofas, fireplaces, or even in hallways.
Purchase or build floating panels from wood or MDF, then paint or finish as desired. Attach mounting hardware that allows for easy removal and rearrangement. Use a level and tape measure to space the boards evenly for a balanced look. Mount the artworks securely, then arrange and rearrange as needed. Incorporate mixed media elements directly onto the boards or hang lightweight objects for variety. Refresh your display periodically to keep it current.
Add personal touches by including favorite photographs, fabric swatches, or textured art pieces. Use LED backlighting behind the boards for a sophisticated glow. Incorporate themed or seasonal displays, changing the content to reflect your mood. Mix in small sculptural or three-dimensional elements for variety. The goal is to create a flexible, evolving art space that showcases your creativity.
Floating art boards turn your living room into an ever-changing art gallery that’s uniquely yours. They’re simple to update and customize, making your space feel fresh and inspiring. Plus, they foster creativity and give you confidence in your design choices. Ready to craft your own mini art museum? It’s easier than you think and deeply rewarding!
Conclusion
With such a variety of Living Room Wall Design Ideas, there’s no limit to how you can personalize your space. Whether you opt for vibrant murals, textured panels, or curated art displays, these ideas can help you create a welcoming and stylish environment. Don’t be afraid to experiment and put your own spin on these concepts—your perfect living room awaits. Start transforming your walls today and enjoy the beautiful, creative space you’ve envisioned!