Imagine elevating your home’s elegance with a stunning ceiling that captures attention and sets the tone for your entire space. Luxury ceiling design ideas have gained immense popularity because they bring a touch of opulence and sophistication, transforming ordinary rooms into extraordinary retreats.
In this article, you’ll explore a diverse array of ideas that cater to different styles and preferences, from intricate moldings and luxurious chandeliers to modern textured finishes and artistic accents. Whether you’re aiming for classic elegance or contemporary flair, these ideas will inspire you to reimagine your ceilings and create a truly breathtaking environment.
1. Intricate Coffered Ceilings with Gold Accents for Opulence
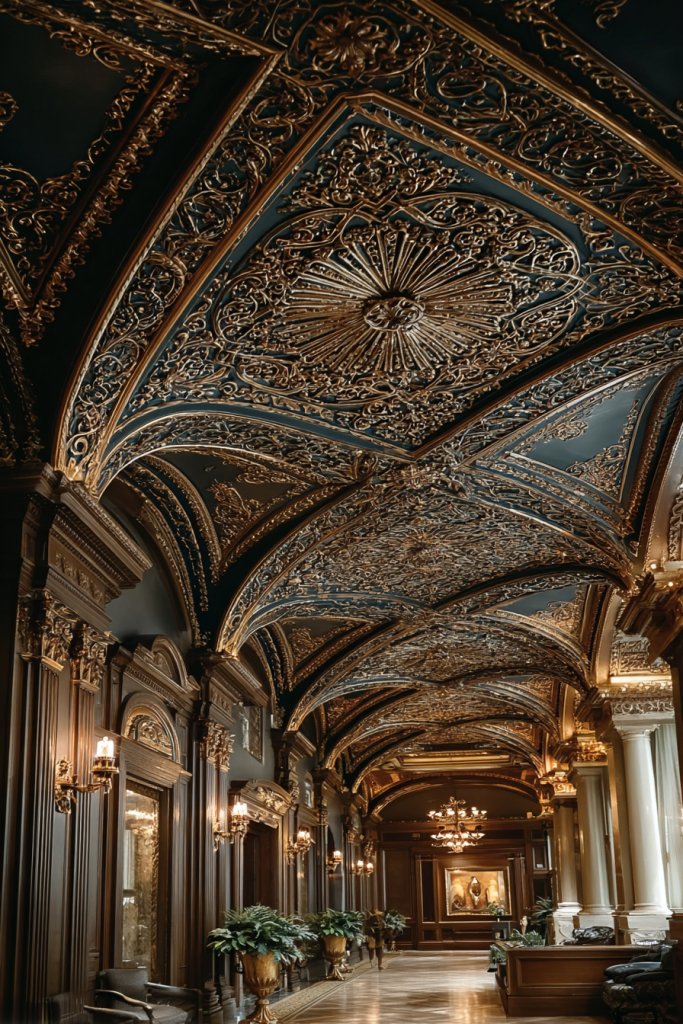
Ever dreamed of turning your home into a palace but feel overwhelmed by the thought of grand renovations? Intricate coffered ceilings with gold accents create that luxurious vibe without needing a full overhaul. They add an instant touch of elegance, making even modest rooms feel regal. If you crave a space that screams opulence, this design trick could be your secret weapon.
Imagine stepping into a room where the ceiling is a masterpiece—layered panels with a subtle, brushed gold leaf shimmering in the light. The geometric recesses add depth, creating shadows that dance across the ceiling. The gold accents catch your eye, elevating the entire space with a rich, warm glow. It’s as if the ceiling itself is a piece of art, elevating the room’s mood instantly.
This look can be tailored to match various styles—go for sleek, modern lines with minimal gold touches or opt for ornate detailing reminiscent of classic European palaces. For smaller spaces, keep the coffered pattern simple and use lighter gold tones. During festive seasons, add subtle highlights with metallic paints to amplify the luxury vibe. It can also be adapted to ceilings with different heights, balancing scale and detail.
Start by measuring your ceiling to determine the pattern size. Use high-quality wood or MDF panels to craft the coffered structure, then install them securely. Finish the panels with a primer, followed by a metallic or gold leaf paint for accents. For a seamless look, consider professional help to ensure precise alignment. Finish with a clear sealant to protect the gold accents from wear and tear. Lighting can be added around the perimeter to emphasize the depth and shimmer.
Personalize this design by choosing custom patterns that reflect your style—geometric, floral, or abstract. Incorporate LED strip lighting within the recesses for a soft glow at night. You could also add subtle textured paints or matte finishes for contrast. For a more dramatic effect, pair with statement crown moldings or decorative beams that complement the gold accents. Think about contrasting wall colors to make the ceiling truly pop.
This ceiling design instantly elevates any space, making it perfect for those wanting a touch of luxury without the fuss. It’s a timeless look that pairs well with classic or modern decor. With a bit of effort, you can achieve a stunning, high-end appearance that impresses everyone who enters. Ready to add that royal touch to your home?
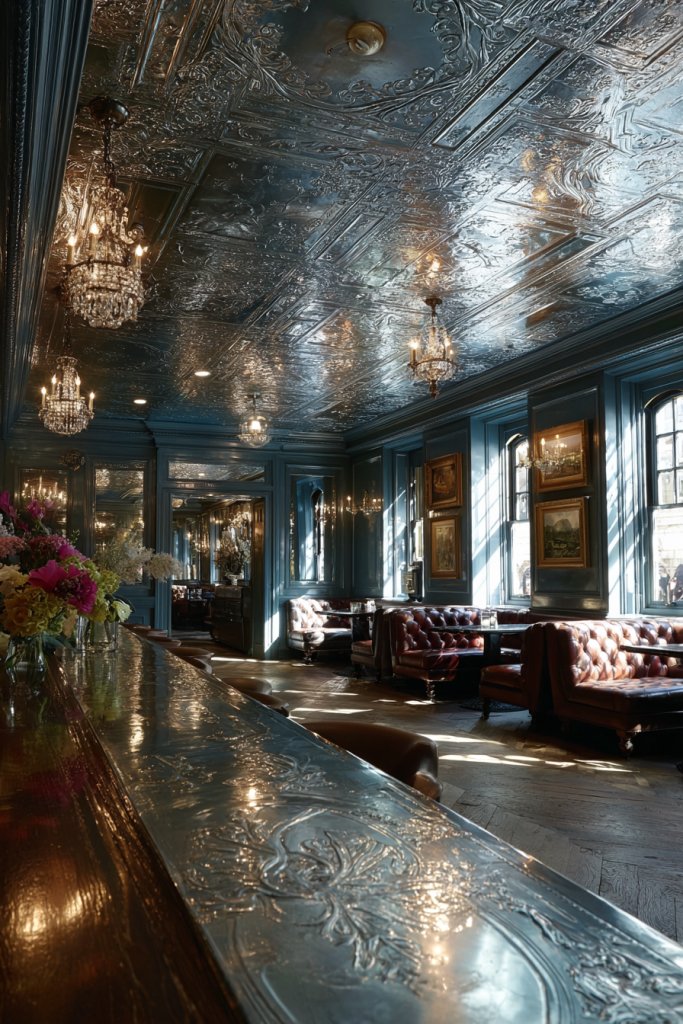
2. Crystal Chandeliers with Ornate Ceiling Medallions
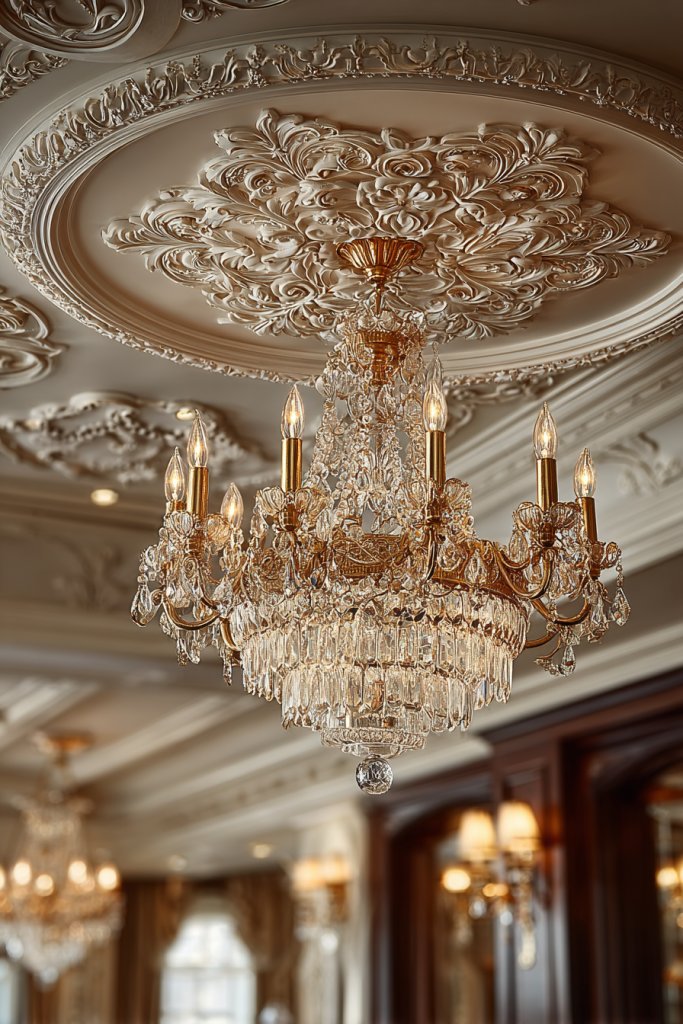
Ever feel like your living room is missing that wow factor? A crystal chandelier paired with an ornate ceiling medallion transforms the ordinary into extraordinary. It’s the perfect way to add glamour and sophistication with minimal effort. If you’re craving a centerpiece that draws admiration, this classic combo is your go-to.
Picture a grand room where a sparkling crystal chandelier hangs gracefully, catching light from every angle. The ceiling medallion surrounds it with intricate carvings—floral motifs, scrolls, or geometric patterns—highlighted by a glossy finish. The shimmer of crystals reflects soft light, creating a mesmerizing ambiance. It’s like having a piece of jewelry suspended in the air, instantly elevating the room’s aesthetic.
Choose medallions in various styles—baroque, rococo, or modern minimal—to match your decor. For smaller spaces, opt for scaled-down medallions with subtle detailing. For high ceilings, go for larger, more elaborate medallions that make a statement. You can also mix and match finishes—gold, silver, or matte black—to suit your overall color scheme. Seasonal accents like ribbons or drapes can further personalize the space.
Begin by selecting a medallion that complements your ceiling height and room size. Attach it using a sturdy ceiling mount, ensuring it is level and secure. Install the chandelier with a chain or rod, making sure it hangs at an ideal height—typically around eye level when seated. Use LED bulbs in your chandelier to maximize sparkle without overheating. Consider adding dimmers for adjustable ambiance. Finish with a polished look by cleaning the crystals regularly.
Add personal flair by choosing a chandelier with colored or tinted crystals for a unique look. Incorporate decorative chains or beaded accents that echo your room’s theme. For a modern twist, select a chandelier with geometric shapes or matte finishes. Alternatively, pair with a custom-painted ceiling or subtle wallpaper around the medallion for extra depth. Play with height and scale for maximum impact.
This combination of chandelier and medallion never goes out of style, making your space instantly elegant. It’s a surefire way to impress guests and boost your own confidence at home. With a little planning, you can recreate the glamour of high-end hotels right in your living room. Time to turn that empty ceiling into a showstopper?
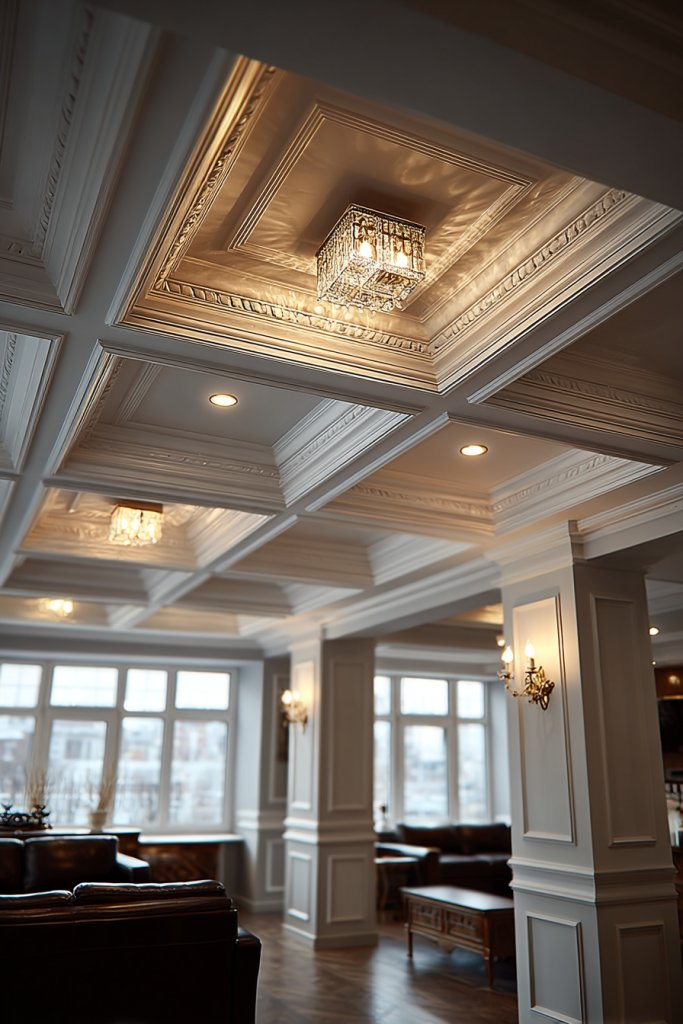
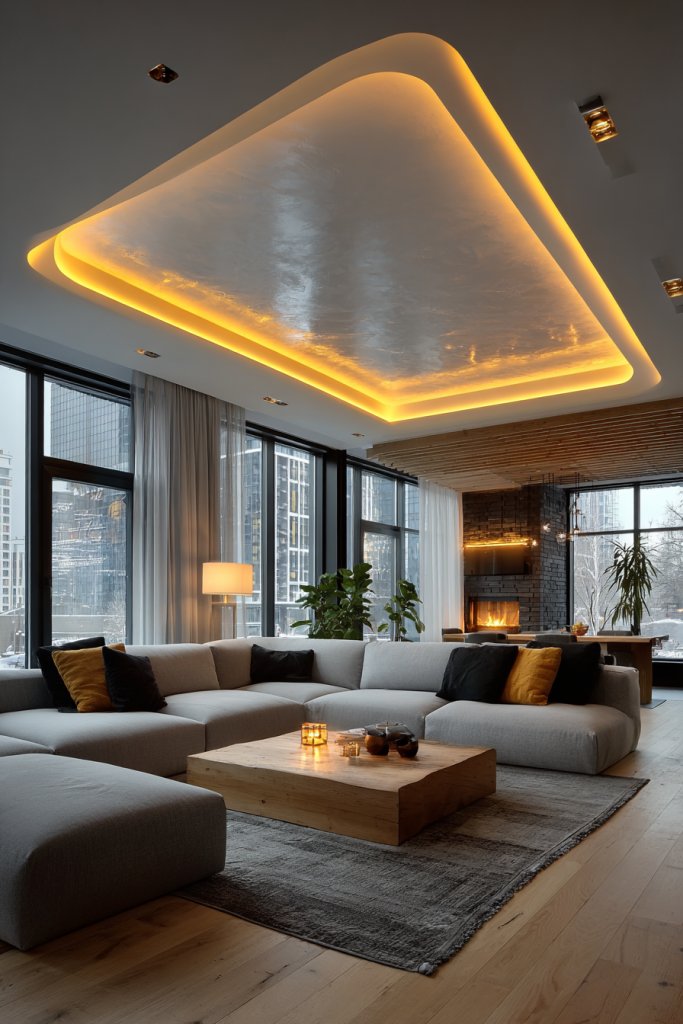
3. Tray Ceilings with Ambient Cove Lighting
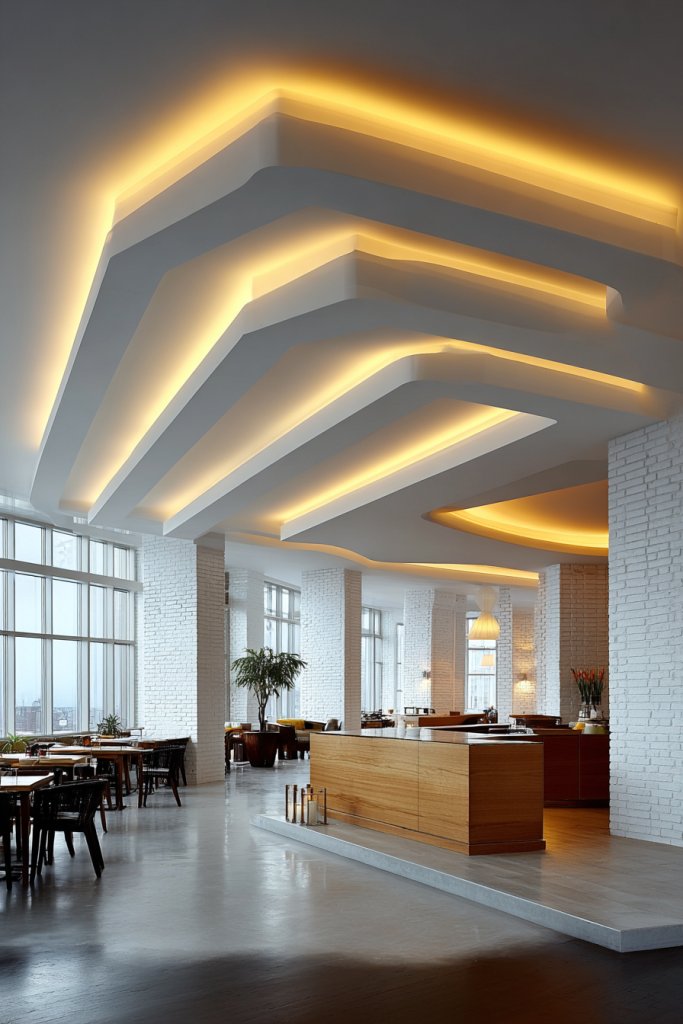
Does your ceiling feel flat and uninspired? A tray ceiling with ambient cove lighting adds instant depth and sophistication. It creates a layered look that makes even small rooms feel more expansive. If you’re after a subtle yet impactful upgrade, this is a design move worth considering.
Visualize a ceiling that slopes inward from the edges, creating a recessed center—like a tray. Soft LED cove lighting traces the perimeter, casting a warm, diffuse glow. The contrast between the shadowed edges and illuminated center adds dimension, making the ceiling a focal point. The effect is calming yet luxurious, transforming the room into a cozy retreat.
Tray ceilings work well in both modern and traditional spaces. For a sleek look, keep the recess minimal with clean lines and soft lighting. For a more ornate style, add decorative moldings or layered trims. During holidays, incorporate color-changing LEDs for a festive touch. You can also customize the depth and width of the tray to suit your ceiling height.
Start by marking the recessed area, then build a frame using drywall or wood to create the tray shape. Install LED strip lights along the perimeter, hidden behind a ledge or molding. Finish with paint or wallpaper that complements your decor. Make sure the lighting is dimmable for adjustable ambiance. For a seamless look, hide all wiring and secure the trims tightly.
Personalize your tray ceiling with textured wall paints or metallic finishes within the recess. Add decorative crown moldings to frame the tray for extra detail. During special occasions, sync the cove lighting with smart home systems for dynamic effects. You can also install small, discreet speakers within the tray for a luxurious audio experience.
This ceiling design is both modern and timeless, fitting into many decor styles. It elevates your space without overwhelming it, making your home look professionally designed. With a bit of DIY or a good contractor, you can achieve a stunning layered effect. Ready to redefine your ceiling?
4. Hand-Painted Murals for Artistic Elegance
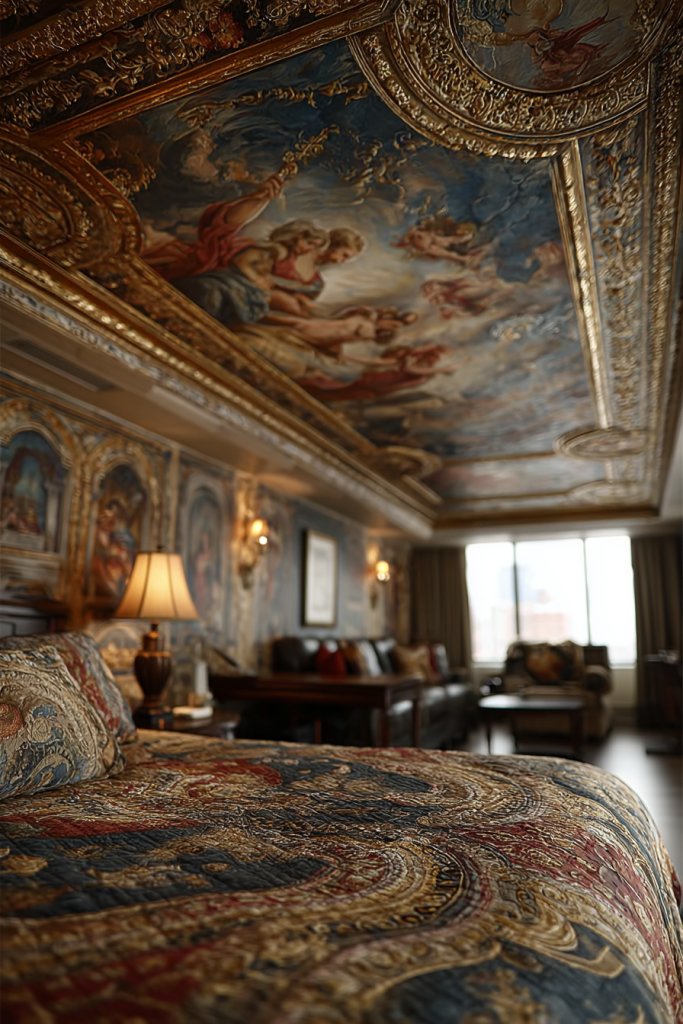
Feeling bored with plain ceilings? Hand-painted murals add a personal touch of artistry that elevates any room. They turn a simple surface into a captivating focal point, showcasing creativity and craftsmanship. If you want your space to tell a story or evoke emotion, this idea might be your answer.
Imagine gazing upward to a ceiling that depicts a dreamy sky, a lush landscape, or abstract swirls of color. Skilled artists can craft intricate scenes or subtle textures that blend seamlessly into your decor. The mural’s vibrant hues and detailed brushwork create a sense of depth and movement that draws the eye upward. It’s almost like stepping into a different world.
Murals can be tailored to match your theme—romantic, whimsical, modern, or classic. For smaller spaces, opt for subtle, monochromatic designs to avoid overwhelming the room. Large murals work best in spacious areas like foyers or formal living rooms. Seasonal themes such as spring blossoms or winter snowscapes can refresh the ambiance periodically.
Hire a professional mural artist or use high-quality wallpaper murals for easier application. Prepare the ceiling surface by cleaning and priming it thoroughly. For hand-painted murals, choose durable, washable paints designed for ceilings. Work closely with the artist to select a theme, color palette, and style. Protect surrounding areas with drop cloths and ensure proper ventilation during painting. Seal the mural with a clear, matte finish for longevity.
Add personalized touches by including family motifs, favorite quotes, or custom symbols into the mural. Layer textures using stencils or metallic paints for extra depth. Incorporate subtle lighting—like soft spotlights or uplights—to highlight the artwork. Change accents seasonally with complementary decor to keep the space lively.
A ceiling mural is a bold statement that shows off your personality and creativity. It’s a conversation starter and a true piece of art in your home. With the right artist or approach, you can achieve stunning results that feel both unique and timeless. Ready to turn your ceiling into a masterpiece?
5. Textured Plaster Ceilings with Subtle Metallic Sheen
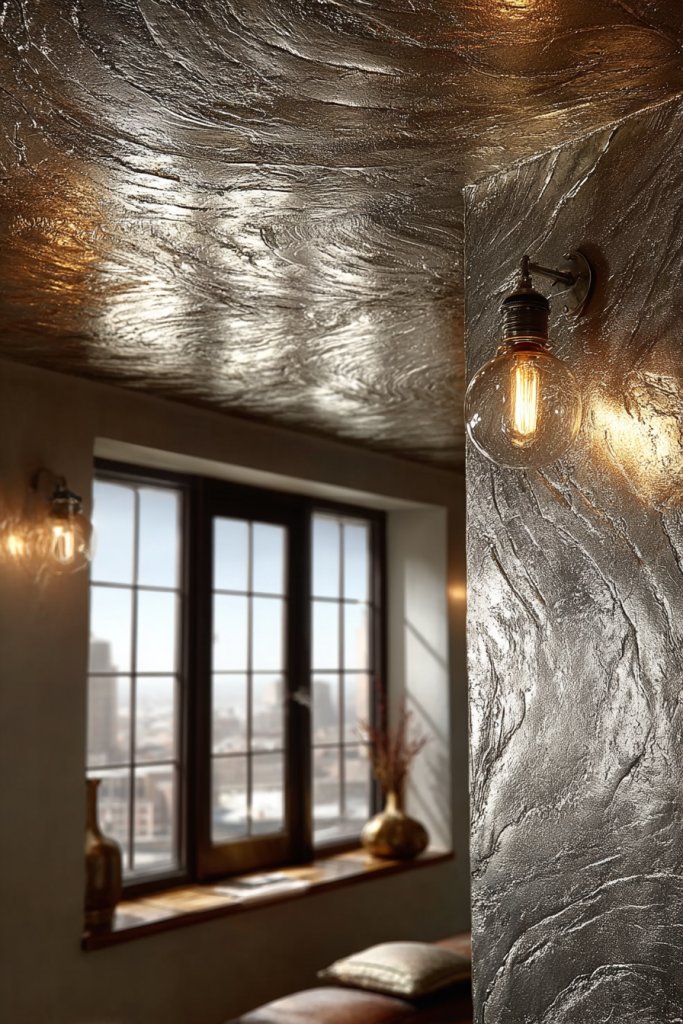
Tired of flat, dull ceilings that do nothing for your decor? Textured plaster with a metallic sheen adds depth and a touch of luxury with minimal fuss. It’s an elegant way to upgrade your space without major renovations. If you crave a sophisticated look that catches the light, this idea is worth exploring.
Imagine running your hand over a ceiling with a subtle, rippled texture that reflects a soft, iridescent glow. The metallic sheen enhances the textured surface, creating a play of light and shadow that shifts throughout the day. The muted shimmer adds a luxurious feel, reminiscent of old-world charm or modern glamour. It’s understated yet impactful, making your ceiling the room’s star.
Choose from various textures—swirls, stipples, or combed patterns—based on your style preference. For contemporary spaces, keep the metallic sheen subtle and cool-toned; for classic or warm interiors, opt for gold or bronze undertones. Apply textured plaster directly to the ceiling or use pre-made panels for easier installation. Seasonal lighting can further enhance the sheen’s effect.
Start by preparing the ceiling surface—clean, sand, and prime it thoroughly. Use a trowel or roller to apply textured plaster, working in sections for consistency. Once dry, apply metallic paint or mica powder mixed with a clear binder for a shimmering finish. For a seamless look, hire professionals experienced in plasterwork. Finish with a protective sealant to preserve the sheen and texture over time.
Accent the texture with complementary wall finishes—like matte paint or fabric wall coverings. Incorporate indirect lighting to highlight the metallic sheen at night. You can also add decorative moldings or beams to frame the textured ceiling elegantly. Keep the color palette simple to let the texture and sheen stand out.
This ceiling finish exudes timeless elegance and pairs beautifully with various decor styles. It’s a subtle upgrade that makes a big impact, perfect for those who want understated luxury. With expert application, you can enjoy a high-end look that feels both durable and stylish. Ready to add texture and shimmer to your ceiling?
6. Reclaimed Wood Beamed Ceilings for Rustic Elegance
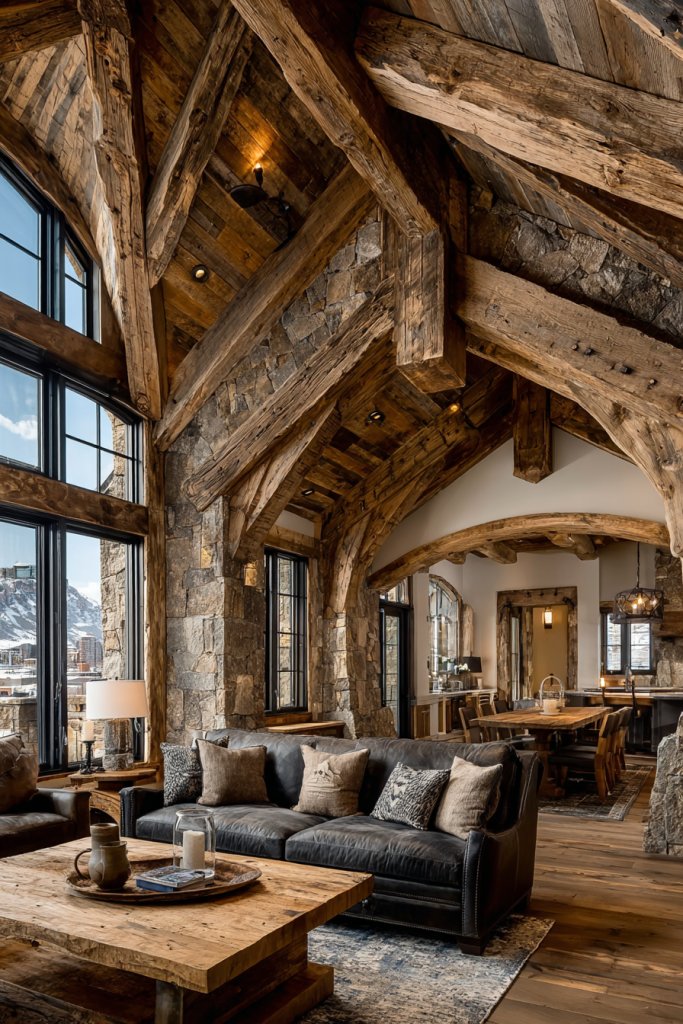
Craving warmth and character in your space? Reclaimed wood beams instantly add rustic charm with a touch of sophistication. They bring texture and history into your home, making a space feel cozy yet luxurious. If you want to make your ceiling a focal point that echoes heritage, this idea fits the bill.
Imagine wide, weathered beams crisscrossing a high ceiling, their natural grain and imperfections adding authenticity. Light filters through the room, bouncing off the textured wood, creating a warm glow. The contrast between rough-hewn wood and sleek decor accentuates the rustic elegance. It’s like bringing a piece of history indoors, adding depth and personality.
Opt for beams in natural, stained, or painted finishes depending on your style. For a more refined look, choose beams with smooth surfaces and minimal distressing. Large beams suit open-plan spaces, while smaller ones work in intimate rooms. Incorporate modern fixtures or minimalist furnishings to balance rustic charm with contemporary elegance. Seasonal decor like fairy lights or fabric drapes can enhance the ambiance.
Source reclaimed wood from reputable suppliers or salvage yards, ensuring quality and sustainability. Measure your ceiling to determine beam size and placement. Mount the beams securely using heavy-duty brackets or custom supports. Sand and treat the wood to preserve it and prevent pests. Finish with a protective sealant or oil to enhance the wood’s natural beauty and durability. Consider professional installation for a seamless, safe fit.
Add personal touches like painted or stained accents to match your room’s color scheme. Incorporate lighting fixtures—like vintage-inspired chandeliers or spotlights—mounted on or between beams. Use textiles such as cozy throws or rugs to complement the rustic vibe. You can also add decorative elements like wrought iron accents or carved details for extra flair.
Reclaimed wood beams create an inviting, timeless atmosphere that suits many decor styles. They add architectural interest and a sense of history that elevates your home’s charm. With proper care and installation, these beams can last for generations, offering both style and substance. Ready to bring rustic elegance into your space?
7. Geometric Paneling with High-Gloss Finishes
Looking for a sleek, contemporary upgrade? Geometric paneling with a high-gloss finish instantly adds a modern luxe touch. It creates visual interest and makes your ceiling the centerpiece of the room. If you crave a chic, minimalist style that screams sophistication, this is your go-to solution.
Envision a ceiling divided into bold, angular panels—triangles, rectangles, or polygons—painted in glossy, reflective finishes. Light bounces off the high-gloss surfaces, amplifying the geometric pattern. The sharp lines and clean shapes lend a futuristic vibe, transforming the ceiling into an eye-catching artwork. It’s a perfect backdrop for a modern, stylish interior.
Choose from various geometric patterns—herringbone, chevron, or tessellations—to suit your aesthetic. For a subtle look, keep the palette monochrome with matte and gloss contrasts. In larger rooms, expand the pattern for maximum impact. Smaller spaces benefit from simpler, less busy designs that don’t overwhelm. Combine with sleek furniture and minimal decor for a cohesive look.
Start by sketching your pattern and marking it on the ceiling. Use high-quality MDF or plywood panels cut to shape, then install with strong adhesive and screws. Sand the panels smooth and prime them before painting. Apply multiple coats of high-gloss paint, allowing each to dry thoroughly. Finish with a clear topcoat for durability. For perfect alignment, consider professional installation.
Personalize by experimenting with color—metallic shades, bold blacks, or crisp whites. Add LED backlighting behind panels for a glowing effect. Incorporate subtle textured wall coverings or minimalistic furniture to enhance the modern vibe. You can also play with different panel sizes or orientations for a custom design. The possibilities are endless.
This style screams modernity and will leave guests in awe. It’s a statement-making choice that boosts your confidence in your decor skills. With a little planning, you’ll create a stunning, high-gloss ceiling that elevates your entire space. Ready to make a bold move?
8. LED Starry Night Ceilings with Fiber Optic Lights
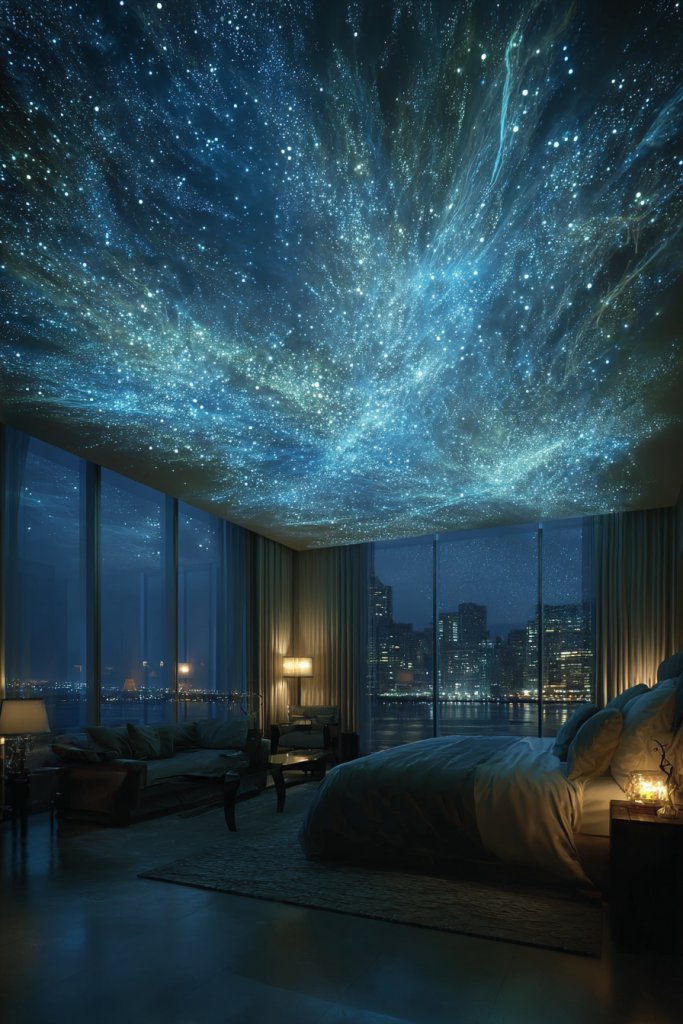
Ever wished your ceiling could mimic the night sky? A starry night ceiling with fiber optic lights turns an ordinary space into a dreamy, celestial escape. It’s perfect for creating ambiance and adding a touch of magic. If you’re into unique, enchanting decor, this idea might just be your new favorite.
Picture a darkened room with tiny points of light scattered across the ceiling, mimicking stars. Fiber optic cables are embedded into a dark, matte surface—perhaps with a subtle galaxy mural or textured finish. When illuminated, the small points twinkle softly, creating a mesmerizing, immersive experience. It feels like lying under a clear night sky from your own home.
Design the surrounding ceiling with dark, matte paint or subtle textured finishes to enhance the star effect. Use color-changing fiber optics for different moods—cool blues, warm golds, or even rainbow effects. Combine with minimal decor to keep the focus on the stars. For a more dramatic look, add a few larger ‘planets’ or celestial shapes to complement the starry sky.
Begin by installing a dark, matte ceiling surface; then embed fiber optic cables in intricate patterns or randomly for a natural look. Connect the fibers to a control system for lighting effects. Use a dimmable power supply to control the twinkle intensity. Seal the cables and finish the surface with a matte paint or textured finish. Test the system thoroughly before finalizing.
Add glow-in-the-dark paint or phosphorescent elements for extra realism. Incorporate small projectors or LED modules for shooting stars or occasional light bursts. Use remote controls or smart home apps to change the star patterns and brightness. Personalize by incorporating your favorite constellation or celestial symbols.
This celestial ceiling creates a magical retreat perfect for relaxing or entertaining. It’s an awe-inspiring feature that sparks conversation and wonder. With some technical know-how or a professional’s help, you can bring the night sky indoors and enjoy endless nights of stargazing.
9. Layered Ceiling Designs with Multiple Levels
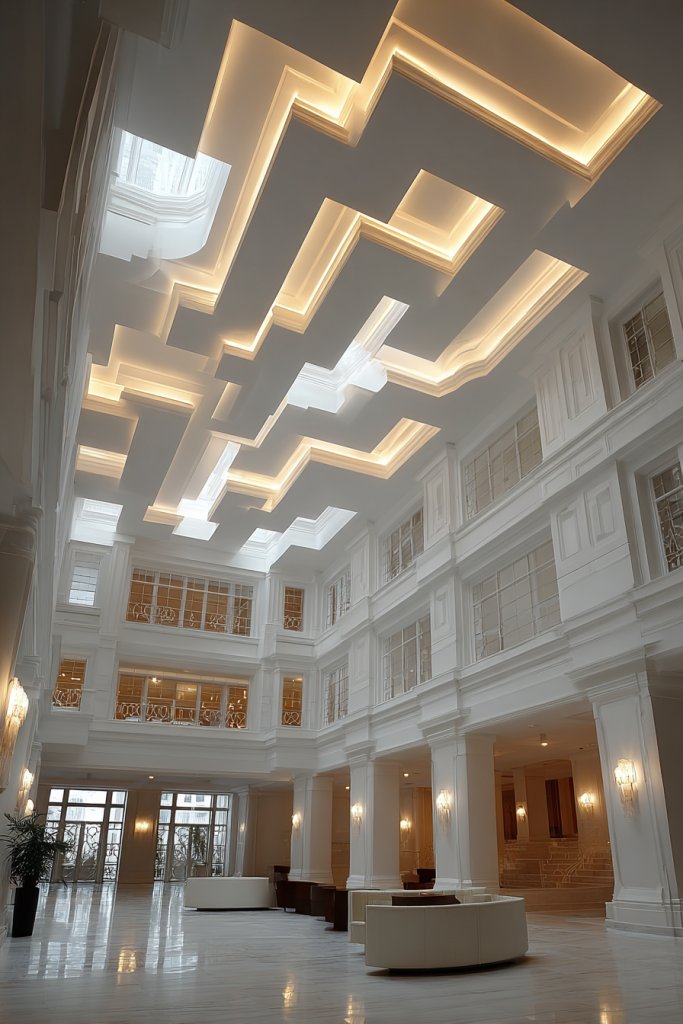
Feeling like your ceiling is just an afterthought? Layered ceiling designs with multiple levels add architectural interest and depth. They make your space feel more grand and sophisticated without tearing down walls. If you love dramatic, eye-catching interiors, this idea will definitely turn heads.
Envision a ceiling with several tiers—perhaps a central tray surrounded by a drop-down border or multiple floating panels. Soft lighting is hidden within the layers, casting gentle glows and creating shadows that emphasize each level. The layered effect adds dimensionality, making the ceiling appear higher and the room more luxurious. It’s like an architectural sculpture hanging overhead.
Choose between symmetrical or asymmetrical layers depending on your style. For a classic look, use ornate moldings and detailed trims; for modern spaces, keep the lines clean and minimalist. Mix materials—wood, plaster, or metallic finishes—for contrast. Adjust the number of layers based on ceiling height to avoid an overwhelming feel. Seasonal decor can be added through textiles or lighting changes.
Plan your layout carefully, marking where each level will sit. Use framing and supports to build the different tiers securely. Finish each level with drywall, plaster, or wood paneling, then paint or decorate accordingly. Install concealed LED strips or cove lighting within the layers for a subtle glow. Ensure proper insulation and ventilation if adding heavy materials or intricate supports. Professional help may be necessary for complex designs.
Personalize by adding decorative moldings, textured finishes, or metallic accents to each layer. Incorporate color schemes that complement your walls and furnishings—dark shades for a dramatic effect or light tones for airy elegance. Use adjustable lighting to change the mood of the room easily. Layered ceilings also pair well with bold wall art or statement furniture.
This design elevates your home’s style to new heights, literally. It’s a statement of craftsmanship and taste that adds value and wow factor. With patience and attention to detail, you can create a stunning layered ceiling that feels both luxurious and bespoke. Ready to add dimension and drama?
10. Ceiling Recessed with Architectural Niches
Does your ceiling look flat and uninspired? Recessed architectural niches turn plain ceilings into functional art pieces. They add depth and can serve as display spots or lighting features. If you want to impress guests and elevate your decor, this idea offers endless possibilities.
Imagine a ceiling with subtle alcoves—rectangular or rounded—carved into the surface. These niches can be illuminated from within, casting soft glows that highlight their depth. They can house decorative elements like sculptures, vases, or lighting fixtures, creating a layered, textured effect. The overall look feels refined and thoughtfully curated.
Niches can be integrated into various styles—classic with ornate moldings, modern with sleek lines, or industrial with raw finishes. Vary the depth and shape of the niches to suit your space, from shallow ledges to deep alcoves. Use lighting within the niches to add drama or highlight artwork. Seasonal decor can be placed in the niches for a fresh look.
Begin by marking the layout and cutting into the ceiling surface, ensuring careful measurements. Reinforce the niches with framing to support the structure. Finish with drywall or plaster, then paint or wallpaper to match your decor. Install LED strip lights or spotlights inside for subtle illumination. Seal all edges smoothly for a seamless appearance. Consider professional installation for complex or large niches.
Customize niches with textured finishes, metallic paints, or decorative trims. Use them to display your favorite collectibles or seasonal decor, changing themes as needed. Add dimmable lighting to switch moods easily. Pair with complementary wall treatments or ceiling moldings for a cohesive look.
Architectural niches transform your ceiling into a gallery of personal or artistic expression. They add architectural interest and provide practical storage or display options. With thoughtful planning, you can achieve a polished, high-end appearance that enhances your entire home.
11. Mirrored Ceilings for Visual Expansion
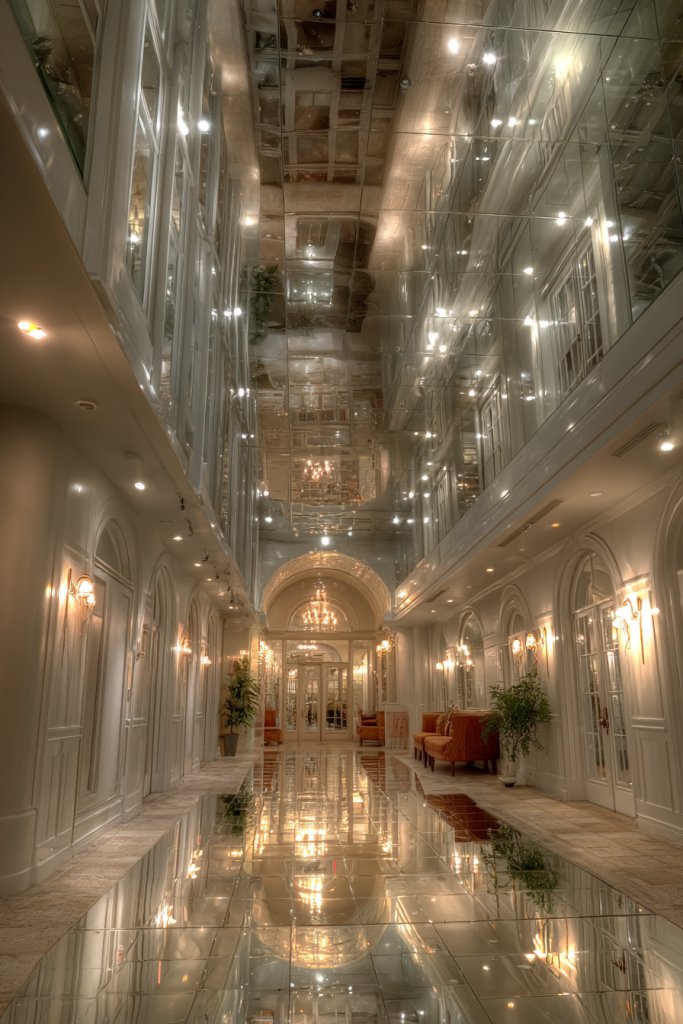
Feeling cramped in your space? Mirrored ceilings create an illusion of height and openness that makes rooms feel larger and more luxurious. They reflect light and surroundings, adding a dramatic, glamorous touch. If you want to wow your guests and boost your confidence in your decor, this is a bold choice.
Imagine a ceiling covered in large, high-quality mirrors that reflect your room’s beauty. The reflections multiply natural or artificial light, brightening even the darkest corners. The mirror surface can be framed with sleek trim or ornate moldings, depending on your style. When lit properly, it creates an illusion of infinite space, transforming your room into a luxurious retreat.
Choose frameless, full-surface mirrors for a seamless look or opt for segmented panels with decorative borders. For modern interiors, keep the framing minimal—think brushed metals or black edges. Traditional styles can incorporate carved or gilded frames for extra elegance. Use lighting to enhance the reflection—recessed LEDs or cove lighting work well. Be mindful of maintenance, as mirrors need regular cleaning.
Start by selecting high-quality, shatter-resistant mirrors suited to your ceiling size. Securely mount the mirrors with strong brackets or adhesive designed for ceilings. Cover edges with decorative trim if desired. Ensure proper ventilation and avoid moisture buildup, especially in humid areas. Use lighting to highlight the mirror’s reflective properties, and plan for easy access for cleaning. Consider professional installation for large or complex setups.
Personalize by adding decorative lighting, such as LED strips or spotlights, to create different moods. Use textured or patterned borders to frame the mirrors uniquely. Incorporate smart lighting controls to switch between different light settings. Avoid overdoing the reflective surface to prevent overwhelming the space—balance with wall decor or furniture.
Mirrored ceilings instantly add a touch of Hollywood glamour and sophistication. They expand your visual space and elevate your decor style effortlessly. With proper planning, you’ll enjoy a stunning, bright, and spacious atmosphere that impresses everyone. Ready to reflect your style?
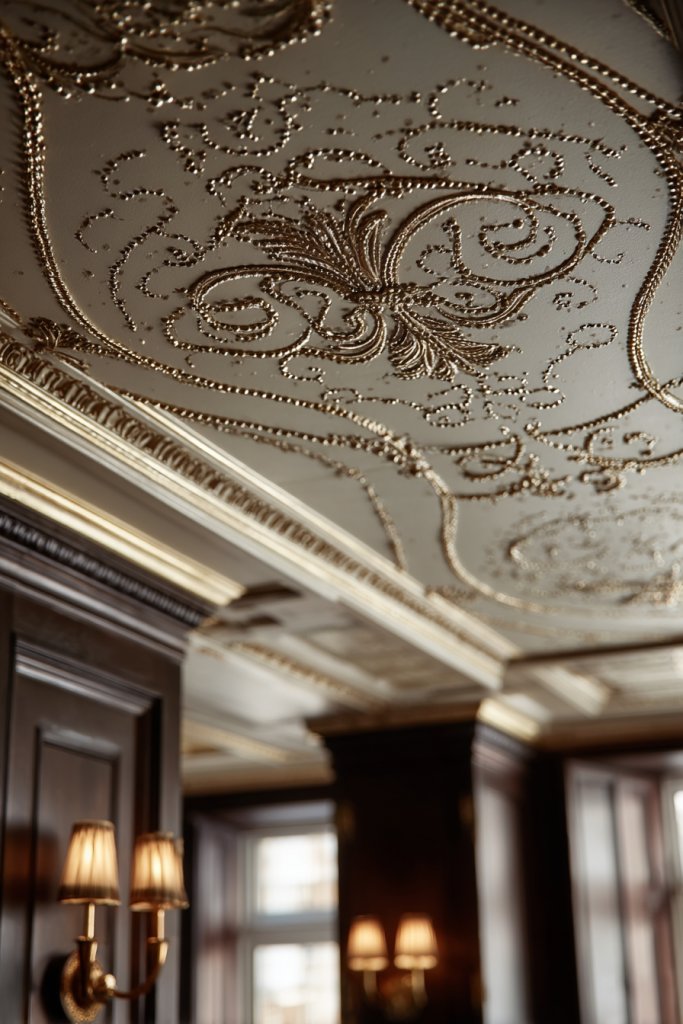
12. Ornate Ceiling Cornices with Elegant Molding
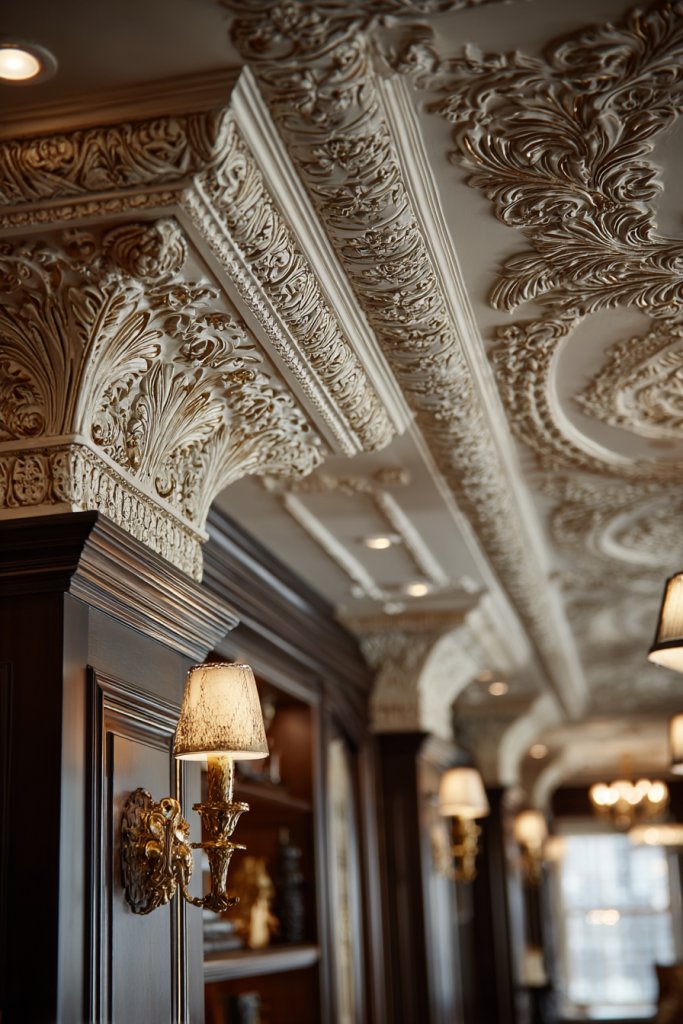
Are plain ceilings making your room look dull? Ornate ceiling cornices with elegant moldings add architectural detail that instantly elevates your decor. They frame the ceiling beautifully and create a sense of grandeur. If you’re after a classic, timeless look, this is a simple yet impactful upgrade.
Visualize intricate plaster or wood moldings tracing the perimeter of your ceiling, with detailed patterns like floral scrolls, acanthus leaves, or geometric motifs. The moldings cast gentle shadows, adding depth and richness. Paired with neutral wall colors and sophisticated furnishings, they evoke a refined, luxurious atmosphere. It’s like wearing a fine suit—subtle but memorable.
Choose from various styles—baroque, rococo, or minimalist—to match your decor. Keep the color palette classic with white or cream for a subtle look, or go bold with dark or metallic finishes for a dramatic effect. Combine with crown moldings or paneling to create a layered, opulent look. For a modern twist, opt for sleek, clean-lined profiles.
Start by measuring your ceiling’s perimeter and selecting a molding style that complements your space. Attach the moldings securely with nails or adhesive suitable for your material. Fill any gaps or joints with filler and sand smooth. Paint or finish the moldings in your chosen color or finish. For detailed designs, consider hiring a craftsman or moldings specialist. Properly sealed, these moldings will last for years.
Add gold or metallic accents to the moldings for extra luxury. Incorporate LED lighting behind the moldings to create a soft glow. Pair with textured walls or upholstered ceiling panels for a layered effect. Personalize with custom patterns or motifs that reflect your personality or heritage. Keep the overall look balanced and elegant.
Ceiling cornices are a classic feature that never goes out of style. They provide a finishing touch that elevates the entire room’s aesthetic. With a little craftsmanship, you can achieve a high-end look that adds value and charm. Ready to crown your space?
13. Suspended Faux Skylights for Natural Light
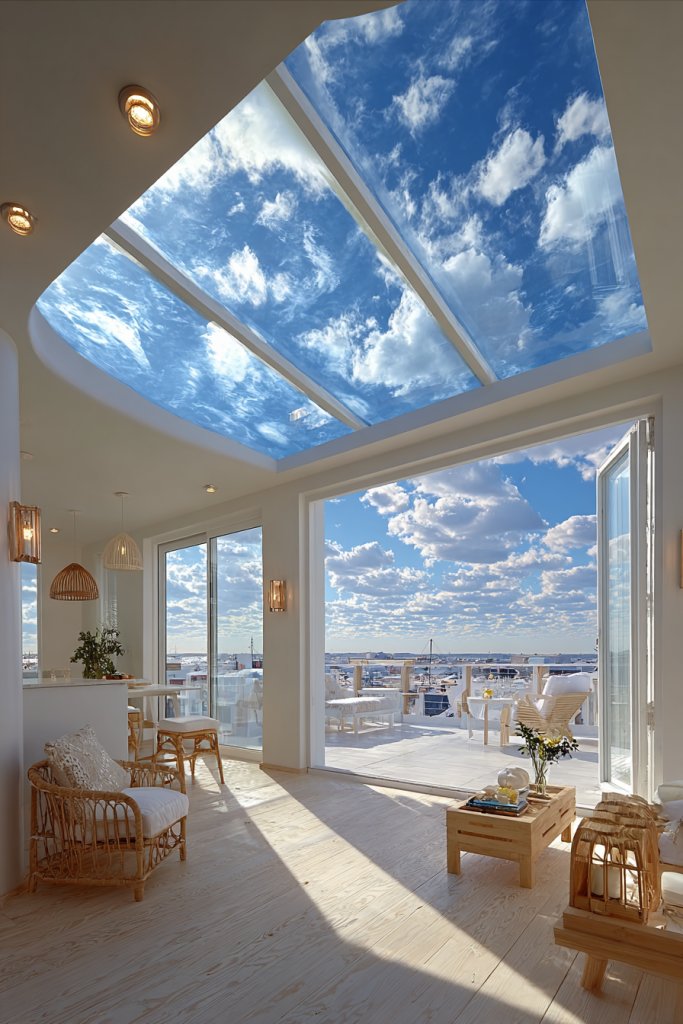
Wish your room could feel brighter and more open? Faux skylights with suspended designs bring in natural light without the need for roof modifications. They create a sense of outdoor openness, perfect for dark or windowless spaces. If you crave a sunny, welcoming atmosphere, this idea offers a clever solution.
Picture a ceiling where a large, light-filled panel mimics the sky—complete with a subtle gradient and soft clouds. Suspended slightly below the actual ceiling, it diffuses light evenly across the room. The effect is like gazing upward on a clear day, even indoors. The frame around the faux skylight can be sleek or ornate, depending on your style.
Choose from different shapes—square, rectangular, or circular—to match your space. Incorporate LED lighting behind the panel for different times of day or mood settings. For more realism, add subtle cloud patterns or light filters. Keep the surrounding ceiling simple to focus attention upward. Use reflective surfaces around the panel to amplify the effect.
Install a sturdy frame within your ceiling to hold the panel securely. Use lightweight, durable materials like acrylic or polycarbonate for the faux skylight surface. Choose a high-quality light diffuser to ensure even light distribution. Connect the lighting to dimmers or smart controls for flexibility. Seal the edges seamlessly into your ceiling for a professional look. Consider hiring specialists for precise installation.
Personalize with different sky images or even custom photos printed on the panel. Use color-changing LEDs to simulate different times of day or weather conditions. Add decorative trims or minimalistic frames to match your decor. Incorporate smart controls to change lighting and mood effortlessly. It’s a creative way to bring nature indoors.
Faux skylights are a game-changer for transforming dark or tiny rooms into bright, airy retreats. They add architectural interest and a natural touch, boosting your confidence as a designer. With some planning, you’ll enjoy endless daylight and a fresh, open feel every day. Ready to brighten your space?
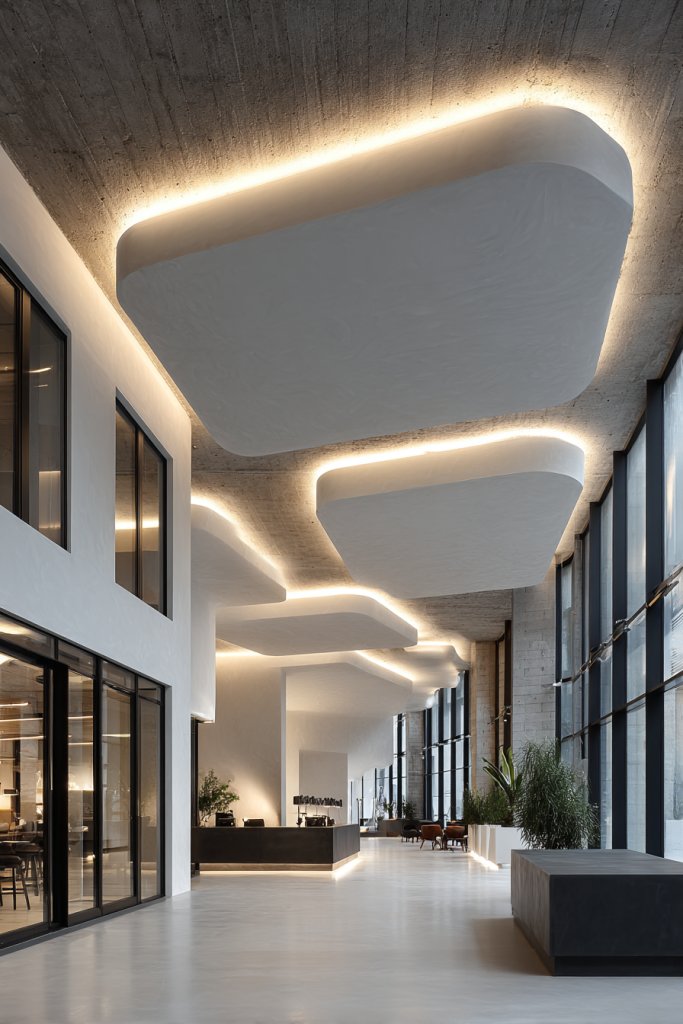
14. Modern Plaster Ceilings with Hidden LED Strips
Bored with plain, flat ceilings that do nothing for your decor? Modern plaster ceilings with hidden LED strips add sleekness and versatility. They create a clean, seamless look while offering customizable lighting options. If you want to upgrade your space with minimal fuss, this is a stylish choice.
Imagine a smooth, matte plaster ceiling with a subtle recess along the edges. Hidden LED strips emit a soft, ambient glow that highlights the architectural lines without any visible fixtures. The light can change color or intensity, making your space adaptable to any mood. It’s a minimalist masterpiece that’s both functional and beautiful.
Keep the ceiling simple with a monochromatic finish, or add textured plaster patterns for extra depth. Choose from warm whites, cool blues, or color-changing LEDs for different occasions. For a contemporary look, pair with sleek, modern furnishings. In smaller rooms, keep the recess narrow to avoid overwhelming the space. Seasonal lighting effects can also enhance the atmosphere.
Start with a flat plaster ceiling, then create the recessed edges using drywall or plasterboard. Install LED strips along the recess, securing wiring neatly behind the surface. Finish with a smooth plaster coat, then paint in your preferred color. Connect the LED strips to dimmers or smart controllers for easy adjustment. Ensure all wiring is concealed and safe for long-term use.
Customize by choosing different light colors, or sync the lighting with music or smart home devices. Add textured finishes or metallic paints to complement the lighting effects. Use minimalist wall decor to keep the focus on the ceiling. Regularly update lighting settings to match seasons or special events. It’s a subtle upgrade that makes a big impact.
This design embodies modern elegance and offers a high-end look with relatively simple execution. It elevates your space’s style and mood effortlessly. With the right tools and a little patience, you can achieve a sleek, tech-savvy ceiling that impresses everyone. Ready to modernize your ceiling?
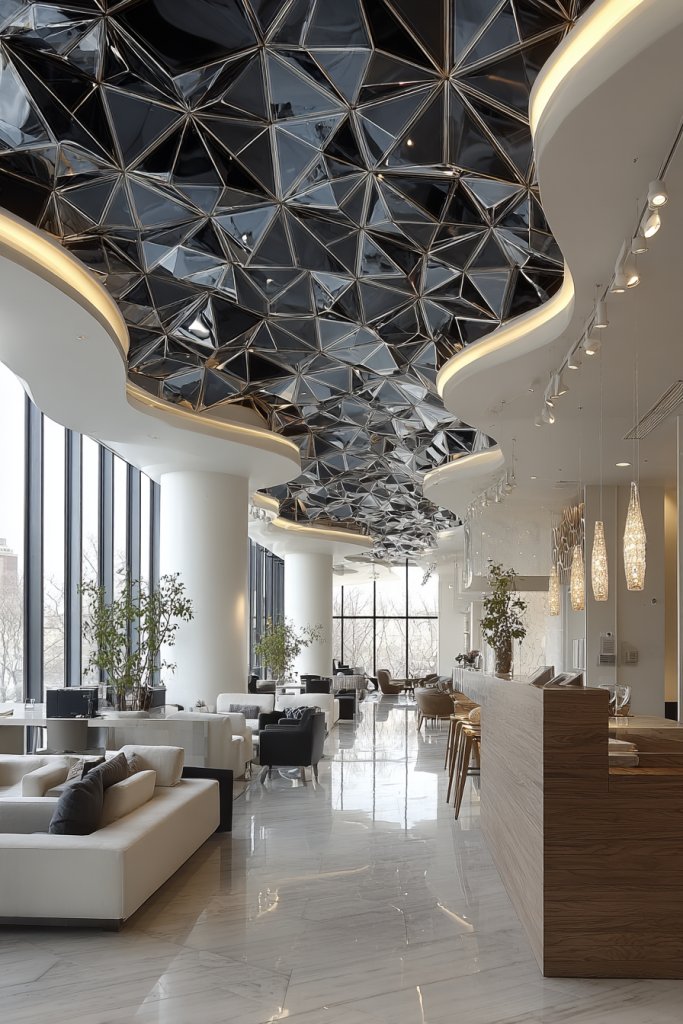
15. Artistic 3D Wall and Ceiling Panels
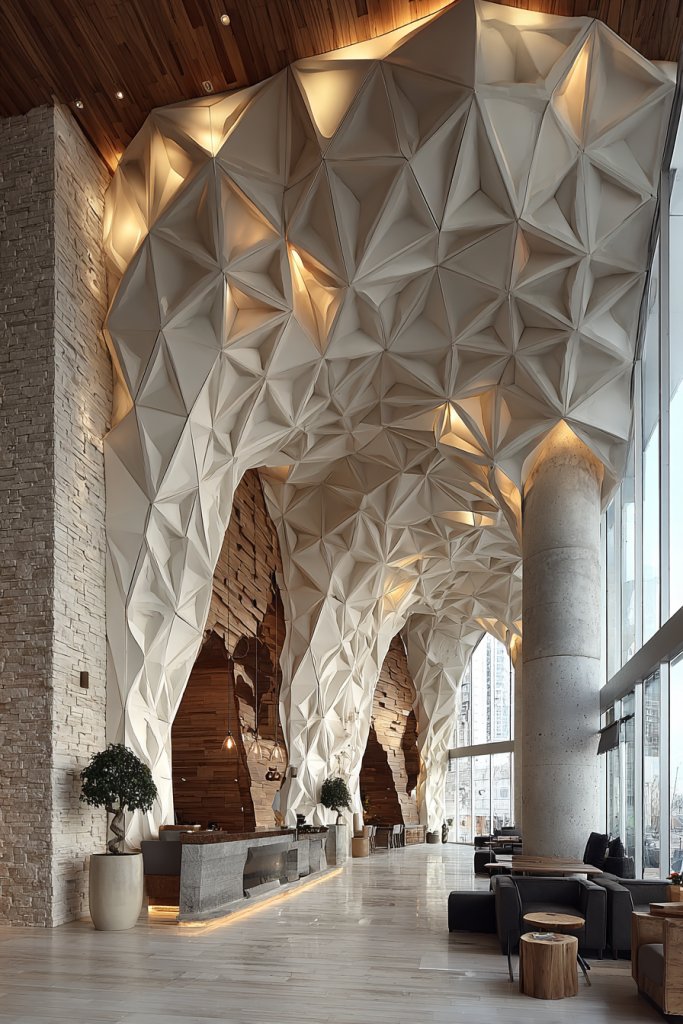
Feeling like your space needs a bold artistic statement? 3D wall and ceiling panels bring texture and depth, transforming flat surfaces into works of art. They add a modern, dynamic vibe that’s hard to ignore. If you’re ready to make a statement, this approach is perfect for elevating your decor game.
Visualize panels with abstract shapes, floral motifs, or geometric patterns protruding from the surface. The play of shadows and light across the textured surface creates an eye-catching effect. When installed on the ceiling, these panels add a sculptural dimension, making your space feel alive with movement. They come in various materials—PVC, wood, or metal—to suit your style.
Choose large-scale panels for a dramatic effect or smaller ones for subtle texture. Mix and match different patterns for an eclectic look. Use monochrome tones for a sleek, modern vibe or vibrant colors for a lively atmosphere. Combine with minimalist furnishings to let the panels stand out or pair with bold decor for a maximalist style.
Begin by selecting panels that fit your design vision. Measure your ceiling carefully and plan the layout. Attach panels using strong adhesive or mechanical fasteners, ensuring they are level and evenly spaced. Finish edges with trim or molding for a seamless look. For durability, seal or paint the panels if necessary. Consider professional installation for complex patterns.
Add LED lighting behind or around the panels for dramatic backlighting. Customize by choosing colors or effects suited to your mood—cool blues or warm ambers. Incorporate metallic or textured paints for extra depth. Use decor elements like sculptures or artwork nearby to complement the panels.
3D panels turn ordinary ceilings into artful focal points that showcase your style. They create a luxurious, textured atmosphere that elevates your entire home. With some creativity and proper installation, you’ll enjoy a space that’s both modern and timeless. Ready to add dimension?
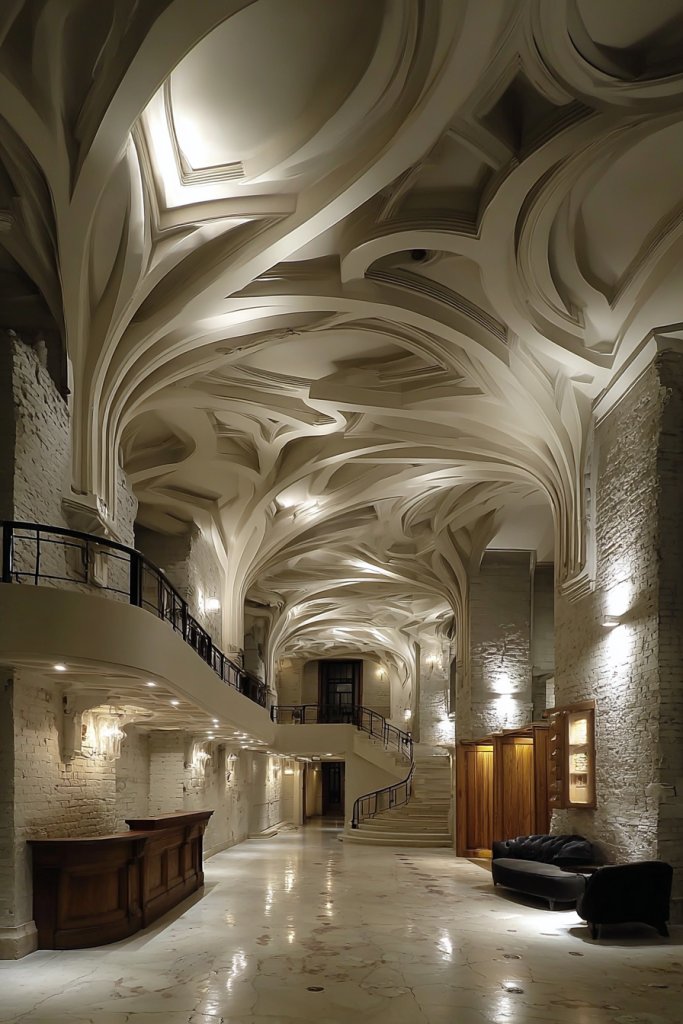
16. Classic Barrel Vault Ceilings with Decorative Detailing
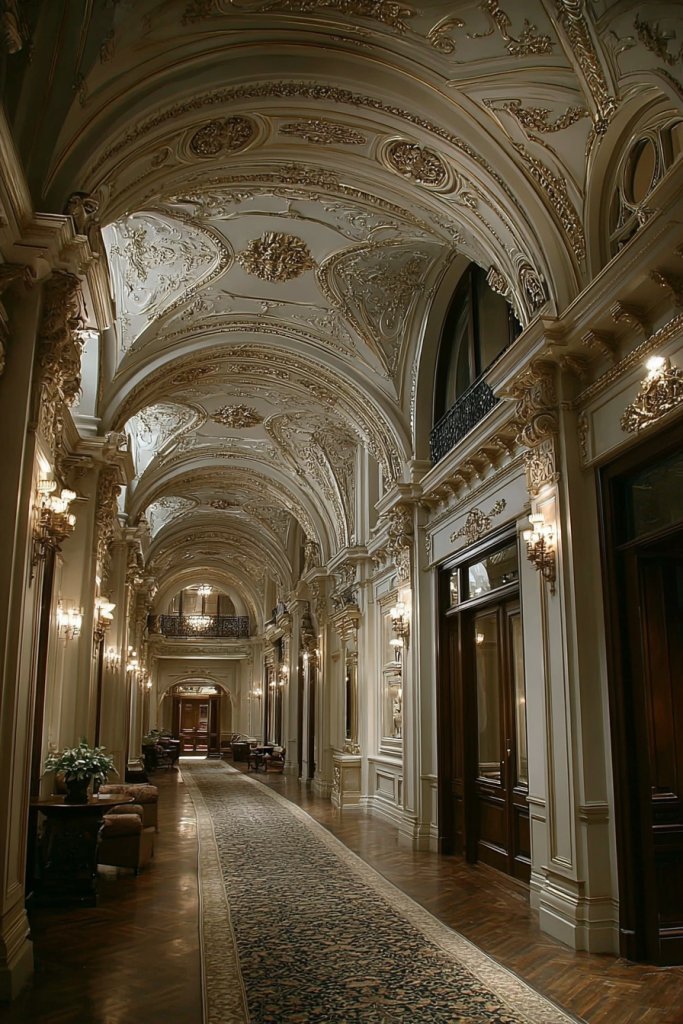
Dreaming of a space with timeless elegance? Barrel vault ceilings exude grandeur and sophistication, reminiscent of classical architecture. They add architectural drama and can make any room feel like a historic masterpiece. If you’re after a luxurious, enduring style, this idea has you covered.
Imagine a sweeping, curved ceiling arching overhead, with decorative moldings and intricate plasterwork along the edges. The smooth, flowing shape draws the eye upward, creating a sense of height and openness. Paired with plush furnishings and warm lighting, the vault becomes a statement of craftsmanship and grace.
Opt for smooth, painted surfaces for a minimalist, modern take or add ornate moldings and carvings for a more opulent look. For smaller rooms, keep the vault subtle or use lighter colors to avoid overwhelming the space. Incorporate decorative lighting fixtures that complement the curvature. Seasonal or thematic accents can be added with textiles or artwork.
Begin by consulting a structural engineer or architect to ensure the ceiling can support the vault. Construct the curved framework using reinforced plaster, wood, or metal framing. Finish with plaster or drywall, then add decorative moldings or plaster details. Paint or finish the surface with your chosen color or texture. Professional installation is recommended for safety and precision.
Highlight the vault with uplighting or wall sconces that accentuate its shape. Use metallic or faux finish paints to add shimmer. Incorporate decorative medallions or motifs within the arch for extra detail. Pair with classic or vintage furnishings to complete the historic look.
A barrel vault ceiling elevates your space to a level of timeless elegance and grandeur. It’s a feature that combines craftsmanship with style, instantly adding value and character. With the right planning, this design can be a show-stopping centerpiece. Ready to vault into luxury?
17. Metallic Foil Ceiling Finishes for Reflective Glamour
Want a ceiling that dazzles and reflects light like a mirror? Metallic foil finishes deliver reflective glamour, instantly creating a luxurious, high-end look. They add brightness and depth, making any space feel more expansive. If you crave a bold, statement ceiling, this is your ticket.
Envision a ceiling covered in shimmering metallic foil—silver, gold, or copper—that catches and reflects ambient light. The reflective surface amplifies the room’s brightness while adding a textured, luminous quality. The crinkled or smooth foil creates a dynamic surface that plays with light and shadow, giving your ceiling a rich, metallic glow.
Opt for smooth, flat foil for a sleek, modern look, or choose crinkled or textured foil for extra visual interest. Gold and copper tones add warmth, while silver suits cooler, contemporary schemes. Pair with neutral walls and minimalist furnishings to let the ceiling shine. Use indirect lighting to enhance the reflective qualities.
Apply a high-quality adhesive to your ceiling surface, then carefully lay the metallic foil, smoothing out air bubbles and wrinkles. Seal the edges with clear or matching adhesive for a seamless finish. For durability, add a protective clear coat or lacquer. Professional application is recommended for large areas to ensure a flawless look.
Complement the foil with accent lighting—such as LED strips or spotlights—to boost the reflective effect. Use warm or cool lighting depending on your tone. Mix metallic finishes with matte or gloss paints for contrast. Personalize by adding decorative trims or framing the foil with moldings.
Metallic foil ceilings radiate luxury and sophistication, perfect for creating a stunning focal point. They’re bold yet versatile, fitting into many decor styles. With careful application, you’ll enjoy a shimmering, glamorous atmosphere that turns heads. Ready to reflect your style?
18. Floating Ceiling Panels with Integrated Lighting
Looking for a modern, sleek ceiling that feels effortless and sophisticated? Floating panels with integrated lighting create a clean, contemporary look that adds depth and dimension. They make your ceiling appear as if it’s hovering, elevating your decor instantly. If you’re into minimalist elegance, this idea is a must.
Imagine a series of rectangular or geometric panels suspended slightly below the main ceiling, with hidden LED lighting strips embedded within. The panels seem to float, casting soft shadows that enhance the three-dimensional effect. The light within the panels highlights their edges, adding a futuristic glow that’s both subtle and striking. It’s a seamless blend of design and technology.
Choose panels in various sizes and shapes to fit your space—think linear, square, or angular designs. Keep the color palette neutral—white, black, or metallics—for a modern vibe. For added dimension, layer panels at different heights or angles. Use color-changing LEDs for mood lighting and adjust the glow to match your decor.
Begin by constructing a sturdy framework to support the floating panels, ensuring they are securely anchored. Install the panels with concealed mounting hardware, keeping a slight gap from the main ceiling for that floating effect. Embed LED strips within the panels and connect to dimmers or smart controls. Finish with a seamless paint or finish that matches or contrasts with your walls. Professional installation guarantees safety and precision.
Customize with different panel finishes—wood veneer, metallic, or matte painted surfaces. Incorporate lighting effects such as color shifts or dimming for ambiance. Pair with sleek, minimalist decor and furniture to complete the look. Add decorative accents like sculptural elements or textured wall finishes nearby for harmony.
Floating ceiling panels make a bold, modern statement that elevates your entire space. They combine form and function seamlessly, showing off your taste for innovation. With proper planning, you’ll enjoy a stunning, high-tech ceiling that impresses and inspires. Ready to elevate?
19. Beaded or Studded Ceiling Accents for Texture
Plain ceilings can feel uninspired and flat. Beaded or studded accents add tactile texture and visual interest, transforming your ceiling into a luxurious feature. They bring depth and a subtle shimmer, making your space feel more curated and sophisticated. If you love intricate details, this idea might be your new favorite.
Imagine a ceiling decorated with evenly spaced beads or metallic studs forming a pattern—geometric, floral, or abstract. The raised elements catch light differently, creating shadows and highlights that add dimension. When paired with soft lighting, the textured surface becomes a captivating focal point. It’s like jewelry for your ceiling, elevating your entire decor.
Choose between traditional beaded trims, metallic studs, or a combination of both. Keep the color scheme neutral for understated elegance or go bold with metallic finishes for extra glamour. Use in bedrooms, dining rooms, or entryways for a touch of sophistication. Match the accents with fixtures or furniture hardware for a cohesive look.
Start by marking your pattern on the ceiling, then attach beads or studs securely with appropriate adhesive or mechanical fasteners. Space them evenly for a tidy look, or vary the spacing for a more organic feel. Seal or paint over to unify the surface if needed. For larger areas, consider professional help to ensure consistency and safety. Regular cleaning maintains the shine and texture.
Add custom touches by mixing different sizes or finishes—matte, gloss, or metallic. Incorporate LED accent lighting to highlight the studs or beads at night. Combine with textured wall treatments or fabrics for a layered aesthetic. Personalize further with monograms, symbols, or motifs that reflect your style.
These accents turn a simple ceiling into a piece of intricate art, showcasing your attention to detail. They add a luxurious tactile element that enriches your decor. With patience, you can craft a stunning textured ceiling that feels both personal and elegant. Ready to add subtle sparkle?
20. Architectural Ceiling with Sculptural Elements
Craving a ceiling that commands attention and exudes artistry? Architectural sculptural elements turn plain ceilings into bold, three-dimensional statements. They add depth, drama, and a personal touch that elevates your entire space. If you’re into artistic, statement decor, this idea is perfect.
Picture a ceiling adorned with sculptural reliefs—waves, floral motifs, or abstract forms—that protrude at varying depths. Light and shadow play across these shapes, creating a dynamic visual effect. The sculptural elements can be integrated into the ceiling’s design or added as decorative accents. It’s like a piece of modern art suspended overhead.
Select sculptural forms that match your decor—smooth, flowing curves for a contemporary look or detailed, ornate reliefs for classic elegance. Use materials like plaster, resin, or lightweight composites for easier installation. Pair with minimalist lighting to highlight the textures. Keep the surrounding decor simple to let the sculptural features shine.
Design or select pre-made sculptural elements suited for ceilings. Securely attach reliefs using appropriate adhesives or mechanical fasteners, ensuring they are level and stable. Finish with paint or finish that emphasizes the sculptural details. For complex designs, consider hiring a sculptor or contractor experienced in architectural details. Ensure all elements are sealed and finished for long-lasting beauty.
Personalize by choosing themes or motifs meaningful to you—nature, abstract art, or cultural symbols. Highlight the reliefs with directional lighting or spotlights to create striking shadows. Incorporate complementary wall treatments or furnishings that echo the sculptural style. Regular maintenance keeps the textures crisp and impressive.
Sculptural ceilings showcase your artistic sensibility and elevate your home’s style. They transform simple rooms into galleries of personal expression. With expert help, you can craft a stunning, artistic ceiling that makes a lasting impression. Ready to sculpt your perfect space?
21. Minimalist Ceiling with Recessed Spotlights
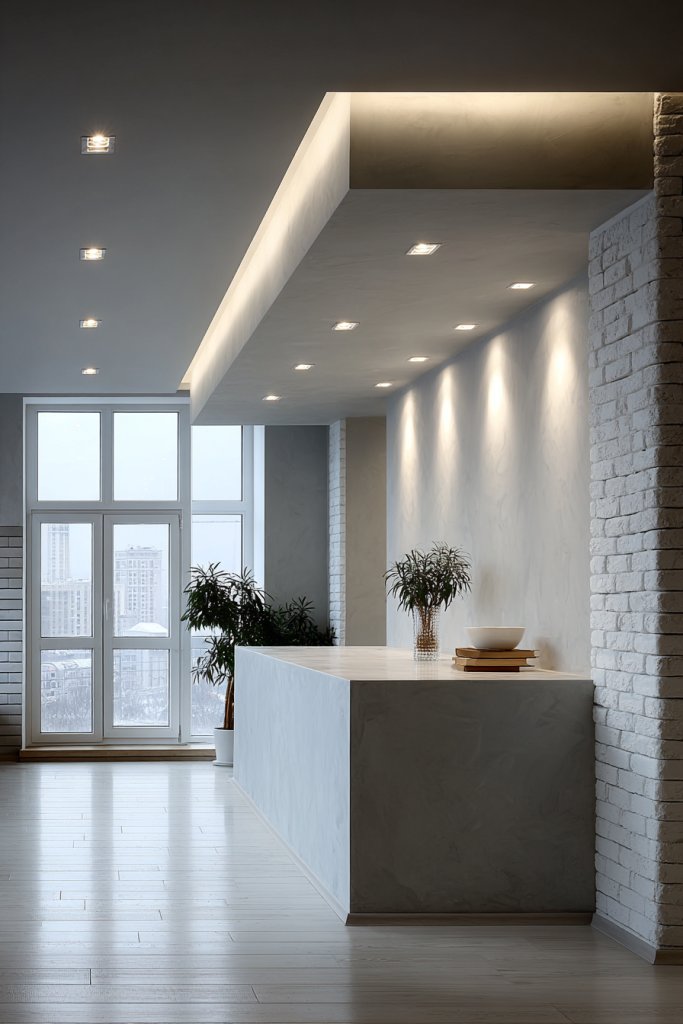
Sometimes less is more. A minimalist ceiling with recessed spotlights offers a clean, uncluttered look that elevates your space’s modern appeal. It provides subtle illumination and highlights architectural features without overwhelming the room. If you prefer sleek sophistication, this idea is ideal.
Visualize a smooth, flat ceiling painted in a neutral tone, with discreet, circular spotlights embedded into the surface. The lighting casts pools of gentle light, accentuating key areas or artwork below. The absence of decorative moldings or details ensures the ceiling remains a quiet, elegant backdrop. It’s a subtle yet impactful upgrade.
Choose from adjustable or fixed spotlights in matte or metallic finishes—black, white, or brushed metal. Use warm or cool LED lights to set the mood. Keep the ceiling color neutral for maximum flexibility and timelessness. For larger rooms, add more spotlights for even coverage; in smaller spaces, a few focus points suffice.
Decide on the placement pattern for your spotlights—symmetrical, asymmetrical, or targeted. Cut precise holes in the ceiling and install the fixtures securely, ensuring wiring is concealed. Connect the lights to dimmers or smart controls for ambiance adjustment. Finish with a smooth, painted ceiling that matches your decor. Hire a professional if unsure about electrical work.
Personalize with color-tunable LEDs or smart lighting systems to change atmospheres easily. Pair with minimalist wall decor or accent furniture to keep the focus on clean lines. Use textured wall finishes or subtle color contrasts to add depth without clutter. Keep the space simple yet inviting.
This understated style creates a sophisticated, modern vibe that never goes out of fashion. It’s perfect for a sleek office, bedroom, or living area. With a small investment and some DIY know-how, you can achieve an elegant, functional ceiling. Ready to embrace minimalism?
Conclusion
The luxurious ceiling design ideas shared here showcase a wide spectrum of styles, from timeless classics to modern marvels, giving you the perfect inspiration to elevate your space. Don’t hesitate to try out these ideas and infuse your home with a touch of glamour and sophistication. Embrace the transformation and let your ceilings become the crowning jewel of your elegant space!