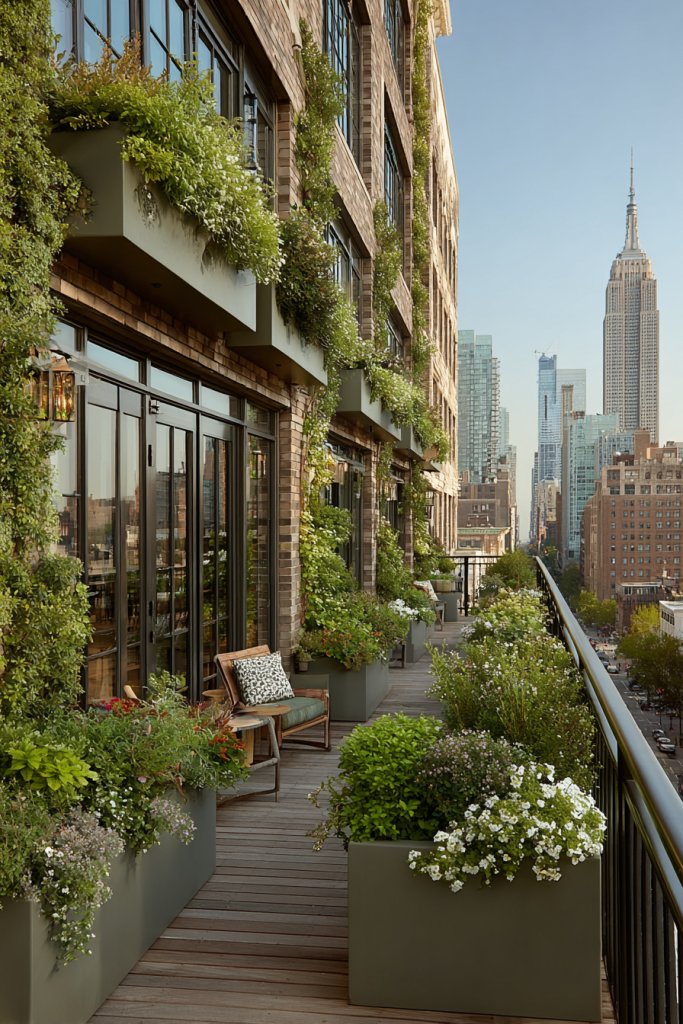
Imagine turning even the smallest outdoor space into a lush, vibrant oasis—sounds like a dream, right? Small garden ideas are gaining popularity because they prove that you don’t need acres of land to enjoy the beauty and tranquility of nature. With clever design tips and creative plant arrangements, anyone can create a charming green corner in their urban home.
In this article, you’ll discover a variety of inspiring ideas to maximize limited space, from vertical gardens to container arrangements. Whether you have a tiny balcony or a compact backyard, these ideas will help you bring nature closer and make your outdoor area a true reflection of your personality and style.
1. Vertical Wall Gardens with Recycled Pallets
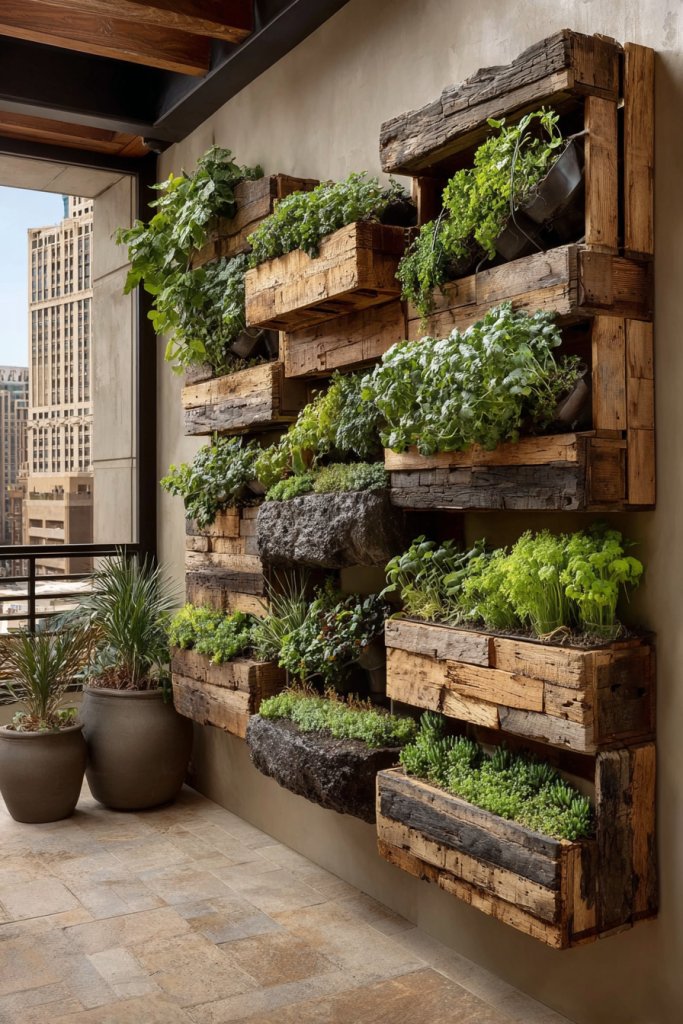
Living in a tiny apartment or a small backyard often leaves you feeling like your green dreams are just out of reach. Limited space makes it hard to indulge in lush greenery or even grow your own herbs. You want a way to bring nature into your home without sacrificing precious floor space. Luckily, vertical wall gardens offer a clever solution to these common frustrations.
Imagine a blank wooden wall transformed into a vibrant tapestry of plants, all supported by reclaimed pallets. The rough texture of the wood contrasts beautifully with the lush, colorful foliage that cascades down. Sunlight filters through the gaps, casting playful shadows, while the scent of fresh herbs fills the air. It’s a living piece of art that makes your space feel alive and inviting.
You can customize these gardens with different types of pallets, from weathered wood for rustic charm to painted or stained versions for a sleek modern look. For seasonal changes, swap out certain sections with flowering plants or colorful foliage. In small spaces, hang the pallet vertically on narrow walls or even inside kitchens. For outdoor setups, consider adding waterproof coatings or mounting on fences.
Start by sourcing sturdy, untreated pallets or repurpose old wood pallets. Sand down rough edges and attach waterproof backing if used outdoors. Use small containers or pockets made from fabric or plastic to hold soil and plants. Secure the pallets to the wall at a comfortable height, ensuring stability. Choose low-maintenance, space-efficient plants like succulents or herbs to keep care simple. Regular watering and occasional pruning keep the garden thriving.
Add personal flair by painting or staining the pallets to match your decor. Incorporate decorative elements like fairy lights or small sculptures attached to the wood for extra character. Mix in different textures, such as moss, stones, or miniature planters, to create a layered look. You can also assign specific sections for herbs, flowers, or even small vegetables, turning your wall into a mini edible garden.
Vertical wall gardens prove that you don’t need acres of land to grow a lush oasis. They’re perfect for city dwellers craving a touch of nature. With a little creativity, you can transform even the smallest wall into a stunning focal point. So go ahead—reclaim your space and let your green thumb shine!
2. Tiered Plant Stands for Limited Spaces
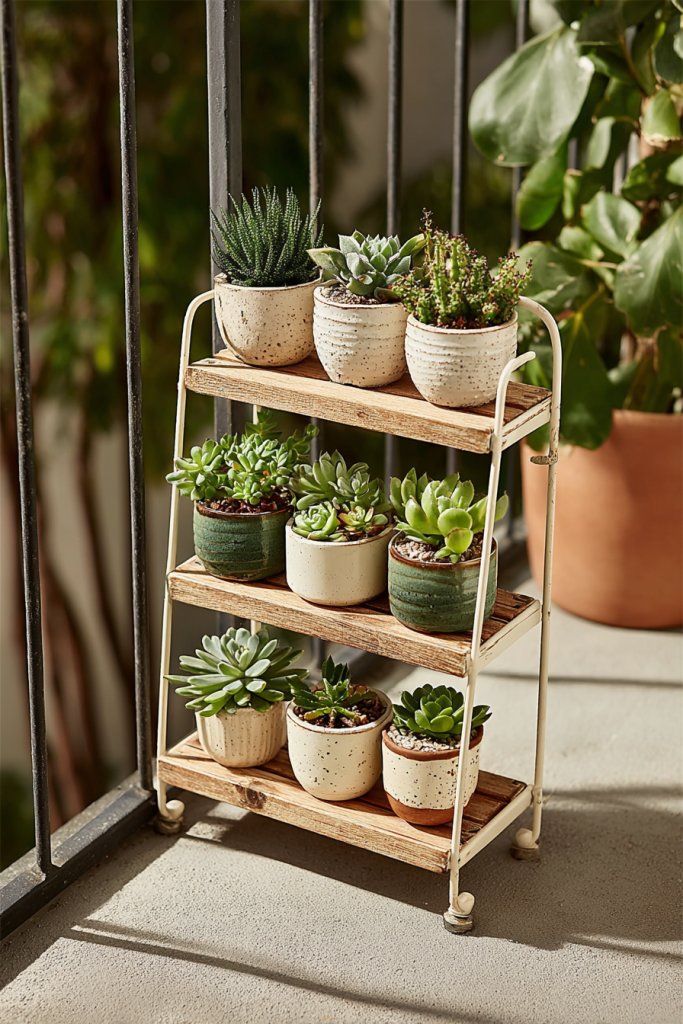
Struggling to fit your favorite plants into a tiny balcony or alcove? Cluttering your space with multiple pots can make it feel cramped and chaotic. You want an elegant way to display your plants that maximizes vertical space while keeping everything accessible and stylish. Enter tiered plant stands—the ultimate solution for compact plant lovers.
Picture a sleek, multi-level stand made from metal or wood, holding an array of different-sized pots. The plants cascade from the top shelf down to the bottom, creating a layered, eye-catching display. The stand’s open design allows for airflow and light to reach each plant evenly. It’s like having a mini botanical tower that elevates your green game without hogging your limited floor space.
Choose from various materials—rustic wood for cozy patios, modern metal for contemporary balconies, or lightweight plastic for easy rearrangement. Adjust the number of tiers based on your space and plant collection. For seasonal flair, swap out pots or add decorative stones and pebbles for a polished look. You can also stack multiple stands for a more dramatic effect or cluster different styles for eclectic charm.
Begin by selecting a sturdy, stable stand appropriate for your space. Measure your plants’ mature size to ensure proper spacing. Use lightweight pots to avoid tipping, especially if the stand is tall. Arrange taller plants on the top tiers and smaller ones below, creating visual balance. Place the stand in a bright spot where your plants can thrive with minimal fuss. Regular watering and occasional repositioning keep everything looking fresh.
Personalize by painting or staining the stand to match your decor. Add decorative elements like small lanterns or sculptures on the tiers for extra personality. Incorporate colorful pots or patterned textiles beneath the pots for a layered look. You can also rotate plants seasonally or swap out based on flowering schedules to keep your display exciting year-round.
Tiered plant stands turn a small space into a lush, organized oasis. They’re perfect for those who want to showcase their collection without cluttering their limited area. With a few simple adjustments, you can create a personalized green corner that’s functional and fabulous. Go ahead—give your plants the stage they deserve!
3. Hanging Basket Gardens for Balcony Edges
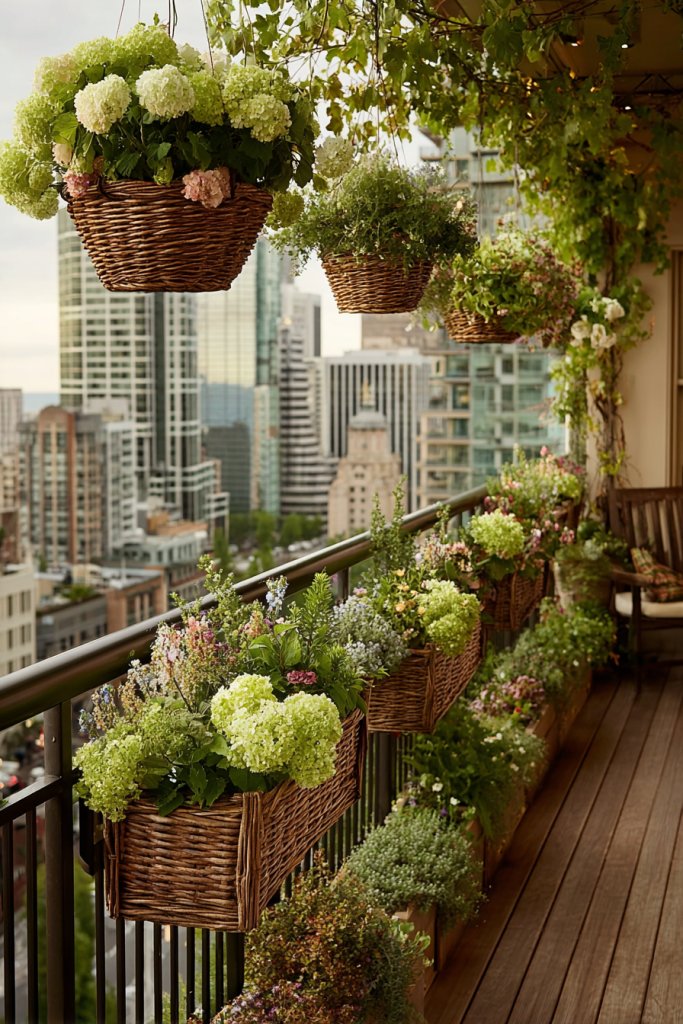
Balconies can feel like tiny, overlooked spaces that don’t quite fulfill your gardening dreams. You want to add greenery without blocking your view or taking up valuable floor real estate. Hanging basket gardens are the perfect fix, allowing you to craft a lush, layered look that’s both stylish and space-efficient.
Visualize a series of woven or metal baskets suspended from your balcony’s edge, overflowing with trailing vines, blooms, or fragrant herbs. The baskets sway gently in the breeze, adding movement and charm. The greenery spills over the sides, creating a soft curtain of natural color that frames your outdoor space. The effect is both inviting and whimsical, like having your own hanging garden.
Choose baskets with decorative elements, from rustic wicker to sleek metal or colorful ceramic options. Vary the sizes and shapes for visual interest, and plant a mix of flowering, trailing, and foliage plants. For seasonal updates, swap out plants or add decorative accents like ribbons or fairy lights. Hang baskets at different heights to create a layered, dynamic effect suited to your balcony’s dimensions.
Start by installing sturdy hooks or brackets along the balcony edge. Use weatherproof baskets with drainage holes and fill them with high-quality potting mix. Select plants that thrive in containers and can handle wind and sun exposure. Hang the baskets securely, ensuring they’re balanced. Water regularly, making sure excess water drains freely to prevent root rot. Consider adding a drip tray or watering system for convenience.
Add decorative touches like colorful ribbons, painted baskets, or small charms. Incorporate fragrant herbs like basil or mint for both beauty and utility. Use lighting—solar-powered fairy lights or lanterns—to highlight your hanging garden at night. Mix in different textures and colors to reflect your personality, creating a cozy, personalized balcony retreat.
Hanging baskets turn limited balcony space into a vibrant, inviting outdoor room. They’re easy to update seasonally and require minimal ground space. With a bit of creativity, your balcony can become a lush haven that’s visually stunning and perfectly suited to city living. Time to hang up those planters and enjoy your elevated garden paradise!
4. Window Box Herb Gardens for Small Kitchens
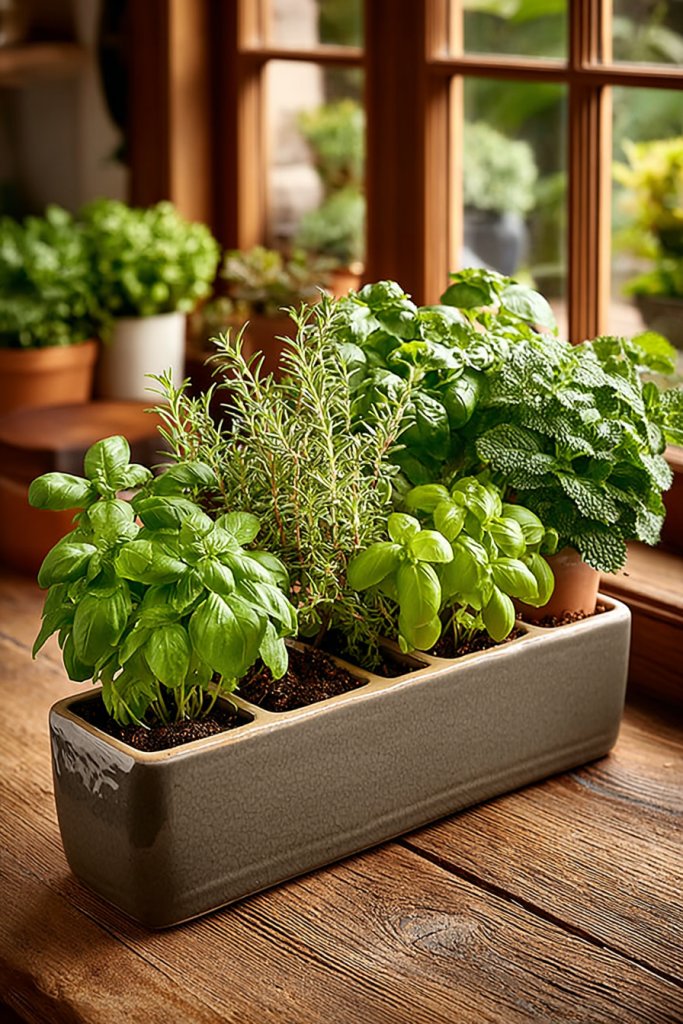
Ever wish you could have fresh herbs at your fingertips without cluttering your counter? Small kitchens often lack dedicated space for gardening, yet everyone loves the idea of cooking with homegrown flavors. Window box herb gardens offer a simple, attractive solution that brings greenery indoors while serving a practical purpose.
Imagine a narrow, deep window box attached beneath your kitchen window sill, brimming with vibrant basil, rosemary, and thyme. The herbs sway gently in the breeze, releasing delightful scents each time you open the window. The container’s rustic ceramic or sleek plastic surface complements your kitchen decor, creating a lively, edible corner that feels both fresh and functional. It’s like having a mini farm right above your sink.
Select window boxes made from durable materials like composite or ceramic, matching your kitchen’s style. For a modern look, opt for sleek, monochrome containers; for a country cottage vibe, choose distressed wood or terracotta. Mix herbs with small flowering plants for added color, or dedicate different sections for specific culinary uses. Adjust the size and depth based on your window’s dimensions and sunlight exposure.
Secure the window box firmly beneath the window sill using brackets or mounting hardware. Fill it with high-quality, well-draining soil designed for container gardening. Plant your herbs in separate sections or containers within the box for easy maintenance. Water regularly but avoid overwatering to prevent root rot. Position the box in an area that receives ample sunlight—at least four hours daily—for optimal growth. Fertilize with organic plant food every few weeks.
Personalize your herb garden with themed containers—rustic, colorful, or minimalist—to reflect your style. Label each herb with small, decorative tags for quick identification. Incorporate decorative stones or mulch on top of the soil for a tidy appearance. Consider adding a small watering can or a tray to catch excess water, keeping your kitchen tidy and functional.
Having fresh herbs at your fingertips can dramatically elevate your cooking and your mood. It’s a simple way to add life and aroma to your kitchen space. Plus, watching your herbs grow from tiny seedlings to lush plants will boost your confidence in your gardening skills. So go ahead—turn your window into a mini herb farm and spice up your life!
5. Compact Container Gardens on Tiny Terraces
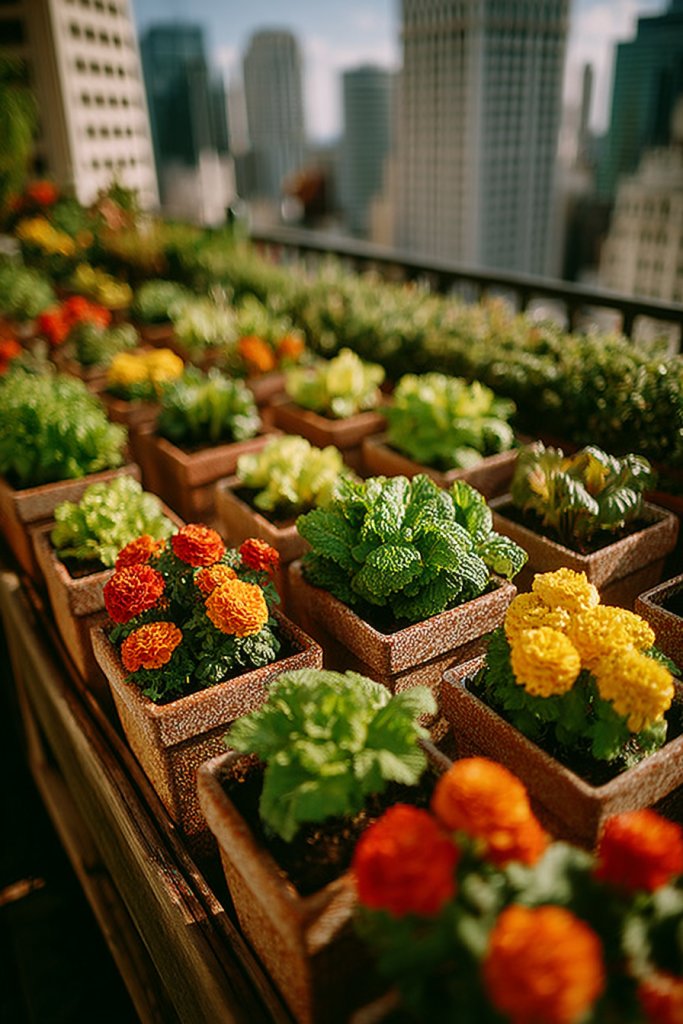
Tiny terraces or balconies often feel like afterthoughts—little more than a concrete slab with potential. You want to turn this neglected corner into a vibrant, relaxing retreat, but space restrictions seem to hold you back. Container gardening offers an easy, flexible way to create a lush oasis in even the smallest outdoor spaces.
Envision a colorful mosaic of small pots arranged along the edge of your terrace, overflowing with cheerful flowers, leafy greens, and even small shrubs. The containers vary in height and style, adding visual interest and depth. The scent of blooming flowers mingles with the fresh air, while textured textiles or outdoor rugs define seating zones. It’s a cozy, personalized corner that invites relaxation and outdoor dining.
Mix and match container styles—terracotta for a rustic feel, modern concrete for sleekness, or vibrant glazed ceramics for a pop of color. Vary pot sizes to accommodate different plant types and growth habits. For seasonal appeal, swap out flowering containers or add decorative elements like lanterns or wind chimes. Use stacking or tiered arrangements to maximize vertical space.
Start with weather-resistant containers that suit your climate. Arrange them along the terrace’s perimeter, leaving enough space for movement. Use lightweight materials for easy repositioning and ensure proper drainage to prevent waterlogging. Fill the pots with organic, nutrient-rich soil, then plant your selection of flowers, herbs, or small vegetables. Water consistently and fertilize to keep everything thriving. Consider adding a small, portable watering system for convenience.
Incorporate decorative elements like colorful stones, mini sculptures, or outdoor fabrics to personalize your space. Create zones for different functions—dining, lounging, gardening—by using planters and furniture arrangements. Seasonal accents like fairy lights or fabric curtains can add warmth and ambiance. Regularly rotate plants or update containers to keep the terrace fresh and engaging.
A well-designed container garden can transform even the tiniest terrace into a lush escape. It’s a perfect way to enjoy nature without needing sprawling land. With a little planning, your terrace can become a vibrant, inviting outdoor room that boosts your mood and impresses visitors. Start small, dream big, and watch your outdoor space flourish!
6. Foldable Garden Tunnels for Seasonal Cover
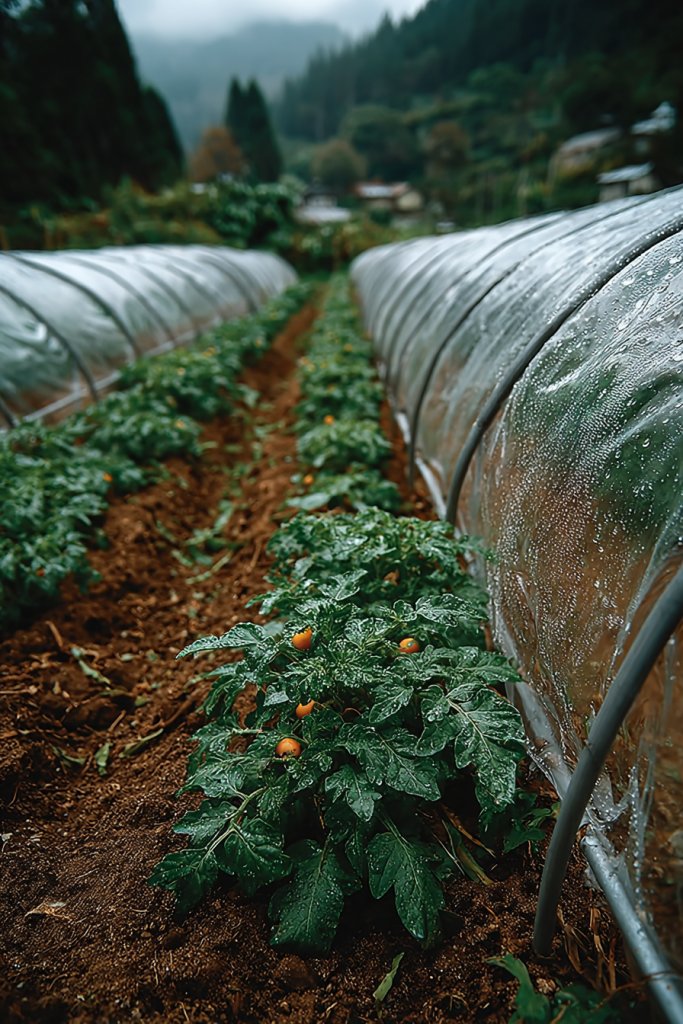
If you’re tired of your plants suffering in harsh weather or just want a way to extend your growing season, a simple solution is a foldable garden tunnel. These lightweight structures provide protection and create a controlled environment for your plants. They’re especially handy for small gardens where space is at a premium and every inch counts.
Picture a clear, flexible tunnel arching over your small vegetable patch or flower bed. When unfolded, it forms a semi-enclosed space that traps warmth and humidity. The material is lightweight yet sturdy, allowing you to fold it back easily on sunny days. Inside, your plants are protected from wind, frost, and unexpected rain, creating a mini greenhouse experience right in your backyard.
Choose from different materials—plastic, polyethylene, or fabric—depending on your climate and aesthetic preferences. Tunnels can be single- or multi-arched, and length can be customized to fit your space. For a permanent look, attach the tunnel to stakes or frames; for seasonal use, opt for portable, foldable designs. Add side vents or zippered entry points for ventilation and easy access.
Start by selecting a suitable location with good sun exposure. Lay out your tunnel and secure it firmly to the ground with stakes or weights. For best results, prepare your soil beforehand and plant your seedlings or seeds within the protected area. When the weather warms up, simply fold back the tunnel to allow your plants to get natural sunlight. Regularly check for wear and tear, and clean the material to keep it transparent and effective.
Decorate the exterior with colorful flags, ribbons, or garden labels to make it visually appealing. Use removable clips or ties for quick adjustments or removal. Incorporate small solar-powered fans or heaters for extra control over temperature. Personal touches like custom fabric covers or decorative stakes can make your tunnel uniquely yours.
Foldable tunnels give you a versatile tool to protect and nurture your plants year-round. They’re easy to store and transport, making them perfect for small or movable gardens. With a little effort, you can enjoy fresh produce and vibrant blooms even in the coldest months. Now, go ahead and give your plants the seasonal cover they deserve!
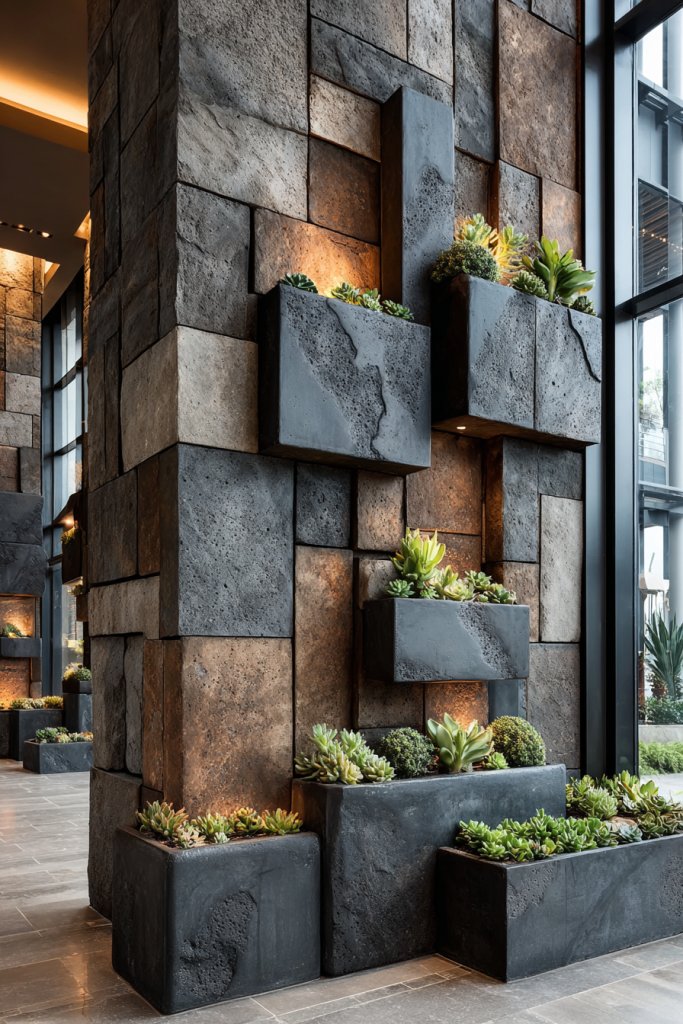
7. Space-Saving Wall-Mounted Planters
Limited floor space often forces you to choose between having a garden or having a clutter-free home. But what if you could have both? Wall-mounted planters offer a clever way to incorporate greenery into your space without sacrificing precious square footage. They’re perfect for small apartments, kitchens, or even bathrooms.
Visualize a sleek, modern wall adorned with a series of rectangular or circular planters filled with lush greenery. The plants hang in a cascading fashion, softening stark walls and adding depth to your room. The planters come in various materials—metal, ceramic, or plastic—and can be arranged in geometric patterns or a simple linear line. It’s a living artwork that transforms your wall into a vibrant focal point.
Choose planters that match your decor style—minimalist metal for contemporary interiors, rustic wood for cozy spaces, or colorful ceramic for playful accents. Vary the sizes and shapes for visual interest and flexibility. For more seasonal flair, swap out plants or add decorative elements like pebbles or fairy lights. Mount them at different heights to create a dynamic, layered effect.
Start by selecting a sturdy wall with sufficient sunlight or shade depending on your plants’ needs. Use appropriate mounting hardware, ensuring the wall can support the weight. Fill each planter with well-draining soil suited for your chosen plants. Arrange the planters in a pattern that suits your aesthetic and allows easy watering. Water regularly, and prune as needed to keep the display looking fresh. Consider adding drip irrigation for low-maintenance care.
Personalize your wall garden with decorative stones, small sculptures, or painted accents on the planters. Label each section with stylish tags for herbs or flowers. Incorporate lighting—LED strips or spotlights—to highlight your living wall at night. Use removable containers for easy updates and to keep your design flexible.
Wall-mounted planters turn blank walls into lush, verdant displays that elevate your interior decor. They’re a space-efficient way to enjoy nature and add a fresh, modern touch to your home. With a bit of planning, you can create an eye-catching feature wall that’s both functional and beautiful. Time to transform your walls into green masterpieces!
8. Creative Upcycled Plant Containers
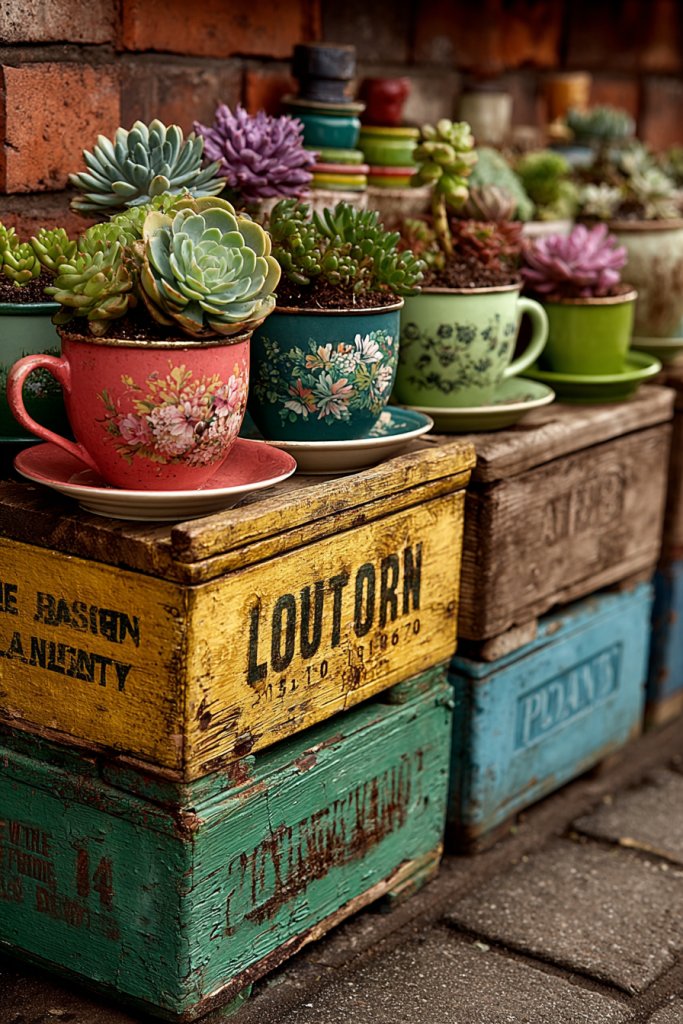
Bored of the usual plastic pots and tired of spending a fortune on trendy planters? Upcycling offers a sustainable, budget-friendly way to add personality to your garden. Plus, it’s a fun project that turns trash into treasure—who doesn’t love that? Whether you’re a DIY fanatic or just looking for quirky decor, upcycled containers are your new best friends.
Imagine a row of vintage tin cans, painted in bright colors or distressed for a shabby chic look, each holding a different plant. Old boots, teacups, or wooden crates are repurposed into charming planters that tell a story of creativity and eco-consciousness. The textures and colors create a playful, eclectic vibe that makes your garden uniquely yours. The plants seem to spill out of these unconventional containers, adding character and whimsy.
Use items that reflect your personality—metal buckets for industrial style, ceramic jars for boho chic, or even old tools for a farm-inspired look. Mix and match sizes and shapes to keep things interesting. For seasonal updates, paint or decorate containers with stencils or decals. Ensure all containers have proper drainage holes to prevent waterlogging.
Start by collecting items you no longer use or want to throw away. Clean and prep them—add drainage holes with a drill if needed. Fill with high-quality soil suitable for your plant choices. Arrange your containers on shelves, hanging hooks, or directly on the ground, depending on size and weight. Choose plants that suit your container size and your climate, and water regularly. For added stability, anchor heavy containers or use weights inside lightweight ones.
Decorate containers with paint, fabric, or decorative paper for a customized look. Label each with fun tags or painted signs indicating the plant type. Incorporate small decorative elements like stones or shells into the soil for visual interest. Rotate plants seasonally or swap out containers to keep your garden fresh and engaging.
Upcycled containers add charm, sustainability, and originality to your garden. They encourage you to think outside the box and embrace a creative, eco-friendly lifestyle. Every time you look at your quirky planters, you’ll feel a sense of pride and accomplishment. So get inventive—your garden’s personality is waiting to shine!
9. Rooftop Garden Pockets with Fabric Planters

Living in the city often means sacrificing outdoor space for a real garden. But what if you could turn your rooftop into a lush, green escape without building bulky structures? Fabric pocket planters offer a lightweight, expandable way to grow a variety of plants right outside your door. They’re perfect for renters or anyone wanting a flexible, low-cost solution.
Visualize rows of fabric pockets attached to your railing or wall, bursting with vibrant greenery and colorful flowers. The pockets hang like soft, textured patches that catch the sunlight, creating a layered, mosaic-like effect. The fabric’s flexibility allows you to customize the layout, filling in gaps or expanding your garden as needed. It’s a cozy, inviting space that feels like a secret garden in the sky.
Select fabric pockets made from weather-resistant materials in neutral or bright colors. Organize them in vertical strips, geometric patterns, or cascading arrangements depending on your aesthetic. Change out plants seasonally or swap pockets for a quick refresh. You can also add small stakes or hooks for extra support or decorative accents.
Secure the fabric pockets firmly to your railing or wall using hooks, clips, or ties. Fill each pocket with high-quality potting mix suitable for container plants. Plant your chosen greenery—succulents, herbs, or small flowering plants—ensuring each has enough space to grow. Water regularly, keeping an eye on drainage and soil moisture. For extra convenience, consider installing a drip irrigation system or self-watering pockets.
Decorate the fabric pockets with fabric paint, stencils, or decorative trims. Label your plants with stylish tags for easy identification. Add fairy lights or small solar-powered lanterns to highlight your rooftop garden at night. Mix in different textures and colors to reflect your personality and create a lively, personalized outdoor space.
Rooftop fabric pockets make urban gardening accessible and adaptable, turning even a small balcony into a tranquil oasis. They’re easy to install, move, and update, making your green space a true reflection of your style. With a little effort, you can enjoy fresh herbs, flowers, and a peaceful view above the city hustle. Time to start planting your rooftop retreat!
10. Miniature Zen Gardens for Calm Reflection

In today’s busy world, finding a moment of calm can feel impossible. You crave a peaceful space to unwind, meditate, or just clear your mind. A miniature Zen garden offers a simple, elegant way to bring tranquility into your small living area or balcony. It’s a perfect retreat for stress relief, right at your fingertips.
Imagine a shallow tray filled with fine gravel, carefully raked into calming patterns. Small, smooth stones are arranged thoughtfully around tiny sculptures or candles, creating a balanced, harmonious scene. The textures of the sand, stones, and optional plant elements evoke a sense of nature’s serenity. It’s a minimalist yet deeply soothing space that invites mindfulness and quiet reflection.
Use different containers—wooden trays, glass bowls, or ceramic dishes—to match your decor. Incorporate elements like driftwood, miniature bridges, or bonsai-style trees for visual interest. Seasonal updates might include adding dried flowers or scented candles. Keep the design simple or elaborate based on your taste, but always prioritize a sense of balance and calm.
Start with a shallow container that fits your available space. Cover the base with a layer of fine gravel or sand, then arrange stones and decorative elements. Use a small rake or even a toothpick to create patterns that promote relaxation. Place your Zen garden in a quiet corner, away from direct sunlight or drafts. Regularly rake and refresh the elements to maintain its calming effect.
Personalize your Zen space with meaningful stones, small sculptures, or scented elements like incense or essential oils. Add a tiny water feature or miniature lanterns for extra ambiance. Keep your design uncluttered, and rotate elements seasonally for variety. Use calming colors and natural materials to deepen the sense of tranquility.
A miniature Zen garden is a small investment with big mental health benefits. It reminds you to slow down, breathe, and reconnect with the present moment. Even in a tiny apartment or balcony, you can create a peaceful corner that renews your mind. Ready to find your zen in a tiny space?
11. Edible Garden Corners with Compact Veggie Pots
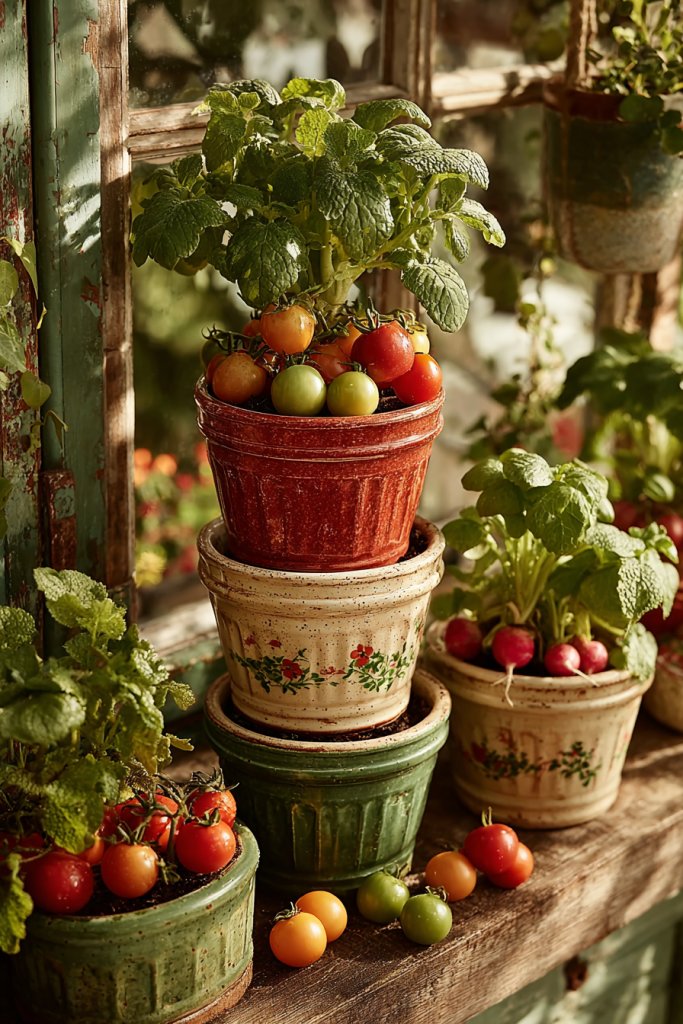
Craving fresh, homegrown vegetables but limited by space? You’re not alone. Growing your own produce in small containers allows you to enjoy farm-to-table flavors without a sprawling garden. A dedicated edible corner with compact veggie pots turns any small balcony or patio into a mini farm, right at your fingertips.
Visualize a cozy nook filled with colorful, stackable pots containing cherry tomatoes, radishes, and leafy greens. The plants are lush and vibrant, with ripe fruit or tender leaves ready to harvest. The pots are arranged in a tiered or clustered pattern, making the most of every inch. The scent of fresh herbs and vegetables fills the air, creating an inviting, productive outdoor space.
Use containers made from durable materials like plastic, ceramic, or recycled materials. Vary pot sizes to accommodate different vegetables and herbs, and add decorative elements like painted patterns or labels. For seasonal diversity, swap out crops or plant succession crops to maximize yield. Adjust your setup to your space—corner shelves, hanging baskets, or compact stacking units work well.
Select pots with drainage holes and fill them with nutrient-rich, well-draining soil. Plant your veggies, ensuring proper spacing for growth. Place your containers in a sunny spot that gets at least six hours of direct sunlight daily. Water consistently and fertilize with organic options to boost growth. Rotate crops seasonally to maintain soil health and productivity. Keep pests at bay with natural deterrents or companion planting.
Label your pots with chalkboard or decorative tags for easy identification. Incorporate small trellises or stakes for vining plants like peas or cucumbers. Use colorful or patterned containers to add visual interest. Consider adding a small compost bin or wormery nearby for sustainable practices. Create a harvesting schedule to enjoy fresh veggies throughout the season.
Growing your own veggies boosts both your confidence and your health. It’s empowering to see tiny seeds turn into delicious produce right outside your door. Plus, it makes cooking more fun and satisfying. Even a small corner can yield a bounty—happy gardening!
12. Stepping Stone Pathways with Embedded Plants
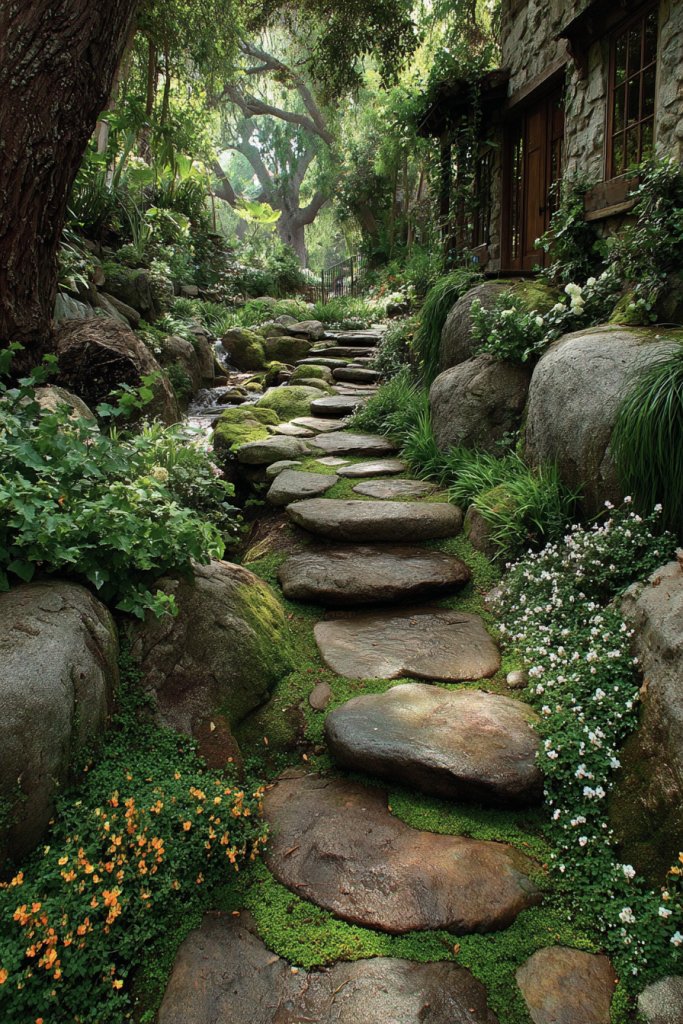
A cluttered, uneven outdoor space makes it hard to enjoy your garden fully. You want a pathway that’s both functional and beautiful, guiding your footsteps while adding visual appeal. Embedding plants within stepping stones creates a charming, low-maintenance walkway that transforms any small garden into a cohesive oasis. It’s like bringing a little bit of nature right under your feet.
Picture a meandering path made of large, flat stones set into the ground, with lush ground cover or tiny succulents growing in the gaps. The stones are smooth and weathered, blending naturally into the landscape. The plants spill over the edges, softening the hardscape and adding texture and color. It’s a serene, inviting route that encourages exploration and relaxation.
Choose stones that complement your outdoor style—rough natural stones for rustic charm or sleek concrete pavers for modern elegance. Use drought-tolerant plants like sedum, thyme, or moss in the gaps for easy maintenance. For seasonal interest, plant bulbs or flowering ground covers. You can also incorporate lighting along the path for nighttime ambiance or add decorative borders.
Start by planning your path layout, marking the desired route. Excavate the ground to create a stable base, then lay the stones with proper spacing. Fill the gaps with soil and plant your selected greenery—preferably low-growing, hardy species. Water thoroughly and ensure good drainage to prevent pooling. Maintain by trimming and replacing plants as needed, and enjoy your natural walkways.
Add decorative elements like engraved stones, painted accents, or small statues along the path. Incorporate seasonal flowers or bulbs for color changes throughout the year. Use mulch or gravel around the stones to define the edges and improve drainage. Personalize with solar lights or lanterns to light the path at night, creating a magical atmosphere.
A stepping stone pathway with embedded plants makes your garden more accessible and inviting. It’s an easy DIY project that adds value and beauty without much expense. You’ll feel accomplished every time you walk along your personalized garden trail. Your small space suddenly feels grand and thoughtfully designed—ready for outdoor adventures!
13. Climbing Plants on Trellises for Space Efficiency
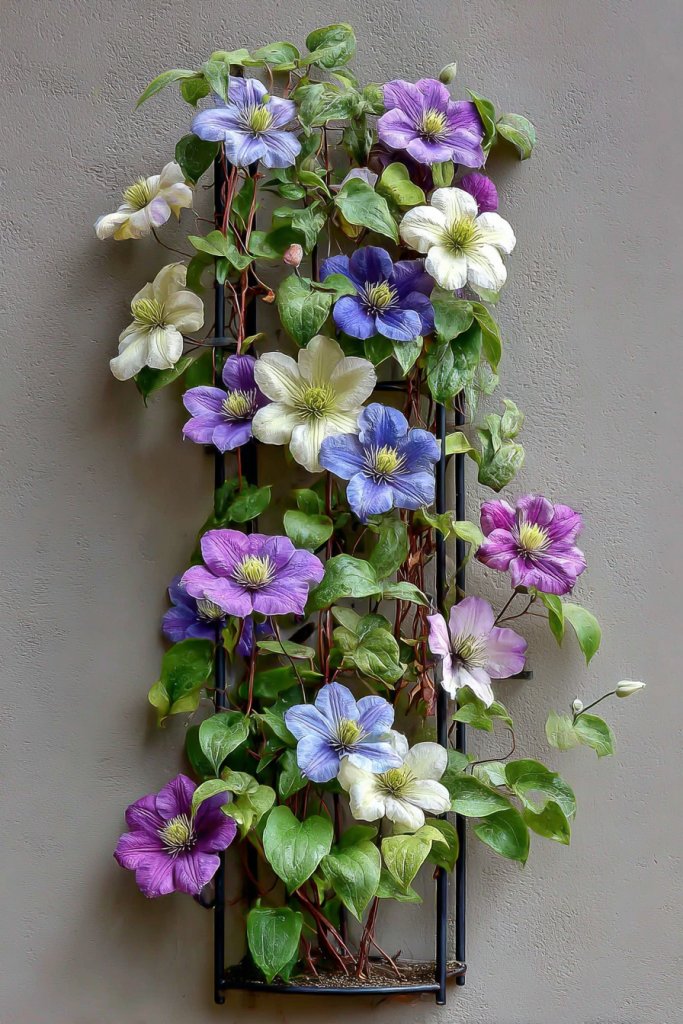
Limited ground space makes it tough to grow tall, lush greenery or flowering displays. You want to add vertical interest without sacrificing valuable patio or balcony real estate. Climbing plants on trellises provide a natural, space-saving solution that enhances privacy and adds charm. It’s a smart way to maximize your small outdoor area.
Imagine a delicate vine of jasmine or clematis winding up a sleek metal trellis against your wall or fence. The plant’s tendrils spiral gracefully, creating a lush curtain of leaves and blooms. The trellis supports the growth without crowding the ground, and the flowers add pops of color and fragrance. It transforms a plain wall into a living, breathing feature wall that invites admiration.
Choose from a variety of trellis styles—simple grids, ornate wrought iron, or minimalist geometric shapes—to match your aesthetic. Vary the plants based on your climate and taste; flowering vines, vegetable climbers, or even fruiting plants work well. For different seasons, swap out the plants for seasonal blooms or foliage. Attach the trellis securely to sturdy structures for safety and durability.
Install the trellis in a sunny spot with good support, anchoring it firmly into the ground or wall. Prepare the soil or container with rich, well-draining soil. Plant your climbing species at the base, guiding the tendrils onto the support system. Water regularly and prune to encourage healthy growth and flowering. Use ties or clips to help vines climb and spread evenly.
Decorate the trellis with fairy lights or wind chimes for added ambiance. Use decorative plant supports, colorful ties, or painted stakes to reflect your style. Combine different climbing plants for a layered, textured effect. Regular pruning and training will keep your climbers looking neat and promote more blooms.
Climbing plants on trellises unlock vertical space, making small gardens seem larger and more dynamic. They’re a low-cost, eco-friendly way to add color, scent, and privacy. Watching plants grow upward builds confidence and patience—two essential gardening virtues. Your space will feel more alive and inviting—ready to impress anyone who visits!
14. Balcony Rail Planters for Instant Privacy
Balconies in tight urban spaces often lack privacy, leaving you exposed to neighbors and passersby. You want a quick, stylish fix that adds greenery and creates a natural screen. Balcony rail planters provide an affordable, simple way to turn an open balcony into a cozy, private retreat.
Imagine long, narrow planters attached directly to your balcony railing, filled with lush, trailing plants or flowering vines. The greenery spills over the edges, forming a living curtain that blocks views and adds a splash of color. The containers are sleek, blending seamlessly with your outdoor decor and turning an ordinary railing into a lush boundary. It’s like creating your own private oasis in the sky.
Use materials like weatherproof plastic, metal, or wood to match your aesthetic. Mix different plants—fast-growing vines for privacy, flowering species for beauty, and evergreen foliage for all-year coverage. For seasonal updates, swap out plants or add decorative accents like ribbons or fairy lights. Adjust the height of the planters or layer multiple tiers for a more dramatic privacy screen.
Secure the planters firmly to the railing using brackets, clips, or specially designed railing mounts. Fill with quality potting soil and plant suitable vines, flowers, or foliage plants that thrive in containers. Water consistently, ensuring proper drainage to prevent root rot. Regular pruning will maintain your privacy screen and keep it looking tidy. For extra stability, use heavy-duty mounting hardware.
Add decorative touches such as colorful pots, fabric wraps, or small hanging ornaments. Incorporate solar lanterns or fairy lights to illuminate your privacy screen at night. Label your plants with stylish tags, and rotate seasonal crops or flowers for variety. Use natural twine or decorative sticks to guide vine growth and add visual interest.
Balcony rail planters are a quick, effective way to boost your outdoor privacy and style. They’re easy to install and maintain, perfect for city living. They turn a plain railing into a lush green barrier that invites relaxation and stunning views. Your outdoor space will feel more secluded and beautiful—ready for peaceful evenings!
15. Low-Profile Raised Garden Beds
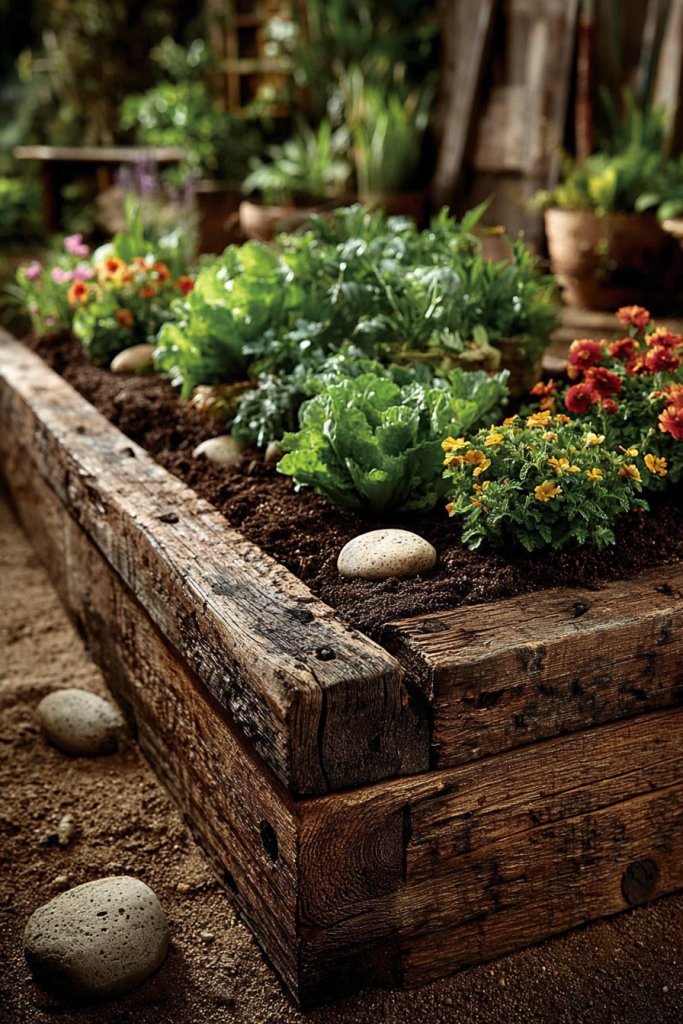
Growing vegetables or flowers in small spaces while avoiding bending over all day can be challenging. You want a solution that’s easy to access, neat, and visually appealing. Low-profile raised garden beds check all these boxes, elevating your planting game without overwhelming your space. They’re perfect for patios, decks, or small yards.
Imagine a compact wooden or composite box set just a few inches above ground level, filled with lush plants and rich soil. The clean lines and simple design blend naturally with your outdoor decor. The raised edges keep soil contained and weeds out, while the height makes gardening more comfortable. The beds are filled with vibrant greens and colorful blossoms, creating a tidy, inviting scene that’s easy to maintain.
Choose materials that match your style—natural wood for rustic charm, painted or composite for modern minimalism. Size and shape can be customized to fit your space—rectangular, square, or L-shaped. Add trellises or supports for vining plants. For seasonal interest, plant cool-weather crops in winter or summer blooms in warm months. Incorporate footpaths or stepping stones around for easy access.
Start by measuring your space to determine the ideal size. Build or buy a sturdy, weather-resistant frame that’s easy to assemble. Fill with high-quality soil rich in organic matter. Plant your chosen vegetables, herbs, or flowers, spacing appropriately for growth. Water regularly and fertilize as needed. Keep the beds weed-free and add mulch to retain moisture.
Paint or stain the wood to match your outdoor aesthetic. Add decorative stones or tiles along the edges for extra flair. Label your plants with stylish markers or tags. Use removable trellises or supports for vining crops. Incorporate compost bins nearby for sustainable gardening practices. Seasonally rotate plants for continuous harvest and color.
Low-profile raised beds make gardening accessible and manageable, even in tight spaces. They boost your confidence by making planting, tending, and harvesting easier. They add a structured, tidy element to your outdoor area that invites outdoor living. With minimal effort, you can enjoy fresh produce and beautiful blooms—your small space, transformed!
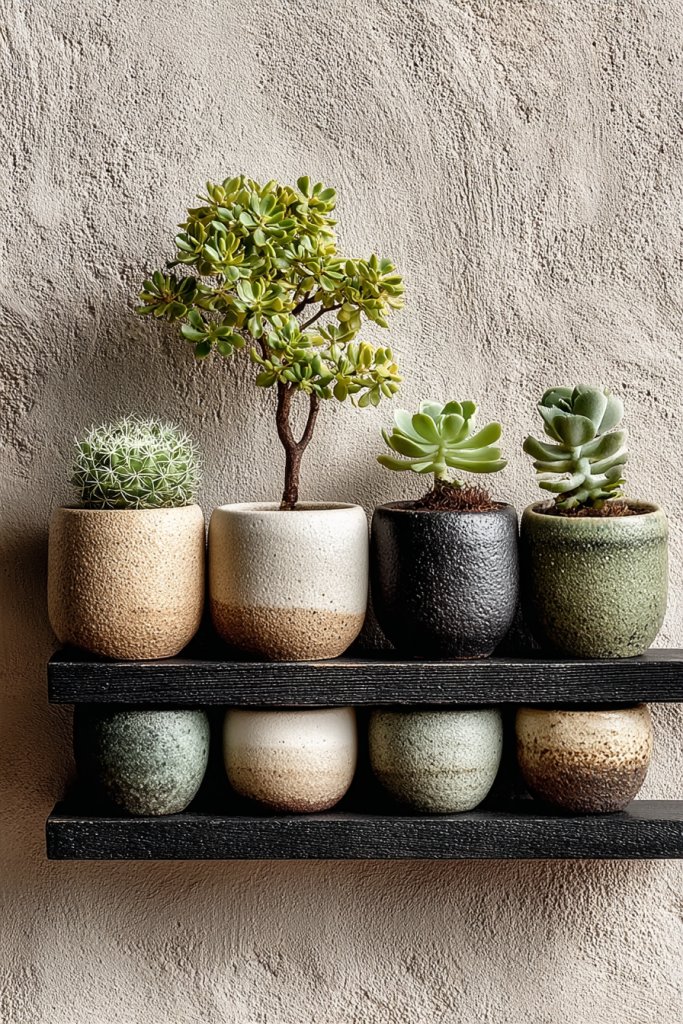
16. Succulent and Cactus Arrangements for Easy Care
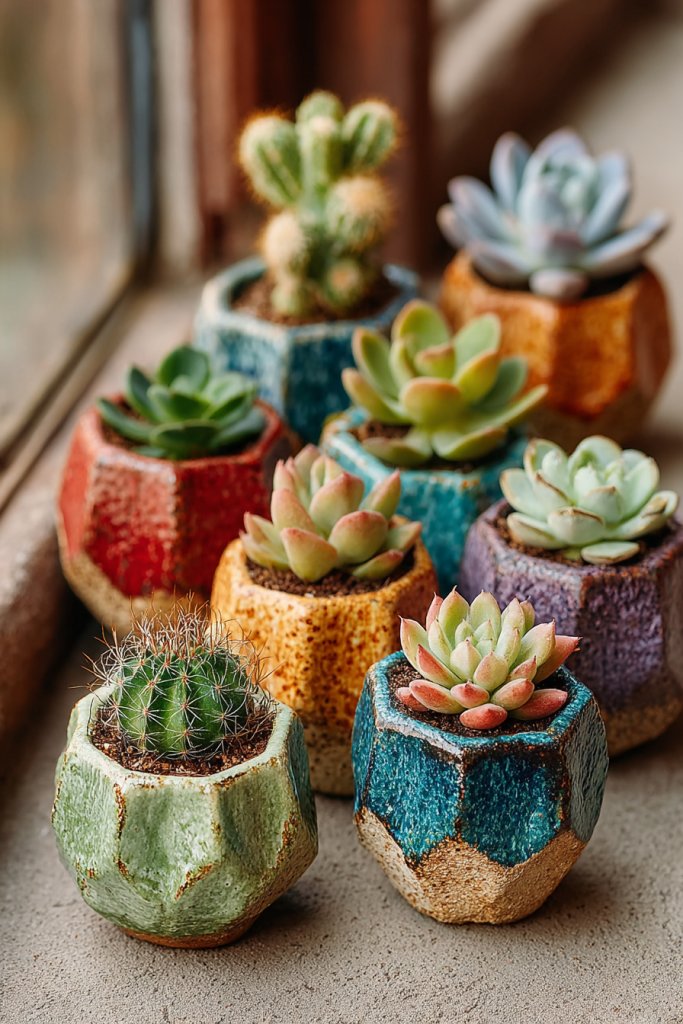
Not everyone has a green thumb or the time to fuss over delicate plants. You still crave a touch of nature and a bit of visual interest in your space. Succulents and cacti are the perfect low-maintenance options that look stylish and require minimal watering. They’re ideal for busy people or those who want a chic, modern vibe.
Picture a collection of small, geometric pots filled with various succulents and cacti arranged on a windowsill or tabletop. The different shapes, sizes, and textures create a striking display—some with rosette formations, others with prickly, sculptural forms. The colors range from muted greens to vibrant reds and purples, adding a pop of color without any fuss. The arrangement feels both artistic and effortless.
Use containers made from concrete, ceramic, or recycled materials for a modern or rustic look. Group plants with similar care needs together for easy maintenance. Incorporate decorative gravel or stones on the soil surface for a polished finish. For seasonal flair, add tiny fairy lights or decorative figurines. Create clusters of different heights and shapes for depth and interest.
Select pots with drainage holes and fill them with well-draining cactus or succulent soil. Plant your specimens, ensuring roots are well-covered. Place your arrangements in a bright, sunny spot—preferably south-facing windows or outdoor sunny spots. Water sparingly—typically once every few weeks—and avoid overwatering, which can cause root rot. Fertilize during active growth phases with cactus-specific feed. Rotate containers for even light exposure.
Arrange the pots in artistic groupings or on decorative trays. Mix in decorative stones, shells, or small sculptures for added personality. Label your plants with sleek tags or paint the pots for a cohesive look. Change up the arrangement seasonally to keep it fresh. Incorporate a small, portable watering can for quick care sessions.
Succulent and cactus arrangements prove that you don’t need a lot of time or skill to enjoy greenery. They’re perfect for decorating small spaces, offices, or bathrooms. Watching these hardy plants thrive boosts your confidence and sense of accomplishment. Plus, they add a sleek, modern vibe that’s always in style—ready to make your space pop!
17. Multi-Functional Garden Benches with Built-in Planters
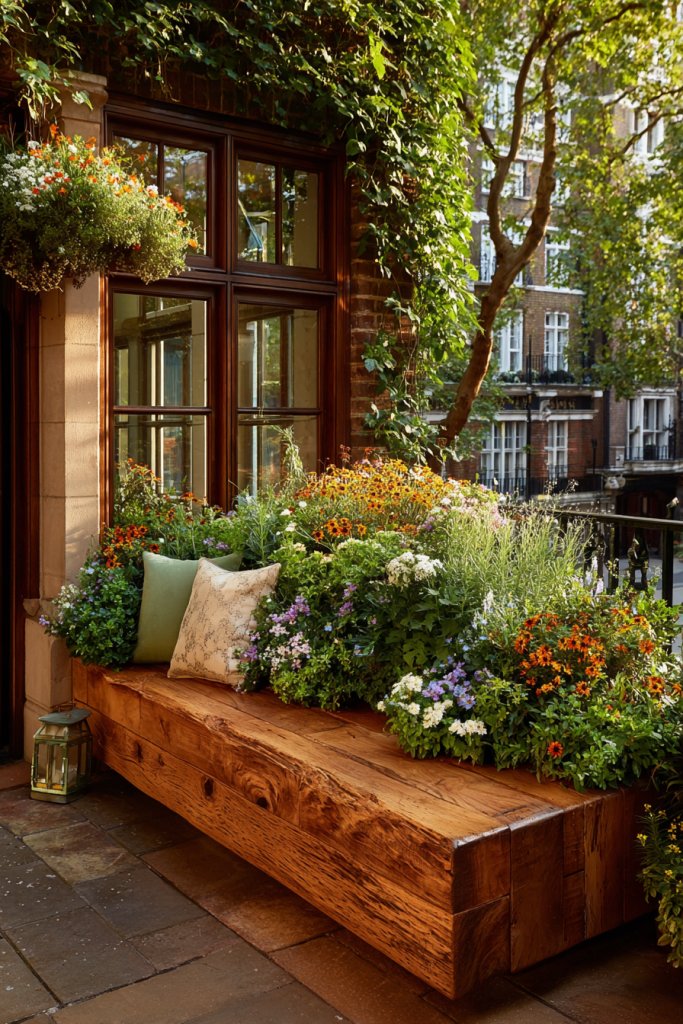
You want a cozy spot to relax outdoors but also need space for your plants. Traditional benches take up room and don’t offer much storage or planting options. Multi-functional garden benches with built-in planters solve this dilemma by combining seating and greenery into one sleek piece. It’s the perfect way to maximize small outdoor areas.
Visualize a charming wooden bench with a long, integrated planter box along its back or sides. The bench’s design invites you to sit and unwind while your favorite flowers or herbs flourish in the planter. The natural wood or painted finish complements your outdoor decor, creating a harmonious blend of function and style. The greenery adds life and color, turning your outdoor space into an inviting retreat.
Choose materials like weatherproof wood, recycled composite, or metal for durability. Customize the size and shape to fit your space—long and narrow or short and wide. Plant a mix of flowers, herbs, or even small vegetables in the built-in planters. For seasonal updates, replace or rearrange plants to keep your garden fresh. Add cushions or throws for extra comfort.
Start by selecting a sturdy, weather-resistant bench with a built-in planter that fits your style. Fill the planter with rich, well-draining soil and choose plants suited to your climate. Position the bench in a shady or sunny spot depending on your plants’ needs. Water your plants regularly, and prune to maintain their shape. Protect the wood with sealant if necessary, and periodically check for stability.
Decorate with colorful cushions or outdoor textiles to add comfort and style. Personalize the planter with decorative stones, painted patterns, or plant labels. Incorporate small storage compartments beneath the seat for gardening tools or outdoor essentials. Rotate plants seasonally or add flowering varieties for continuous color.
A garden bench with built-in planters combines practicality with beauty, making your outdoor space more inviting. It encourages you to relax and tend to your plants without needing extra furniture. Watching your garden flourish from your favorite seat boosts confidence and pride. It’s a simple, stylish upgrade for any small garden or patio—time to sit back and enjoy!
18. Mini Greenhouses for Seed Starting and Protection
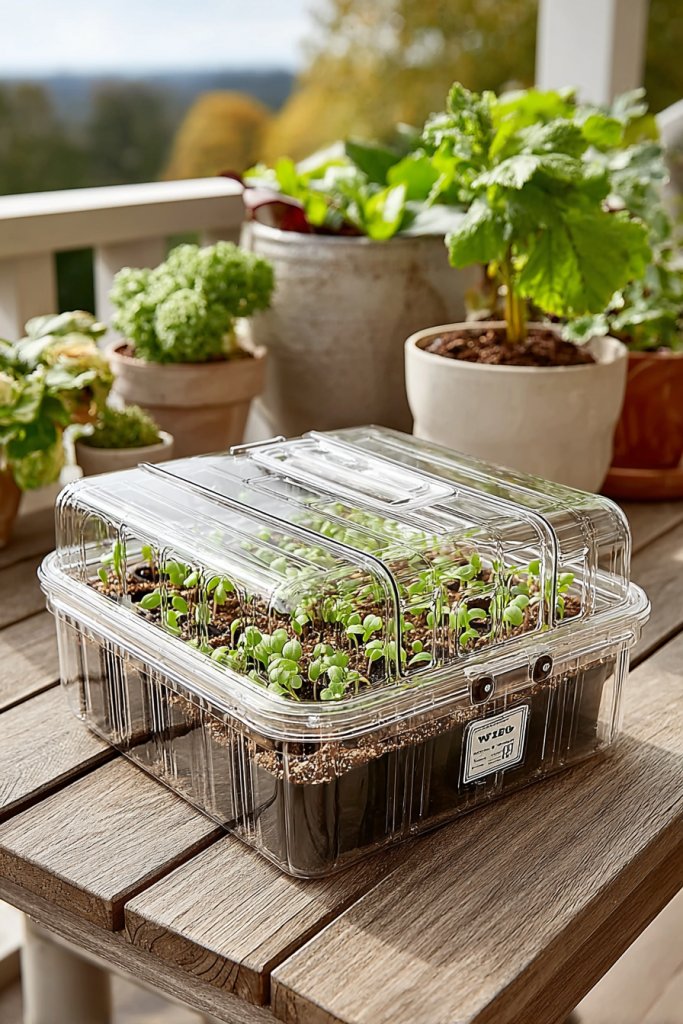
Starting plants from seed can be tricky, especially in unpredictable weather or limited space. You want a way to nurture seedlings indoors or on a small balcony, giving them a jumpstart before transplanting outdoors. Mini greenhouses provide an affordable, portable solution for seed starting and protecting delicate plants.
Imagine a compact, transparent enclosure sitting on your windowsill or balcony, housing tiny seedlings and young plants. The clear walls trap warmth and humidity, creating a cozy environment that accelerates growth. Small vents or zippers allow you to control airflow, mimicking a real greenhouse. The seedlings thrive under this nurturing cover, ready for transplanting in just a few weeks.
Choose from different materials—plastic, PVC, or glass—based on durability and aesthetics. Sizes range from simple cloches to larger, multi-tiered structures. For portability, opt for foldable or collapsible designs. You can add heating mats or grow lights for extra warmth and light during colder months. Customize with labels or decorative wraps for a personalized touch.
Start by selecting a suitable location—near a sunny window or sheltered balcony. Set up your mini greenhouse on a stable surface, ensuring proper ventilation. Fill containers with seed-starting soil, plant your seeds, and cover with the greenhouse lid or plastic. Water gently and monitor humidity levels. When seedlings develop a few true leaves, gradually acclimate them to outdoor conditions before transplanting.
Decorate your mini greenhouse with colorful labels, custom covers, or fairy lights. Incorporate small tools or trays to organize watering and feeding. Use decorative stones or pebbles on the base for aesthetic appeal. Rotate your seedlings seasonally or experiment with different plant varieties for variety. Keep a gardening journal to track growth and success.
Mini greenhouses make seed starting manageable and fun, even in tight spaces. They give you control over the growing environment and boost your confidence as a gardener. Watching tiny seedlings sprout and flourish is incredibly rewarding. Plus, it’s a cost-effective way to grow a variety of plants year-round. Time to get started and watch your garden grow!
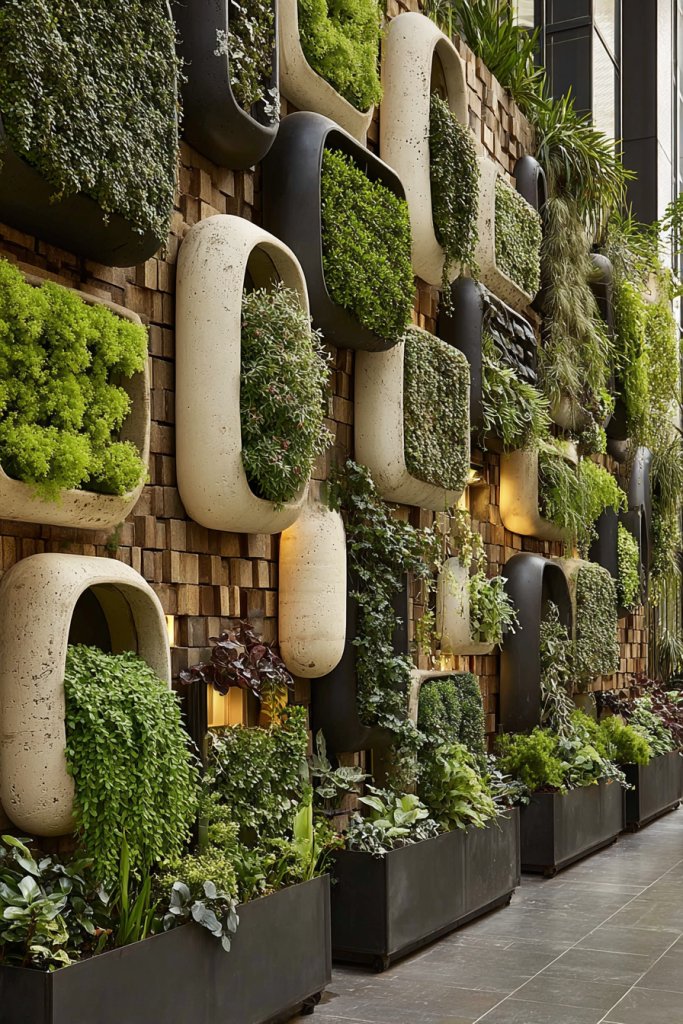
19. Artistic Plant Wall Panels for a Modern Look
Tired of boring walls or empty corners that lack personality? You want a striking feature that combines art and greenery, adding a modern touch to your small space. Artistic plant wall panels offer a creative way to showcase your love for plants while creating a contemporary statement piece. It’s the perfect blend of decor and nature.
Visualize a sleek, textured panel made from materials like metal, wood, or composite, embedded with built-in planters. These panels host a variety of plants—succulents, ferns, or trailing species—arranged in a geometric or abstract pattern. The contrast of materials and colors enhances the visual impact, transforming a blank wall into a living piece of art. At night, subtle lighting highlights the textures and plant silhouettes, creating a captivating scene.
Choose panels with modular sections, allowing you to customize the layout and plant choices. For a minimalist look, stick with monochrome or metallic finishes; for a more vibrant vibe, incorporate colorful or textured panels. Mix in different types of plants for variety and seasonal interest. Mount the panels securely on sturdy walls or fences and ensure good drainage and airflow.
Select a wall with adequate sunlight or shade depending on your plant choices. Install the panel securely using appropriate anchors or brackets. Fill the embedded planters with suitable soil and plant your selected greenery—consider drought-tolerant or low-maintenance options for simplicity. Water and fertilize according to each plant’s needs. Regularly prune and rotate plants to keep the display fresh and healthy.
Decorate the panels with LED lighting, decorative stones, or themed accessories that match your decor. Label specific plants with modern tags or incorporate small sculptures for added artistic flair. Change out plants seasonally or as your preference evolves. Use contrasting colors or textures on the panel to enhance visual interest.
Artistic plant wall panels elevate your decor while showcasing your green thumb. They’re a bold, modern way to bring nature inside or outside, making a strong visual statement. Creating and maintaining these panels builds confidence and design skills. They’re perfect for transforming any small space into a contemporary, lush focal point—ready to impress!
20. Floating Plant Shelves for a Layered Green Effect
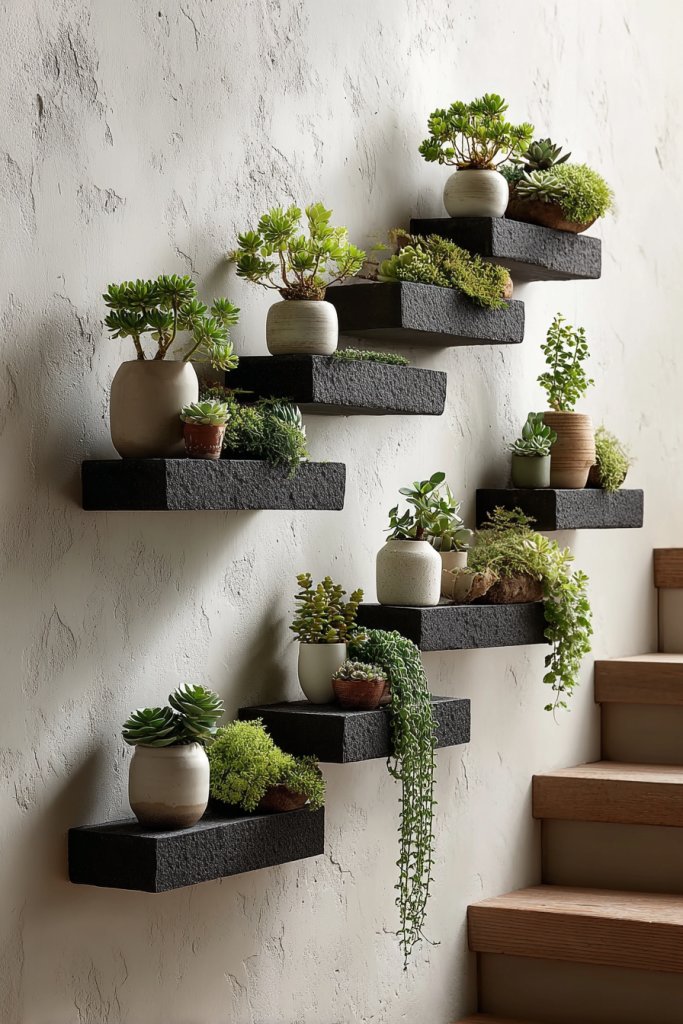
Your walls look empty and uninspiring, but you can’t afford to clutter your space with bulky furniture or large planters. You want a simple, stylish way to add greenery and depth to your small room or balcony. Floating plant shelves offer a sleek, minimal solution that creates a layered, lush effect with little effort.
Imagine a set of slim, sturdy shelves mounted on your wall, each holding small pots or containers filled with greenery. The plants cascade down from the shelves, creating a visual flow of textures and colors. The floating design makes the space feel open and airy, and the layered arrangement adds depth and interest. It’s like building a vertical garden that’s both functional and beautiful.
Select floating shelves in materials such as wood, metal, or acrylic to match your decor. Vary the length and spacing for a dynamic look, and choose containers in different shapes and colors for variety. For seasonal updates, swap out plants or change the arrangement. You can also add decorative elements like small sculptures or lights on the shelves.
Install the shelves securely on a sturdy wall using appropriate anchors or brackets. Place lightweight, well-draining pots or containers on each shelf. Fill with suitable plants—succulents, ferns, or herbs—that thrive in your light conditions. Water and fertilize as needed, and prune regularly to maintain the look. Keep the shelves dust-free and check their stability periodically.
Decorate the shelves with decorative stones, painted pots, or fairy lights to add personality. Label your plants with modern tags or small chalkboard signs. Rotate plants seasonally or introduce new varieties for freshness. Use contrasting colors or textures on the shelves to enhance visual appeal.
Floating plant shelves turn a blank wall into a vibrant, layered garden that elevates your decor. They’re easy to install and adapt, making your space more inviting and lively. Watching your plants grow in this vertical arrangement boosts your confidence as a gardener. It’s a simple, elegant way to bring nature indoors or onto a small balcony—ready to inspire!
21. Compact Water Features with Surrounding Greenery

Your small garden or balcony needs a focal point that radiates calm and tranquility. Large water features are impractical for tiny spaces, but a compact fountain or pond can provide soothing sound and visual appeal. Combining a water feature with surrounding greenery creates a peaceful oasis that fits even the tightest spots.
Picture a small, sleek fountain nestled among potted plants or a tiny pond with floating stones and aquatic plants. The gentle sound of flowing water relaxes your mind, while the greenery around it softens the hardscape. The reflective surface of water adds dimension and serenity, turning your small outdoor or indoor space into a calming retreat. The combination of water and plants creates a multi-sensory experience.
Choose from various styles—wall-mounted fountains, tabletop waterfalls, or miniature ponds—depending on your space and aesthetic. Surround water features with decorative gravel, stones, or low-maintenance plants like sedum or rushes. For seasonal interest, add decorative elements like lanterns or sculptures. Ensure proper filtration and waterproofing to keep your feature functional and clean.
Select a suitable location that can support the weight and requires minimal maintenance. Install the water feature securely, following manufacturer instructions or DIY guides. Fill with water, add any necessary pumps or filters, and decorate the surrounding area with plants or stones. Regularly clean and top up water to prevent algae buildup. Keep electrical components away from water splashes and ensure safety.
Enhance your water feature with lighting—solar or LED—for nighttime glow. Incorporate decorative elements like wind chimes, small statues, or aquatic plants for added interest. Use containers or planters around the feature to extend the greenery. Seasonal decorations or floating candles can add a special touch for festivals or cozy evenings.
A compact water feature elevates your small garden into a tranquil sanctuary. It’s a simple project that creates a big impact, helping you unwind after busy days. Watching water flow and plants thrive builds a sense of accomplishment. Even in limited space, you can enjoy a calming, beautiful environment—your personal retreat awaits!
22. String Lights and Tiny Garden Decor for Night Charm

Your small garden or balcony looks great during the day, but you want to extend its magic into the night. String lights and subtle decor can transform your outdoor space into a cozy, inviting retreat after sunset. It’s the finishing touch that adds warmth, ambiance, and a touch of whimsy.
Picture delicate string lights draped across your patio or balcony, casting a soft glow over plants, furniture, and decorative accents. Tiny lanterns or fairy lights twinkle among your greenery, creating a starry, magical atmosphere. The ambient lighting invites you to linger outside, relax with a book, or enjoy intimate gatherings. The gentle radiance turns your small outdoor space into a nighttime haven.
Choose from warm white, cool white, or colorful string lights to match your mood and decor style. Decorate with small hanging ornaments, paper lanterns, or solar-powered candles for added charm. Use clips, hooks, or tension wires for easy installation and removal. For seasonal flair, incorporate themed decor like autumn leaves or holiday ornaments.
Securely install your string lights along walls, railings, or pergolas, ensuring electrical safety. Use outdoor-rated extension cords and timers for convenience. Add decorative elements like paper lanterns or mini flags to personalize the space. Keep some extra bulbs or replacement parts handy. Test the setup at night to ensure even, safe lighting.
Create a themed ambiance with colorful or vintage-style decor. Incorporate small, decorative lanterns or LED candles for a flickering glow. Use outdoor fabrics or cushions with vibrant patterns to add comfort and style. Rotate your decor seasonally, adding pumpkins, flowers, or holiday accents for variety.
String lights and small decor turn your outdoor area into a magical escape after dark. They’re simple to install and instantly elevate the mood. Creating this cozy atmosphere boosts your confidence in decorating and entertaining outdoors. Your small space can shine bright with just a little light and imagination—time to light it up!
23. Multi-Use Garden Carts for Mobility and Storage
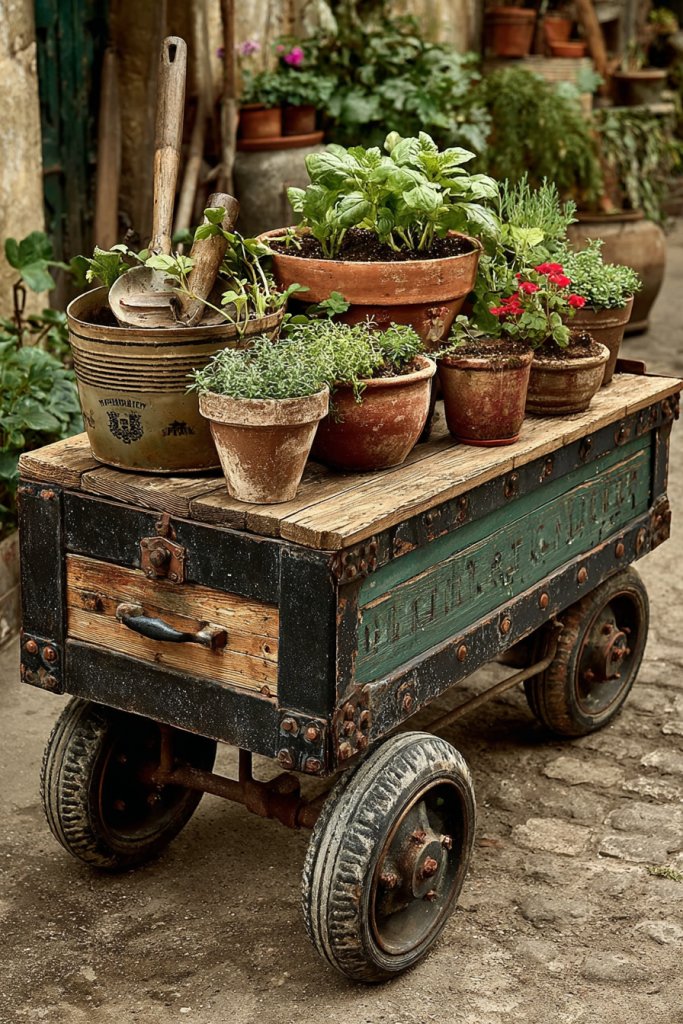
Managing a small garden or balcony often means juggling tools, pots, and supplies. You need a versatile solution that combines storage, mobility, and workspace. Multi-use garden carts fit the bill perfectly, offering a mobile hub for your gardening needs. They’re ideal for small spaces where efficiency is key.
Envision a sturdy, wheeled cart filled with gardening tools, potted plants, and supplies. The cart’s surface doubles as a workbench, making planting or potting easy and comfortable. Its compact size allows you to move it effortlessly around your space, whether you’re watering, pruning, or harvesting. The design blends practicality with style, often featuring shelves, drawers, or hooks for extra organization. It’s your mobile gardening assistant, always ready to roll.
Choose materials like weatherproof wood, plastic, or metal depending on your aesthetic. Customize with storage compartments, removable trays, or foldable parts for compact storage when not in use. Use bright colors or natural finishes to match your outdoor decor. For seasonal tasks, attach additional accessories like watering cans or small pots. Adapt the size to fit your space and collection.
Start with selecting a durable, wheeled cart that suits your needs. Organize your tools and supplies within compartments or baskets. Use the top surface for potting, transplanting, or organizing harvesting. Move the cart easily to different areas of your garden or balcony as needed. Regularly clean and restock to keep it ready for your next gardening session. Lock the wheels when stationary for stability.
Decorate the cart with stickers, paint, or labels to reflect your style. Add hooks or hanging baskets for extra storage. Incorporate small decorative elements like plant stakes or themed accessories. Use weather-resistant materials to extend longevity. Rotate tools and supplies seasonally to keep everything organized and fresh.
A multi-use garden cart makes gardening more manageable and enjoyable, especially in small spots. It encourages you to stay organized and active. Watching your garden thrive with the help of your mobile helper boosts confidence and pride. It’s a practical, stylish addition that turns small spaces into efficient green zones—ready for action!
24. Indoor-Outdoor Hybrid Gardens with Folding Doors
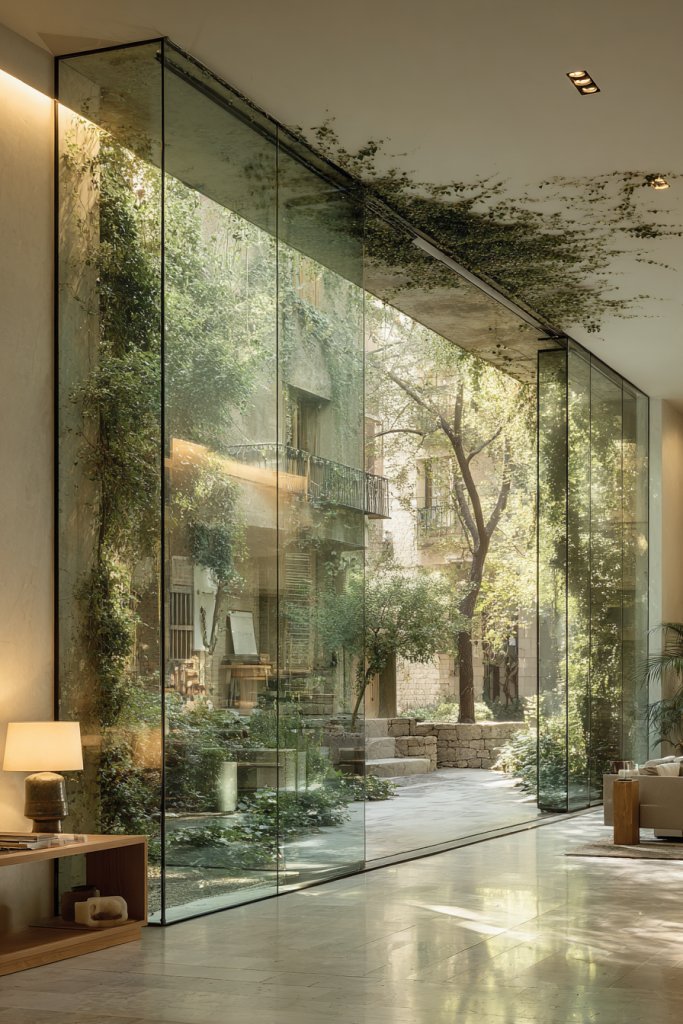
You love your indoor plants but crave a seamless connection to your outdoor space. Limited by doors or windows that feel disconnected, your garden could use a more integrated design. Folding doors that open wide to your patio or balcony create a hybrid garden experience, blending indoor comfort with outdoor freshness. It’s a game-changer for small homes.
Imagine a set of sleek, large folding glass doors that slide open to reveal a lush, green outdoor terrace. When closed, they keep your indoor environment cozy and protected. When opened, the boundary between inside and outside disappears, flooding your living space with natural light and fresh air. You can enjoy your plants from both inside and out, creating a unified, inviting environment. It’s like living in a garden-themed dream.
Choose from different frame materials—aluminum, wood, or PVC—to match your aesthetic. Add custom window treatments, such as curtains or blinds, for privacy and style. Incorporate built-in planters or hanging gardens around the opening for a lush, integrated look. For seasonal adjustments, use screens or shutters that open or close as needed. Personalize with decorative hardware or trims.
Work with professionals or DIY to install the folding doors securely, ensuring proper sealing and insulation. Design your garden layout to include containers, vertical gardens, or small trees that can be easily accessed from both sides. Use weather-resistant containers and plants suited for indoor or shaded outdoor conditions. Regularly water and maintain your plants, and keep the glass clean for maximum clarity. Consider adding a retractable awning or shade for comfort.
Decorate the outdoor side with decorative stones, fairy lights, or outdoor furniture to create a cozy patio. Inside, add textiles, artwork, or rugs that complement the garden view. Label your plants and incorporate seasonal decorations to keep the space lively. Use smart home tech or automated watering systems for convenience.
Indoor-outdoor hybrid gardens with folding doors make your small home feel spacious and connected to nature. They boost your confidence in creating stylish, functional living spaces. The joy of having a garden that flows seamlessly from indoors encourages daily care and appreciation. It’s a modern, elegant solution that transforms your living environment into a year-round green sanctuary—your personal oasis.
25. Minimalist Plant Arrangements with Monochrome Pots
Overcrowded plant displays can feel chaotic, especially in small spaces. You want a sleek, modern look that emphasizes simplicity and elegance. Minimalist arrangements with monochrome pots help you achieve a clutter-free, sophisticated vibe that lets your plants shine without overwhelming your decor. It’s a subtle way to elevate your small garden.
Picture a series of uniform, matte black or white pots arranged in a clean, geometric pattern. Inside, a carefully curated selection of small plants—succulents, ferns, or air plants—are positioned with precision. The monochrome palette creates a calming, cohesive look, highlighting textures and forms rather than colors. The overall effect is modern, understated, and effortlessly chic, perfect for contemporary interiors or balconies.
Choose pots in a single color for a monochrome look, or mix shades within the same tone for subtle variation. Use different sizes and shapes for visual interest, but keep the overall palette consistent. Incorporate sculptural or architectural plants to add form and structure. For seasonal updates, swap out plants or add decorative stones and moss to refresh the look. Keep your arrangement simple and balanced.
Start by selecting a collection of monochrome pots that fit your space and style. Arrange them on shelves, tables, or directly on the floor in a grid or linear pattern. Fill each pot with low-maintenance plants suited for your environment—succulents, cacti, or small foliage. Water and fertilize as needed, and prune regularly to maintain a tidy appearance. Use consistent potting soil and avoid cluttering with unnecessary decorative items.
Add visual interest with textured pots, matte or glossy finishes, or subtle decorative accents. Label your plants with sleek tags or paint markers for a modern touch. Incorporate small decorative stones, sand, or moss for added depth. Rotate plants seasonally or introduce new arrangements to keep your space fresh and engaging.
Minimalist, monochrome plant arrangements offer a calm, elegant aesthetic that’s easy to maintain. They help you develop a refined eye for design and balance. As your collection grows, you’ll gain confidence in curating stylish, cohesive displays. Your small space will feel polished and modern—ready to impress anyone who visits.
Conclusion
Exploring these diverse small garden ideas showcases how creativity can turn even the tiniest spaces into stunning green retreats. From vertical gardens to cozy corner setups, there’s a solution for every urban dweller eager to embrace gardening. Don’t hesitate—start experimenting with these ideas today and transform your outdoor space into a personal paradise that delights and relaxes. Your green oasis awaits!