Ever dreamed of maximizing your living space while keeping it cozy and stylish? Tiny studio apartments have gained immense popularity, offering a perfect blend of affordability, convenience, and charm. Their compact size encourages creative solutions that make every square inch count, transforming small areas into functional and inviting homes.
In this article, you’ll discover a variety of clever layout ideas designed to optimize your tiny space. From versatile furniture arrangements to innovative storage solutions, these ideas will inspire you to rethink your studio and make it uniquely yours. Get ready to turn limited space into a comfortable haven with these inspiring tips and tricks!
1. Multi-Functional Murphy Bed with Under-Bed Storage
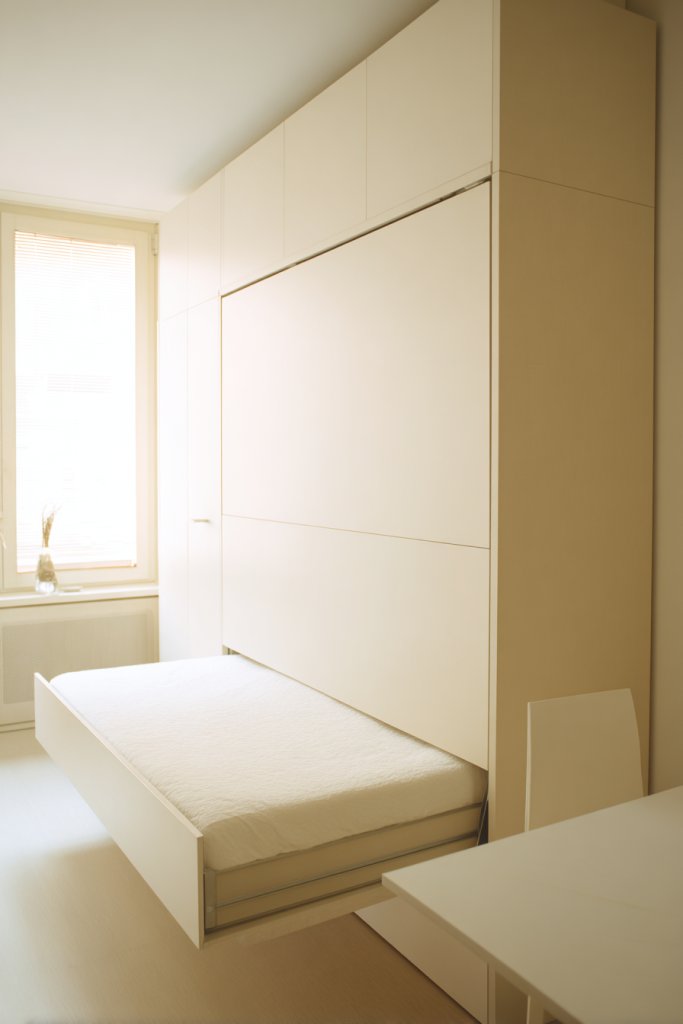
Living in a tiny studio often feels like you’re playing Tetris with your furniture. The need for a good night’s sleep while keeping the space functional is a constant challenge. A Murphy bed offers a smart solution, transforming your room from a cozy bedroom into a living area in seconds. It’s perfect for those who want to maximize every inch without sacrificing comfort.
Imagine a sleek wall-mounted bed that folds up seamlessly during the day, revealing a clean, open floor. Beneath it, built-in drawers or shelves hide essentials like extra bedding or seasonal clothing. The room feels uncluttered, with a soft fabric headboard adding a touch of warmth. When folded up, the space looks airy, bright, and ready for lounging or working.
Choose a Murphy bed with a stylish frame to match your decor, from rustic wood to glossy modern finishes. Opt for neutral tones to blend into minimalist themes or bold colors for a statement piece. For seasonal variation, add a decorative throw or a textured headboard cover. If you prefer a more industrial vibe, go for metal frames with exposed hardware.
Start by measuring your wall and selecting a Murphy bed that fits your space. Look for models with sturdy hinges and reliable locking mechanisms. Install a wall mount with proper anchors, ensuring it can support the weight. Use pre-drilled kits for easier assembly, and consider hiring a professional if you’re not comfortable with DIY. Add under-bed storage drawers or baskets for extra organization.
Personalize your Murphy bed with decorative textiles, like a soft throw blanket or a custom headboard cover. Incorporate LED strip lighting around the frame for ambient illumination. Use decorative storage boxes or baskets beneath for quick access to essentials. Add a foldable or adjustable reading pillow for extra comfort when the bed is in use.
This setup proves you don’t need a mansion to live stylishly and practically. With a Murphy bed, your tiny space becomes an oasis of comfort and efficiency. Ready to transform your room into a versatile retreat?
2. Compact Kitchen Island as a Dining and Prep Station
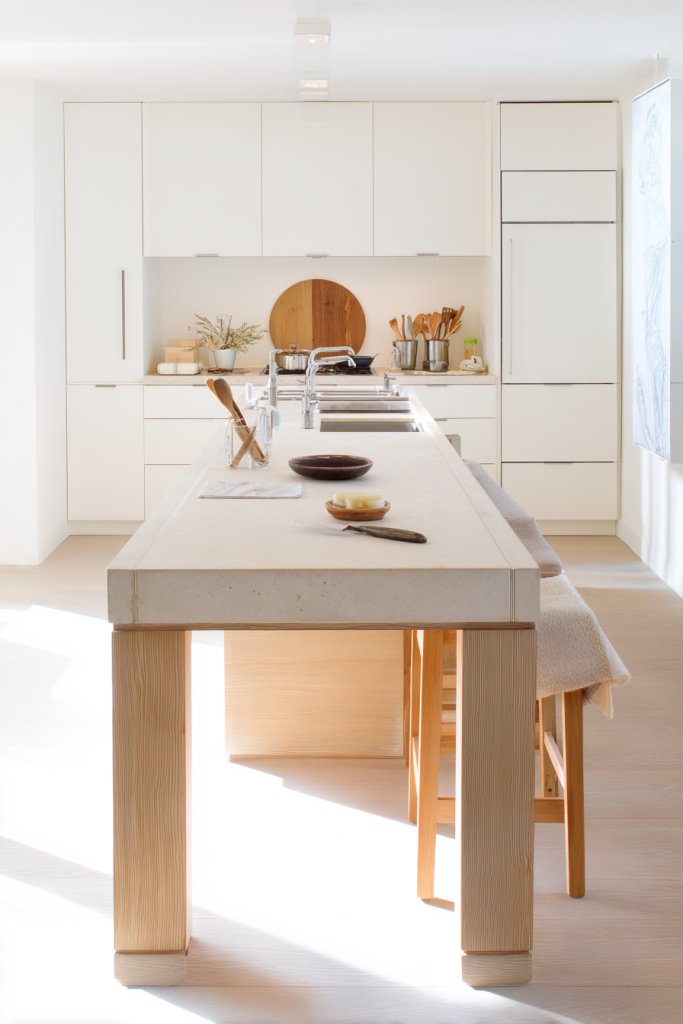
Cooking in a small studio often feels like a constant juggling act—where to prep, where to eat, and how to store everything. A compact kitchen island can turn a tight space into a functional culinary hub. It’s like adding a mini countertop extension that doubles as a dining table and workspace.
Picture a sleek, movable island with a smooth surface that invites meal prep and casual dining. Picture also a couple of bar stools tucked neatly underneath, saving space when not in use. The island can feature open shelves or drawers for utensils and ingredients, keeping everything handy yet out of sight. When you need more room, just roll it aside or fold a section down.
Choose a lightweight, multi-purpose island in a bright color or natural wood finish to add warmth or vibrancy. For small spaces, opt for a fold-out extension that can be tucked away when not needed. You can also pick models with built-in storage or wheels for easy rearrangement. During holidays or special occasions, swap out the top for a decorative tray or textured textile for a cozy vibe.
Select a compact, sturdy piece with casters for mobility. Measure your available space carefully to find a size that complements your layout without overcrowding. Consider materials like butcher block, laminate, or stainless steel for durability. Assembling usually involves attaching legs and optional shelves—most come with detailed instructions. Position it where it allows smooth flow between cooking, prep, and dining zones.
Add colorful or patterned placemats or cloth napkins for a welcoming touch. Incorporate a foldable or extendable feature to adapt to different needs. Use stylish storage containers or baskets to organize utensils or dry goods. You could also add a small tray for condiments or utensils, elevating the functional aesthetic.
A multi-functional kitchen island boosts your confidence in cooking and entertaining, even in tight quarters. It creates a cozy, inviting atmosphere where meal prep feels less like a chore and more like a gathering. Who says small spaces can’t be big on style?
3. Vertical Shelving Walls for Organization and Decor
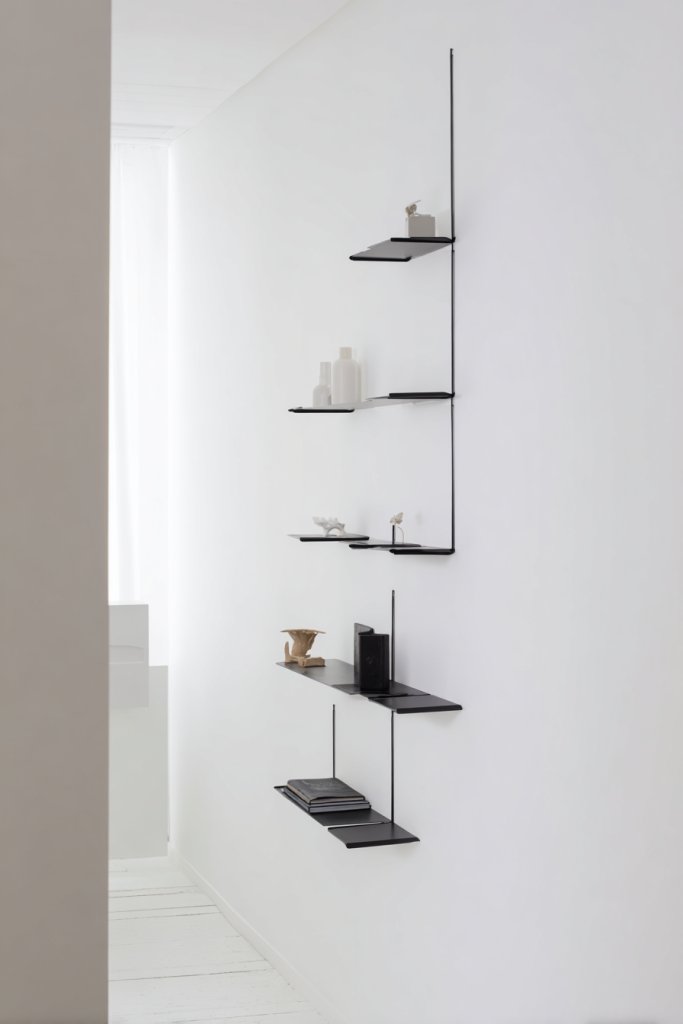
Clutter in tiny spaces is like that persistent fly—annoying and hard to ignore. Finding a place for everything without sacrificing style can seem impossible. Vertical shelving walls offer a brilliant solution to keep belongings organized while adding a touch of visual interest.
Imagine tall, open shelves climbing up your wall from floor to ceiling, filled with neatly arranged baskets, books, or decorative storage boxes. The shelves create a dynamic backdrop, with textures like reclaimed wood or painted finishes adding personality. Small decorative objects or minimalistic baskets break the monotony, making the space inviting.
Opt for modular shelving units that can be customized to fit your space and style. Use contrasting colors or materials to create visual contrast and interest. Incorporate hidden compartments or baskets for quick access to everyday essentials. For seasonal updates, swap out decorative items or add textiles like woven baskets for a cozy touch.
Start by measuring your wall height and width, then select shelves that fit proportionally. Mount sturdy brackets securely into wall studs, or use anchors if studs are not accessible. Use level tools to ensure perfect alignment. Organize your belongings into baskets or containers, stacking or grouping similar items for easy access. Consider adding a few hooks underneath for keys or accessories.
Paint the back of your shelves in a bold color to create a statement. Incorporate decorative boxes or fabric-lined baskets for a refined look. Use labels or tags for quick identification of stored items. You might also add small LED lights underneath or beside shelves to highlight your favorite objects.
Vertical shelves turn clutter chaos into curated displays, elevating your space’s style quotient. They prove that organization can be both functional and beautiful. Ready to create your own vertical oasis?
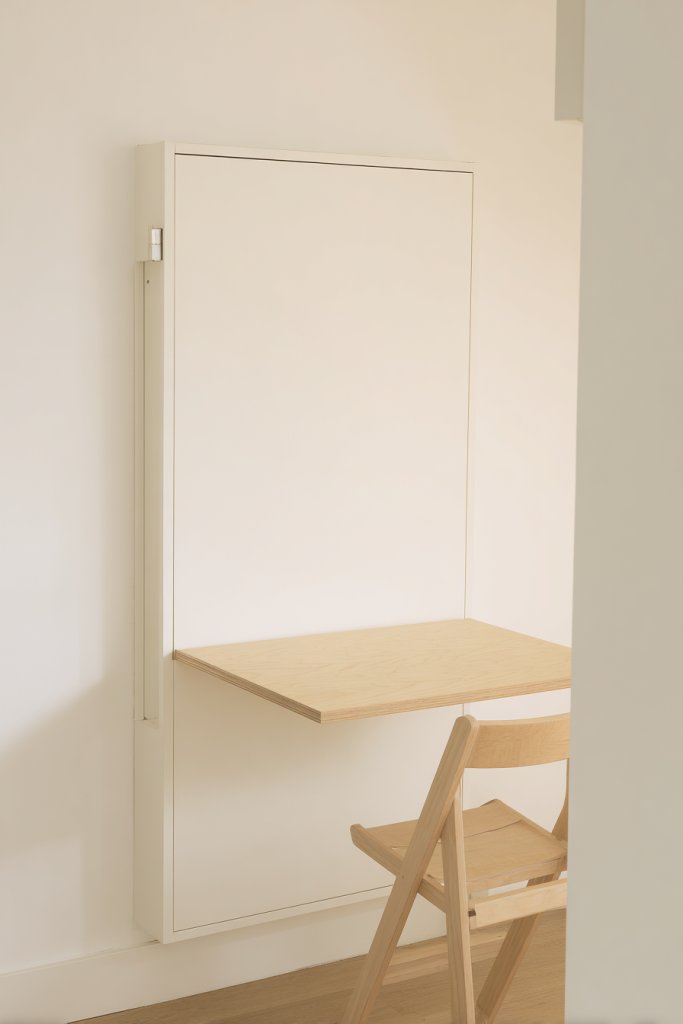
4. Fold-Out Desk Hidden Behind a Wall Panel
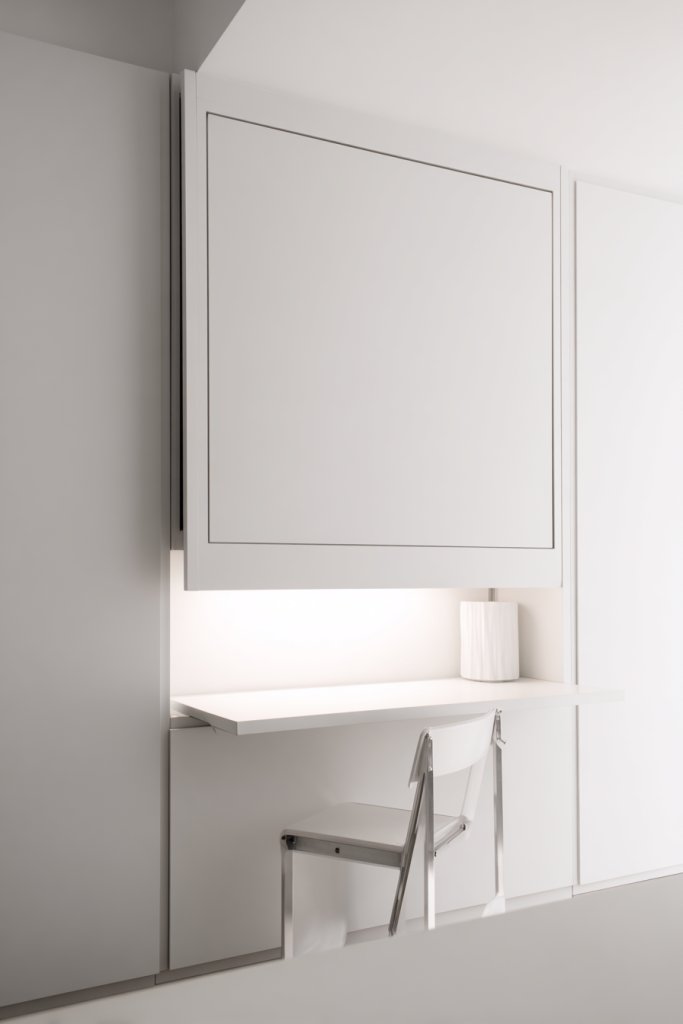
Working or studying from a tiny studio often feels like trying to fit a square peg into a round hole. Cluttered surfaces and lack of dedicated workspace hinder productivity. A fold-out desk hidden behind a wall panel offers a sleek, space-saving solution that keeps your space tidy and functional.
Envision a smooth wall panel that seamlessly flips down to reveal a sturdy, compact desk surface. When not in use, it folds back flush against the wall, hiding away your workspace. It’s a minimalist design, with clean lines and perhaps a small foldable chair tucked underneath. The setup maintains the room’s uncluttered aesthetic and allows quick transformation.
Choose a wall panel in a color or finish that complements your decor—painted, wood veneer, or laminated. For a more modern look, incorporate magnetic or pegboard features on the inside of the panel to hold small tools or accessories. During different seasons or projects, update the desktop surface with a decorative mat or textured cover for personality.
Start by selecting a sturdy wall with enough clearance for the folded-down desk. Use a quality hinge system designed for frequent use. Mount the panel securely into wall studs, aligning the mechanism carefully. Attach a foldable or collapsible chair that can stow away underneath or beside the panel. Consider adding a small shelf or pocket for supplies.
Opt for a colorful or textured wall panel to add visual interest. Add a small magnetic or corkboard surface within the panel for notes or inspiration. Incorporate a decorative cover or trim that matches your overall decor theme. You can also paint or stencil a pattern on the panel for extra flair.
This hidden workspace proves that functionality and aesthetics can coexist beautifully. It allows you to work efficiently without sacrificing space or style. Perfect for freelancers, students, or anyone who values a clutter-free environment.
5. Corner Sofa with Built-In Storage
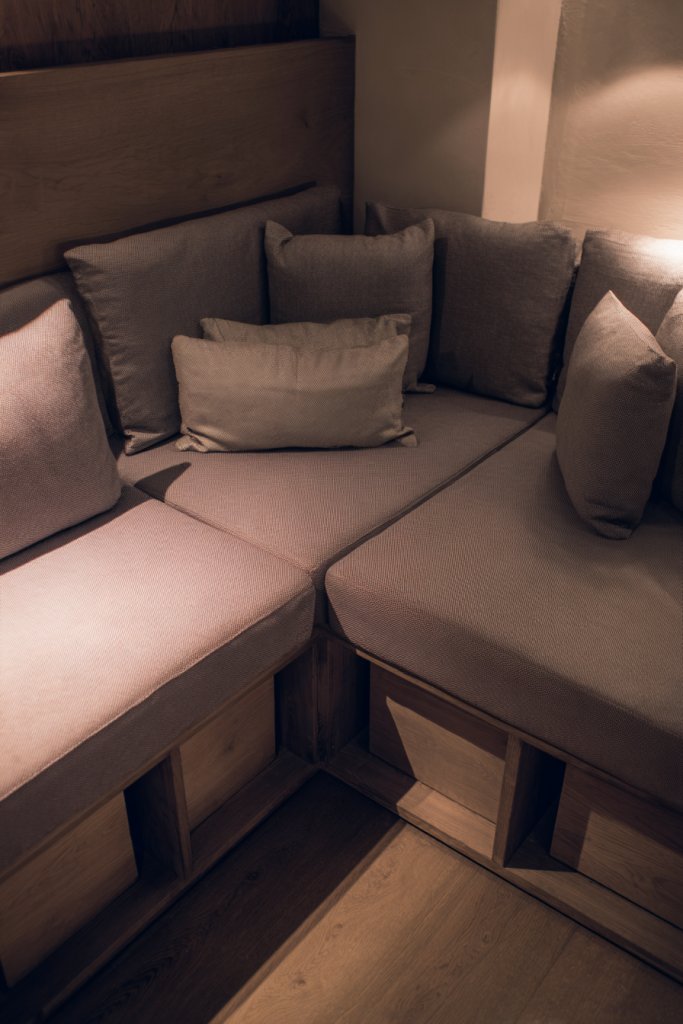
A cozy corner sofa sounds perfect until you realize it often eats up precious space with bulky cushions and fabric. But what if your sofa could do double duty—providing comfort and hidden storage? This clever piece turns an awkward corner into a functional feature.
Imagine an L-shaped sofa snugly fitting into your corner, with the cushions lifting to reveal spacious compartments underneath. You might see blankets, books, or even seasonal clothing neatly stored out of sight. The upholstery could be a soft, textured fabric, with decorative pillows adding personality. The sleek design makes the space inviting without feeling cramped.
Select a modular sofa with removable cushions and accessible storage drawers. For a modern look, choose a low-profile design in neutral tones, adding colorful throws or pillows for accents. In smaller spaces, opt for a slim profile with built-in storage that doesn’t overwhelm the room. For a cozy vibe, incorporate plush textures or patterned upholstery.
Measure your corner space carefully to choose a size that fits comfortably. Look for sofas with lift-up cushions or hidden compartments built into the base. Assemble according to instructions, ensuring the storage access points are secure. Use soft-close hinges or mechanisms to prevent slamming. Layer with a small rug or textured throw for added comfort and style.
Decorate the sofa with a variety of textured cushions, excluding artwork or vases, to create visual interest. Incorporate a mix of fabrics like velvet, linen, or boucle for a tactile feel. Add a small, stylish side table or a foldable tray for drinks and snacks. Personal touches like a cozy blanket can make the space feel even more inviting.
This multifunctional sofa makes tiny living feel spacious and inviting. It’s proof that smart design turns limited space into maximum comfort. Ready to relax and organize in style?
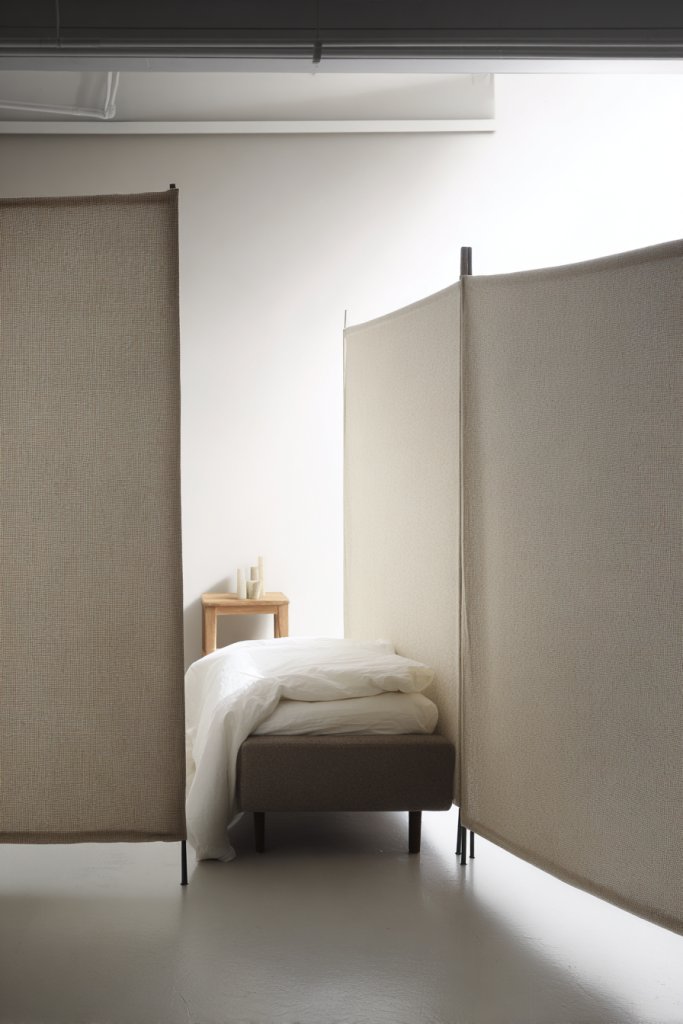
6. Partition Screens to Define Zones
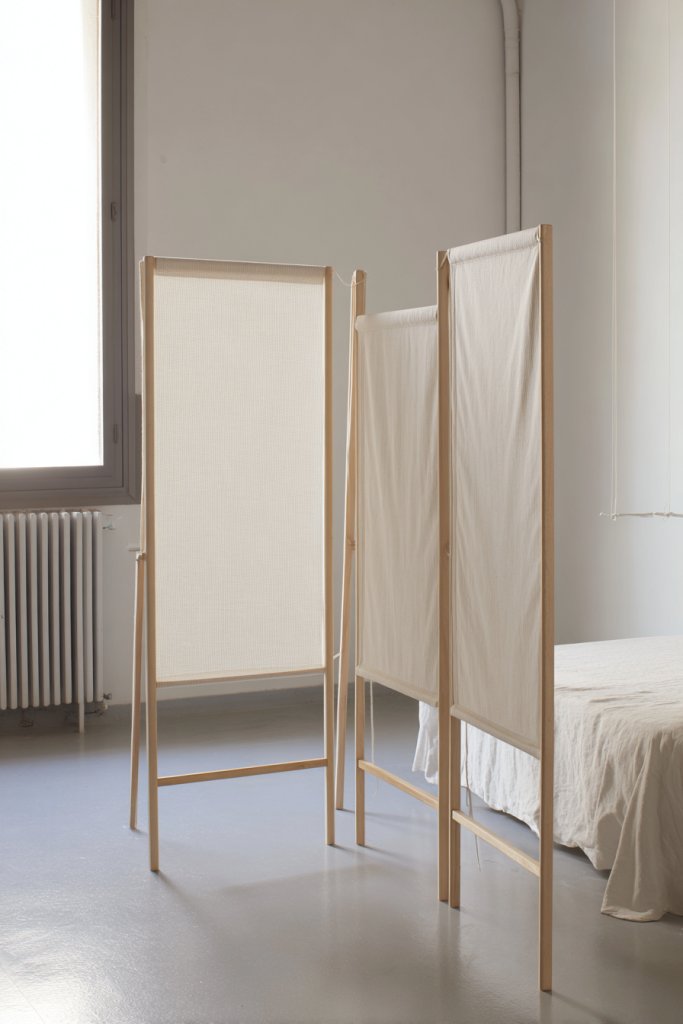
Living in a studio means sharing your space with multiple functions—sleeping, working, relaxing—often all in one. Without walls, it’s easy to feel like your space is spilling over. Partition screens offer a flexible way to create distinct zones without sacrificing openness or natural light.
Visualize lightweight, foldable screens that can be moved or stacked according to your needs. They might feature woven textures, fabric panels, or sleek metal frames. When set up, they form a cozy boundary around your sleeping area or workspace. When not needed, they fold away, maintaining the room’s airy feel.
Choose screens with patterns, neutral tones, or metallic accents to match your decor. Use a combination of different heights or materials for visual interest. For a more permanent look, incorporate shelves or hooks into the screens for extra storage. Seasonal textiles or decorative throws can be added for a fresh look.
Select lightweight, foldable screens that are easy to move. Position them strategically to block sight lines or create privacy. Secure them with minimal hardware or simply lean against walls for flexibility. Consider stacking or layering screens for larger zones or more privacy. Regularly rearrange to refresh your space’s vibe.
Add textured fabrics or colorful patterns to personalize your screens. Incorporate small hooks or pockets for organizing accessories or essentials. Use decorative trims or fringe to elevate their look. Consider adding LED strip lights along the edges for a soft glow when in use.
Partition screens show that you don’t need walls to design a functional, beautiful space. They give you control over your environment, making tiny living both practical and stylish. Ready to redefine your space?
7. Lofted Bed with a Cozy Lounge underneath
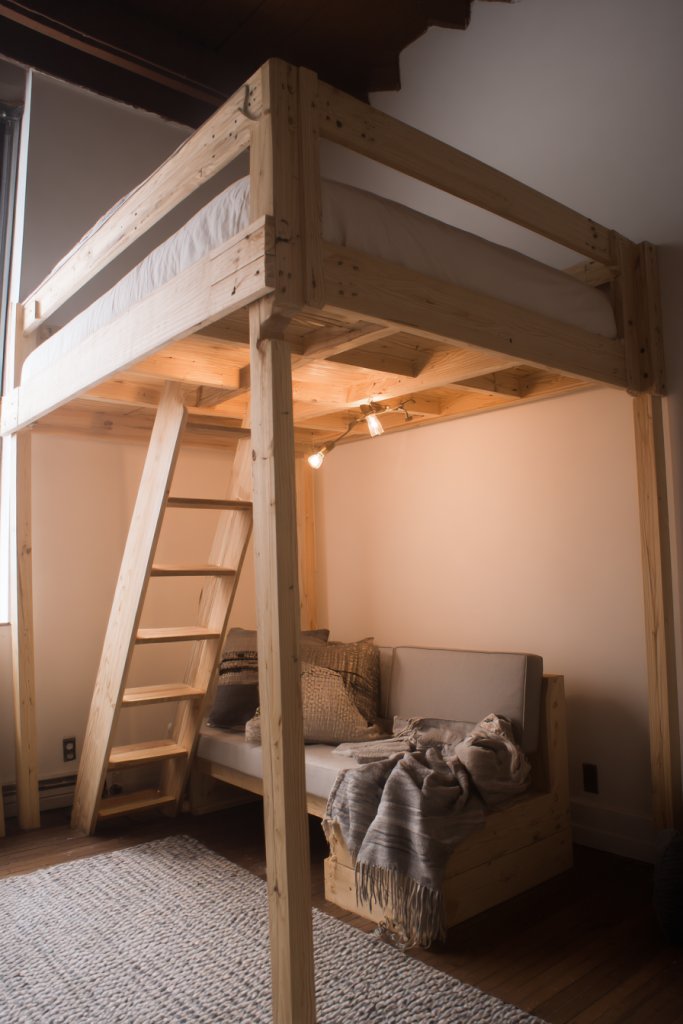
Sleeping in a tiny studio means sacrificing living space, making it tough to have both a bed and a lounge area. A lofted bed solves this dilemma by elevating your sleeping zone, freeing up space below for relaxation or work. It’s the ultimate space-saver for small dwellings.
Picture a sturdy wooden or metal loft bed with a simple railing to ensure safety. Beneath it, you create a cozy lounge with a comfy chair or a small sofa, complemented by textured cushions or throws. The elevated bed leaves room for a small desk or wardrobe underneath, maximizing vertical space. Soft lighting and rugs add warmth and intimacy.
Choose a minimalist design in neutral tones for a clean look, or go bold with vibrant paint or wallpaper for a playful vibe. Use a foldable or compact seating option beneath, like bean bags or poufs, for added flexibility. During different seasons, swap textiles and add textured throws to change the ambiance.
Measure your ceiling height and select a loft bed that fits comfortably with clearance for movement. Securely anchor the bed into wall studs, ensuring stability. Decide what to place underneath—be it a lounging area or workspace—and arrange accordingly. Use soft rugs or textured mats to define the space and add comfort. Incorporate lighting fixtures to create ambiance.
Decorate the lounge area with plush cushions, textured throws, or a small side table. Incorporate multi-use furniture like a fold-out bed or storage ottoman. Use curtains or fabric panels around the loft for added privacy or aesthetic appeal. Personal touches like fairy lights or decorative pillows enhance the cozy vibe.
A lofted bed turns vertical space into a multi-purpose zone, proving that small doesn’t mean limited. It creates a stylish, cozy retreat where you can relax or work without feeling cramped. Your tiny space just got a whole lot cooler.
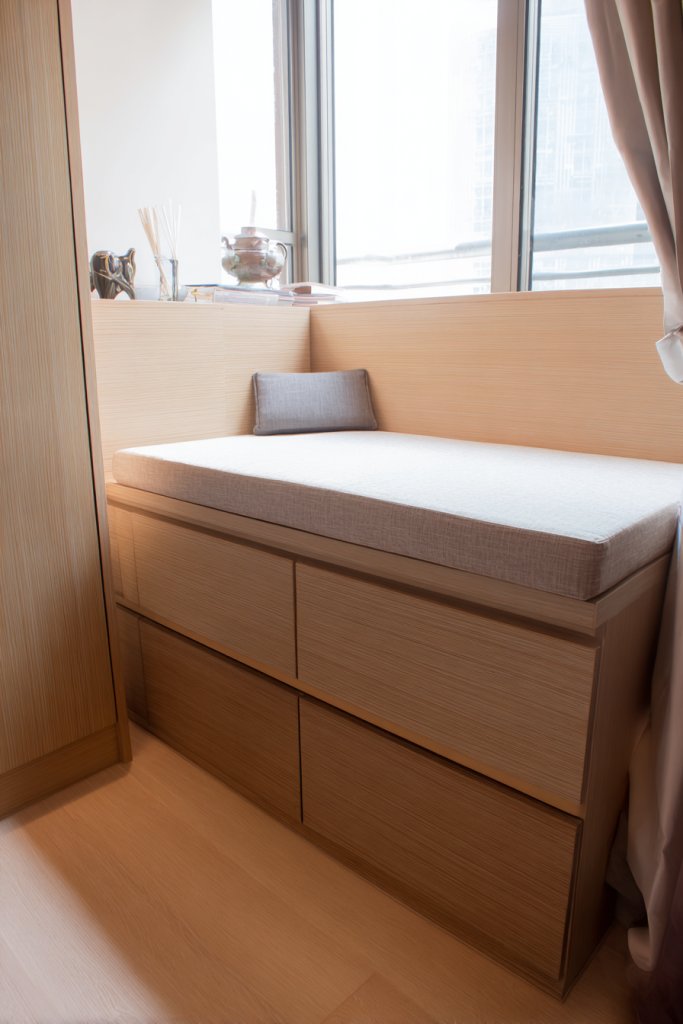
8. Under-Window Window Seat with Storage
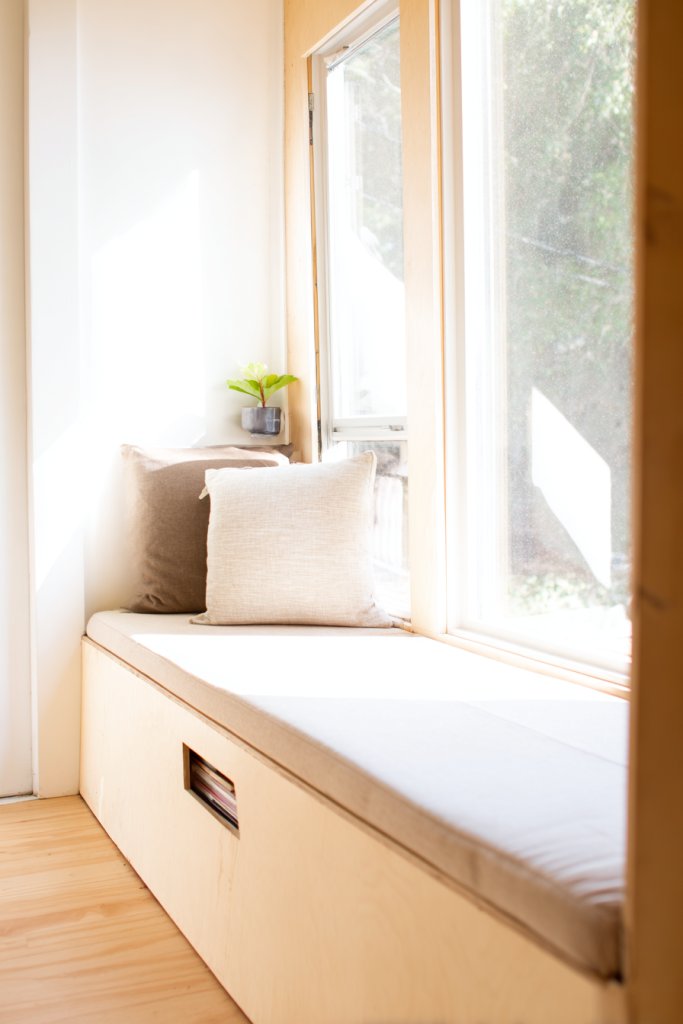
Windows are often overlooked in small apartments, yet they hold potential for so much more than just sunlight. An under-window seat creates a perfect nook for relaxing and makes excellent use of space that’s usually wasted. It’s a cozy spot and extra storage rolled into one.
Imagine a cushioned bench that fits snugly beneath your window, topped with a plush cushion and textured throw. Beneath, built-in drawers or baskets hide away seasonal gear or books. The window seat becomes a focal point, inviting you to curl up with a good book or enjoy your morning coffee. Natural light floods the area, making it feel inviting and bright.
Choose a seat with a simple wooden or upholstered frame, matching your decor style. For a more layered look, add textured cushions, throws, or a soft fabric cover. Incorporate hidden compartments or baskets for extra storage, and paint or wallpaper the wall behind to add personality. During holidays, swap textiles or add decorative elements like string lights for ambiance.
Measure your window width and depth to select a seat that fits perfectly. Build or buy a bench with integrated storage drawers or baskets. Secure the seat to the wall or floor if stability is a concern. Finish with a comfortable cushion in a durable, easy-to-clean fabric. Use the space underneath for lightweight storage solutions.
Decorate with textured fabrics, colorful cushions, or seasonal textiles to match your style. Add small decorative touches like a soft throw or a decorative pillow. Incorporate a small side table or tray for drinks or snacks. Personalize further with a framed quote or your favorite artwork on the wall.
A window seat turns a plain window into a beautiful retreat, proving that tiny details make a big difference. It’s a practical, beautiful way to enhance your space and create a personal sanctuary. Ready to cozy up?
9. Floating Nightstands and Shelves for Minimal Clutter
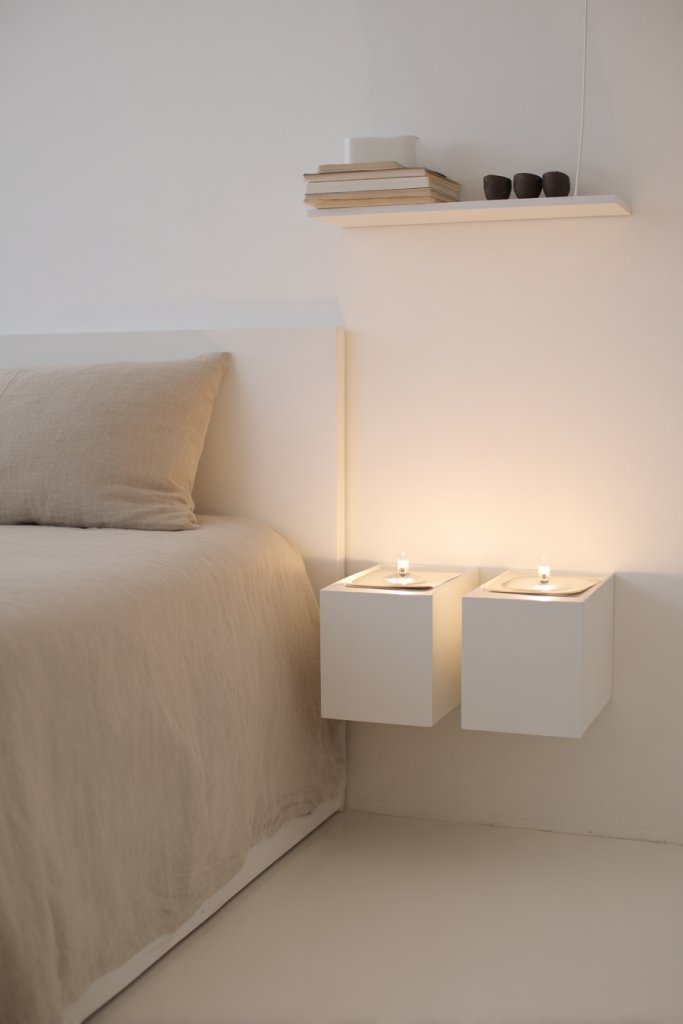
Nightstands and shelves often crowd the bedside area, especially in small rooms. They clutter surfaces and make the space feel cramped. Floating furniture offers a sleek, modern solution that keeps essentials accessible without sacrificing style or space.
Picture a slim, wall-mounted nightstand with a textured surface, floating just beside your bed. It holds a small decorative box or a minimal lamp, keeping your space clean and open. Above, a set of open shelves displays books, candles, or decorative objects, all floating in perfect harmony. The overall effect is a neat, uncluttered vibe.
Choose floating units in materials that match your decor—wood, metal, or acrylic. Use a variety of sizes to add visual interest, placing essentials within easy reach. Incorporate hidden LED strip lighting underneath for a soft glow. Seasonal textiles or decorative trays can be added for change and personalization.
Identify wall studs or use wall anchors suitable for your wall type. Secure the floating units at a height that’s ergonomic for your needs. Keep weight limits in mind when placing items. Mount shelves above or beside the nightstand for additional storage. Use cable clips or covers to hide wires for a clean look.
Decorate with textured fabrics, like a soft throw blanket or a plush fabric cover for the shelves. Add small decorative objects or storage baskets to organize clutter. Use smart lighting solutions for ambiance. Personal touches like a favorite book or a decorative box can make it uniquely yours.
Floating furniture proves that less is more, especially when it’s beautifully designed. It keeps your space feeling open, organized, and stylish. Who knew minimal could be so impactful?
10. Open-Plan Kitchen and Living Area with Clear Pathways
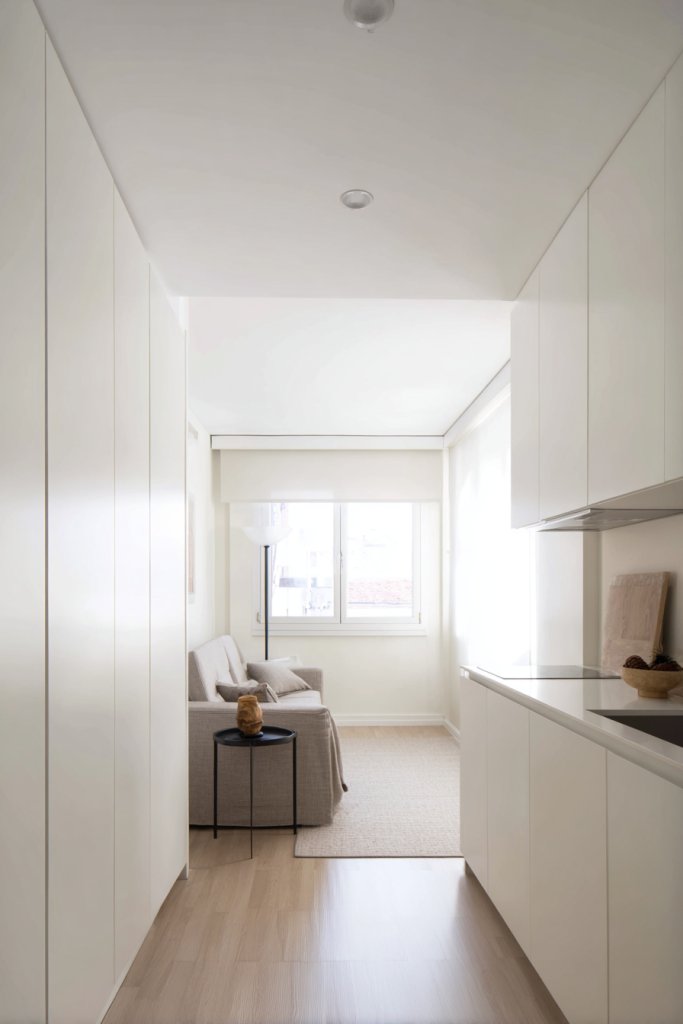
In tiny apartments, the kitchen and living space often blend into one chaotic zone. Without proper planning, it can feel cluttered and overwhelming. An open-plan layout with clear pathways creates a sense of flow, making your small space feel bigger and more inviting.
Visualize a seamless space where the kitchen counters flow into a cozy seating area. Use rugs or textured flooring to subtly define zones without walls, maintaining openness. Keep pathways clear of furniture or clutter, allowing smooth movement. The arrangement encourages socializing and easy living, with everything within reach.
Use different textures or subtle color shifts to differentiate zones. For example, a soft rug under the seating area and a sleek countertop in the kitchen. Keep furniture low-profile or multi-purpose to avoid blocking sightlines. During the seasons, swap textiles or add decorative elements to refresh the space.
Identify a layout that promotes flow and accessibility. Arrange furniture to create clear pathways, avoiding blocking doorways or windows. Use multifunctional pieces like a fold-out dining table or a compact sofa. Keep surfaces clutter-free and designate specific zones for cooking, dining, and relaxing. Consistent color schemes unify the space.
Decorate with textured cushions, throws, or artwork that complements the overall palette. Incorporate a variety of lighting options—ambient, task, and accent—to highlight zones. Use open shelving or hooks for easy access to everyday items. Personal touches like a favorite quote or a unique centerpiece add character.
An open-plan layout shows that even small spaces can be functional and stylish. It encourages a lifestyle of easy flow and social interaction. Your cozy studio can feel expansive and welcoming—just plan smartly.
11. Vertical Storage with Overhead Cabinets
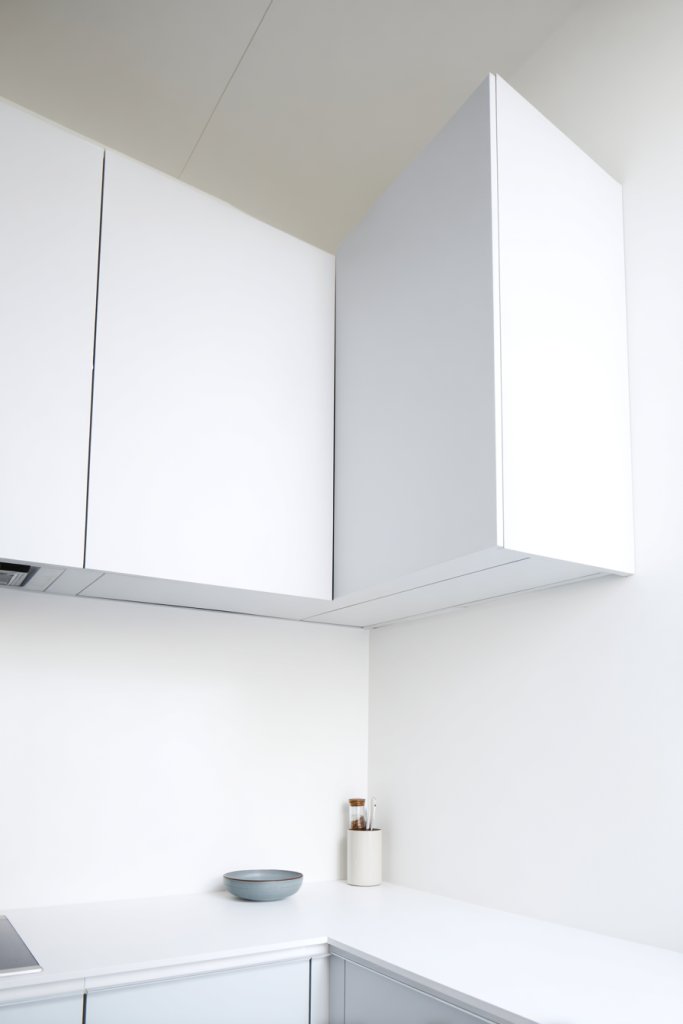
Cluttered counters and overflowing shelves make tiny kitchens and studios feel chaotic. Vertical storage, especially overhead cabinets, taps into unused space above head height. This approach declutters the lower areas and keeps essentials within easy reach. It’s a clever way to add storage without sacrificing style.
Picture sleek, high-mounted cabinets that reach the ceiling, painted in a light color to reflect light and make the room feel taller. The cabinets hide away dishes, dry goods, or cleaning supplies, keeping counters clear. Below, a minimalist countertop with a few well-chosen accessories keeps the space looking fresh. The overall look is streamlined, organized, and airy.
Choose cabinets with glass doors or open shelving for display, or opt for solid doors for a clean look. Use bright or reflective finishes to add depth and bounce light around. Incorporate built-in lighting inside the cabinets for visibility. For seasonal updates, switch out hardware or paint the cabinet doors for a fresh look.
Measure your wall space carefully and select overhead cabinets that fit comfortably without crowding windows or ceilings. Secure cabinets into wall studs, ensuring they can handle the weight of stored items. Use a level for perfect alignment. For easy access, consider installing pull-down or soft-close mechanisms. Keep frequently used items on lower shelves for convenience.
Add decorative hardware or paint the cabinet doors in bold colors to personalize your storage. Incorporate under-cabinet lighting or LED strips for extra brightness. Use labeled containers or baskets inside for organization. Seasonal updates, like new hardware or color accents, keep the look fresh.
Vertical storage shows that smart design can make tiny kitchens feel spacious and organized. It maximizes every inch of your vertical wall, making clutter a thing of the past. Your space will feel both functional and stylish—proof that small can be mighty.
12. Compact Dining Nook with Fold-Down Table
Dining in a tiny studio often turns into a game of Tetris—trying to fit a table and chairs without blocking pathways. A fold-down table creates a dedicated dining area that vanishes when not in use. It’s a space-saving game-changer for small living.
Imagine a wall-mounted, fold-down table in a sleek finish, with space-saving, stackable chairs stored nearby. When needed, unfold the table, and it becomes a cozy dining spot for two or four. When finished, simply fold it back up, revealing a clean wall with perhaps a piece of artwork or decorative panel. The design maintains an open, uncluttered feel.
Choose a table with a textured wood finish, a painted surface, or a sleek laminate to match your decor. Use foldable or stackable chairs in complementary colors or textures for flexibility. For seasonal or festive occasions, add decorative placemats or textiles to elevate the look.
Select a wall with enough clearance for the table to fold down comfortably. Mount the table securely into wall studs using heavy-duty brackets designed for load-bearing. Use a level to ensure the table is even. Store chairs nearby in a vertical or stacked arrangement to save space. Regularly check hardware for stability.
Decorate the table with textured table runners or placemats. Paint or stencil the wall behind to add character. Use coordinating chair cushions or covers to tie into your decor theme. Seasonal textiles or decorative objects can be added or swapped out easily.
A fold-down table proves that functional design can be elegant and space-efficient. It makes tiny dining spaces practical without sacrificing style. Who says small living can’t be both beautiful and functional?
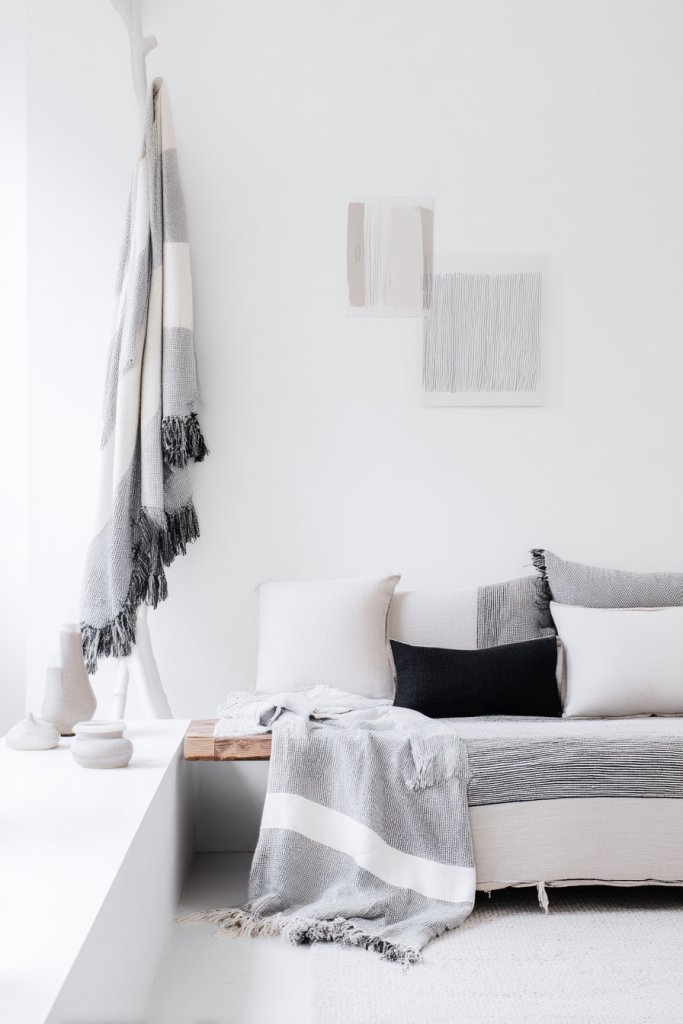
13. Minimalist Monochrome Color Scheme for Calmness
Color can be overwhelming in tiny spaces, making rooms feel smaller or chaotic. A minimalist monochrome palette offers a calming, cohesive look that visually expands your studio. It’s a simple trick to make your space feel serene and uncluttered.
Picture a room painted in shades of soft gray, beige, or white, with furniture and textiles in matching tones. The uniform color scheme creates a seamless flow, making furniture and architectural features blend harmoniously. Textures like linen, wool, and matte finishes add depth without visual clutter. The overall effect is tranquil, spacious, and stylish.
Opt for different shades within the same color family to add subtle contrast. Incorporate textures like soft rugs, woven throws, or matte finishes for visual interest. During seasons, layer textiles in similar hues or swap out accent pieces for slight variations. Keep accessories minimal—think sculptural lighting, geometric shapes, or simple decor.
Choose a base color and stick with it for walls, furniture, and textiles. Use different textures and matte or satin finishes to create visual layers. Incorporate multi-functional furniture in neutral tones to unify the space. Avoid clutter by limiting decorative items and keeping surfaces clear. Add subtle lighting to enhance the monochrome palette.
Introduce textured textiles like a soft cream throw blanket with chunky knit texture or a plush rug in the same palette. Use sculptural or geometric decor elements for visual interest. Keep accessories in similar muted tones for a cohesive look. Seasonal updates can include adding a pop of metallic or subtle color accents.
A monochrome scheme proves that less is more, especially in small spaces. It creates a peaceful environment perfect for relaxation and focus. Your tiny studio can feel bigger, brighter, and more inviting with just a simple color strategy.
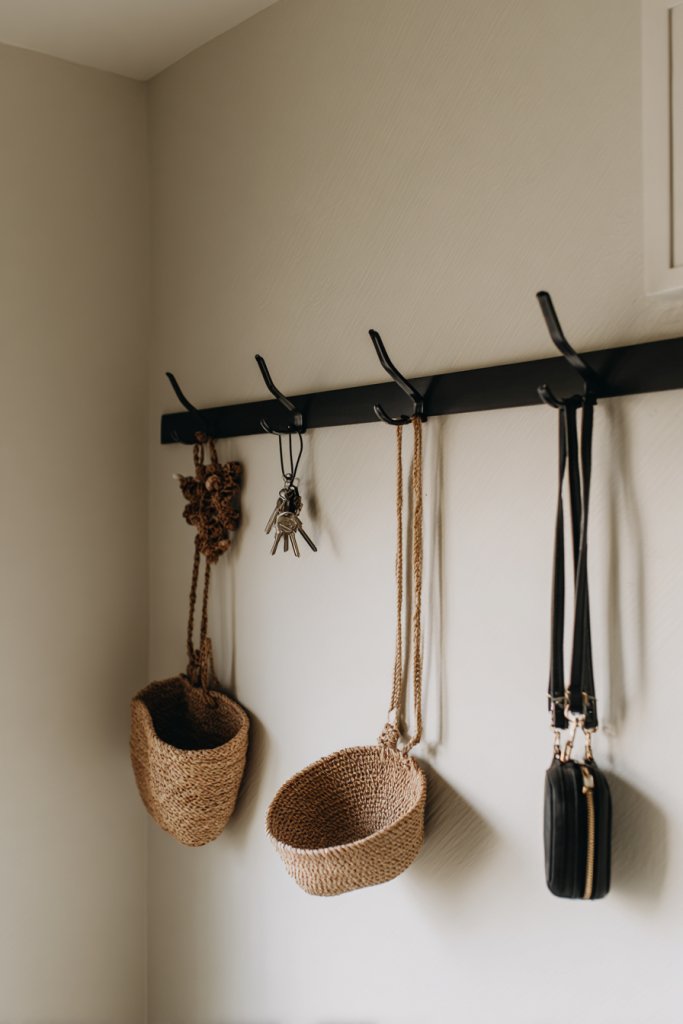
14. Hanging Baskets and Hooks for Accessories
Countertops and walls in small studios often get cluttered with everyday essentials. Hanging baskets and hooks offer a clever way to organize accessories, keys, or small items, freeing up surface space. It’s a simple trick to keep your space neat and accessible.
Imagine wall-mounted hooks holding your favorite accessories like scarves or bags, while woven baskets hang from ceiling hooks, storing items like chargers or snacks. The textured baskets add visual warmth and contrast against a clean wall. This setup makes everything easy to grab and puts clutter out of sight, creating a tidy, inviting environment.
Choose hooks and baskets in materials and colors that match your decor—metal, wood, or fabric. Use decorative hooks with unique shapes or finishes for a personalized touch. Arrange baskets at different heights for visual interest or functionality. Seasonal textiles or decorative trims can refresh the look.
Identify wall or ceiling points that can support hooks or baskets. Use appropriate anchors or nails to secure them firmly. Group similar items together for easy access and visual harmony. Regularly review and swap out textiles or contents to keep the system fresh. Keep frequently used items at eye level for convenience.
Decorate baskets with fabric liners or textured trims to match your decor. Personalize hooks with custom labels or painted finishes. Incorporate decorative elements like tassels or beads for a playful touch. Seasonal or themed textiles add variety and fun.
Using hanging baskets and hooks shows you can organize efficiently without bulky furniture. It’s a flexible, stylish way to keep essentials within arm’s reach. Your space will feel more open and uncluttered—ready for anything.
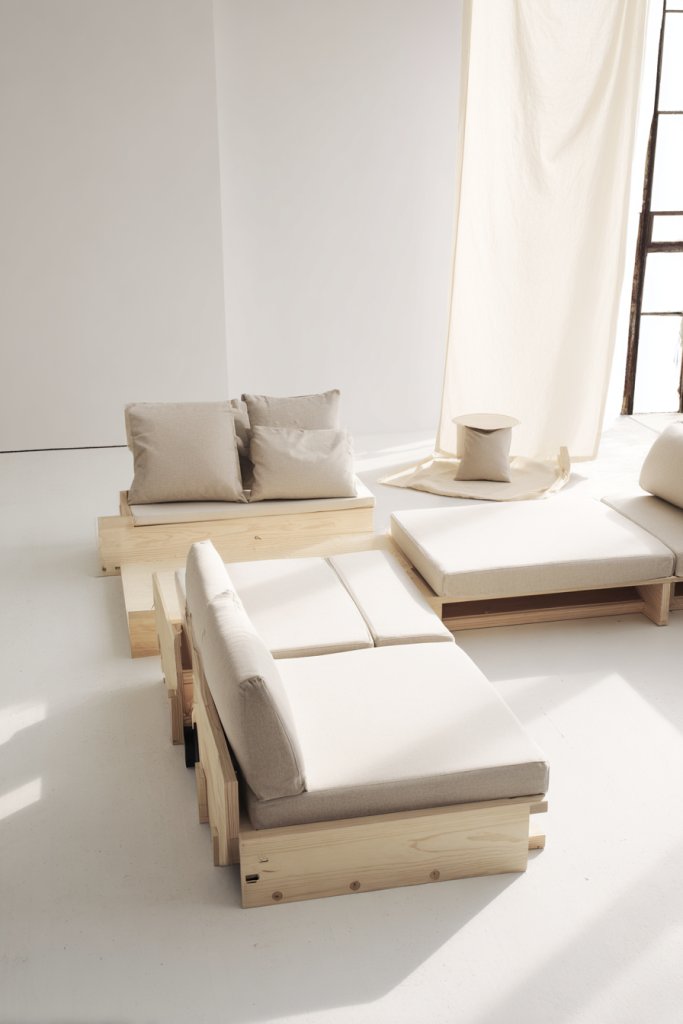
15. Modular Furniture Pieces for Flexibility
Tiny apartments demand furniture that can adapt to your changing needs. Modular pieces offer flexibility, allowing you to reconfigure your space for lounging, working, or sleeping. It’s like having multiple furniture options in one compact package.
Picture a sofa that can be separated into individual seats or combined into a sectional, depending on your mood. A coffee table that transforms into a dining surface or a bed that folds out from a wall unit. The modular design creates a dynamic space that evolves with your lifestyle. The textures and colors blend seamlessly, making it feel cohesive.
Choose neutral tones or bold colors for your modules, depending on your style. Use different textures—leather, fabric, or velvet—to add tactile interest. Incorporate hidden storage or fold-out features for added function. Seasonal or mood-based changes can be easily achieved by rearranging modules or swapping covers.
Select modular furniture that fits your space and lifestyle. Follow manufacturer assembly instructions, ensuring secure connections. Arrange modules in different configurations to suit your needs, from a cozy loveseat to a full sectional. Use multi-purpose pieces like ottomans with storage or fold-out beds. Maintain flexibility by choosing lightweight or easily movable units.
Add textiles like cushions or throws in your favorite colors or patterns for customization. Incorporate decorative accents like textured pillows or slipcovers. Experiment with different arrangements for seasons or special occasions. Use accessories like small rugs or curtains to define zones within the modular setup.
Modular furniture proves that versatility is key in tiny living. It adapts to your evolving needs and tastes, making your space feel larger and more personalized. Ready to create a flexible, stylish sanctuary?
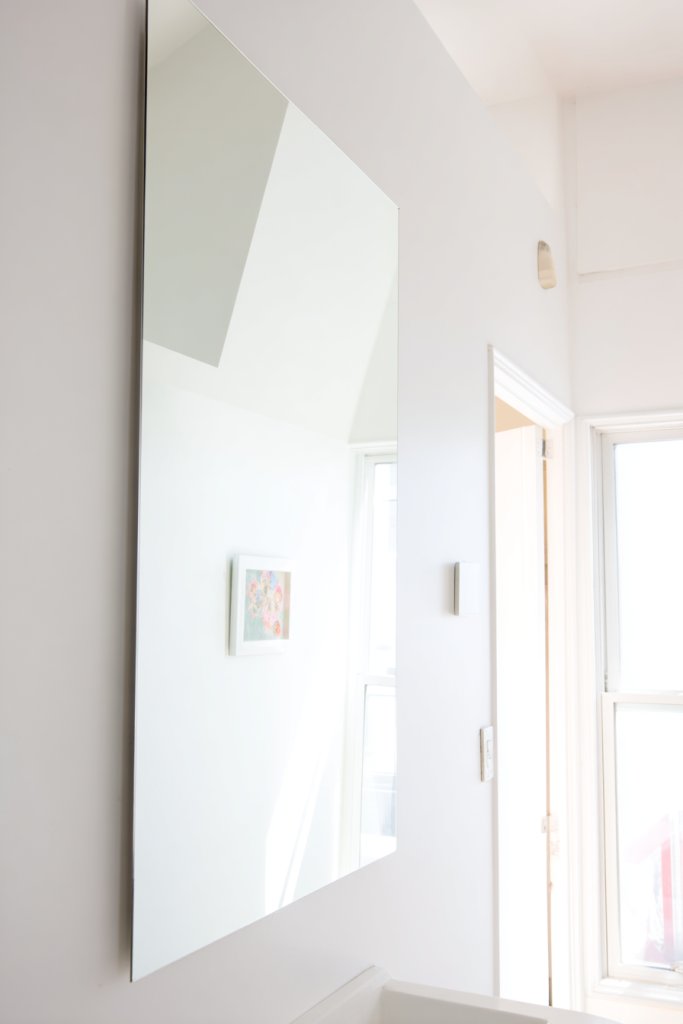
16. Use of Mirrors to Enhance Light and Space
Small rooms often feel dark and cramped, especially when natural light is limited. Mirrors can instantly brighten a space and create the illusion of depth. They’re an affordable, stylish way to make your tiny studio feel larger and more inviting.
Imagine a large, frameless mirror mounted on one wall, reflecting light from a nearby window. The mirror visually doubles the space, bouncing light into every corner. It complements your decor with sleek frames or decorative shapes, adding a touch of elegance. The effect is a brighter, more open environment that invites relaxation.
Choose mirrors with interesting shapes or textured frames to add personality. Position them strategically across from windows or light sources to maximize brightness. Use multiple smaller mirrors grouped together for a gallery wall effect. Seasonal updates could include decorative films or stained glass overlays.
Select a wall with enough clearance and secure the mirror with appropriate hooks or brackets. Ensure the mounting hardware can support the weight safely. Position the mirror to reflect natural or artificial light sources for maximum impact. Keep the mirror clean and free of smudges to maintain brightness. Consider tilting or angled mirrors for specific lighting effects.
Decorate the frame with painted designs or textured finishes. Use small decorative elements like LED backlights or fairy lights around the mirror’s edge. Incorporate decorative tapes or washi to add color or patterns. Personalize with a favorite quote or a decorative decal on the wall beside.
Using mirrors transforms your tiny space into a brighter, more expansive retreat. They prove that clever design can create big impacts. Ready to reflect your style?
17. Cozy Nook with a Compact Reading Corner
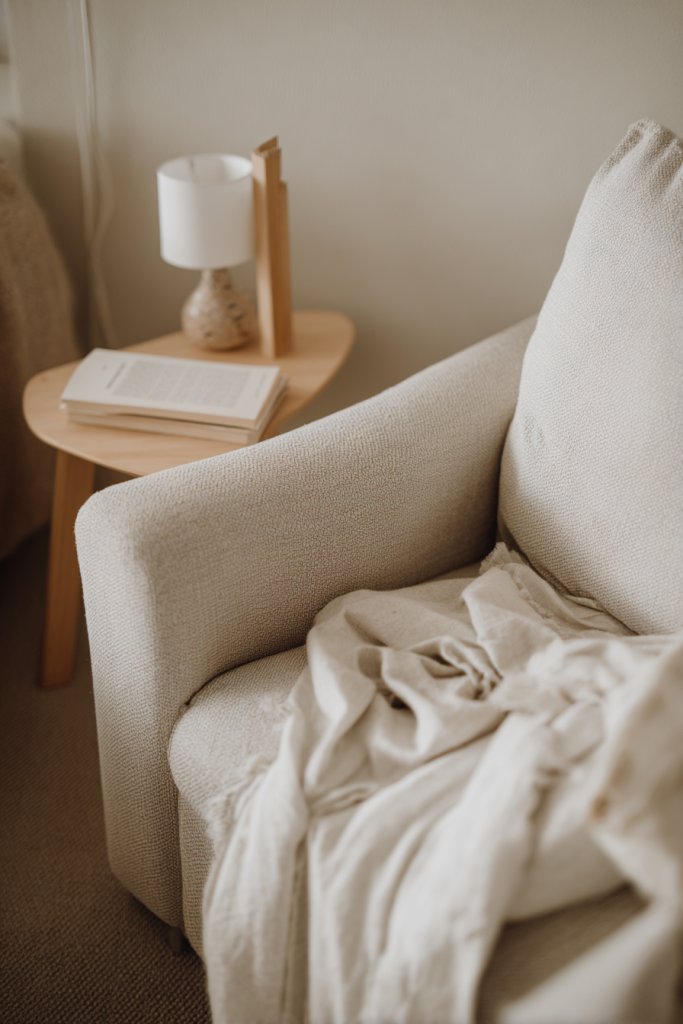
Every small space needs a personal retreat—a cozy nook where you can unwind and escape. Creating a dedicated reading corner transforms a corner of your studio into a relaxing sanctuary. It’s a simple way to add comfort and a touch of luxury.
Picture a plush armchair with textured cushions and a soft throw, nestled beside a window or in a quiet corner. A small side table holds your favorite book or a cup of tea. Soft lighting, like a wall sconce or a small lamp, casts a warm glow, making it inviting. The space feels intimate and restful, perfect for unwinding.
Choose a comfortable chair or a small loveseat in cozy fabrics like velvet or boucle. Layer with textured cushions or a chunky knit throw for added warmth. Incorporate a small, stylish side table for convenience. During different seasons, swap textiles or add decorative accents like a basket of magazines or a small sculpture.
Identify a quiet corner or underutilized space near natural light. Add a small armchair or a bench with cushions. Install a wall-mounted reading light or small lamp for focused illumination. Keep the area clutter-free, with a small shelf or basket for books or magazines. Use a textured rug or mat to define the space.
Decorate with textured textiles like a cozy blanket or decorative pillows. Personalize with favorite books, small artwork, or decorative objects. Add a small plant or scented candle for ambiance (avoiding restricted items). Seasonal updates with textiles or accessories keep it fresh.
A dedicated reading nook enriches your daily routine and elevates your space’s comfort. It’s proof that small areas can be both functional and luxurious. Ready to curl up?
18. Over-the-Door Storage Solutions
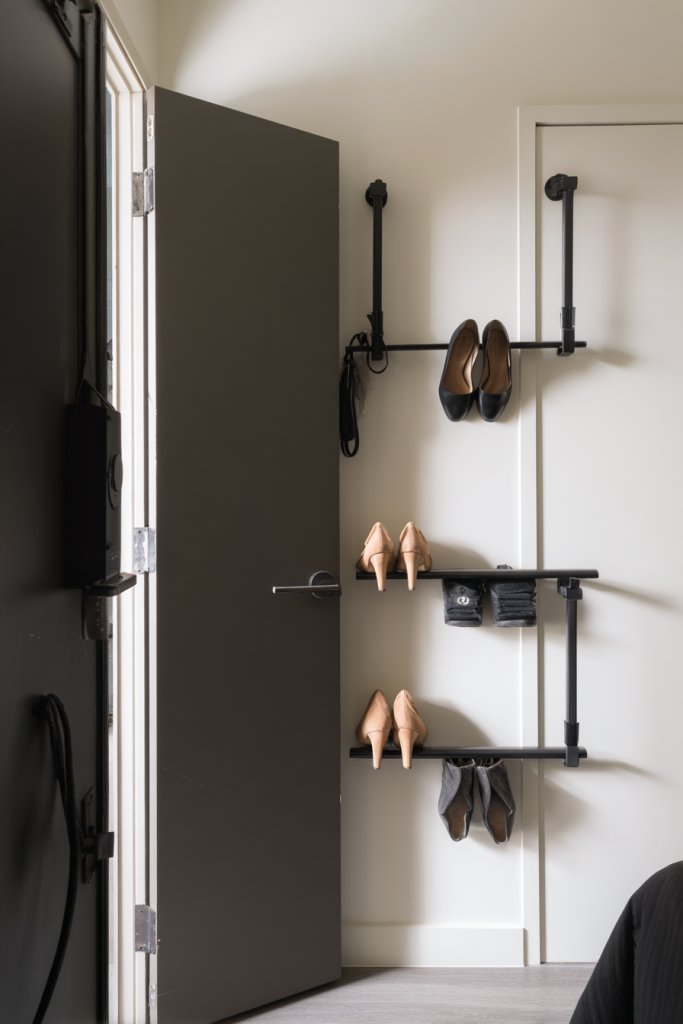
Doors in small apartments often go underutilized, wasting vertical space. Over-the-door storage solutions offer a practical way to organize shoes, accessories, or cleaning supplies without adding clutter. It’s a space-efficient hack every tiny home needs.
Imagine a sturdy over-the-door rack with hooks or pockets, neatly holding shoes, scarves, or small tools. The door doubles as extra storage, keeping your floor and closet area free. The design is sleek, with options in metal, fabric, or plastic to match your decor. It’s a hidden storage hero that’s always within reach.
Choose racks with adjustable hooks or multiple compartments to customize storage. Use fabric pockets for a softer look, or metal hooks for a more industrial vibe. For seasonal or holiday updates, swap out contents or add decorative textiles. Keep frequently used items at the front for easy access.
Select a door with enough clearance and mount your rack securely with hooks or adhesive strips. Distribute weight evenly to prevent damage. Organize items by category—shoes, accessories, cleaning supplies—for quick retrieval. Regularly declutter to maintain efficiency. Ensure the door can open and close smoothly.
Decorate fabric pockets with patterned textiles or labels for organization. Add decorative trims or paint the hooks for a personalized touch. Incorporate seasonal or themed textiles to match your decor. Keep contents lightweight to prevent damage or sagging.
Over-the-door storage proves that saving space can be simple and stylish. It’s an easy upgrade that keeps your tiny home organized and efficient. Who knew a door could do so much?
19. Minimalist Bed Frame with Storage Drawers
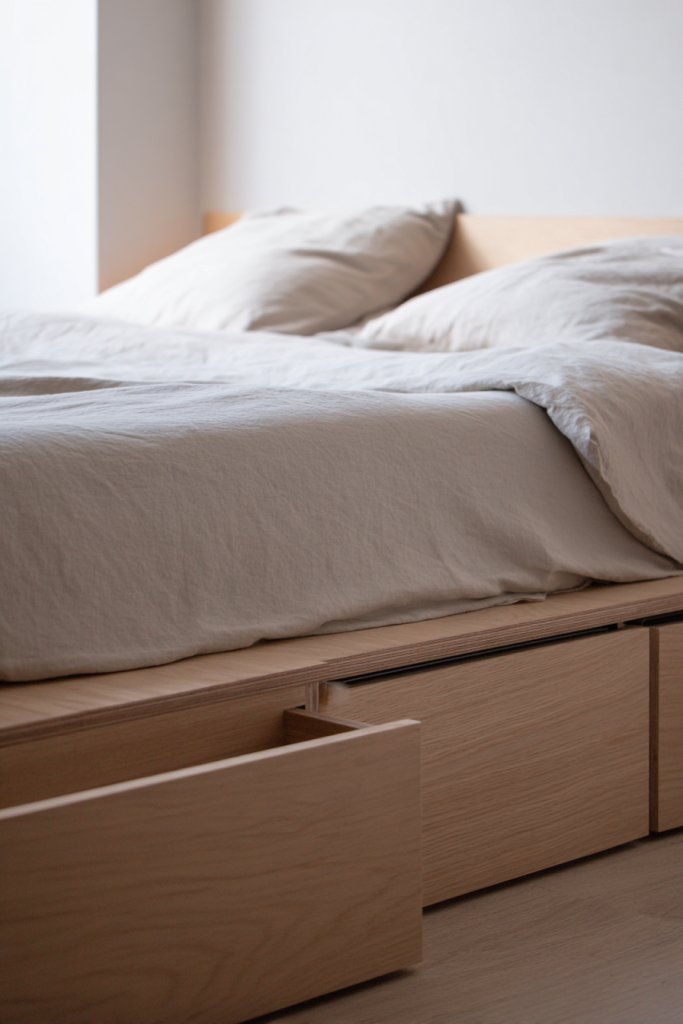
A cluttered bedroom can make your tiny studio feel chaotic and cramped. A minimalist bed frame with built-in storage drawers offers a sleek solution to hide clothes, linens, or other essentials. It’s a perfect blend of function and clean aesthetics.
Picture a low-profile bed frame in neutral tones, with spacious drawers underneath. When the bed is made, it looks like a simple, elegant piece of furniture. When drawers are pulled out, you reveal a hidden treasure trove of organization. The space feels uncluttered, serene, and effortlessly stylish.
Choose a frame with a simple, modern design in wood, metal, or upholstered fabric. Use textured bedding or a monochrome palette to enhance the minimalist vibe. For seasonal updates, swap out bedding or add decorative pillows in complementary textures. Keep accessories minimal to maintain the clean look.
Measure your space carefully and select a bed frame with adequate clearance for storage drawers. Assemble according to instructions, ensuring stability. Organize stored items in labeled boxes or baskets for easy access. Regularly declutter to prevent accumulation. Elevate the bed slightly to facilitate cleaning underneath.
Decorate with textured bedding, simple headboards, or minimalist accents. Add a small, stylish tray or a decorative pillow to personalize. Use seasonal textiles or colors to refresh the look. Keep the surrounding area tidy for maximum visual impact.
A minimalist bed frame with storage proves that simplicity can be highly functional. It transforms your space into a peaceful retreat, free from clutter. Small living doesn’t mean sacrificing style or utility.
20. Layered Lighting for Ambiance and Function
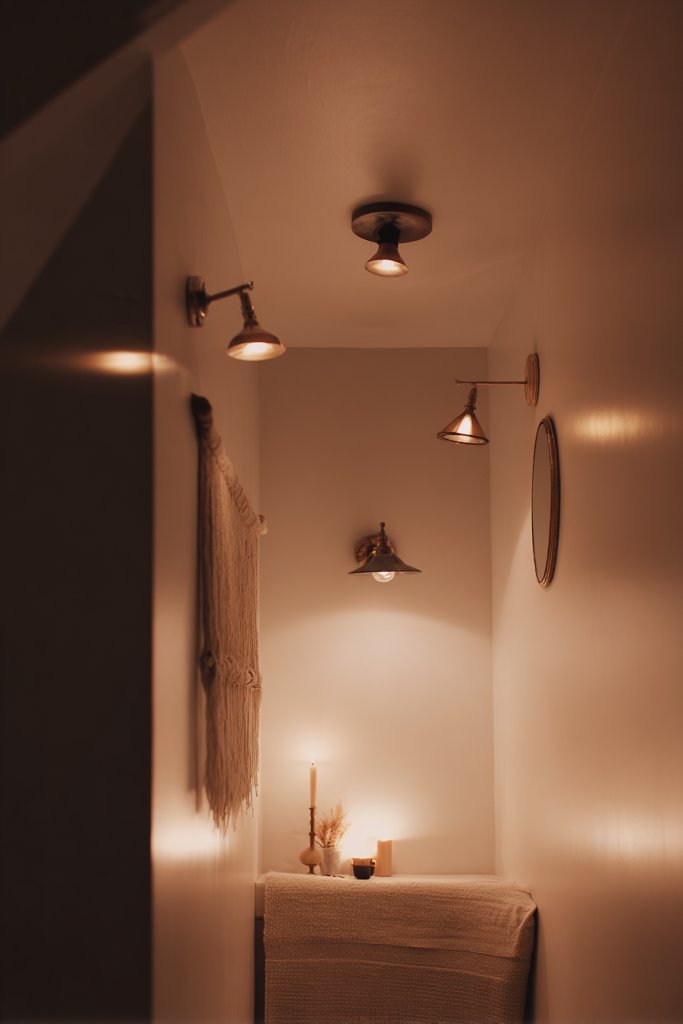
Lighting sets the mood in any space, but in tiny studios, a single overhead light often falls flat. Layered lighting combines different sources to create an adaptable, cozy atmosphere. It’s the key to making your small space feel warm, inviting, and functional.
Picture a mix of soft pendant lights, wall sconces, and table lamps—each serving a purpose. Pendant lights hang over a small dining nook, sconces highlight architectural features, and a table lamp provides task lighting. The combination creates depth, warmth, and versatility, making the space feel layered and intentional. The light’s glow bounces off textured walls and surfaces, adding coziness.
Choose fixtures in finishes that match your decor—matte black, brushed brass, or matte white. Use dimmable bulbs to control brightness, especially during evening hours. For seasonal changes, swap out shades or add decorative bulbs. Incorporate smart lighting options for remote control or automation.
Plan your lighting layers by identifying functional zones—sleep, work, dining—and assign specific fixtures. Install fixtures securely with appropriate wiring and switches. Use multiple outlets to accommodate various lamps and sconces. Adjust the placement to avoid glare and shadows, enhancing comfort and usability. Regularly clean fixtures for maximum brightness.
Decorate lampshades with textures or patterns that match your decor. Use string lights or fairy lights for a soft, whimsical glow. Incorporate colored bulbs or smart lighting for mood settings. Personal touches like vintage or handcrafted fixtures add character.
Layered lighting proves that small spaces can be both functional and atmospheric. It creates a welcoming environment perfect for relaxing or entertaining. Your tiny studio can glow with personality and warmth.
21. Portable Room Dividers for Flexibility
Tiny studios crave flexibility—sometimes you want an open feel, other times privacy. Portable room dividers offer a quick, stylish way to switch between open and segmented layouts. They’re perfect for adapting your space for work, sleep, or entertaining.
Imagine lightweight, foldable screens or rolling panels that can be moved easily. They feature fabrics, wood slats, or modern acrylic designs, adding visual interest. When set up, they create a cozy, private nook; when folded away, the space opens up for socializing or multitasking. The design is sleek, unobtrusive, and highly functional.
Choose a style that complements your decor—minimalist, boho, industrial—and materials like fabric, wood, or metal. Use different heights or panel configurations for visual rhythm. During seasonal shifts, swap out fabrics or add decorative trims. Keep the panels clean and in good condition for longevity.
Select lightweight, foldable, or rolling panels that fit your space and aesthetic. Set up on smooth floors or attach wheels for easy mobility. Position panels to create zones or block direct sightlines. Use hooks or clips to secure panels temporarily or permanently. Regularly rearrange for variety and freshness.
Decorate panels with textiles, tapestries, or textured finishes, avoiding artwork or vases. Incorporate decorative trims or patterns to match your style. Use LED strip lights along edges or behind panels for a subtle glow. Personalize with seasonal textiles or themed motifs.
Portable dividers show that your space can be both flexible and stylish, adapting to your needs. They make tiny living dynamic and customizable, proving that small doesn’t mean static. Ready to switch things up?
22. Small-Scale Plants in Compact Containers
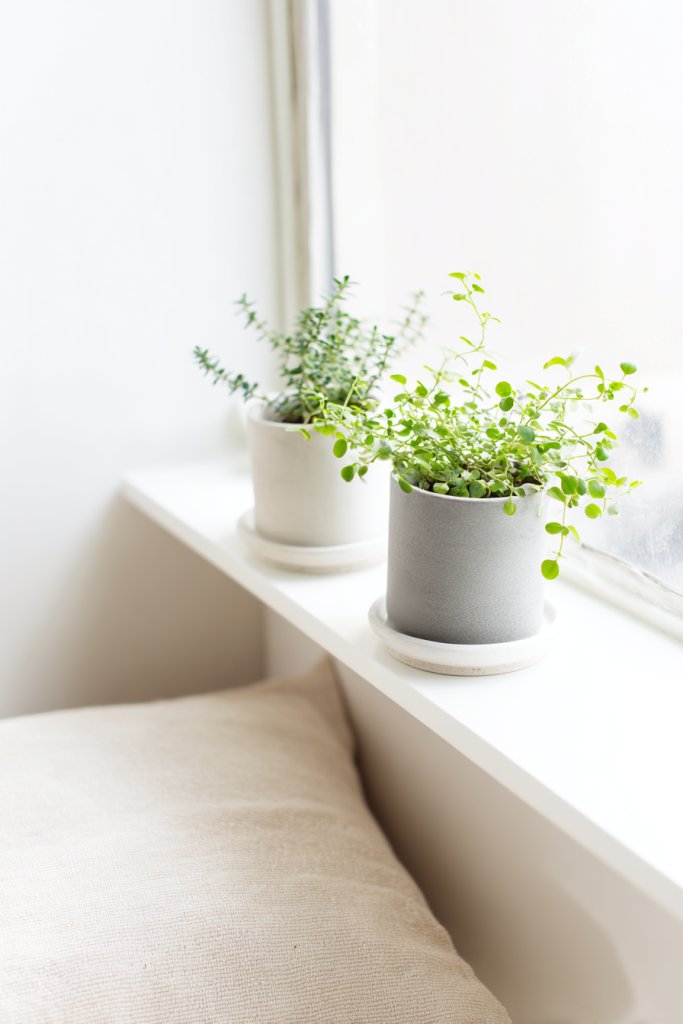
Greenery instantly adds life to any space, but in tiny studios, large plants can feel overwhelming. Small-scale plants in compact containers bring freshness and a touch of nature without cluttering your environment. They’re perfect for adding a calming vibe and visual interest.
Visualize tiny succulents or herbs in sleek ceramic or textured planters placed on shelves, windowsills, or small tables. The greenery softens harsh corners, adds color, and creates a cozy, inviting feel. The containers can be in contrasting textures—matte, glazed, or woven—to elevate the aesthetic. These plants silently enhance your space’s ambiance.
Choose plants that thrive indoors with minimal maintenance—succulents, air plants, or small ferns. Use decorative containers that match your decor style, from minimalist to boho. Seasonal accents like small pumpkins or decorative stones can be added during holidays. Group several small plants for a mini indoor garden.
Select compact containers with drainage holes and suitable soil. Place them in strategic spots—near natural light sources or in shaded corners—based on plant needs. Water carefully to avoid overwatering, especially in small containers. Regularly dust or clean the containers and trim dead leaves for healthy growth. Rotate plants occasionally for even light exposure.
Decorate containers with painted designs, textured finishes, or decorative stones. Incorporate small decorative objects like miniature sculptures or stones. Use matching or contrasting colors to complement your decor palette. Seasonal updates, like mini pumpkins or holiday-themed containers, add festive charm.
Small plants in compact containers show that even tiny spaces can be lush and lively. They bring a peaceful, natural element to your home, proving that green living is achievable anywhere. Ready to grow?
23. Clever Use of Corner Spaces for Storage or Seating
Corners in small apartments often go unused or become dumping grounds for clutter. Cleverly utilizing these spaces turns them into functional zones—storage, seating, or both. It’s a smart way to maximize every inch of your tiny home.
Picture a custom-built corner shelf with open and closed compartments for books, decorative objects, or daily essentials. Adjacent, a small corner bench with hidden storage underneath offers a cozy seating spot. The combination creates a seamless, efficient nook that feels intentional and stylish. Textured finishes or decorative trims elevate the look.
Choose corner units with modular or adjustable features to suit your needs. Use textured fabrics or painted finishes for visual interest. Incorporate cushions or throws for added comfort if seating is involved. During different seasons, update textiles or accessories for variety.
Measure your corner space carefully to find or build a unit that fits perfectly. Secure shelving or seating to walls with appropriate anchors for stability. Organize stored items in baskets or boxes for easy access. Use decorative elements like textured textiles or colorful accents to personalize.
Add textured cushions or throws to the seating area. Decorate shelves with curated objects, avoiding artwork or vases, for a clutter-free aesthetic. Incorporate lighting like small wall sconces or clip-on lamps for ambiance. Seasonal or thematic textiles refresh the look periodically.
Utilizing corners creatively shows that no space is too small for smart design. It adds personality and convenience, making your tiny studio more livable and stylish. Who knew corners could be so clever?
24. Textured Wall Coverings for Visual Warmth
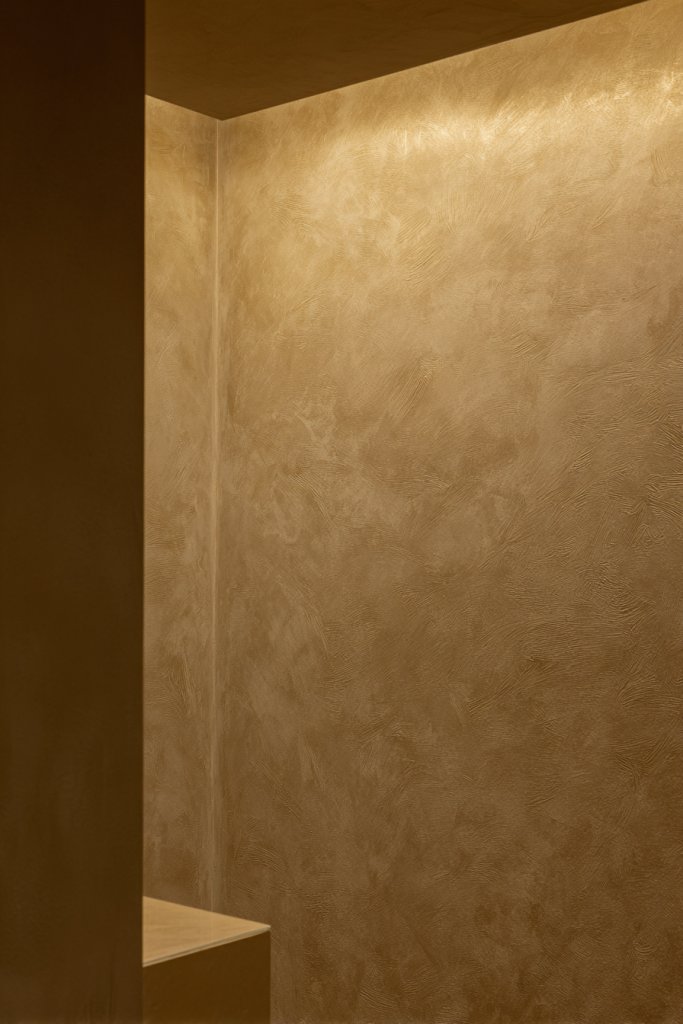
Flat, smooth walls can make a tiny space feel cold and sterile. Textured wall coverings add depth and warmth, transforming your studio into a cozy, inviting retreat. It’s an easy way to upgrade your walls without heavy artwork or clutter.
Imagine peel-and-stick textured wallpapers in subtle patterns or fabrics that evoke warmth and comfort. They add tactile interest, making the walls more engaging and the space more intimate. Pair with neutral furniture and textiles to create a harmonious, layered environment. The textures catch light differently, adding dimension.
Choose from textured wallpapers, fabric panels, or 3D wall tiles depending on your decor theme. Use neutral tones for a calming effect or bold patterns for a statement. During seasonal changes, swap textures or colors for variety. Incorporate complementary textiles and accessories to enhance the tactile experience.
Select a wall or area that needs visual warmth—such as behind your bed or seating. Follow installation instructions carefully, ensuring the surface is clean and smooth. Use adhesive-backed options for easy DIY, or hire a professional for intricate designs. Seal edges and seams for a seamless look. Regular maintenance involves gentle cleaning or touch-ups.
Decorate with textured panels or wallpapers in patterns that reflect your personality. Combine with textured textiles—like a chunky knit throw or woven cushions—for layered warmth. Add small decorative elements like a textured mirror frame or tactile art objects that complement the wall material. Seasonal updates can refresh the ambiance.
Textured wall coverings prove that small touches make big impacts, creating a cozy, sophisticated feel. They turn plain walls into design features that elevate your entire space. Ready to add depth and warmth?
Conclusion
These tiny studio apartment layout ideas showcase a wide range of creative solutions to make your space both functional and cozy. Whether you prefer open layouts, clever zoning, or multi-purpose furniture, there’s an idea here to suit your style. Don’t hesitate to try out these concepts and tailor them to your own home—your perfect compact sanctuary awaits. Embrace the challenge and transform your small space into a beautiful, efficient retreat!